Installing, Deploying, and Using HA
- Installing, Deploying, and Using HA
- Installation and Configuration
- Quick User Guide
Installation and Configuration
- Environment preparation: At least two physical machines or VMs with openEuler 20.03 LTS SP1 installed are required. (This section uses two physical machines or VMs as an example.) For details, see the openEuler 20.03 LTS SP1 Installation Guide.
Modifying the Host Name and the /etc/hosts File
- Note: You need to perform the following operations on both hosts. The following takes the operation on one host as an example.
Before using the HA software, ensure that the host name has been changed and all host names have been written into the /etc/hosts file.
- Run the following command to change the host name:
hostnamectl set-hostname ha1
- Edit the /etc/hosts file and write the following fields:
172.30.30.65 ha1
172.30.30.66 ha2
Configuring the Yum Source
After the system is successfully installed, the Yum source is configured by default. The file location information is stored in the /etc/yum.repos.d/openEuler.repo file. The HA software package uses the following sources:
[OS]
name=OS
baseurl=http://repo.openeuler.org/openEuler-20.03-LTS-SP1/OS/$basearch/
enabled=1
gpgcheck=1
gpgkey=http://repo.openeuler.org/openEuler-20.03-LTS-SP1/OS/$basearch/RPM-GPG-KEY-openEuler

[everything]
name=everything
baseurl=http://repo.openeuler.org/openEuler-20.03-LTS-SP1/everything/$basearch/
enabled=1
gpgcheck=1
gpgkey=http://repo.openeuler.org/openEuler-20.03-LTS-SP1/everything/$basearch/RPM-GPG-KEY-openEuler

[EPOL]
name=EPOL
baseurl=http://repo.openeuler.org/openEuler-20.03-LTS-SP1/EPOL/$basearch/
enabled=1
gpgcheck=1
gpgkey=http://repo.openeuler.org/openEuler-20.03-LTS-SP1/OS/$basearch/RPM-GPG-KEY-openEuler
Installing HA Software Package Components
yum install corosync pacemaker pcs fence-agents fence-virt corosync-qdevice sbd drbd drbd-utils -y
Setting the hacluster User Password
passwd hacluster
Modifying the /etc/corosync/corosync.conf File
totem {
        version: 2
        cluster_name: hacluster
         crypto_cipher: none
        crypto_hash: none
}
logging {
        fileline: off
        to_stderr: yes
        to_logfile: yes
        logfile: /var/log/cluster/corosync.log
        to_syslog: yes
        debug: on
       logger_subsys {
               subsys: QUORUM
               debug: on
        }
}
quorum {
           provider: corosync_votequorum
           expected_votes: 2
           two_node: 1
       }
nodelist {
       node {
               name: ha1
               nodeid: 1
               ring0_addr: 172.30.30.65
               }
        node {
               name: ha2
               nodeid: 2
               ring0_addr: 172.30.30.66
               }
        }
Managing Services
Disabling the Firewall
systemctl stop firewalld
Change the status of SELINUX in the /etc/selinux/config file to disabled.
# SELINUX=disabled
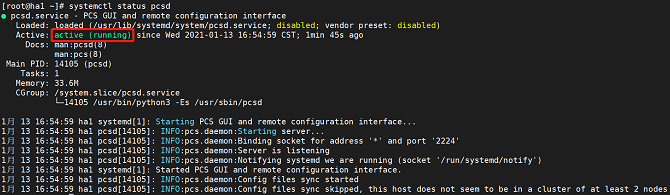
Managing the pcs Service
- Run the following command to start the pcs service:
systemctl start pcsd
- Run the following command to enable pcs to start upon system startup.
systemctl enable pcsd
- Run the following command to query service status:
systemctl status pcsd
The service is started successfully if the following information is displayed:
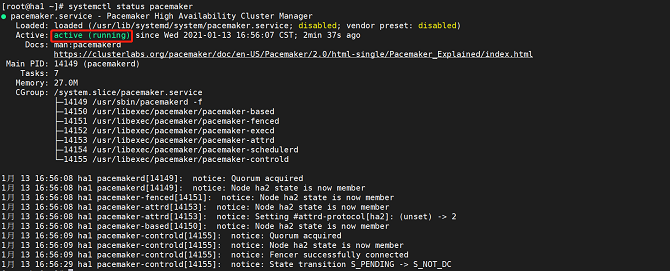
Managing the pacemaker Service
- Run the following command to start the pacemaker service:
systemctl start pacemaker
- Run the following command to query service status:
systemctl status pacemaker
The service is started successfully if the following information is displayed:
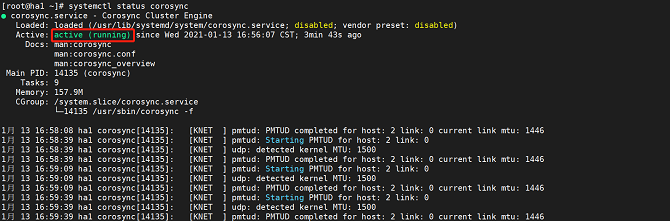
Managing the corosync Service
- Run the following command to start the corosync service:
systemctl start corosync
- Run the following command to query service status:
systemctl status corosync
The service is started successfully if the following information is displayed:
Performing Node Authentication
- Note: Perform this operation on only one node.
# Use pcs to authenticate the user names and passwords of each node.

$ pcs host auth ha1 ha2
Username: hacluster
Password:
ha1: Authorized
ha2: Authorized
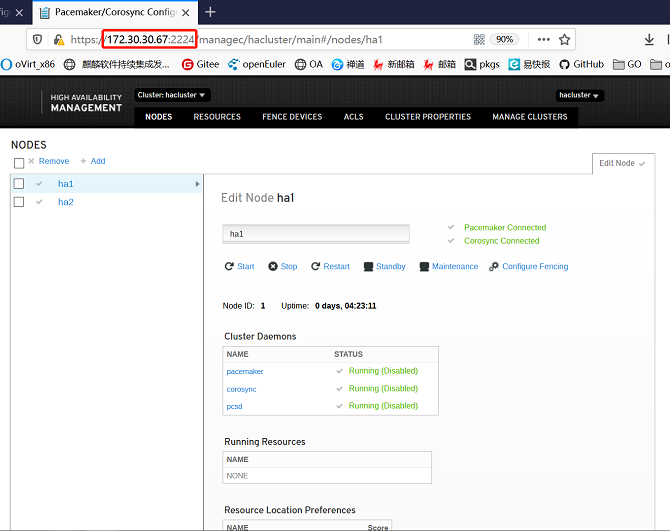
Accessing the Front-End Management Platform
After the preceding services are started, open the browser (Chrome or Firefox is recommended) and enter https://IP:2224 in the address box.
Quick User Guide
Login Page
The username is hacluster and the password is the one set on the host.

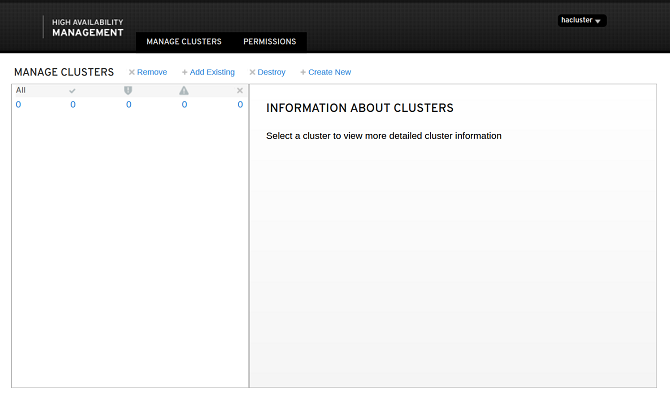
Home Page
The home page is the MANAGE CLUSTERS page, which includes four functions: remove, add existing, destroy, and create new clusters.
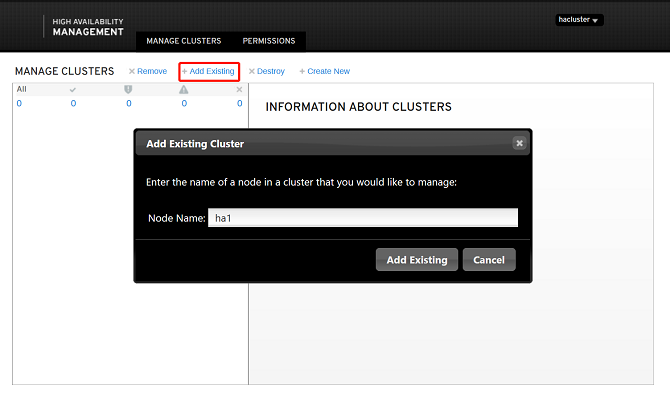
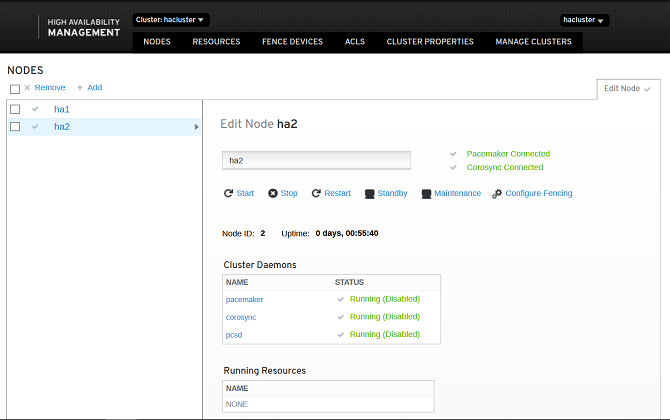
Managing Nodes
Node
You can add and remove nodes. The following describes how to add an existing node.
Node management includes the following functions: start, stop, restart, standby, maintenance, and configure Fencing. You can view the enabled services and running resources of the node and manage the node.
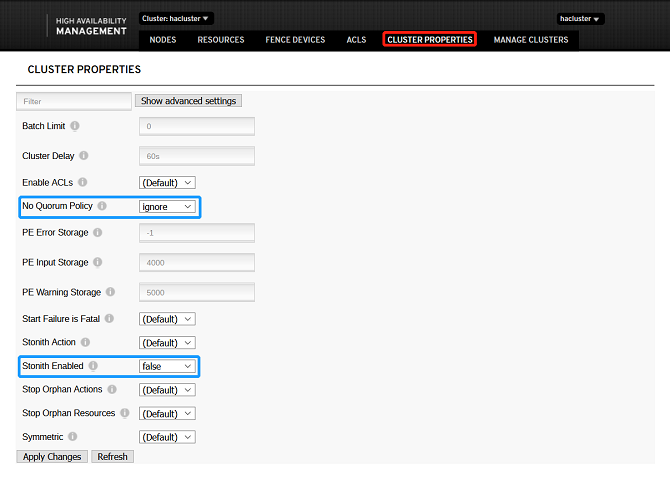
Preference Setting
You can perform the following operations using command lines. The following is a simple example. Run the pcs --help command to query more commands available.
pcs property set stonith-enabled=false
pcs property set no-quorum-policy=ignore
Run the pcs property command to view all settings.
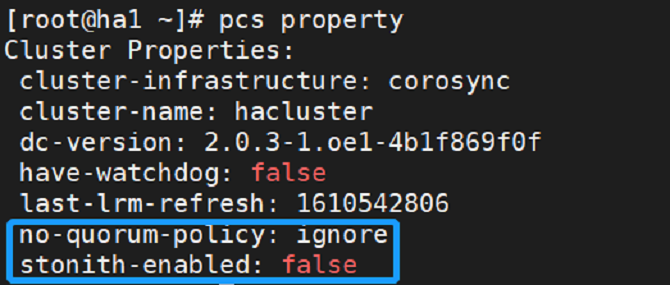
- Change the default status of No Quorum Policy to ignore, and the default status of Stonith Enabled to false, as shown in the following figure:
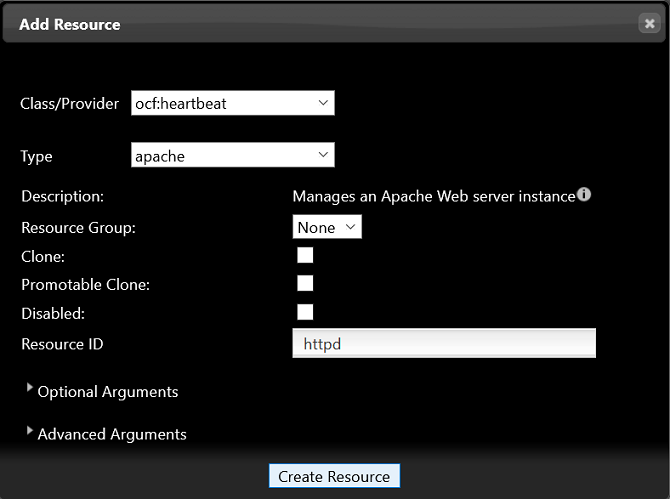
Adding Resources
Adding Common Resources
The multi-option drop-down list box in the system supports keyword matching. You can enter the keyword of the item to be configured and quickly select it.
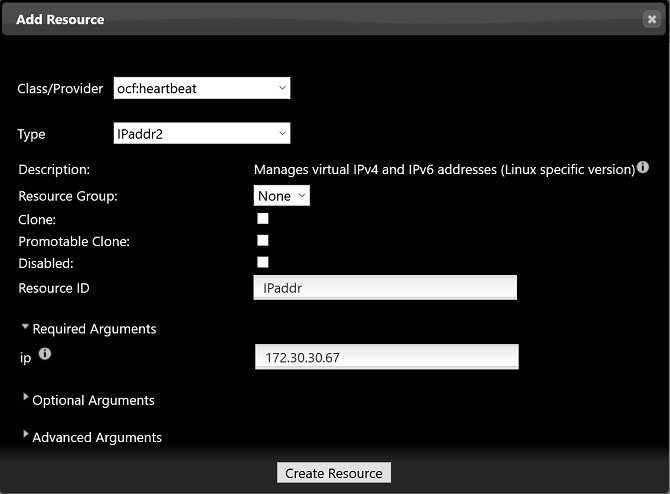
Apache and IPaddr are used as examples.
Run the following commands to add the Apache and IPaddr resources:
pcs resource create httpd ocf:heartbeat:apache
pcs resource create IPaddr ocf:heartbeat:IPaddr2 ip=172.30.30.67
Run the following command to check the cluster resource status:
pcs status
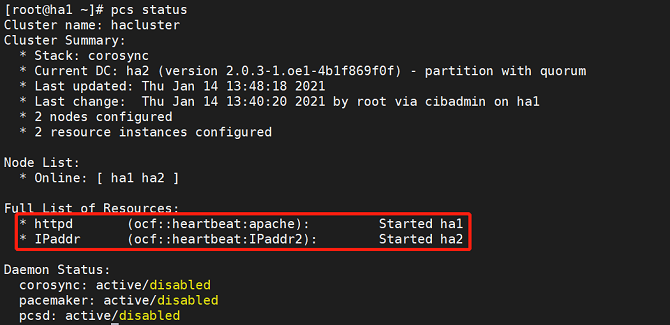

- Add Apache resources.
- The resources are successfully added if the following information is displayed:
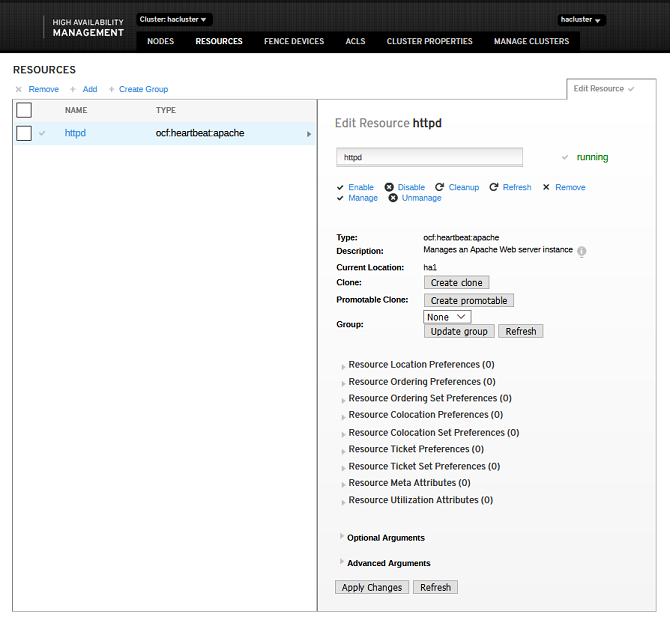
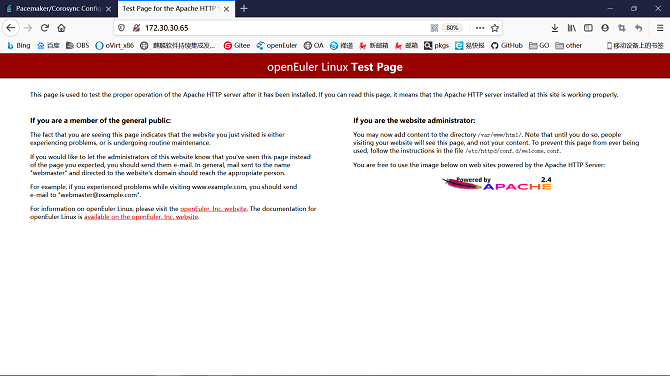
- The resources are created and started successfully, and run on a node, for example, ha1. The Apache page is displayed.
- Add IPaddr resources.
- The resources are successfully added if the following information is displayed:
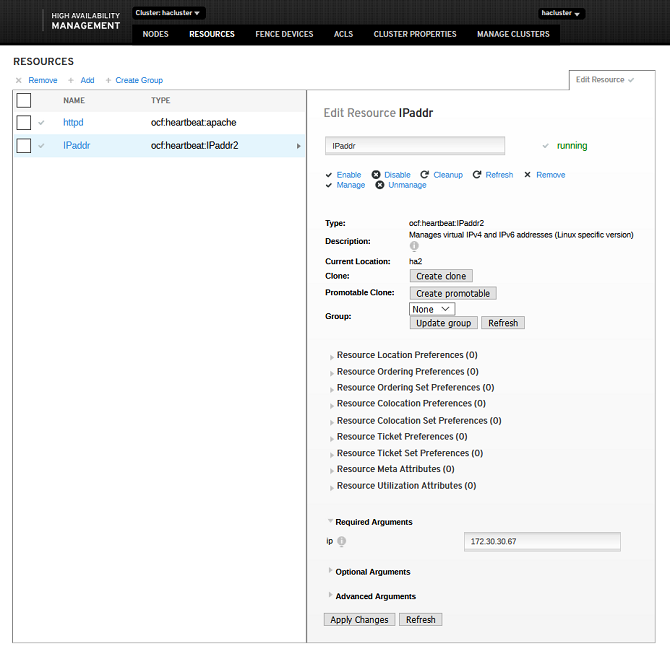
- The resources are created and started successfully, and run on a node, for example, ha1. The HA web login page is displayed, and you can log in to the page and perform operations. When the resources are switched to ha2, the web page can still be accessed.
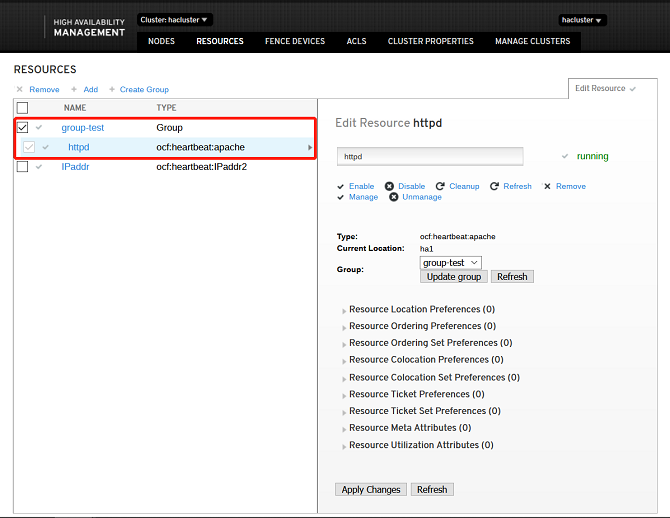
Adding Group Resources
When you add group resources, at least one common resource is needed in the cluster. Select one or more resources and click Create Group.
- Note: Group resources are started in the sequence of subresources. Therefore, you need to select subresources in sequence.

The resources are successfully added if the following information is displayed:
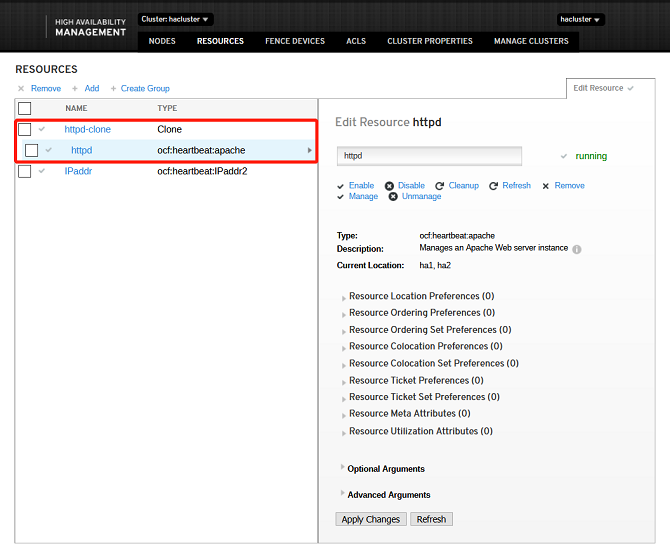
Adding Clone Resources
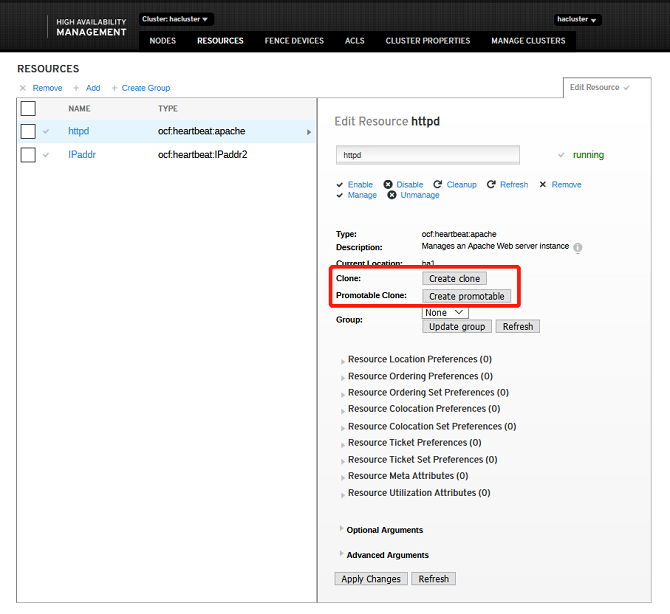
The resources are successfully added if the following information is displayed:
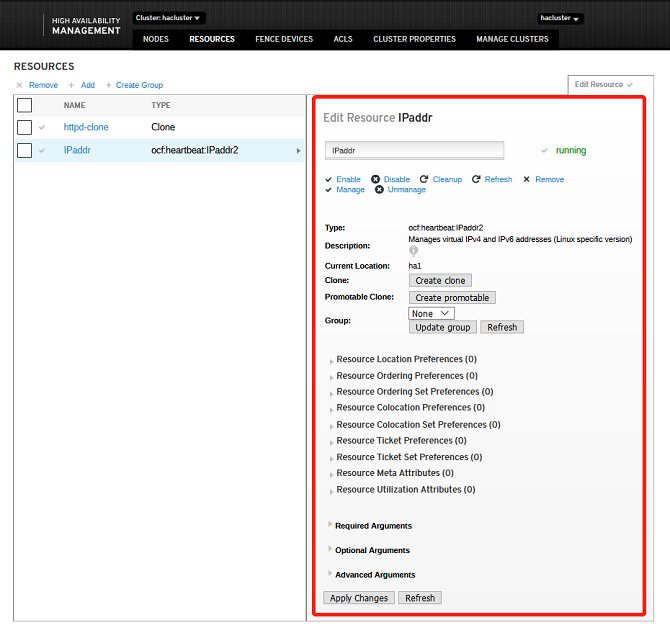
Editing Resources
- Enable: Select a target resource that is not running from the resource node list. Enable the resource.
- Disable: Select a target resource that is running from the resource node list. Disable the resource.
- Clearup: Select a target resource from the resource node list and clear the resource.
- Porting: Select a target resource from the resource node list. The resource must be a common resource or group resource that is running. You can port the resource to a specified node.
- Rollback: Select a target resource from the resource node list. Before rolling back a resource, ensure that the resource has been ported. You can clear the porting settings of the resource and roll the resource back to the original node. After you click the button, the status of the resource item in the list is the same as that when the resource is enabled.
- Remove: Select a target resource from the resource node list and remove the resource.
You can perform the preceding resource operations on the page shown in the following figure:
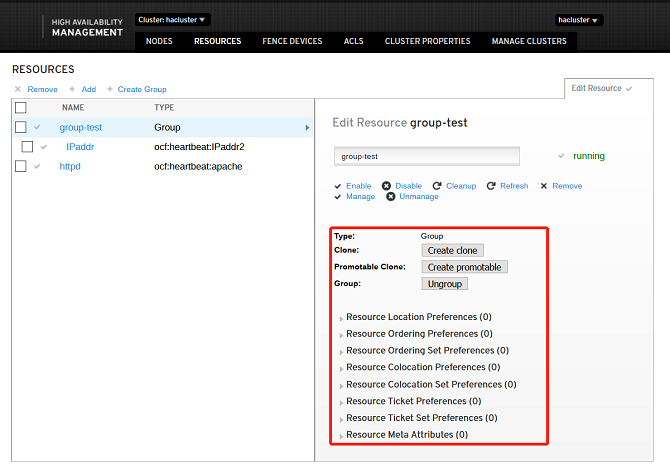
Setting Resource Relationships
The resource relationship is used to set restrictions for target resources. Resource restrictions are classified as follows: resource location, resource colocation, and resource ordering.
- Resource location: Set the runlevel of nodes in the cluster to determine the node where the resource runs during startup or switchover. The runlevels are Master and Slave in descending order.
- Resource colocation: Indicate whether the target resource and other resources in the cluster are running on the same node. For resources on the same node, the resource must run on the same node as the target resource. For resources on mutually exclusive nodes, the resource and the target resource must run on different nodes.
- Resource ordering: Set the ordering in which the target resource and other resources in the cluster are started. The preamble resource must run before the target resource runs. The postamble resource can run only after the target resource runs.
After adding common resources or group resources, you can perform the preceding resource operations on the page shown in the following figure:
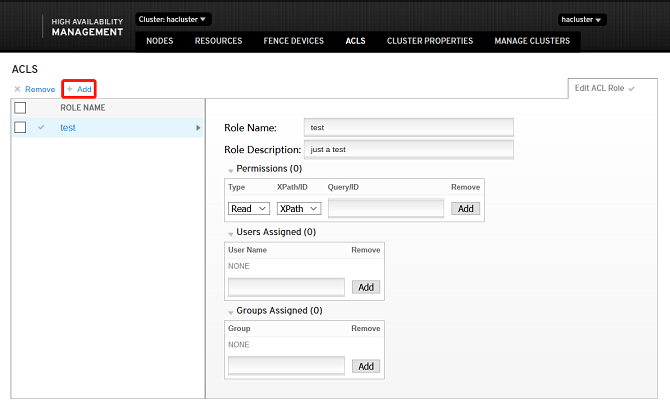
ACLS
ACLS is an access control list. You can click Add to add a user and manage the user access.