Guide to Porting OpenStack Train to openEuler
- Software Overview
- Environment Configuration
- System Configuration
- Software Compilation
- Software Running
- FAQs
Software Overview
OpenStack
OpenStack is an open source cloud computing infrastructure software project developed by the community. It provides an operating platform or toolset for deploying the cloud, offering scalable and flexible cloud computing for organizations.
OpenStack consists of several major components, such as nova、neutron、glance、keystone、horizon and so on.It supports almost all cloud environment types. The project aims to provide a cloud computing management platform that is easy-to-use, scalable, unified, and standardized. OpenStack provides an infrastructure as a service (IaaS) solution that combines complementary services, each of which provides an API for integration.
Applicable Version
This document uses the Train release for adaptation. Unveiled on October 16, 2019, Train is the 20th release of the most widely deployed open source cloud software.
DevStack
DevStack is a modular set of scripts that allow developers to quickly deploy OpenStack. The scripts can be run on a single node that is a bare metal server (BMS) or a virtual machine (VM). It can also be configured to deploy on multiple nodes.
By default, the core services for OpenStack are installed, but users can also modify the configuration file to deploy other services. All services are installed from source, which can be obtained from devstack.github.
Generally, DevStack will pull the core services from git master unless configured to clone from a stable branch, such as stable/pike.
This document uses the devstack script for installation, deployment, and testing. The all-in-one mode is used to install DevStack on x86- or ARM-based servers. For the installation on these two architectures, only some commands or procedures are different. This document will elaborate the differences.
Environment Configuration
It is recommended that the memory of the deployment environment be greater than 2 GB.
Software Platform
| Software | Version Number | Installation Method | Remarks |
|---|---|---|---|
| openEuler | 20.03-LTS-SP1 | iso | In terms of architecture, openEuler can be deployed on x86-based VMs and physical machines, but only on ARM-based physical machines. |
| gcc | 7.3.0 | Refer to Installing Required Libraries and Dependencies | |
| python3 | 3.7.9 | Refer to Installing Required Libraries and Dependencies | |
| bash | 5.0 | Refer to Installing Required Libraries and Dependencies | |
| devstack | Latest | Refer to Modifying the devstack Script and Related Configurations | devstack |
Required Dependency Packages
| Software | Version Number | Installation Method |
|---|---|---|
| python3-systemd | 234 | Refer to Installing Required Libraries and Dependencies |
| pcp-system-tools | 4.1.3 | Refer to Installing Required Libraries and Dependencies |
| haproxy | 2.0.14 | Refer to Installing Required Libraries and Dependencies |
| httpd httpd-devel | 2.4.43 | Refer to Installing Required Libraries and Dependencies |
| memcached | 1.5.10 | Refer to Installing Required Libraries and Dependencies |
| python3-devel | 3.7.9 | Refer to Installing Required Libraries and Dependencies |
| libffi-devel | 3.3.7 | Refer to Installing Required Libraries and Dependencies |
| open-iscsi-devel | 2.1.1 | Refer to Installing Required Libraries and Dependencies |
| libxml2 libxml2-devel python3-libxml2 | 2.9.10 | Refer to Installing Required Libraries and Dependencies |
| python3-lxml | 4.2.3 | Refer to Installing Required Libraries and Dependencies |
| libxslt libxslt-devel | 1.1.34 | Refer to Installing Required Libraries and Dependencies |
| edk2-ovmf(x86) edk2-aarch64(ARM) edk2-devel python3-edk2-devel | 202002 | Refer to Installing Required Libraries and Dependencies |
| qemu qemu-guest-agent | 4.1.0 | Refer to Installing Required Libraries and Dependencies |
| libvirt* python3-libvirt | 6.2.0 | Refer to Installing Required Libraries and Dependencies |
| rabbitmq-server | 3.7.23 | Refer to Installing Required Libraries and Dependencies |
| python3-copr | 1.105 | Refer to Installing Required Libraries and Dependencies |
| python3-uWSGI | 2.0.19 | Refer to Installing Required Libraries and Dependencies |
| python3-mod_wsgi | 4.6.4 | Refer to Installing Required Libraries and Dependencies |
| python3-sqlalchemy python3-sqlalchemy-utils | 1.2.19 | Refer to Installing Required Libraries and Dependencies |
| python3-scss | 1.3.5 | Refer to Installing Required Libraries and Dependencies |
| openeuler-lsb | 5.0 | Refer to Installing Required Libraries and Dependencies |
| mariadb-server | 10.3.9 | Refer to Installing Required Libraries and Dependencies |
System Configuration
Disabling the Firewall
Run the following command to stop the firewall:
# systemctl stop firewalld.serviceRun the following command to disable the firewall:
# systemctl disable firewalld.service
Changing the Value of SELINUX to disabled
Run the following commands to disable SELINUX:
# sed -i 's/SELINUX=enforcing/SELINUX=disabled/g' /etc/sysconfig/selinux
# setenforce 0
Software Compilation
Installing Required Libraries and Dependencies (Local Yum Source)
Note
You can run the automation script prep_install.sh to implement what is described in this section. For details, see the Appendix.
Run the following commands to install the libraries and dependencies required for executing the script:
# yum -y install tar git bash
# yum -y install python3-systemd
# yum -y install libffi-devel
# yum -y install open-iscsi-devel
# yum -y install libxml2-devel
# yum -y install python3-lxml python3-libxml2 libxslt libxslt-devel
# yum -y install pcp-system-tools
# yum -y install haproxy
# yum -y install qemu qemu-guest-agent
# yum -y install libvirt*  python3-libvirt
# yum -y install httpd httpd-devel
# yum -y install memcached
# yum -y install mariadb-server
# yum -y install rabbitmq-server
# yum -y install python3-uWSGI
# yum -y install python3-mod_wsgi
# yum -y install python3-copr
# yum -y install python3-scss
# yum -y install gcc-c++
# yum -y install python3-devel
# yum -y install python3-sqlalchemy python3-sqlalchemy-utils
# yum -y install openeuler-lsb
Use the Yum source to install UEFI-related libraries. The commands for the x86 and ARM architectures are as follows:
x86 architecture
# yum -y install edk2-ovmf edk2-devel python3-edk2-develARM architecture
# yum -y install edk2-aarch64 edk2-devel python3-edk2-devel
Creating an Execution User
Log in to the target host as root user and run the following command to create a stack user to execute the script:
# useradd -s /bin/bash -d /home/stack -m stackPerform the following operations to set root permission for the stack user:
# chmod +w /etc/sudoers
# vi /etc/sudoers //Insert "stack  ALL=(ALL) NOPASSWD: ALL" in the position shown in the figure.
# chmod -w /etc/sudoers
Downloading the devstack Script
Switch to the stack user and run the following command to download the devstack script file:
# su - stack
# git clone https://opendev.org/OpenStack/devstack
Perform the following operations as the stack user.
Modifying the Host Environment
You can run the automation script prep_install.sh to implement what is described in this section. For details, see the Appendix.
Run the
sudo vi /etc/httpd/conf/httpd.confcommand to add the following configuration to the/etc/httpd/conf/httpd.conffile as the administrator so that the third-party plug-in service can be loaded. The following figure shows the position where the configuration is added:LoadModule wsgi_module modules/mod_wsgi_python3.so
Run the following commands to fix the bug that occurs when Yum is used to install edk2.x86_64 (or edk2.aarch64 for the ARM architecture). Pay attention to the directory and file permissions.
x86 architecture
# cd /usr/share
# sudo mkdir OVMF && sudo chmod -R 755 OVMF
# cd OVMF
# sudo ln -s ../edk2/ovmf/OVMF_CODE.fd OVMF_CODE.fd
# sudo ln -s ../edk2/ovmf/OVMF_VARS.fd OVMF_VARS.fd
ARM architecture
# cd /usr/share
# sudo mkdir AAVMF && chmod -R 755 AAVMF
# cd AAVMF
# sudo ln -s ../edk2/aarch64/QEMU_EFI-pflash.raw AAVMF_CODE.fd
# sudo ln -s ../edk2/aarch64/vars-tmplate-pflash.raw AAVMF_VARS.fd
Add the following configuration to the
/etc/libvirt/qemu.conffile to enable QEMU to support UEFI:x86 architecture
nvram = ["/usr/share/OVMF/OVMF_CODE.fd:/usr/share/OVMF/OVMF_VARS.fd","/usr/share/edk2/ovmf/OVMF_CODE.fd:/usr/share/edk2/ovmf/OVMF_VARS.fd"]ARM architecture
nvram = ["/usr/share/AAVMF/AAVMF_CODE.fd:/usr/share/AAVMF/AAVMF_VARS.fd","/usr/share/edk2/aarch64/QEMU_EFI-pflash.raw:/usr/share/edk2/aarch64/vars-template-pflash.raw"]
Modifying the devstack Script and Related Configurations
Run the following commands to create the
local.conffile:# cd /home/stack/devstack # touch local.confEdit the
local.conffile and configure the following information:x86 architecture
[[local|localrc]]
HOST_IP=172.168.132.11
ADMIN_PASSWORD=a123456
DATABASE_PASSWORD=d123456
RABBIT_PASSWORD=r123456
SERVICE_PASSWORD=s123456

disable_service tempest

GIT_BASE=http://git.trystack.cn
NOVNC_REPO=http://git.trystack.cn/kanaka/noVNC.git
SPICE_REPO=http://git.trystack.cn/git/spice/spice-html5.git

LOGFILE=$DEST/logs/stack.sh.log
ARM architecture
[[local|localrc]]
HOST_IP=192.168.122.8
ADMIN_PASSWORD=a123456
DATABASE_PASSWORD=d123456
RABBIT_PASSWORD=r123456
SERVICE_PASSWORD=s123456

disable_service tempest

GIT_BASE=http://git.trystack.cn
NOVNC_REPO=http://git.trystack.cn/kanaka/noVNC.git
SPICE_REPO=http://git.trystack.cn/git/spice/spice-html5.git

DOWNLOAD_DEFAULT_IMAGES=False
IMAGE_URLS="https://github.com/cirros-dev/cirros/releases/download/0.5.1/cirros-0.5.1-aarch64-disk.img"
ETCD_DOWNLOAD_LOCATION=https://mirrors.huaweicloud.com/etcd/v3.3.12/etcd-v3.3.12-linux-arm64.tar.gz

LOGFILE=$DEST/logs/stack.sh.log
You can run the automation script prep_install.sh to implement what is described in this section. For details, see the Appendix.
Edit the
/home/stack/devstack/stackrcfile and change the value of the field shown in the following figure to stable/train to specify the OpenStack release to be installed.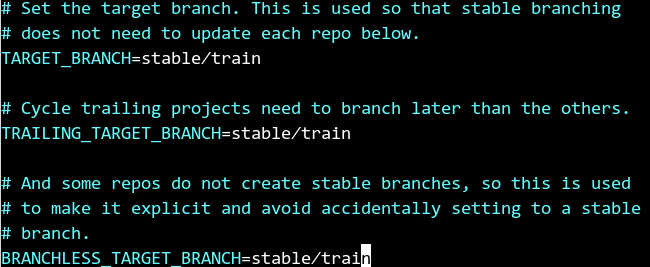
The devstack currently does not maintain the openEuler platform. run the following command to adapt to the OpenEuler version installation.
# cd /home/stack/devstack
# sed -i "/\# Git Functions/i\\function is_openeuler {\n\tif [[ -z \"\$os_VENDOR\" ]]; then\n\tGetOSVersion\n\tfi\n\n\t[[ \"\$os_VENDOR\" =~ (openEuler) ]]\n}\n" functions-common
# sed -i "s/elif is_fedora/elif is_fedora || is_openeuler/g" functions-common
# sed -i "/DISTRO=\"f\$os_RELEASE\"/a\ \ \ \ elif [[ \"\$os_VENDOR\" =~ (openEuler) ]]; then\n\tDISTRO=\"openEuler-\$os_RELEASE\"" functions-common
# grep -nir "is_fedora" | grep -v functions-common | cut -d ":" -f1 | sort | uniq | for line in `xargs`;do sed -i "s/is_fedora/is_fedora || is_openeuler/g" $line;done
The default python-libvirt version in the script file does not adapt to openEuler. Therefore, you need to edit the
/home/stack/devstack/lib/nova_plugins/functions-libvirtfile and comment out the code related to python-libvirt installation. python-libvirt has been manually installed in the Yum source of openEuler-20.03-LTS-SP1.
Edit the
/home/stack/devstack/inc/pythonfile and change the value of thecmd_pipparameter to the Chinese source, as shown in the following figure:
Modify the
/home/stack/devstack/inc/pythonfile to install the Glance component by default.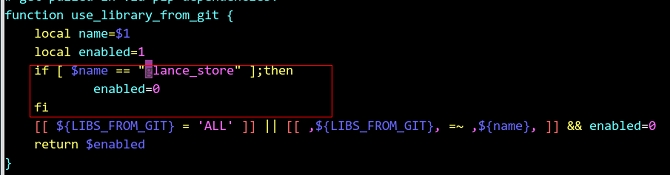
Modify the
/home/stack/devstack/lib/neutron_plugins/services/l3file and add the following configuration to the position shown in the following figure:# source openrc admin admin
Modify the
/home/stack/devstack/stackrcfile and change the value ofVIRTUALENV_CMD.
After the modification is completed, save the modification and exit. Then, run the following command:
# pip3 install virtualenv
Running the devstack Script to Install OpenStack
Run the following commands as the stack user to execute the stack.sh script to install OpenStack on a single-node system:
# cd  /home/stack/devstack
# FORCE=yes ./stack.sh
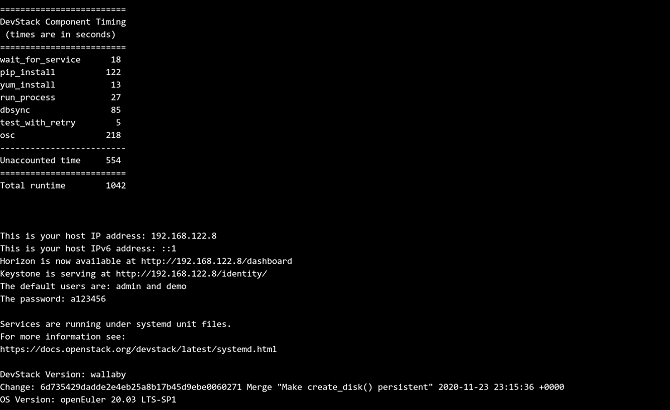
The installation takes more than 10 minutes. The information displayed after the successful installation is the same for both x86 and ARM architectures. The following uses the ARM architecture as an example. If the installation is successful, the page shown in the following figure is displayed:
Software Running
If the devstack.sh script is executed successfully, the specified sub-modules are installed on the current host according to the configuration information in the local.conf file. If no sub-module is specified in the local.conf file, all sub-modules are installed.
Run the following command as the stack user to log in to the OpenStack client as the administrator:
# source openrc admin admin
Obtain the resource lists
- Run the following command to obtain the image resource list:
# openstack image list - Run the following command to obtain the network resource list:
# openstack network list - Run the following command to obtain the VM configuration type list:
# openstack flavor list
- Run the following command to obtain the image resource list:
Start an instance
Run the following command to create a VM using the queried resources:
x86 architecture
# openstack server create -image cirros-0.5.1-x86_64-disk -flavor 1 vm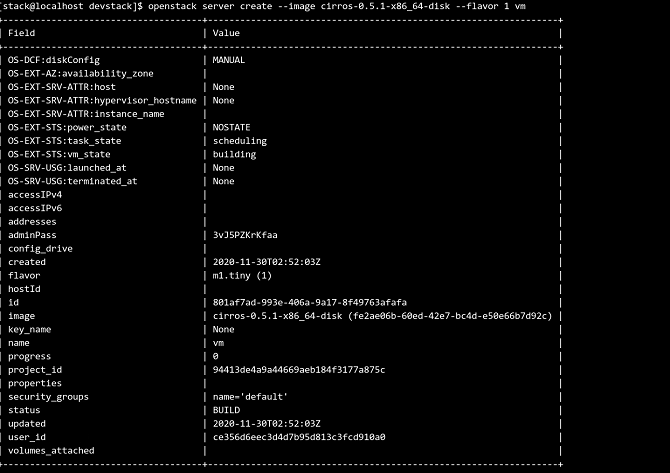
ARM architecture
# openstack server create --image cirros-0.5.1-aarch64-disk.img --flavor 1 vm
Run the following command to check the VM status:
# openstack server list // View VM status.
Software Uninstallation
Run the following commands to uninstall and clear the files generated by devstack and the environment configuration:
# cd /home/stack/devstack
# ./unstack.sh
# ./clean.sh
Delete the devstack.
# cd /home/stack
# rm -rf devstack
# rm -rf /opt/stack
FAQs
The OpenStack Project List Occasionally Fails Due to Network Problems
Symptom
An error is reported when the script runs the openstack project list command.
Cause Analysis
This is a network problem. After running the source openrc admin admin command, wait for a period of time and run the openstack project list command to make the execution take effect.
Solution
Modify the /home/stack/devstack/lib/neutron\_plugins/services/l3 file as shown in the following figure:

The devstack@q-meta.service Occasionally Fails to Be Started
Symptom
The sudo systemctl start devstack@q-meta.service command fails to be executed.
Cause Analysis
After running the systemctl enable devstack@q-meta.service command, you need to wait for a period of time.
Solution
After the service is enabled, wait for 30 seconds and then start the service.
Modify the /home/stack/devstack/functions-common file as shown in the following figure:

The MariaDB Service Fails to Be Started
Symptom
The MariaDB service fails to be started.
Cause Analysis
The mysql_install_db database fails to be created, and a message is displayed indicating that the gssapi plug-in reports an error.
Solution
The gssapi plug-in is not used. Run the following command to uninstall the mariadb-gssapi-server package:
# ./unstack.sh ./clean.sh && FORCE=yes ./stack.sh
The Neutron Service Fails to Be Started
Symptom
The Neutron service occasionally fails to be started.
Cause Analysis
The network is unstable. As a result, the network node fails to be set up.
Solution
Run the following command to execute the script again:
# ./unstack.sh && FORCE=yes ./stack.sh
The pip Boot Fails
Symptom
The pip boot fails, and the console displays the error message ERROR: Links are not allowed as constraints.
Cause Analysis
The latest pip 20.3 release has been available, but it does not adapt to openEuler.
Solution
Refer to the community solution. Use the patch to modify the devstack source code. Run the following commands in the /home/stack/devstack directory:
# wget https://github.com/openstack/devstack/commit/7a3a7ce87.patch
# sudo yum install patch -y
# patch -p1 < 7a3a7ce87.patch
Appendix
Click prep_install.sh to obtain the automation script prep_install.sh.
Save the script to the /home/stack directory and run the bash -x prep_install.sh command to install required libraries and dependencies, modify the host environment, and modify the devstack script and related configurations.