Common Operations
Configuring a Repository
Prerequisites
- You have logged in to x2openEuler.
- You are creating an upgrade, information collection and analysis, or configuration migration task.
Procedure
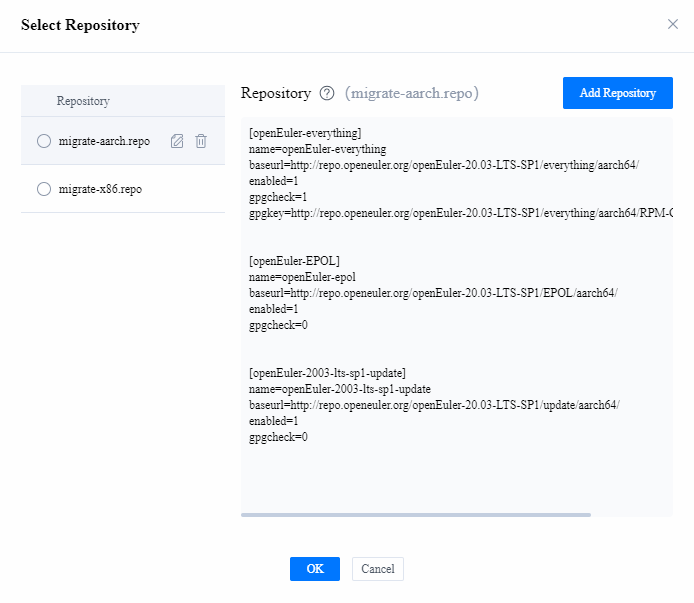
When creating a task, click Add Node and scroll down to Repository. Click Select on the right. The Select Repository page is displayed, as shown in Figure 1.
 NOTE
NOTE
By default, x2openEuler provides the aarch and x86_64 repositories of openEuler 22.03 LTS SP4. It is recommended to use repo sources from mirror sites to increase the download rate.In the Repository list on the left, select a repository and click OK.
(Optional) Manage repositories.
 NOTICE
- Ensure that the added repositories of the target OS are supported by x2openEuler. Otherwise, the upgrade will fail. At least everything, update, and EPOL must be added.
- Modifying a repository may affect the normal running of other nodes that use the repository. Exercise caution when performing this operation.
- Deleting a repository may affect the normal running of other nodes that use the repository. Exercise caution when performing this operation.
To add a repository:
Click Add Repository in the upper right corner. On the displayed page, configure the repository by referring to the default repository. The suffix of the repository name is .repo. Click Save to complete the configuration.
To modify a repository:
In the Repository list on the left, select a repository and click
 to open it for modification.
To delete a repository:
In the Repository list on the left, select a repository and click
 to delete it.
(Optional) Importing a Root Certificate for x2openEuler
If a security warning is displayed when you use a browser to log in to x2openEuler, you can import a root certificate for x2openEuler so that the security warning will not be generated.
The following uses Chrome 105.0 as an example to describe how to import a root certificate for x2openEuler.
Log in to x2openEuler, click
 in the upper right corner, choose Web Server Certificate, and click Download Root Certificate.
Open the browser and choose Settings > Privacy and security > Security > Manage certificates.
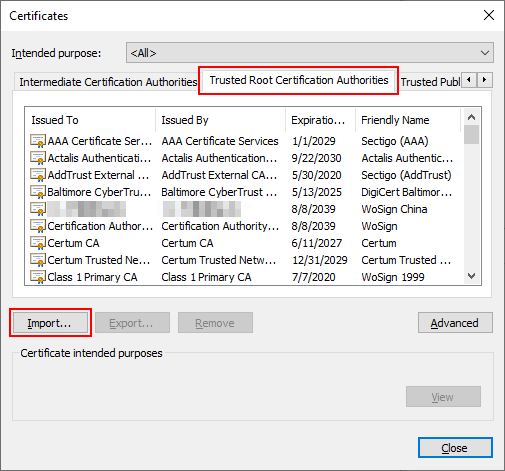
In the Certificates dialog box displayed, select the Trusted Root Certification Authorities tab and click Import, as shown in Figure 2.
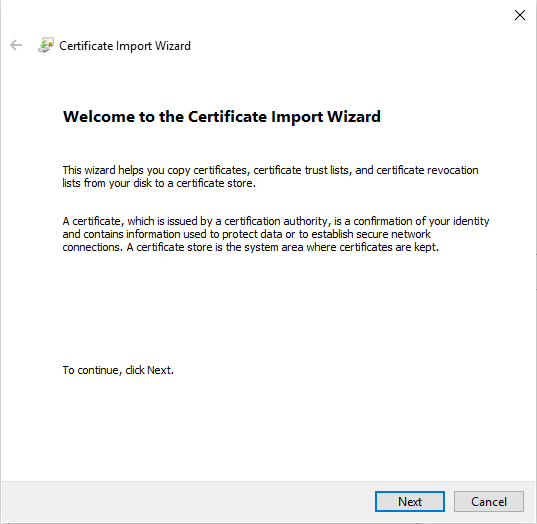
In the Certificate Import Wizard dialog box displayed, click Next, as shown in Figure 3.
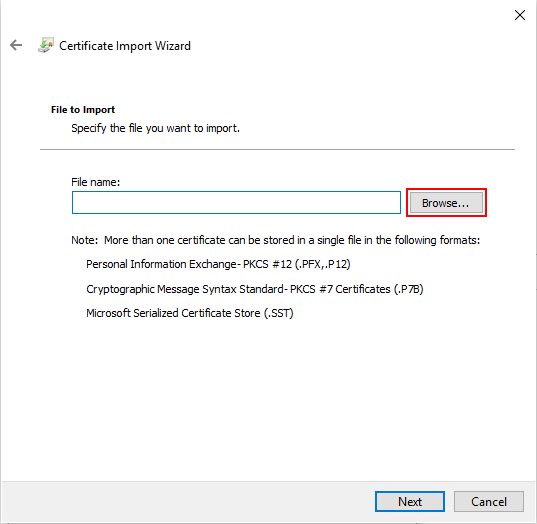
In the File to Import dialog box displayed, click Browse, as shown in Figure 4.
Select the certificate to be imported on the local PC.
Click Next.
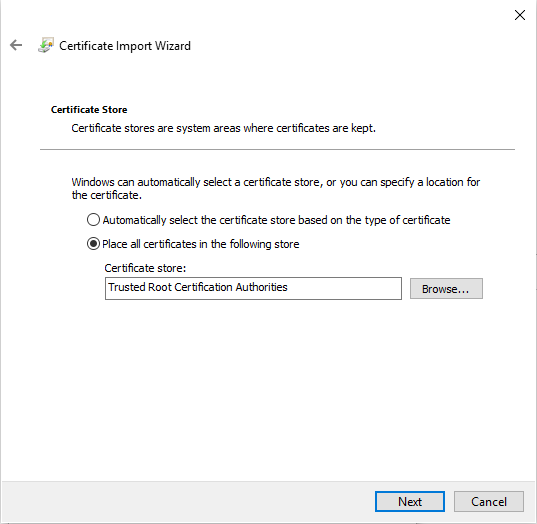
In the Certificate Store dialog box displayed, set the certificate store as shown in Figure 5.
Click Next and then Finish.
The Security Warning dialog box is displayed.
Click Confirm.
"The import was successful" is displayed.
Click OK to complete the import.
Modify the mapping between the server IP address and the tool name in the local hosts file.
Open the browser, enter
https\://x2openEuler:_port_number_(for example,https\://x2openEuler:8084) in the address box, and press Enter.

Modifying SSH Configurations
Modify the SSH configuration file of x2openEuler to configure the SSH timeout duration.
Log in to the node where x2openEuler is deployed and run the following commands to go to the corresponding directory and open the conf.ini file:
cd /usr/local/x2openEuler/portal/src/
vi conf.ini
Modify the configuration file content as required by referring to Table 1.
Parameter Description long_cmd_timeout Timeout duration for a command that takes long to execute, for example, a command for obtaining node logs. The default value is 600. tail_line_number Number of log lines displayed when you use tail to obtain node logs. The default value is 100. hostname_length Length of the host name, which is used to dynamically configure the length of a line in the command output. The default value is 100. cmd_timeout Timeout duration for a command that does not take long to execute, for example, the whoami command. The default value is 10. Press Esc, type :wq, and press Enter to save the changes and exit.
Run the following command to restart the SSH service for the configuration to take effect:
systemctl restart sshd.service
Disabling the SELinux Enforcing Mode
To disable the SELinux enforcing mode on a node, perform the following operations:
Disabling the SELinux enforcing mode temporarily
Query the SELinux status.
sestatusIf the value of Current mode is enforcing, the SELinux enforcing mode is enabled.
Set the SELinux mode to permissive.
setenforce 0Query the SELinux status again.
If the value of Current mode is permissive, the SELinux enforcing mode is disabled temporarily.
NOTICE
The setting becomes invalid after the server is rebooted. When x2openEuler is used, service exceptions may occur.Disabling SELinux enforcing mode permanently
Query the SELinux status.
sestatusIf SELinux status is enabled, SELinux is enabled.
Open the /etc/selinux/config file.
vi /etc/selinux/configPress i to enter the insert mode and change SELINUX=enforcing to SELINUX=disabled.
Press Esc, type :wq, and press Enter to save the change and exit.
Reboot the server.
rebootQuery the SELinux status again.
If the value of SELinux status is disabled, the SELinux enforcing mode is disabled.
Changing the IP Address and Port Numbers of x2openEuler
Prerequisites
x2openEuler has been deployed.
Procedure
Use an SSH tool to remotely log in to the x2openEuler deployment environment and enter the Linux CLI.
Run the following commands to stop x2openEuler.
NOTE
Before changing the IP address and port numbers, you must stop x2openEuler.systemctl stop nginx_x2openEuler.service systemctl stop gunicorn_x2openEuler.serviceChange the IP address and port numbers.
cd /usr/local/x2openEuler/portal/service/
bash change_ip_x2openEuler.sh
The command output is as follows:
Start Nginx service and Gunicorn service
=====================================================
Original IP address and x2openEuler number: x.x.x.x:18082
=====================================================
Ip address list:
sequence_number         ip_address              device
[1]                     x.x.x.x                 br0
[2]                     y.y.y.y                 br1
Enter the sequence number of listed ip as web server ip(default: 1): 1
Set the web server IP address y.y.y.y
Please enter HTTPS port(default: 18082):19082
The HTTPS port 19082 is valid.  Set the HTTPS port to 19082 (y/n default: y):y
Set the HTTPS port 19082
Please enter gunicorn port(default: 18080):
The GUNICORN port 18080 is valid.  Set the GUNICORN port to 18080 (y/n default: y):
Set the GUNICORN port 18080
The Nginx and Gunicorn ports are set up successfully.
NOTE
x.x.x.x and y.y.y.y indicate the IP addresses of the x2openEuler deployment environment.- Before changing the IP address and port numbers, go to the /usr/local/x2openEuler/portal/service directory.
- After the commands are executed, available IP addresses will be listed. You can select one of them.
- Before changing the port numbers, ensure that the desired ports are not occupied to avoid port conflict. If the firewall is enabled in the x2openEuler deployment environment, open the new ports on the firewall. If the original ports are no longer used, close them on the firewall for security purposes.
- After changing the port numbers, restart the tool-related services. For details, see Starting, Stopping, or Restarting Services.
Starting, Stopping, or Restarting Services
Prerequisites
x2openEuler has been deployed.
Procedure
Use an SSH tool to remotely log in to the x2openEuler deployment environment and enter the Linux CLI.
Run the following commands to start, stop, restart, or query services:
systemctl start/stop/restart/status nginx_x2openEuler.service
systemctl start/stop/restart/status gunicorn_x2openEuler.service
Managing Logs
Log Description
Operation Logs
Operation logs record information about the modification operations performed by users and scheduled tasks of the system. The following operations are logged:
- User login and logout
- File upload
- Task creation
- User creation or deletion
- Locking or unlocking of users
- User configuration modification
- Password change
- Report download or deletion
- Setting of the maximum number of online users
- Setting of the run log level
- Certificate import or replacement
- Setting of the certificate expiration alarm threshold
- Weak password dictionary management
- Working key update
Run Logs
Run logs record program running information that is necessary for R&D personnel or users to quickly locate and rectify faults.
The following table describes the log files contained in the log package downloaded.
| File | Description |
|---|---|
| certificate_manager.log | Records management operations on the x2openEuler certificate. |
| config.log | Records operations on x2openEuler configurations. |
| operationlog_manager.log | Records management operations on operation logs. |
| requests.log | Records access requests. |
| ssh_connect.log | Records SSH connections. |
| user_manager.log | Records user management operations. |
| work_key_manager.log | Records working key operations. |
| cipher.log | Records password change operations of login users. |
| get_node_finger_print.log | Records node fingerprint output. |
| permission.log | Records x2openEuler permission changes. |
| runlog_manager.log | Records operations of obtaining run logs. |
| task_manager.log | Records upgrade task operations. |
| weakpassword_manager.log | Records weak password changes. |
| pre-execute.log | Records the logs of executing the pre-upgrade scripts on the upgrade node. |
| post-execute.log | Records the logs of executing the post-upgrade scripts (after restart) on the upgrade node. |
| execute.log | Records the logs of executing the post-upgrade scripts (before restart) on the upgrade node. |
| NOTE Run logs are stored in /usr/local/x2openEuler/portal/logs/backend. Pre-upgrade script execution logs are stored in /opt/x2openEuler/scripts-execute/n-x.x.x.x/pre-execute. Post-upgrade script (after restart) execution logs are stored in /opt/x2openEuler/scripts-execute/n-x.x.x.x/post-execute. Post-upgrade script (before restart) execution logs are stored in /opt/x2openEuler/scripts-execute/n-x.x.x.x/post-execute-before-reboot. In the paths: n indicates the ID of the upgrade task, and x.x.x.x indicates the IP address of the node to be upgraded. | |
Managing Operation Logs
Prerequisites
You have logged in to x2openEuler.
- Common users can only view and download their own operation logs. The administrator can view operation logs of all users.
- Operation logs are stored in the operaitonlogmanager_operationlog table of the MariaDB database of x2openEuler and saved as the /usr/local/x2openEuler/portal/logs/backend/operationlog_manager.log file.
- The operation logs are retained for 30 days by default. x2openEuler automatically checks operation logs at 1:00:00 a.m. every day and deletes expired logs.
Procedure
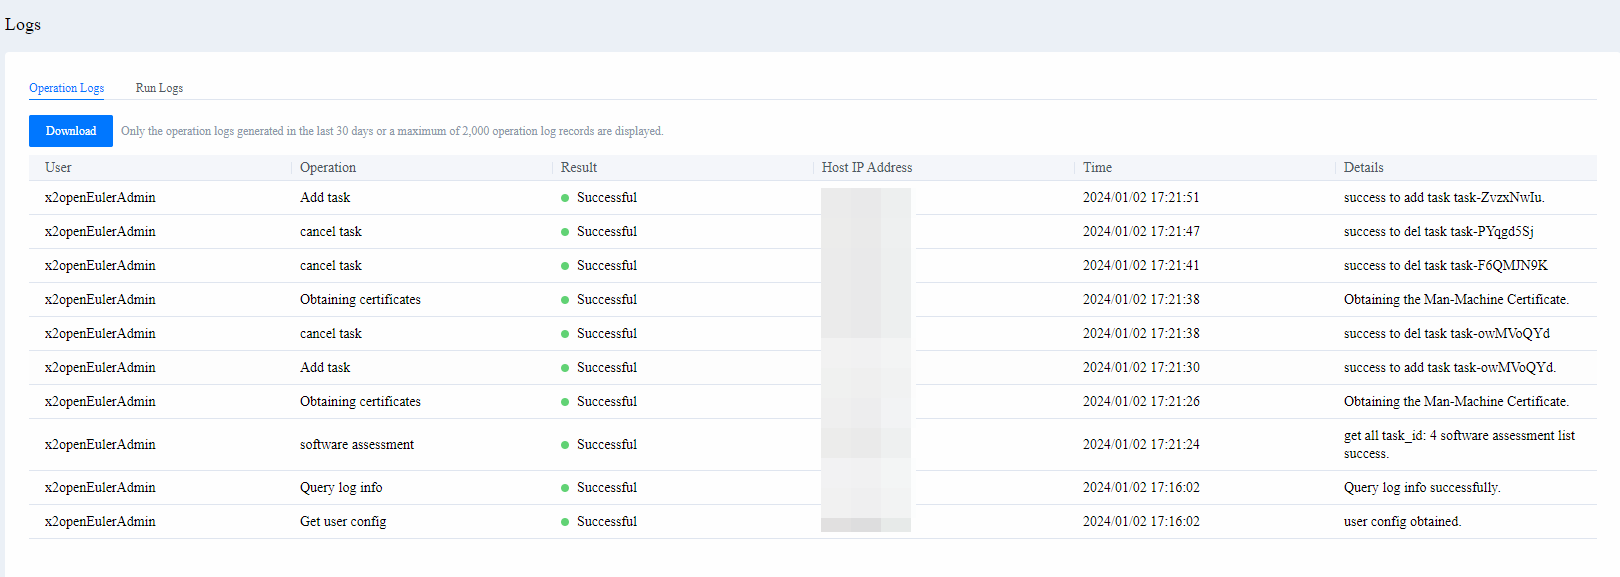
On the WebUI, click
in the upper right corner and choose Logs.On the Logs page displayed, click the Operation Logs tab, as shown in Figure 7.
(Optional) Download the operation logs.
Click Download to download the log file in CSV format.
Managing Run Logs
Prerequisites
You have logged in to x2openEuler.
- Only the administrator x2openEulerAdmin can view and download run logs and change the run log level.
- The administrator can click
Procedure
On the WebUI, click
in the upper right corner and choose Logs.On the Logs page displayed, click the Run Logs tab, as shown in Figure 8.
Click Download to download run logs.
The run logs downloaded are in the following format:
[Time] [Log_level] [Process_ID] [Thread_name] [Module_name:Function_name:Line_number] Log_detailsExample:
[2020-08-20 09:50:21] [INFO] [processID:18508] [MainThread] [solution_api:get_solution_category:143] get_solution_categoryThe log level indicates the importance of the log information. The default log level is INFO. The run logs are classified into the following levels:
- DEBUG: debugging information for fault locating
- INFO: key information about the normal running of the service
- WARNING: unexpected system events that do not affect the running of the system
- ERROR: errors that may not affect the application running

Managing Users
Resetting a Password
Prerequisites
You have logged in to x2openEuler.
Only the administrator x2openEulerAdmin can reset passwords.
Procedure
On the WebUI, click
in the upper right corner and choose User Management.The User Management page is displayed.
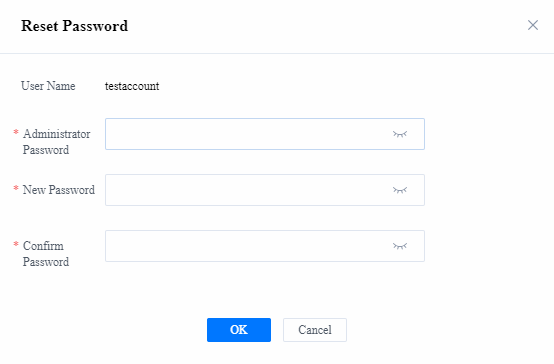
Locate the user whose password needs to be reset and click Reset Password. The Reset Password dialog box is displayed, as shown in Figure 9. Table 3 describes the parameters.
Table 3 Parameters for resetting a password
Parameter Description User Name Name of the user whose password needs to be reset. It cannot be changed when you reset the password. Administrator Password Password of the administrator. New Password New password of the user. The password must meet the following complexity requirements:
- Contains 8 to 32 characters.
- Contains at least two types of the uppercase letters, lowercase letters, digits, and special characters (`~!@#$%^&*()-_=+\\|[{}];:'",<.>/?).
- Cannot contain any space.
- Cannot be the same as the user name.
- Cannot be a password in the weak password dictionary.
Confirm Password Password re-entered for confirmation Reset the password according to Table 3 and click OK.
NOTE
If the password of a user who has logged in is reset, the user will automatically exit to the login page and needs to log in again using the new password.
Deleting Users
Prerequisites
You have logged in to x2openEuler.
- Only the administrator x2openEulerAdmin can delete users.
- The default administrator cannot be deleted.
Procedure
On the WebUI, click
in the upper right corner and choose User Management.The User Management page is displayed.
Locate the user to be deleted, and click Delete in the Operation column.
NOTICE
Deleting a user will delete all historical data of the user. Exercise caution when performing this operation.Enter the password of the administrator and click OK.
Changing the Current User Password
Prerequisites
You have logged in to x2openEuler.
The password of an x2openEuler user is valid for 90 days by default. Change the password before it expires. If the password has expired, you need to change the password after login.
Procedure
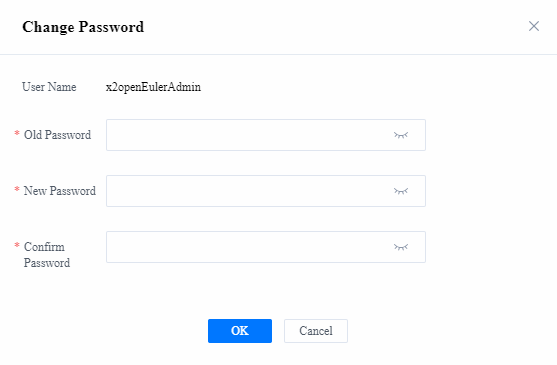
Open the login user drop-down menu in the upper right corner and choose Change Password.
The Change Password page is displayed, as shown in Figure 10. Table 4 describes the parameters.
Table 4 Parameters for changing a password
Parameter Description User Name Name of the current login user. Old Password Old password of the user. New Password Enter a new password. The password must meet the following complexity requirements:
- Contains 8 to 32 characters.
- Contains at least two types of the uppercase letters, lowercase letters, digits, and special characters (`~!@#$%^&*()-_=+\\|[{}];:'",<.>/?).
- Cannot contain any space.
- Cannot be the same as the user name.
- Cannot be the same as the old password.
- Cannot be the old password in reverse order.
- Cannot be a password in the weak password dictionary.
Confirm Password Password re-entered for confirmation. Change the password according to Table 4 and click OK.
NOTE
After your password is changed, you will automatically exit to the login page and need to use the new password to log in to the system again.
Managing the Weak Password Dictionary
A weak password can be easily guessed or cracked. When a user sets or changes a password, the system checks the new password against the weak password dictionary. If a match is found, the user needs to set another password for security purposes.
Prerequisites
You have logged in to x2openEuler.
- Users can view and search for weak passwords.
- Only the administrator x2openEulerAdmin can add and delete weak passwords.
- By default, 52 weak passwords are provided.
- A maximum of 1,000 weak passwords can be configured.
Procedure
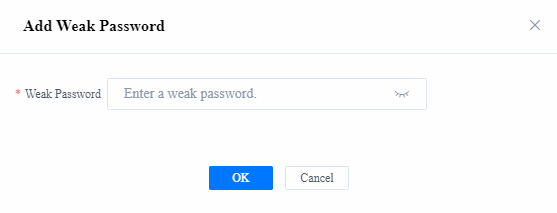
On the WebUI, click
in the upper right corner and choose Weak Password Dictionary.Click New. A dialog box is displayed.
Enter the weak password to be added in the text box. The weak password must meet the following requirements:
- Contains 8 to 32 characters.
- Contains at least two types of the following characters:
- Uppercase letters A to Z
- Lowercase letters a to z
- Digits 0 to 9
- Special characters (`~!@#$%^&*()-_=+\|[{}];:'",<.>/?)
Click OK.
NOTE
To delete a weak password, locate the weak password and click Delete in the Operation column. In the dialog box displayed, click OK.
Managing the Web Server Certificate
The web server certificate is used for secure communication between the client browser and a web server. It implements encrypted data transmission between the client and web server. For security purposes, replace the original certificate with your custom certificate and promptly update the certificate.
Prerequisites
You have logged in to x2openEuler.
Only the administrator x2openEulerAdmin can generate a certificate signing request (CSR) file, import the web server certificate, download the root certificate, restart the system, and change the working key.
Procedure
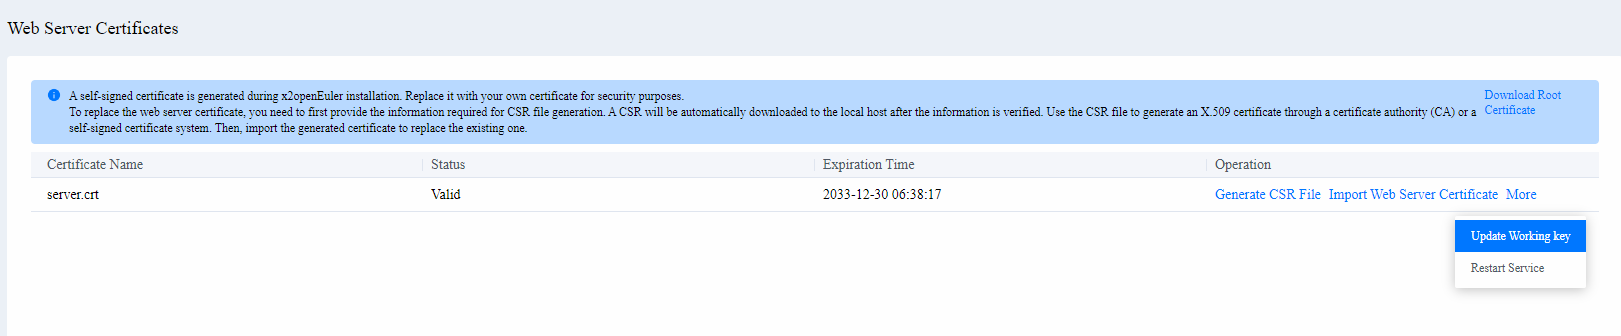
On the WebUI, click
in the upper right corner and choose Web Server Certificate.Query the information of the certificate, as shown in Figure 12. Table 5 describes the parameters.
Figure 12 Web Server Certificate

Table 5 Web server certificate parameters
Parameter Description Certificate Name Name of the certificate. Expiration Time Time when the certificate expires. Status Status of the certificate, which can be any of the following:
Valid: The certificate is valid.
About to expire: The remaining validity period of the certificate is less than or equal to the certificate expiration alarm threshold.
Expired: The certificate has expired.
NOTE- The tool automatically checks and updates the certificate status every day.
- The default alarm threshold of the web server certificate is 90 days. The administrator can click and choose System Settings on the x2openEuler home page and set the certificate expiration alarm threshold. The value ranges from 7 to 180 days.
Operation The following operations can be performed: - Download the root certificate.
NOTE
If a security warning is displayed when you use a browser to log in to x2openEuler, you can import a root certificate for x2openEuler to ignore the security warning. - Generate a CSR file.
NOTE
CSR is short for certificate signing request. When a certificate applicant applies for a digital certificate, the cryptographic service provider (CSP) generates a private key and a CSR. After the certificate applicant submits the CSR file to a certificate authority (CA), the CA uses the private key of the root certificate to generate a public key file, that is, a certificate. - Import a web server certificate.
- Restart the service.
- Update the working key.
Customizing and Importing a Web Server Certificate
On the Web Server Certificate page, click Generate CSR File.
The Generate CSR File page is displayed, as shown in Figure 13. Table 6describes the parameters.
Figure 13 Generate a CSR file.

Parameter Description Country/Region Country/Region of the user.
This parameter is mandatory. The value must be a two-letter country code.Province or State Province or state of the user.
The value can contain a maximum of 128 characters, allowing letters, digits, hyphens (-), underscores (_), periods (.), and spaces.City City of the user.
The value can contain a maximum of 128 characters, allowing letters, digits, hyphens (-), underscores (_), periods (.), and spaces.Company Company of the user.
The value can contain a maximum of 64 characters, allowing letters, digits, hyphens (-), underscores (_), periods (.), and spaces.Department Department of the user.
The value can contain a maximum of 64 characters, allowing letters, digits, hyphens (-), underscores (_), periods (.), and spaces.Common Name Name of the user.
This parameter is mandatory. The value can contain a maximum of 64 characters, allowing letters, digits, hyphens (-), underscores (_), periods (.), and spaces.Click OK to generate a CSR file.
Export and send the CSR file to an SSL CA and apply for an SSL certificate. After obtaining the formal certificate, save it to the local host.
NOTE
You can also obtain a formal certificate by using a self-signed digital certificate based on the root certificate.Click Import Web Server Certificate. The Import Web Server Certificate page is displayed.
Click
 , select the certificate to be imported, and click Upload. NOTE
- The certificate file to be imported must be in *.crt, *.cer, or *.pem format and cannot exceed 1 MB.
- The CSR file generated in 1 correlates with the server certificate applied from the CA. Do not generate a new CSR file before importing the server certificate. Otherwise, you have to use the new CSR file to apply for a new server certificate from the CA.
- If the SSL certificate imported is not obtained from a CA, check whether the browser has the root certificate.
Click OK to import the web server certificate.
Click More and choose Restart Service for the certificate to take effect.
NOTE
If you manually restart the Nginx service on the server, the certificate does not take effect. You must restart the server on the WebUI.
Updating the Working Key
The working key is used to encrypt the password for starting the Nginx service. For security purposes, you are advised to update the working key periodically.
On the WebUI, click
in the upper right corner and choose Web Server Certificate.Click More and choose Update Working Key, as shown in Figure 14.
Click More and choose Restart Service for the working key to take effect.
Viewing the Release Information
Prerequisites
You have logged in to x2openEuler.
Procedure
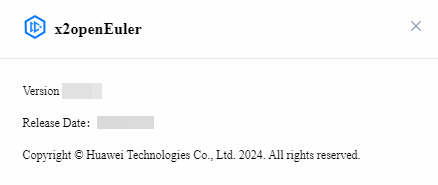
Choose
 > About in the upper right corner.
View information such as version and release date, as shown in Figure 15.
Viewing the Disclaimer
Prerequisites
You have logged in to x2openEuler.
Procedure
Choose
> Disclaimer in the upper right corner, as shown in Figure 16.Read the disclaimer carefully.
Configuring Rollback Consistency Check Filters
Prerequisites
You have logged in to x2openEuler.
Procedure
Choose
> Rollback Consistency Check Filters in the upper right corner. The Rollback Consistency Check Filters page is displayed.Configure rollback consistency check filters by referring to Table 7. Regular expressions can be used in the configuration values.
Parameter Description Software Configurations Software configurations to be excluded from the consistency check. Software Packages Software packages to be excluded from the consistency check. Files Files to be excluded from the consistency check. Service Configurations Service configurations to be excluded from the consistency check. Kernel Parameters Kernel parameters to be excluded from the consistency check. Click OK to save the configurations.
NOTE
Some items may become inconsistent after the rollback. You can exclude these items from the rollback consistency check. The configuration takes effect after the next rollback.
Generating and Configuring a Key
Prerequisites
- x2openEuler has been deployed.
- An SSH remote connection tool has been installed on the local PC.
Procedure
Use an SSH tool to remotely log in to the node to be upgraded and enter the Linux CLI. Run the following commands to generate a key and change the public key name:
ssh-keygen cd /root/.ssh mv id_rsa.pub authorized_keys NOTE- After entering the ssh-keygen command, input information as prompted.
- After the name of id_rsa.pub is changed, ensure that the value of AuthorizedKeysFile in the /etc/ssh/sshd_config file is .ssh/authorized_keys.
Open the /etc/ssh/sshd_config:
vi /etc/ssh/sshd_configUncomment the following content to enable key authentication:
PubkeyAuthentication yesThen, press Esc, enter :wq, and press Enter to save the modification and exit.
Run the following command to restart the SSH service for the configuration to take effect:
systemctl restart sshdTransfer the id_rsa file to the node where x2openEuler is deployed.
Use an SSH tool to remotely log in to the node to be upgraded and enter the Linux CLI.
Move the id_rsa file on the node to be upgraded to the /opt/x2openEuler directory and run the following commands to change the permission, owner, and owner group of id_rsa:
chown x2openEuler:x2openEuler id_rsa
chmod 600 id_rsa
When adding a node or importing nodes in a batch to x2openEuler, set Authentication Mode to Key authentication.
Uploading an OS Database Support Package
Prerequisites
x2openEuler has been installed.
An OS database support package has been downloaded to the local PC.
Procedure
Download an OS database support package from the openEuler extension repository to the local PC.
This document uses the OS database support package required for upgrading CentOS 7.3 to openEuler 22.03 LTS as an example.
Enter the following directory:
openEuler-22.03-LTS/contrib/x2openEuler/noarch/Packages/ NOTE
In the path:openEuler-22.03-LTS indicates the target OS.
noarch indicates the OS platform, which can be aarch or x86_64.
Obtain the following OS database support packages:
Table 8 OS database support packages
Package Description x2openEuler-database-centos7.3-openEuler22.03-LTS-2.0.0.630-1.noarch.rpm OS database support package for upgrading the source OS to the target OS x2openEuler-database-centos7.3-2.0.0.630-1.noarch.rpm OS database support package of the source OS x2openEuler-database-openEuler22.03-LTS-2.0.0.630-1.noarch.rpm OS database support package of the target OS
Use an SSH tool to remotely log in to the x2openEuler deployment environment and upload the OS database support packages to the following directory:
/etc/x2openEuler/rpms/databases NOTE
By default, x2openEuler supports CentOS 7.6 as the source OS and openEuler 20.03 LTS SP1 as the target OS. Therefore, if you need to upgrade other OSs to openEuler 20.03 LTS SP1, you do not need to upload the OS database support package of the target OS.Log in to the x2openEuler WebUI. When creating a task, choose CentOS 7.3 as the source OS and openEuler 22.03 LTS as the target OS.
Customizing the Health Inspection
Prerequisites
- x2openEuler has been deployed.
- The environment of the node to be upgraded has been checked.
Procedure
Use an SSH tool to log in to the node to be upgraded and enter the following path:
/usr/lib/x2openEuler-upgrade/src/env_check/check_actor/Add an actor by referring to the following code, which checks whether the available memory is greater than 1 GB.
NOTE
An actor is a Python file. After composing the actor code on the local PC, upload the code to the /usr/lib/x2openEuler-upgrade/src/env_check/check_actor directory on the node to be upgraded. x2openEuler automatically reads and parses all actor files in check_actor, and executes the code in the corresponding processes. Execution of the actor does not require remote connection.# -*- coding: utf-8 -*- from src.env_check.check_actor.base_check_actor import BaseCheckActor, ReturnMessage from src.env_check.check_scheduler.register import register_func from src.utils.command.command_executor import CommandExecutor from src.utils.log.logger_generator import LoggerGenerator LOG = LoggerGenerator().get_logger() @register_func.register # Register, which automatically registers the actor and is mandatory class MemoryUsageStatisticsActor(BaseCheckActor): name = "MemoryUsageStatisticsActor" # Actor name, which will be displayed on the frontend. description = "get memory usage statistics" # Actor description, which will be displayed on the frontend. level = "Low" # Actor level, which is reserved but not used sort = "100" # Priority. Decimals are supported. A smaller value indicates a higher priority. The value cannot be less than 10. priority = "unnecessary" # Actor necessity, which can be mandatory or unnecessary. If a mandatory actor fails, the related step fails. task_type = (BaseCheckActor.task_type.SYSTEM_UPGRADE,) # Actor type. An actor is executed when the type matches the task. SYSTEM_UPGRADE corresponds to environment check tasks. @staticmethod def run(node: dict): # node is a dictionary that records node-related information. To view the content, use LOG.info(node) to record it in logs. The run() method must be implemented. LOG.info("start to get memory usage info...") used_size, total_size = MemoryUsageStatisticsActor._get_memory_usage() # Obtains memory data. if used_size < 0 or total_size < 0 or total_size < 1024*1024: # Compares memory sizes. return ReturnMessage(result=BaseCheckActor.FAIL, solution="Check the output of the free -k command.", failed_reason="Failed to obtain the memory usage by using the free -k command, or the memory value is less than 1 GB.") # A value of the ReturnMessage type must be returned. info = f"Memory usage (used memory/total memory): {round(used_size / 1024, 1)}MB / {round(total_size / 1024, 1)}MB" return ReturnMessage(result=BaseCheckActor.SUCCESS, solution=info, failed_reason="") # A value of the ReturnMessage type must be returned. If the actor fails, failed_reason and solution will be displayed on the frontend. @staticmethod def _get_memory_usage() -> (int, int): cmd = ["free", "-k"] # The free -k command is used to obtain the used memory. stdout, _, return_code = CommandExecutor.run_single_cmd(cmd, timeout=15) # Executes the command. The return values are the command output, error output, and exit code. if return_code or not stdout: return -1, -1 for line in stdout.splitlines(): if not line.startswith('Mem:'): # Obtains key information. continue words = line.split() total_size = int(words[1]) used_size = int(words[2]) return used_size, total_sizeLog in to x2openEuler, create an upgrade task, and perform the environment check after the upgrade.
Customizing the Environment Check
Prerequisites
x2openEuler has been deployed.
Procedure
Use an SSH tool to log in to the node where x2openEuler is deployed and enter the following path:
/usr/local/x2openEuler/portal/src/taskmanager/actors/env_check_actorAdd an actor by referring to the following code.
NOTE
An actor is a Python file. After composing the actor code on the local PC, upload the code to the /usr/local/x2openEuler/portal/src/taskmanager/actors/env_check_actor directory on the node to be upgraded. x2openEuler automatically reads and parses all actor files in check_actor, and executes the code in the corresponding processes. Execution of the actor does not require remote connection.# -*- coding: utf-8 -*- from src.env_check.check_actor.base_check_actor import BaseCheckActor, ReturnMessage from src.env_check.check_scheduler.register import register_func from src.utils.command.command_executor import CommandExecutor from src.utils.log.logger_generator import LoggerGenerator LOG = LoggerGenerator().get_logger() @register_func.register # Register, which automatically registers the actor and is mandatory class MemoryUsageStatisticsActor(BaseCheckActor): name = "MemoryUsageStatisticsActor" # Actor name, which will be displayed on the frontend. description = "get memory usage statistics" # Actor description, which will be displayed on the frontend. level = "Low" # Actor level, which is reserved but not used sort = "100" # Priority. Decimals are supported. A smaller value indicates a higher priority. The value cannot be less than 10. priority = "unnecessary" # Actor necessity, which can be mandatory or unnecessary. If a mandatory actor fails, the related step fails. task_type = (BaseCheckActor.task_type.PRE_SYSTEM_UPGRADE,) # Actor type. An actor is executed when the type matches the task. PRE_SYSTEM_UPGRADE corresponds to environment check tasks. @staticmethod def run(node: dict): # node is a dictionary that records node-related information. To view the content, use LOG.info(node) to record it in logs. The run() method must be implemented. LOG.info("start to get memory usage info...") used_size, total_size = MemoryUsageStatisticsActor._get_memory_usage() # Obtains memory data. if used_size < 0 or total_size < 0 or total_size < 1024*1024: # Compares memory sizes. return ReturnMessage(result=BaseCheckActor.FAIL, solution="Check the output of the free -k command.", failed_reason="Failed to obtain the memory usage by using the free -k command, or the memory value is less than 1 GB.") # A value of the ReturnMessage type must be returned. info = f"Memory usage (used memory/total memory): {round(used_size / 1024, 1)}MB / {round(total_size / 1024, 1)}MB" return ReturnMessage(result=BaseCheckActor.SUCCESS, solution=info, failed_reason="") # A value of the ReturnMessage type must be returned. If the actor fails, failed_reason and solution will be displayed on the frontend. @staticmethod def _get_memory_usage() -> (int, int): cmd = ["free", "-k"] # The free -k command is used to obtain the used memory. stdout, _, return_code = CommandExecutor.run_single_cmd(cmd, timeout=15) # Executes the command. The return values are the command output, error output, and exit code. if return_code or not stdout: return -1, -1 for line in stdout.splitlines(): if not line.startswith('Mem:'): # Obtains key information. continue words = line.split() total_size = int(words[1]) used_size = int(words[2]) return used_size, total_sizeAfter adding the actor, run the following command to restart the Gunicorn service.
systemctl restart gunicorn_x2openEuler.serviceLog in to the x2openEuler WebUI and perform the environment check.
Customizing the Pre-upgrade Check
Prerequisites
x2openEuler has been deployed.
An upgrade task has been created.
Procedure
Use an SSH tool to log in to the node to be upgraded and enter the following path:
/usr/lib/x2openEuler-upgrade/src/env_check/check_actor/Add an actor to the pre-upgrade check by referring to the following code, which checks whether the available memory is greater than 1 GB.
NOTE
An actor is a Python file. After composing the actor code on the local PC, upload the code to the /usr/lib/x2openEuler-upgrade/src/env_check/check_actor/ directory on the node to be upgraded where x2openEuler-upgrade is deployed. x2openEuler automatically reads and parses all actor files in check_actor, and executes the code in the corresponding processes. Execution of the actor does not require remote connection.# -*- coding: utf-8 -*- from src.env_check.check_actor.base_check_actor import BaseCheckActor, ReturnMessage from src.env_check.check_scheduler.register import register_func from src.utils.command.command_executor import CommandExecutor from src.utils.log.logger_generator import LoggerGenerator LOG = LoggerGenerator().get_logger() @register_func.register # Register, which automatically registers the actor and is mandatory class MemoryUsageStatisticsActor(BaseCheckActor): name = "MemoryUsageStatisticsActor" # Actor name, which will be displayed on the frontend. description = "get memory usage statistics" # Actor description, which will be displayed on the frontend. level = "Low" # Actor level, which is reserved but not used sort = "100" # Priority. Decimals are supported. A smaller value indicates a higher priority. The value cannot be less than 10. priority = "unnecessary" # Actor necessity, which can be mandatory or unnecessary. If a mandatory actor fails, the related step fails. task_type = (BaseCheckActor.task_type.AFTER_SYSTEM_CHECK,) # Actor type. An actor is executed when the type matches the task. AFTER_SYSTEM_CHECK corresponds to environment check tasks. @staticmethod def run(node: dict): # node is a dictionary that records node-related information. To view the content, use LOG.info(node) to record it in logs. The run() method must be implemented. LOG.info("start to get memory usage info...") used_size, total_size = MemoryUsageStatisticsActor._get_memory_usage() # Obtains memory data. if used_size < 0 or total_size < 0 or total_size < 1024*1024: # Compares memory sizes. return ReturnMessage(result=BaseCheckActor.FAIL, solution="Check the output of the free -k command.", failed_reason="Failed to obtain the memory usage by using the free -k command, or the memory value is less than 1 GB.") # A value of the ReturnMessage type must be returned. info = f"Memory usage (used memory/total memory): {round(used_size / 1024, 1)}MB / {round(total_size / 1024, 1)}MB" return ReturnMessage(result=BaseCheckActor.SUCCESS, solution=info, failed_reason="") # A value of the ReturnMessage type must be returned. If the actor fails, failed_reason and solution will be displayed on the frontend. @staticmethod def _get_memory_usage() -> (int, int): cmd = ["free", "-k"] # The free -k command is used to obtain the used memory. stdout, _, return_code = CommandExecutor.run_single_cmd(cmd, timeout=15) # Executes the command. The return values are the command output, error output, and exit code. if return_code or not stdout: return -1, -1 for line in stdout.splitlines(): if not line.startswith('Mem:'): # Obtains key information. continue words = line.split() total_size = int(words[1]) used_size = int(words[2]) return used_size, total_sizeLog in to the x2openEuler WebUI and perform the pre-upgrade check again.
Forcibly Deleting a Node
Prerequisites
x2openEuler has been installed.
You have created a task involving node operations.
Procedure
To ensure the security of the environment on the x2openEuler deployment node, do not perform operations on the database unless necessary.
Use an SSH tool to log in to the x2openEuler deployment node, run the following command, and enter the password to log in to the database:
mysql -u user -p NOTE
user indicates the database user.Run the following SQL statement on the database terminal to forcibly delete the node:
delete from taskmanager_report where step_id in (select id from taskmanager_step where node_id = (select id from taskmanager_node where ip_address='x.x.x.x' and port=22));
delete from taskmanager_step where node_id = (select id from taskmanager_node where ip_address='x.x.x.x' and port=22);
delete from taskmanager_node where ip_address='x.x.x.x' and port=22;
NOTE
In the statements, x.x.x.x indicates the IP address of the node to be upgraded, and 22 indicates the SSH port of the node to be upgraded.
Forcibly Changing the Database Password
Prerequisites
x2openEuler has been deployed.
Procedure
To ensure the security of the environment on the x2openEuler deployment node, do not perform operations on the database unless necessary.
Use an SSH tool to remotely log in to the Linux CLI.
Run the following command to log in to MariaDB:
mysql -u root -p;After logging in to the database, run the following SQL statements to change the password of the x2openEuler user:
use mysql;
UPDATE mysql.user SET Password=PASSWORD('password') WHERE User='x2openEuler';
flush privileges;
NOTE
In the statements, password indicates the new password.After the password is set, exit the database terminal.
Run the following command to synchronize the new password to x2openEuler:
bash /usr/local/x2openEuler/portal/service/update_db_pwd.sh