Feature Guide
Using x2openEuler on the WebUI
OS Upgrade
The OS upgrade feature helps upgrade the OS of the node to a target OS for service continuity and security.
Creating an Upgrade Task
Prerequisites
You have logged in to x2openEuler.
Procedure
NOTICE
Up to 1,000 nodes can be upgraded in a single x2openEuler upgrade task.
On the left of the page, click New Task and choose OS Upgrade. The New Upgrade Task page is displayed. x2openEuler automatically generates a task name by default. You can change the task name as required.
On the New Upgrade Task page, confirm the task name, select Batch Import or Add Node, and set the required parameters.
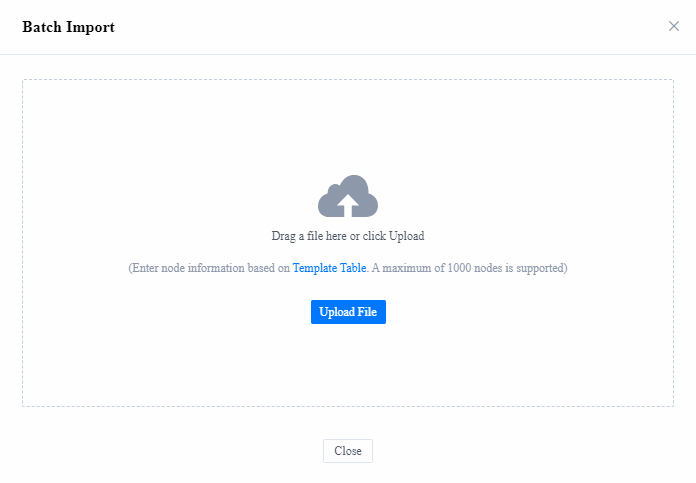
Batch Import: Batch import information about multiple nodes using a template.
 NOTE
NOTE
When nodes are imported in a batch, x2openEuler verifies the imported node information. If the verification fails, modify the imported information as prompted and import the nodes again.On the Batch Import page, click Template Table to obtain the template and enter node information by referring to Table 1.
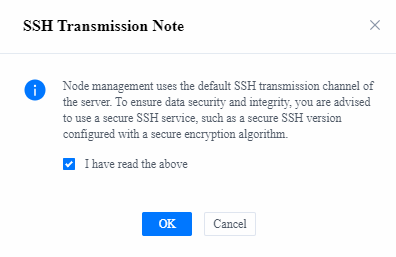
After entering the node information, click Upload File and agree to the SSH Transmission Note. Select and upload the batch import file.
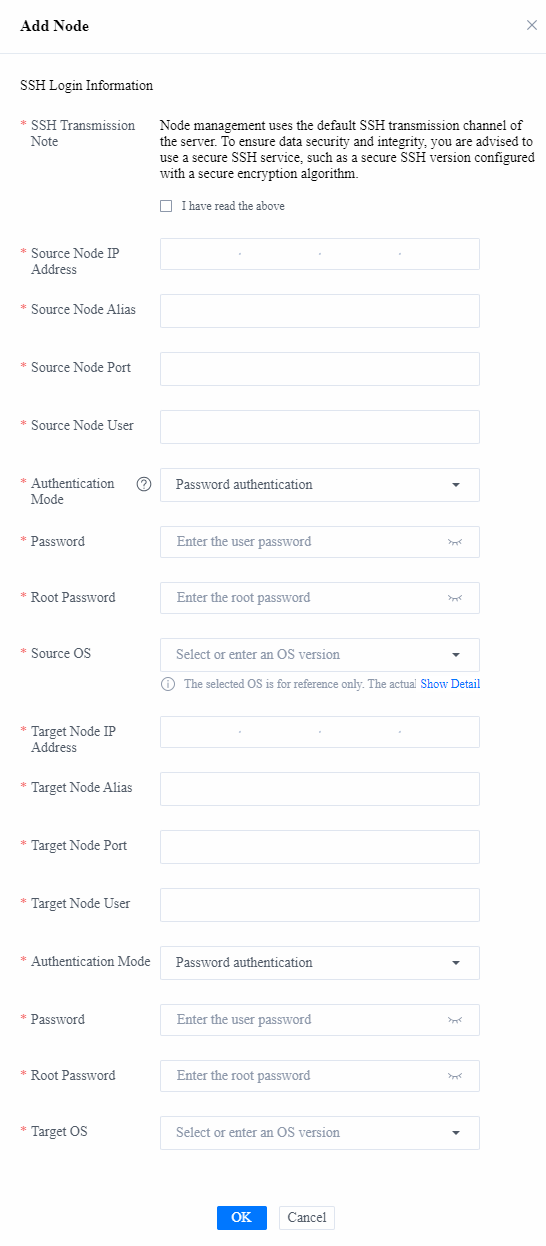
Add Node: Add information about a single node.
On the Add Node page, set the parameters by referring to Table 1 and click OK.
Table 1 Node information parameters
Parameter Description SSH Transmission Note The default SSH transmission channel of the server is used for node management. To ensure data security and integrity, you are advised to use a secure SSH service, such as a secure SSH version configured with a secure cryptographic algorithm. IP Address IP address of the node to be upgraded
NOTEThe node to be upgraded must be accessible to the environment where the x2openEuler WebUI is deployed.Alias Alias of the node to be upgraded. The alias is used to identify the function of the node. Port SSH port for logging in to the node to be upgraded User User name for logging in to the node to be upgraded Authentication Mode Key authentication: The authentication is performed based on a private key file and its password. - Private Key File: absolute path of the private key file for logging in to the node to be upgraded
- Passphrase: passphrase of the private key file for logging in to the node to be upgraded. For details about how to configure the key authentication mode, see Generating and Configuring a Key.
Password authentication: The authentication is performed based on a password.
Password: password for logging in to the node to be upgraded
NOTE- If you log in to the node as a common user, you need to enter the password of the root user to switch to the root user. The root user has all the operation permissions. Logging in to the server as the root user may pose security risks. For security purposes, disable the SSH login of the root user. The configuration procedure is as follows: Log in to the server as a common user, switch to the root user, and check the value of PermitRootlogin in the /etc/ssh/sshd_config file. If the value is no, the root user is not allowed to log in to the server. If the value is yes, change it to no. After modifying the settings, restart the sshd service for the modification to take effect.
- User passwords are involved during node information configuration. You need to maintain user information routinely and ensure environment security.
Source OS Source OS of the node to be upgraded. See Operating System Requirements for a list of supports. Target OS Target OS of the upgrade. See Operating System Requirements for a list of supports. Repository Enter a configured repository name or click **Select** on the right to select the repository required by the node to be upgraded. For details, see Configuring a Repository. NOTICE - The assessment report will not be generated if no service software is specified. Service software (RPM packages) not to be upgraded has a higher priority than service software (RPM packages).
- If you enter multiple software directories or RPM package names, separate them with commas (,).
Service Software Service Software (RPM Packages) For service software installed using RPM packages, you only need to enter the main software name. For example, if Docker is installed, you only need to enter Docker. x2openEuler checks whether the software exists in the openEuler repository. If yes, x2openEuler automatically upgrades the software. If no, x2openEuler checks the software compatibility. If the software is compatible with openEuler, the software is retained. Otherwise, the node cannot be upgraded. Service Software (Directories) For service software installed using compressed packages or source packages, enter the actual paths of the software. The paths can only contain files related to the service software only. x2openEuler checks whether the software is compatible with openEuler. If yes, the node can be upgraded and the software can be retained. Otherwise, the node cannot be upgraded. Service Software (RPM Packages) Not to Be Upgraded For service software installed using RPM packages, you only need to enter the main software name. For example, if Docker is installed, you only need to enter Docker. x2openEuler checks whether the software is compatible with openEuler. If yes, the node can be upgraded and the software package can be retained. Otherwise, the node cannot be upgraded. Software to Be Installed after the Upgrade For service software installed using RPM packages, you only need to enter the main software name. For example, if Docker is to be installed after the upgrade, you only need to enter Docker. x2openEuler checks whether the software is compatible with openEuler. If yes, the node can be upgraded and the software will be installed after the upgrade. Otherwise, the software cannot be installed. Advanced Settings Upgrade Scheme Upgrade scheme Backup Sources Directories to be backed up in the OS to be upgraded
The /etc, /usr, /boot, /var, /run, and /opt/sutcheck_result directories, as well as all RPM packages, are backed up by default. Use commas (,) to separate multiple directories to be backed up.
NOTE- Data will be automatically backed up during the upgrade. By default, the files in the /usr, /run, /boot, /var, and /etc directories are backed up. The backup files can be stored in a custom directory, or the /.osbak directory by default.
- Only the directories required for system running need to be backed up. Service data does not need to be backed up. If service data is stored in or mounted to the directories to be backed up by default, enter the service data directories in Excluded Directories. Generally, you do not need to set the directories to be backed up.
Backup Destination Directory for storing backup files during node upgrade. If this parameter is not specified, backup files are stored in /.osbak by default Excluded Directories Directories not to be backed up in the OS to be upgraded. Use commas (,) to separate multiple directories. Conflicting Software Conflicting software packages to be deleted together with those detected during the pre-upgrade check. Some important software packages on which the OS depends cannot be deleted. cmdline Kernel startup items of the target OS. If this parameter is not specified, the cmdline value of the source OS is retained. Software Package Swap Software packages that cannot be upgraded and need to be swapped. For example, if you want to swap package A for package B after the upgrade, enter A->B. File Migration Customized list of files to be migrated. When the file's location is the same on both the source OS and the target OS, the absolute file path can be directly entered, e.g., /.../A. When the file's location is different between the source OS and the target OS, use "->" to connect the paths before and after the upgrade, e.g., /.../B->/.../C. File Permission Inheritance Customized list of files' permission inheritance. When the file's location is the same on both the source OS and the target OS, the absolute file path can be directly entered, e.g., /.../A. When the file's location is different between the source OS and the target OS, use "->" to connect the paths before and after the upgrade, e.g., /.../B->/.../C. NOTICE - The custom actor script can only be uploaded as xxx.tar.gz files. Xxx indicates the name of the compressed directory, which must contain the python script written strictly according to the template in the first level. X2openEuler determines whether the script is successfully executed based on the return value. The script will run on the node to be upgraded. Ensure that the uploaded script has no security risk.'
- The default directory for storing scripts to be uploaded is /opt/x2openEuler/scripts-execute/upload/.
- Run the chown -R x2openEuler:x2openEuler xxx.tar.gz command to change the owner and owner group of the file.
Custom Actor Script Enter the path of the custom actor script. Depending on the task_type, this script can run during the environment check, pre-upgrade check, or post-upgrade environment check. NOTICE - The pre-upgrade and post-upgrade scripts can only be uploaded in xxx.tar.gz files. xxx indicates the name of the compressed directory, which must contain a run.sh file in the first level. x2openEuler determines whether the script is successfully executed based on the return value of run.sh. The script will run on the node to be upgraded. Ensure that the uploaded script has no security risk.
- The default directory for storing scripts to be uploaded is /opt/x2openEuler/scripts-execute/upload/.
- Run the chown -R x2openEuler:x2openEuler xxx.tar.gz command to change the owner and owner group of the file.
Pre-upgrade Script If this option is enabled, you need to enter the path of the pre-upgrade script. The pre-upgrade script runs after the environment check. Post-upgrade Script (Before Restart) If this option is enabled, you need to enter the path of the post-upgrade script (before restart). This script runs after the upgrade and before the restart. Post-upgrade Script (After Restart) If this option is enabled, you need to enter the path of the post-upgrade script (after restart). This script runs after the upgrade and after the restart. NOTICE - The SMT custom actor script can only be uploaded as xxx.tar.gz files. Xxx indicates the name of the compressed directory, which must contain a pre_run.sh entry file of the pre-SMT script, and a post_run.sh entry file of the post-SMT script in the first level. Whether the custom actor script execution is successful or not should not not affect the execution of the SMT itself. The script will run on the node to be upgraded. Ensure that the uploaded script has no security risk.
- The default directory for storing scripts to be uploaded is /opt/x2openEuler/scripts-execute/upload/.
- Run the chown -R x2openEuler:x2openEuler xxx.tar.gz command to change the owner and owner group of the file.
SMT Custom Actor Script Enter the path of the SMT custom actor script. The pre-upgrade script and the post-upgrade script run before and after this script after reboot respectively.
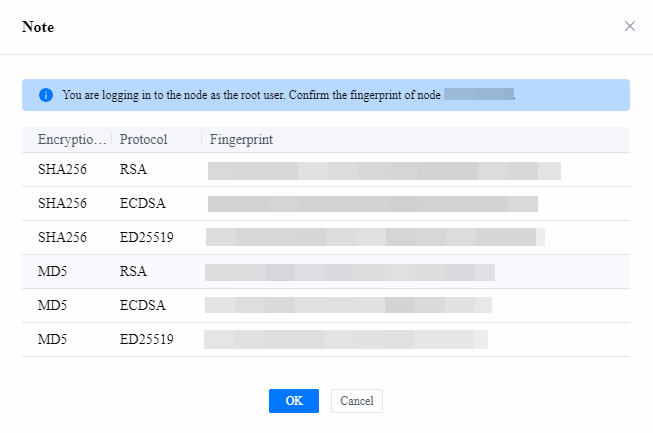
After x2openEuler verifies the imported node information (adding a single node is used as an example), the node fingerprint verification page is displayed. Check that the node fingerprint is correct, and then click OK.
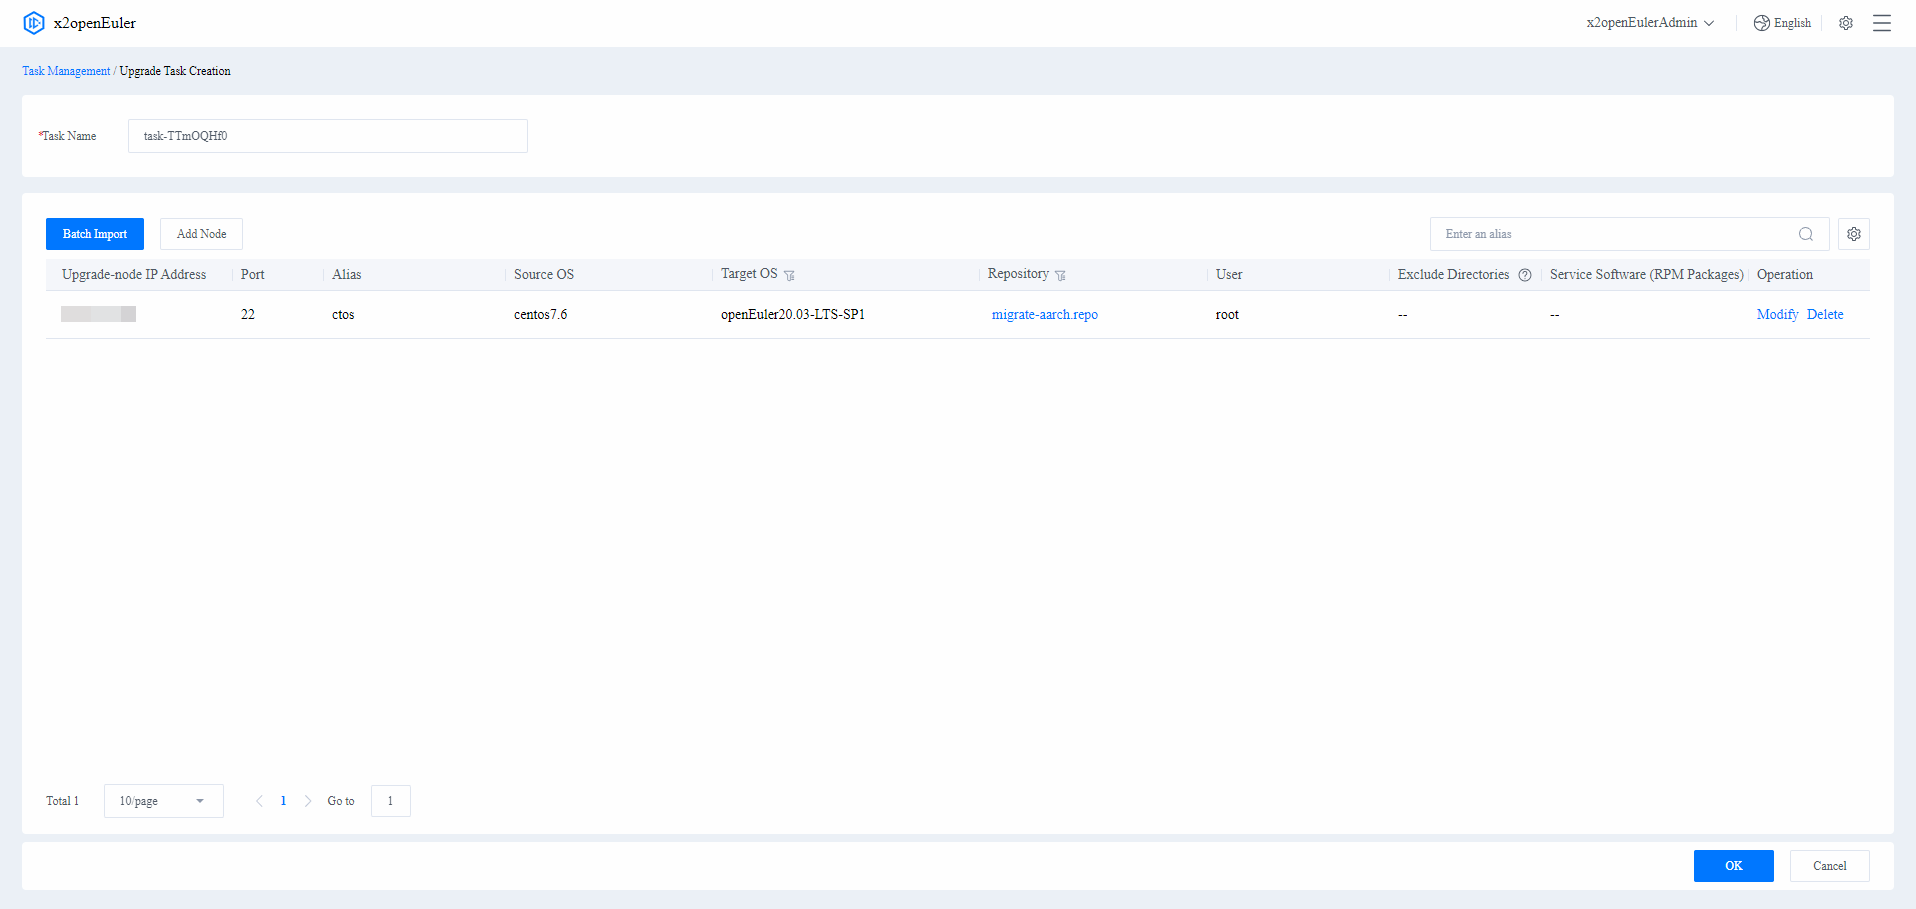
After the node is added, confirm the node information and click OK in the lower right corner to complete the upgrade task creation. To modify or delete a node, click Modify or Delete in the Operation column. Click OK in the lower right corner to start the upgrade task or click Cancel in the lower right corner to cancel the upgrade task.
 NOTE
NOTE
After the upgrade task is created, x2openEuler automatically checks the environment of the nodes to be upgraded in the task. Subsequent upgrade operations can be performed only after the environment check is passed. If the environment check fails, check and modify the node information.
Upgrading Nodes
Prerequisites
- You have logged in to x2openEuler.
- An upgrade task has been created.
Procedure
Select the required upgrade task in the task list and click Details on the right. The task details page is displayed.
Click Start Check on the right of the node information to check a single node. You can select multiple nodes and click Batch Operation > Start Check in the upper left corner to start checking of multiple nodes.
The node upgrade process includes multiple stages. The failure of any stage will terminate the subsequent upgrade process.
 NOTE
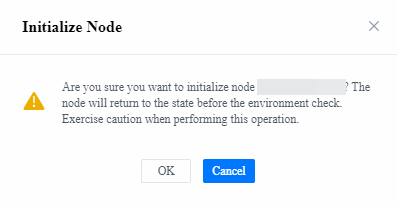
NOTE- After each upgrade stage, you can click Initialize in the lower right corner to restore the node to the state before the check.
- If the pre-upgrade or post-upgrade script is uploaded, the corresponding stage will be added to the upgrade process.
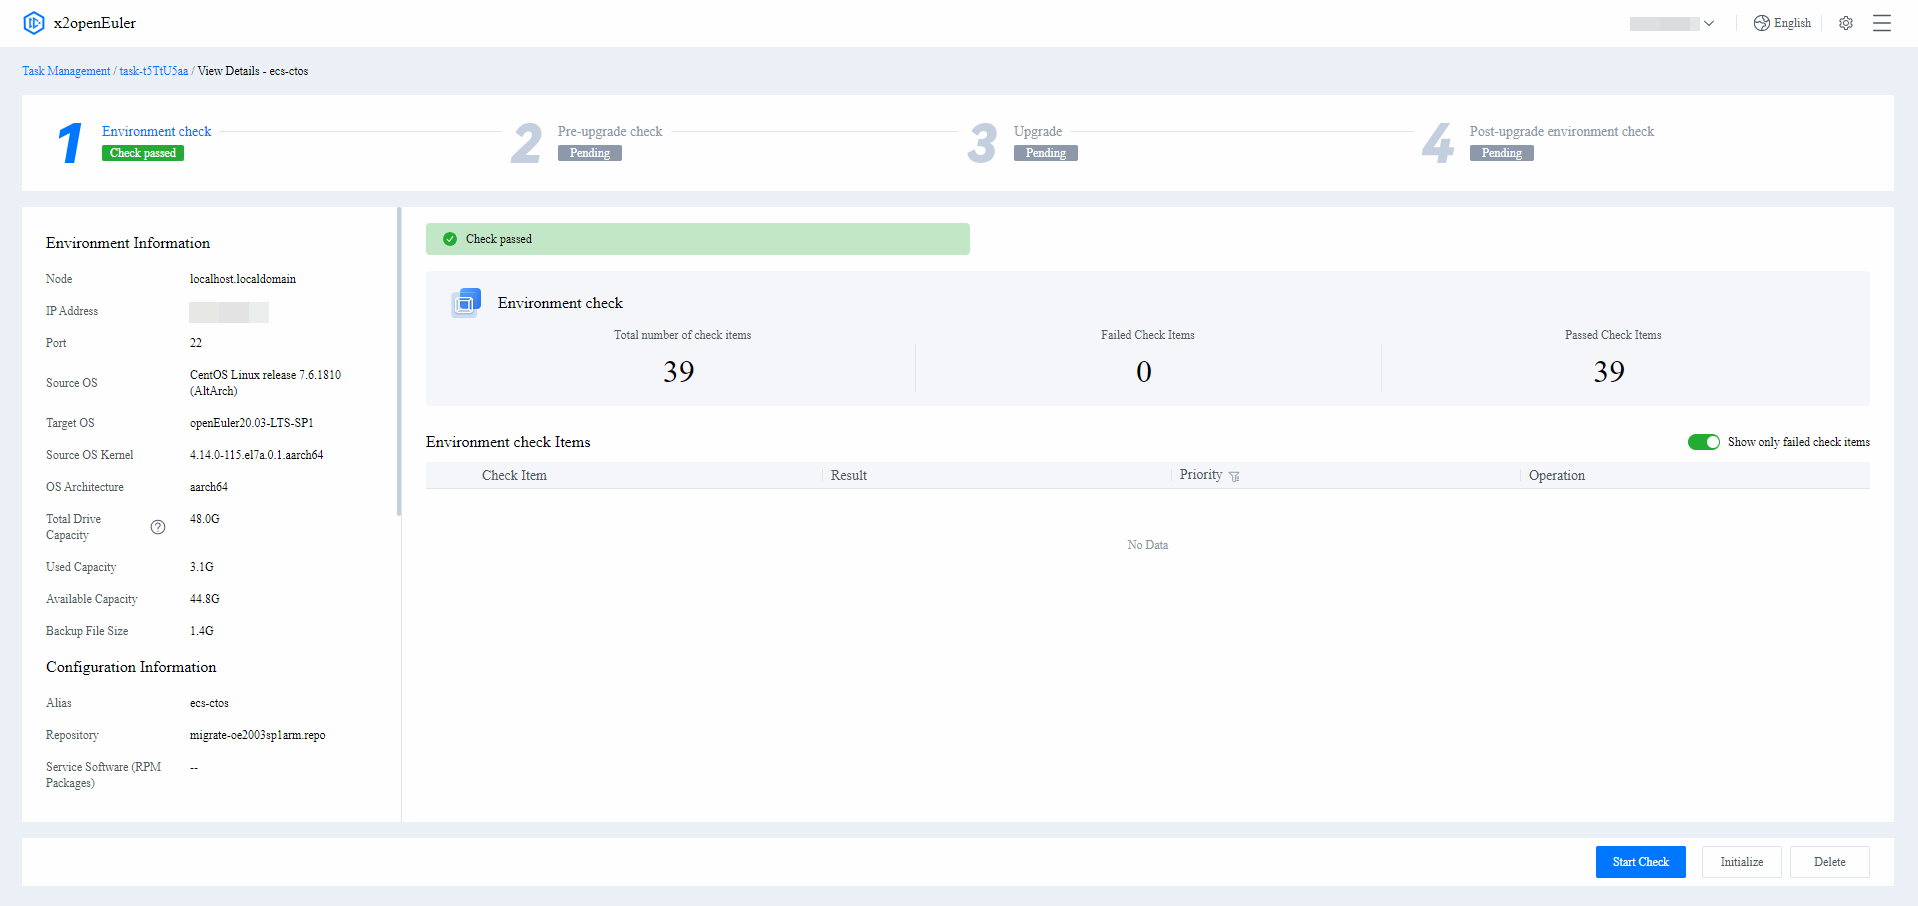
Environment check
The environment check analyzes the connectivity between x2openEuler and the node to be upgraded and checks whether the repository is available. If the environment check fails, modify the node information based on the suggestions of related check items. For details about how to customize the environment check, see Customizing the Environment Check.
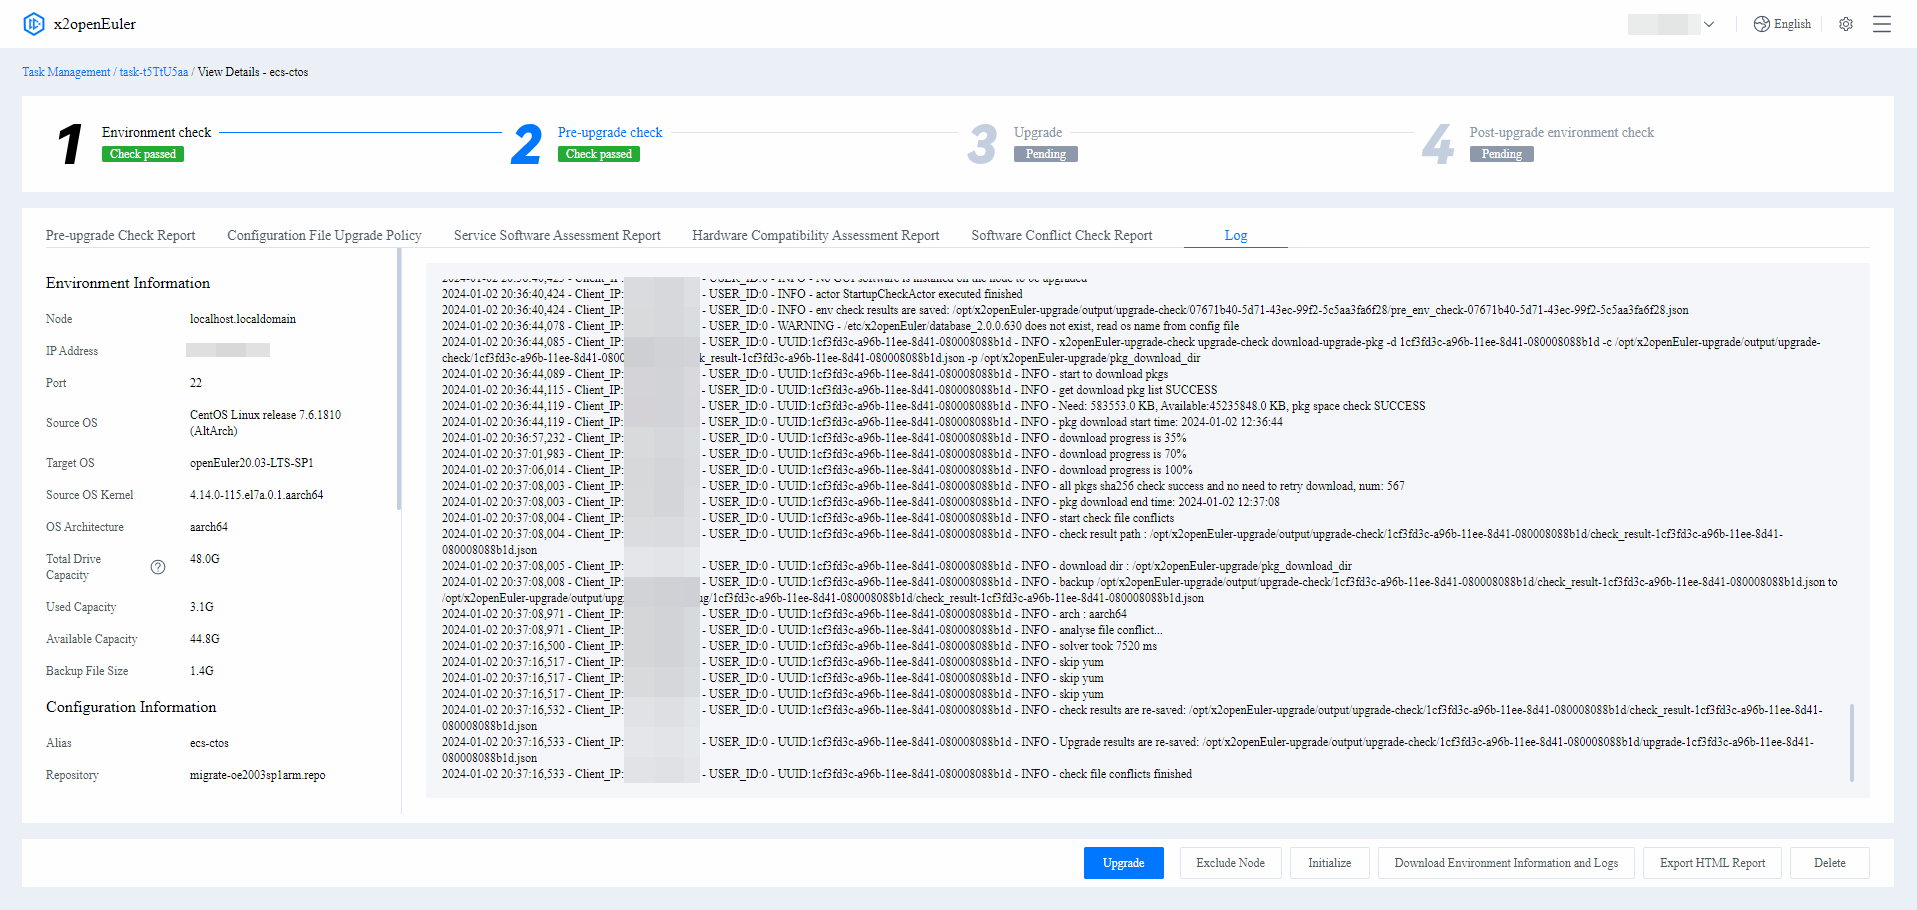
Pre-upgrade check The pre-upgrade check assesses the configuration file upgrade policy, service software, and hardware compatibility, and checks software and services for conflicts. Assessment reports will be generated to determine whether the node to be upgraded meets the upgrade requirements. If the compatibility check fails, perform software adaptation based on the assessment report. For details about assessment report parameters, see Table 2, Table 3, Table 4, and Table 5.
Table 2 Pre-upgrade Check Report parameters
Parameter Description Item Services, policies, and configuration files that are upgraded with the source OS Result Whether the check item passes the pre-upgrade check
- Passed
- Failed
Priority Impact of the check item on the upgrade
- High: The upgrade may be stopped.
- Medium: An exception may occur during the upgrade, but the upgrade process may not be stopped.
- Low: An exception may occur during the upgrade, but the upgrade process will not be affected.
Operation Cause and solution for the failed check item Table 3 Service Software Assessment Report parameters
Parameter Description Result Assessed software name, source OS, target OS, system architecture, evaluation result, and other information related to the assessment task Suggestion Suggested solution based on the compatibility result in the assessment report Dependency Compatibility Direct dependencies required by the software and the RPM packages corresponding to the dependencies in the source and target OSs
- If the names and versions of a direct dependent RPM package are not changed, Version not changed is displayed.
- If the version of a direct dependent RPM package is changed but the interfaces are not changed, Version changed is displayed.
- If the name of a direct dependent RPM package is changed but the interfaces are not changed, Package changed is displayed.
- If an RPM package is found in the source OS but not in the target OS, Missing is displayed.
- If an RPM package is not found in the source OS but in the target OS, or any interface of the package is changed, Check required is displayed.
- If an RPM package is not found in the source or target OS, the RPM package is displayed in Others, and Check required is displayed.
Interface Compatibility (C/C++) - Called Function: name of the function called in the assessed software
- Interface Caller: program that is called by a changed external interface in the assessed software
- Results:
- Removed: The interface is missing.
- Changed: The input parameter, return value, or implementation of the function is changed.
- Parameters in the expanded details:
- OS: name of the assessed OS
- Function: representation of the interface
- File: name of the file where the external interface is located
- Dependency Package: external .so library where the interface is located
- Interface Differences: changes in the external interface. If an interface has been removed, this field is left blank.
Interface Compatibility (JDK) Changes between the interfaces found in the JDK of the JAR package scanning and those in the minimum required JDK version in the target OS
- openEuler JDK: minimum version of openEuler JDK that meets the JAR package requirements
- Object Build JDK: JDK version corresponding to the scanned JAR package
- JAR Package: name of the scanned JAR package
- Method: name of the method whose interface is changed
- Function Signature: signature of the function whose interface is changed
- Package: name of the package where the method with a changed interface is located, displayed as the package name and class name
- Difference: difference in the interface
Interface Compatibility (Java) Changes in the interfaces of the JAR package in the source OS
- Invoked JAR package: name of the invoked JAR package
- RPM package: RPM package to which the JAR package belongs
- Parameters in the expanded details:
- CentOS 7.6 methods: names of the incompatible CentOS 7.6 interfaces
- Package: JAR package to which the incompatible interface belongs
- Class: class to which the incompatible interface belongs
- Changes in openEuler20.03 LTS SP1: changes of the incompatible interface in openEuler 20.03 LTS SP1, including method removal, return parameters, method signatures, method modifiers, and exceptions
Table 4 Hardware Compatibility Assessment Report parameters
Parameter Description Result Compatibility information about the system, basic system, CPU, and entire device Board Compatibility in the Target OS A board is compatible only if its parameters are the same as those in the known board list. If the parameters are not completely the same, the board compatibility is to be confirmed. The parameters include:
- Vendor ID
- Device ID
- Subsystem Vendor ID
- Subsystem ID
- Chip Model
- Compatible or Not: whether the hardware is compatible with the target OS
- Risk Level: assessment of the level of risk caused by the hardware compatibility during the upgrade
Table 5 Software Conflict Check Report parameters
After the pre-upgrade check is complete, click **Export HTML** Report in the lower right corner to export the check report. Click **Download** to obtain the environment information and task execution logs collected during the check. If the pre-upgrade check fails, click **Retry** in the lower right corner to perform the upgrade check again or click **Exclude Node** to clear the current status of the node. After the node is excluded, click **Restore** to restore the node to the status before the exclusion.Parameter Description Software Conflict Statistics Assessment of conflicts during the upgrade and information about the following software packages: retained source OS software packages, software packages upgraded to the target OS, software packages upgraded to those in the openEuler extension repository, removed source OS software packages, and additional target OS software packages. Conflicts Software package conflicts between the source OS and the target OS Retained Packages Source OS software packages that are retained after the OS is upgraded Upgraded Packages Software packages that are upgraded after the OS is upgraded Packages Upgraded to openEuler Software packages that are upgraded to those in the openEuler extension repository after the OS is upgraded Removed Packages Source OS software packages that are removed after the OS is upgraded Additional Packages Software packages that will be installed in addition after the OS is upgraded Upgrade and data backup
 NOTE
NOTE
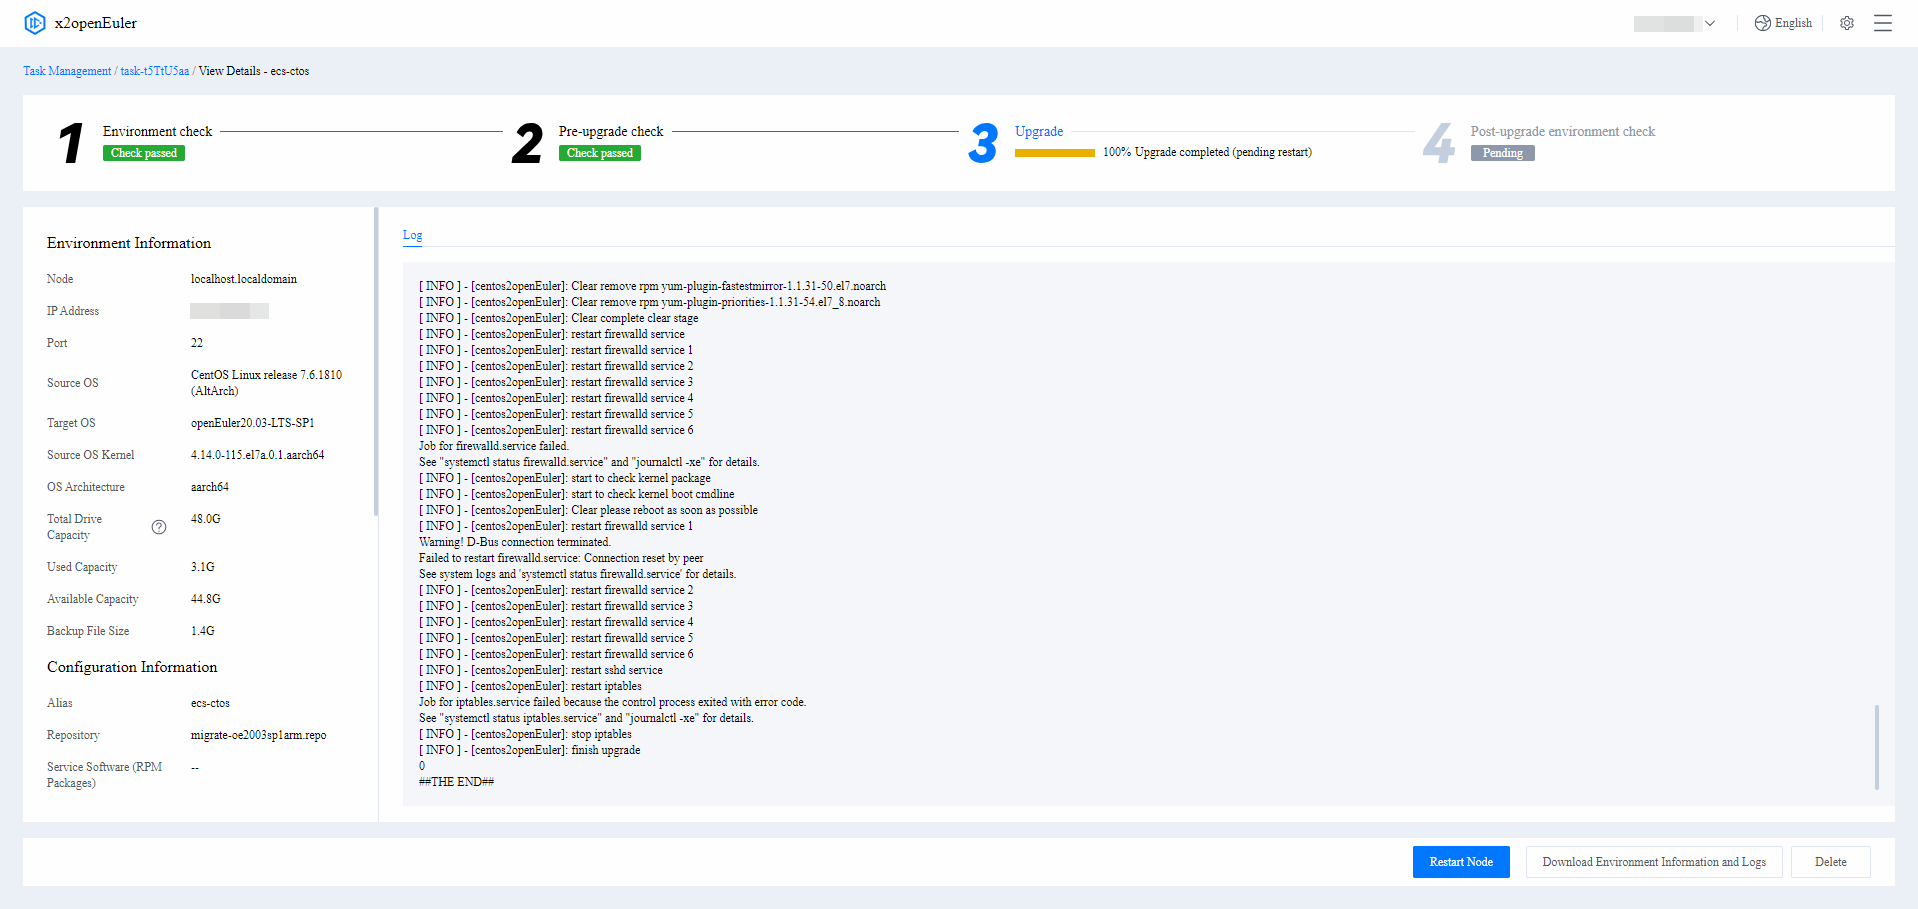
Data will be automatically backed up during the upgrade. By default, the files in the /usr, /run, /boot, /var, and /etc directories are backed up. The backup files can be stored in a custom directory, or the /.osbak directory by default.After the environment check and pre-upgrade check are passed, the node upgrade stage starts. After the upgrade stage, click Restart Node or manually start the upgraded node to ensure that the upgrade is complete. Click Download Environment Information and Logs to obtain the environment information and task execution logs collected during the upgrade.
After the node is restarted, click Start Check to enter the post-upgrade environment check stage.
Post-upgrade environment check
During the post-upgrade environment check, x2openEuler checks the OS running status, commands, software packages, and services after the upgrade and generates an inspection report. For details about how to customize inspection items, see Customizing the Health Inspection. After the upgrade is complete, you are advised to clear the backup data to release node space. If a rollback is required, you can retain the backup data.
 NOTE
NOTE
After the upgrade is complete, verify running of the services. If services are running properly, delete backup data to release space.
After the upgrade is complete, verify the environment by referring to Verifying the Upgrade.
 NOTE
NOTE
After the system is restarted, SELinux performs the relabel operation, which may take a long time on a physical machine. After the relabel operation is complete, the system automatically restarts. Then, the upgrade to the target OS is completely finished.
Verifying the Upgrade
Prerequisites
After the upgrade is complete, perform the following operations to verify the upgrade.
Procedure
Run the following command to check whether the OS has been upgraded to the target OS:
cat /etc/os-releaseIf the following information is displayed, the OS has been upgraded to the target OS:
NAME="openEuler"
VERSION="20.03 (LTS-SP1)"
ID="openEuler"
VERSION_ID="20.03"
PRETTY_NAME="openEuler 20.03 (LTS-SP1)"
ANSI_COLOR="0;31"
Run an openEuler command. If the command can be executed correctly, the OS has been upgraded to the target OS.
(Optional) Restore services or adapt scripts based on service requirements.
Check whether the services are running properly.
System Information Collection and Assessment
System information collection and assessment tasks collect information about nodes to be upgraded, assess software and hardware compatibility of the nodes, check software conflicts, generate assessment reports, and check whether the nodes to be upgraded meet upgrade requirements.
Creating a System Information Collection and Assessment Task
Prerequisites
You have logged in to x2openEuler.
Procedure
On the left of the page, click New Task and choose System Information Collection and Assessment. The New System Information Collection and Assessment Task page is displayed. x2openEuler automatically generates a task name by default. You can change the task name as required.
On the New System Information Collection and Assessment Task page, confirm the task name, select Batch Import or Add Node, and set the required parameters.
Batch Import: Batch import information about multiple nodes using a template.
 NOTE
NOTE
When nodes are imported in a batch, x2openEuler verifies the imported node information. If the verification fails, modify the imported information as prompted and import the nodes again.On the Batch Import page, click Template Table to obtain the template and enter node information by referring toTable 6.
After entering the node information, click Upload File and agree to the SSH Transmission Note. Select and upload the batch import file.
Add Node: Add information about a single node. On the Add Node page, set the parameters by referring to Table 6 and click OK. Table 6 Node information parameters
Parameter Description SSH Transmission Note The default SSH transmission channel of the server is used for node management. To ensure data security and integrity, you are advised to use a secure SSH service, such as a secure SSH version configured with a secure cryptographic algorithm. IP Address IP address of the node to be upgraded
NOTEThe node to be upgraded must be accessible to the environment where the x2openEuler WebUI is deployed.Alias Alias of the node to be upgraded. The alias is used to identify the function of the node. Port SSH port for logging in to the node to be upgraded User User name for logging in to the node to be upgraded Authentication Mode Key authentication: The authentication is performed based on a private key file and its password. - Private Key File: absolute path of the private key file for logging in to the node to be upgraded
- Passphrase: passphrase of the private key file for logging in to the node to be upgraded. For details about how to configure the key authentication mode, see Generating and Configuring a Key.
Password authentication: The authentication is performed based on a password.
Password: password for logging in to the node to be upgraded
NOTE- If you log in to the node as a common user, you need to enter the password of the root user to switch to the root user. The root user has all the operation permissions. Logging in to the server as the root user may pose security risks. For security purposes, disable the SSH login of the root user. The configuration procedure is as follows: Log in to the server as a common user, switch to the root user, and check the value of PermitRootlogin in the /etc/ssh/sshd_config file. If the value is no, the root user is not allowed to log in to the server. If the value is yes, change it to no. After modifying the settings, restart the sshd service for the modification to take effect.
- User passwords are involved during node information configuration. You need to maintain user information routinely and ensure environment security.
Source OS OS of the node to be upgraded. The default value is CentOS 7.6. More OSs can be supported by performing Uploading an OS Database Support Package. Target OS Target OS of the upgrade. The default value is openEuler 20.03 LTS SP1. More OSs can be supported by performing Uploading an OS Database Support Package. Repository Enter a configured repository name or click **Select** on the right to select the repository required by the node to be upgraded. For details, see Configuring a Repository. Service Software NOTICE - The software assessment report will not be generated if no service software is specified. Service software (RPM packages) not to be upgraded has a higher priority than service software (RPM packages).
- If you enter multiple software directories or RPM package names, separate them with commas (,).
- Service Software (RPM Packages): For service software installed using RPM packages, you only need to enter the main software name. For example, if Docker is installed, you only need to enter Docker. x2openEuler checks whether the software exists in the openEuler repository. If yes, x2openEuler automatically upgrades the software. If no, x2openEuler checks the software compatibility. If the software is compatible with openEuler, the software is retained. Otherwise, the node cannot be upgraded.
- Service Software (Directories): For service software installed using compressed packages or source packages, enter the actual paths of the software. The paths can only contain files related to the service software only. x2openEuler checks whether the software is compatible with openEuler. If yes, the node can be upgraded and the software can be retained. Otherwise, the node cannot be upgraded.
- Service Software (RPM Packages) Not to Be Upgraded: For service software installed using RPM packages, you only need to enter the main software name. For example, if Docker is installed, you only need to enter Docker. x2openEuler checks whether the software is compatible with openEuler. If yes, the node can be upgraded and the software package can be retained. Otherwise, the node cannot be upgraded.
- Software to Be Installed after the Upgrade: For service software installed using RPM packages, you only need to enter the main software name. For example, if Docker is to be installed after the upgrade, you only need to enter Docker. x2openEuler checks whether the software is compatible with openEuler. If yes, the node can be upgraded and the software will be installed after the upgrade. Otherwise, the software cannot be installed.
After x2openEuler verifies the imported node information (adding a single node is used as an example), the node fingerprint verification page is displayed. Check that the node fingerprint is correct, and then click OK.
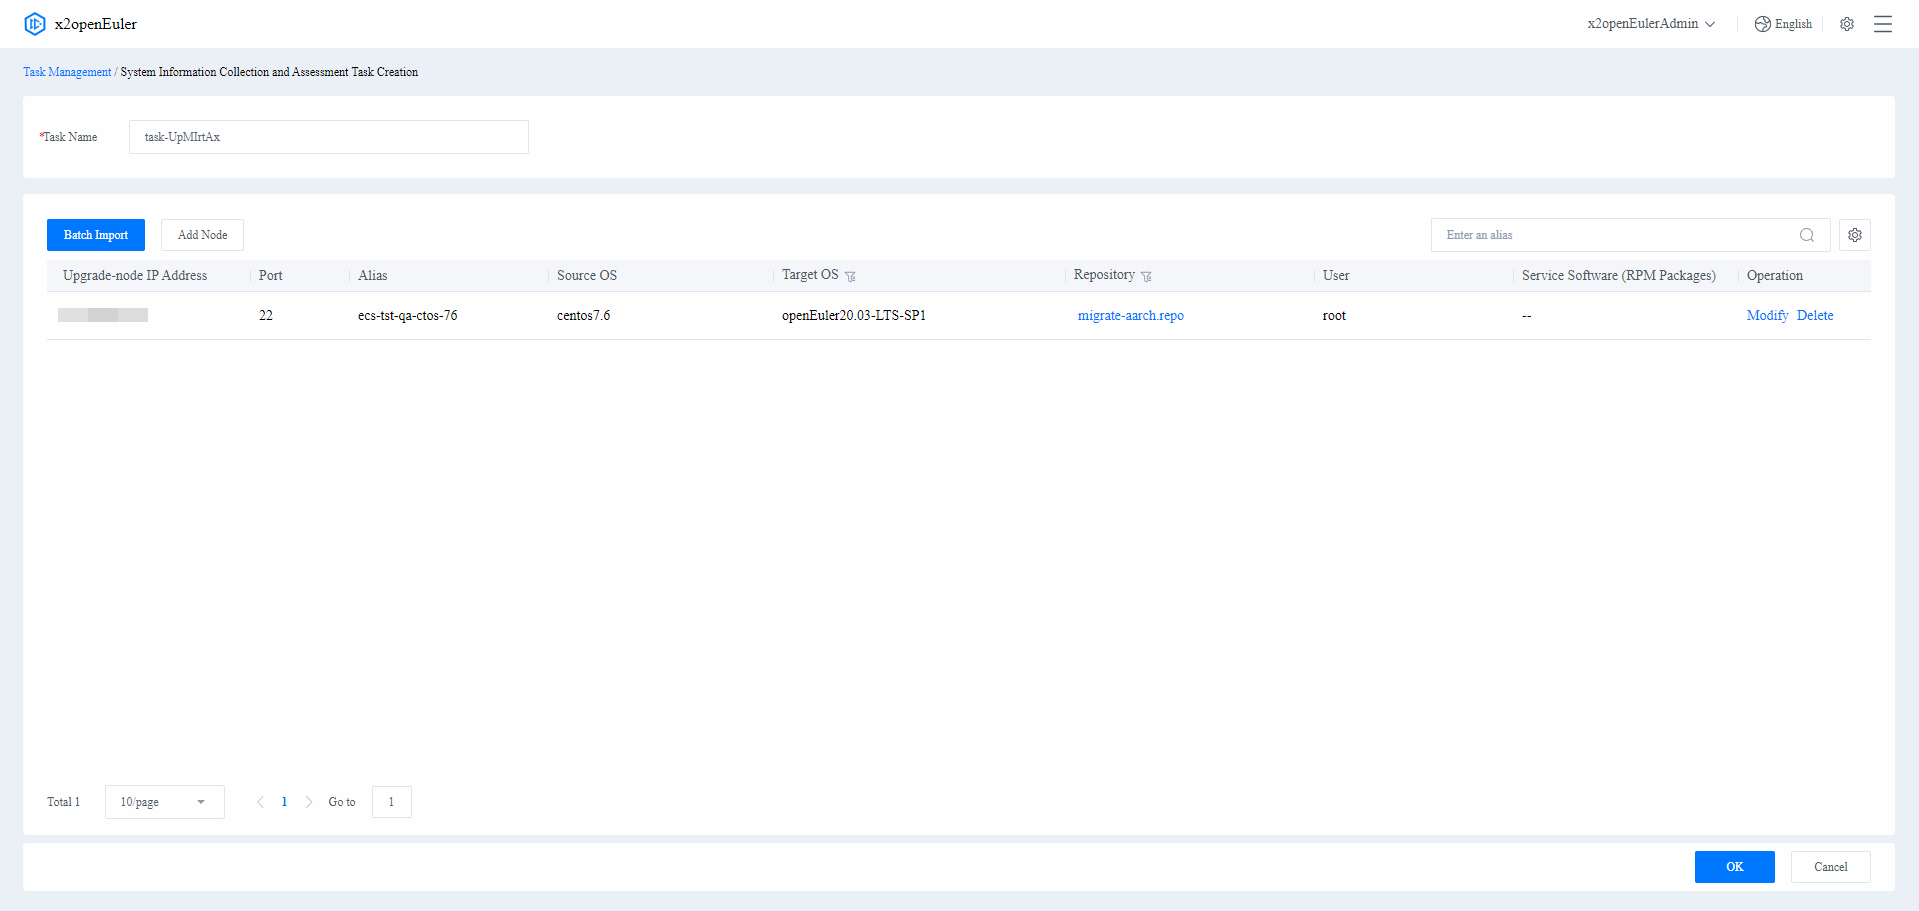
After the node is added, confirm the node information and click OK in the lower right corner to complete the system information collection and assessment task creation. To modify or delete a node, click Modify or Delete in the Operation column. Click OK in the lower right corner to start the upgrade task or click Cancel in the lower right corner to cancel the task.
 NOTE
NOTE
After the task is created, x2openEuler automatically checks the environment of the nodes to be upgraded in the task. Subsequent collection and assessment can be performed only after the environment check is passed. If the environment check fails, check and modify the node information.Figure 12 System information collection and assessment task information confirmation
Performing System Information Collection and Assessment
Prerequisites
A system information collection and assessment task has been created.
Procedure
Under the All Nodes area, select the required system information collection and assessment task and click Details on the right. The task details page is displayed.
Click Check on the right of the node information to check the environment of the node. You can select multiple nodes and click Batch Operation > Start Check in the upper left corner to check the environment of multiple nodes.
The node system information collection and assessment task includes two stages. The failure of any stage will terminate the task.
 NOTE
NOTE- After each upgrade stage, you can click Initialize in the lower right corner to restore the node to the state before the check.
- If the pre-upgrade or post-upgrade script is uploaded, the corresponding stage will be added to the upgrade process.
- If a rollback is required during the upgrade, you can perform Configuring Rollback Consistency Check Filters to bypass consistency check for the configured items. The configuration takes effect after the next rollback.
Environment check
The environment check analyzes the connectivity between x2openEuler and the node to be upgraded and checks whether the environment information is correct. If the environment check fails, modify the node information.
Collection and assessment
x2openEuler collects information about nodes to be upgraded, assess software and hardware compatibility of the nodes, check software conflicts, generate assessment reports, and check whether the nodes to be upgraded meet upgrade requirements. If the compatibility check fails, perform software adaptation based on the assessment report. For details about assessment report parameters, seeTable 7, Table 8, and Table 9.
Figure 15 Collection and assessment
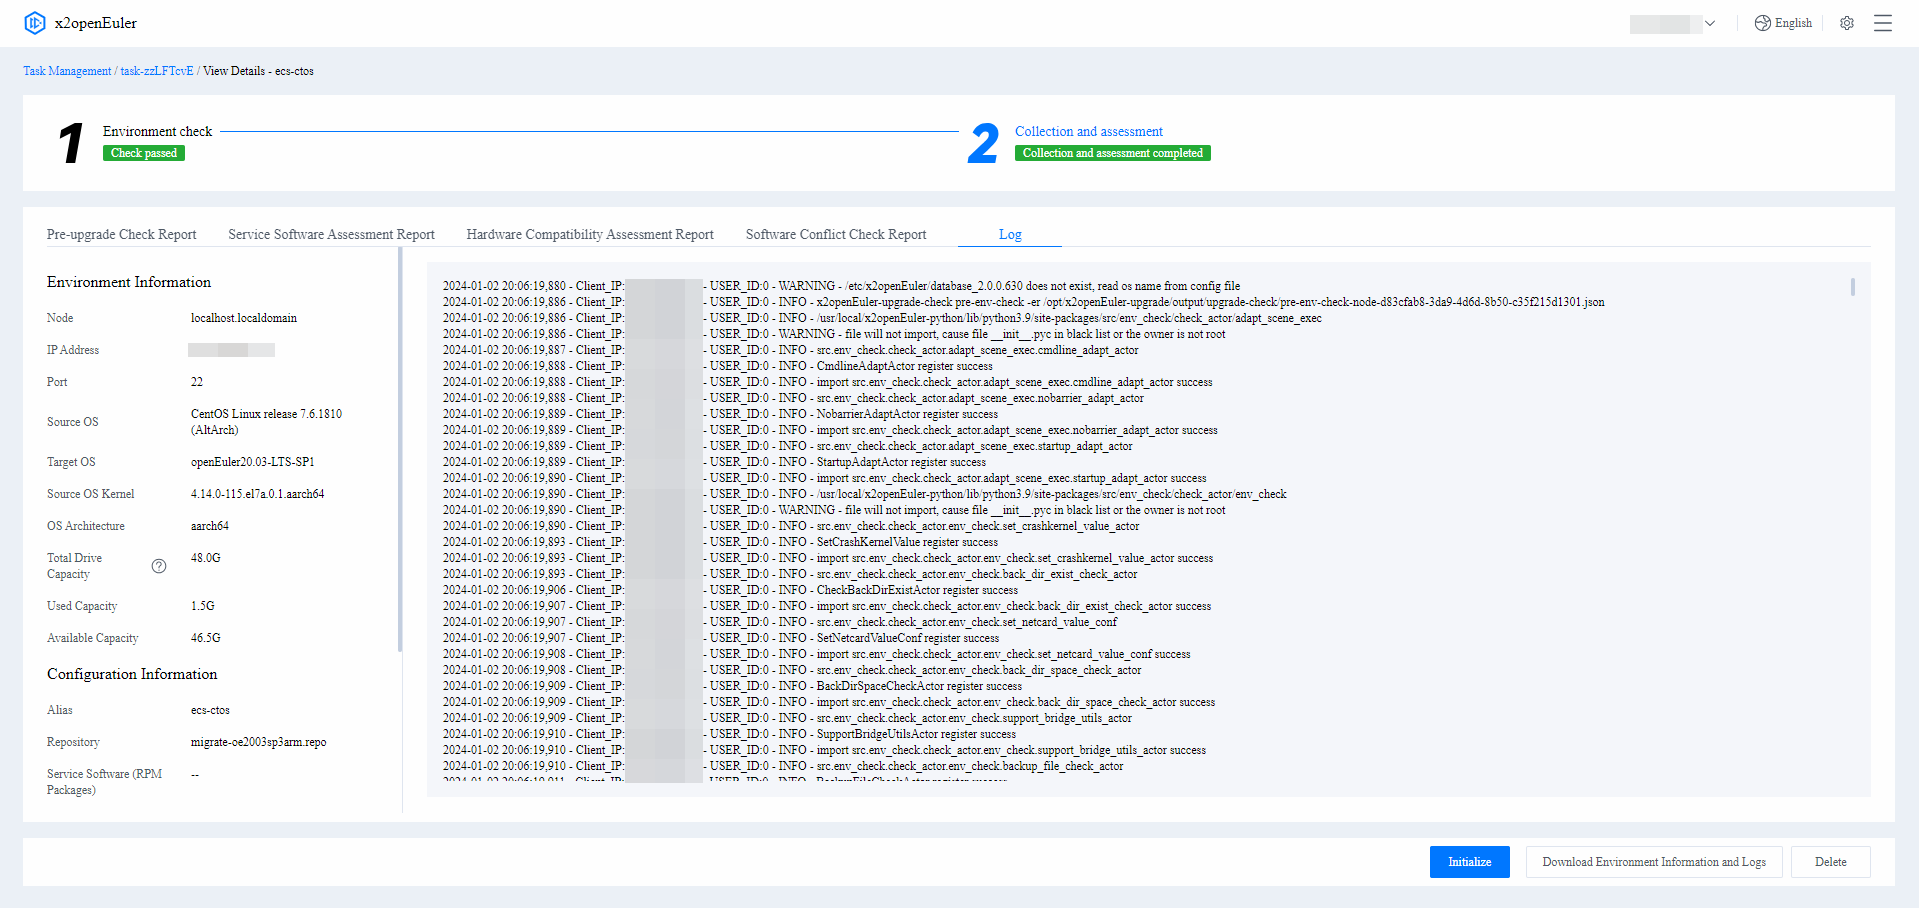
Table 7 Service Software Assessment Report parameters
Parameter Description Result Assessed software name, source OS, target OS, system architecture, evaluation result, and other information related to the assessment task Suggestion Suggested solution based on the compatibility result in the assessment report Dependency Compatibility Direct dependencies required by the software, as well as the RPM packages corresponding to the dependencies in the source and target OSs
- If the names and versions of a direct dependent RPM package are not changed, Version not changed is displayed.
- If the version of a direct dependent RPM package is changed but the interfaces are not changed, Version changed is displayed.
- If the name of a direct dependent RPM package is changed but the interfaces are not changed, Package changed is displayed.
- If an RPM package is found in the source OS but not in the target OS, Missing is displayed.
- If an RPM package is not found in the source OS but in the target OS, or any interface of the package is changed, Check required is displayed.
- If an RPM package is not found in the source or target OS, the RPM package is displayed in Others, and Check required is displayed.
Interface Compatibility (C/C++) - Called Function: name of the function called in the assessed software
- Interface Caller: program that is called by a changed external interface in the assessed software
- Results:
- Removed: The interface is missing.
- Changed: The input parameter, return value, or implementation of the function is changed.
- Parameters in the expanded details:
- OS: name of the assessed OS
- Function: representation of the interface
- File: name of the file where the external interface is located
- Dependency Package: external .so library where the interface is located
- Interface Differences: changes in the external interface. If an interface has been removed, this field is left blank.
Interface Compatibility (JDK) Changes between the interfaces found in the JDK of the JAR package scanning and those in the minimum required JDK version in the target OS
- openEuler JDK: minimum version of openEuler JDK that meets the JAR package requirements
- Object Build JDK: JDK version corresponding to the scanned JAR package
- JAR Package: name of the scanned JAR package
- Method: name of the method whose interface is changed
- Function Signature: signature of the function whose interface is changed
- Package: name of the package where the method with a changed interface is located, displayed as the package name and class name
- Difference: difference in the interface
Interface Compatibility (Java) Changes in the interfaces of the JAR package in the source OS
- Invoked JAR package: name of the invoked JAR package
- RPM package: RPM package to which the JAR package belongs
- Parameters in the expanded details:
- CentOS 7.6 methods: names of the incompatible CentOS 7.6 interfaces
- Package: JAR package to which the incompatible interface belongs
- Class: class to which the incompatible interface belongs
- Changes in openEuler20.03 LTS SP1: changes of the incompatible interface in openEuler 20.03 LTS SP1, including method removal, return parameters, method signatures, method modifiers, and exceptions
Table 8 Hardware Compatibility Assessment Report parameters
Parameter Description Result Compatibility information about the system, basic system, CPU, and entire device Board Compatibility in the Target OS A board is compatible only if its parameters are the same as those in the known board list. If the parameters are not completely the same, the board compatibility is to be confirmed. The parameters include:
- Vendor ID
- Device ID
- Subsystem Vendor ID
- Subsystem ID
- Chip Model
- Compatible or Not: whether the hardware is compatible with the target OS
- Risk Level: assessment of the level of risk caused by the hardware compatibility during the upgrade
Table 9 Software Conflict Check Report parameters
Parameter Description Software Conflict Statistics Assessment of conflicts during the upgrade and information about the following software packages: retained source OS software packages, software packages upgraded to the target OS, software packages upgraded to those in the openEuler extension repository, removed source OS software packages, and additional target OS software packages. Conflicts Software package conflicts between the source OS and the target OS Retained Packages Source OS software packages that are retained after the OS is upgraded Upgraded Packages Software packages that are upgraded after the OS is upgraded Packages Upgraded to openEuler Software packages that are upgraded to those in the openEuler extension repository after the OS is upgraded Removed Packages Source OS software packages that are removed after the OS is upgraded Additional Packages Software packages that will be installed in addition after the OS is upgraded
(Optional) Click Initialize in the lower right corner to restore the node to the state before the check. Click Download Environment Information and Logs to obtain the environment information and task execution logs.
Configuration Migration
onfiguration migration tasks analyze the configuration information in the node environments and migrate the information to the target environment to ensure service continuity.
Creating a Configuration Migration Task
Prerequisites
You have logged in to x2openEuler.
Procedure
On the left of the page, click New Task and select Configure Migration. The New Configuration Migration Task page is displayed. You can change the automatically generated task name.
Enter a task name, select a migration type (Analysis and Migration is used as an example), and set the parameters.
 NOTICE
By default, configuration migration covers the configurations of mainstream Linux distributions. The task types are as follows:- Analyze Only: Analyze the configuration information of the source node. The analysis result can be exported.
- Migrate Only: Migrate the configuration information to the target node.
- Analyze and Migrate: Analyze the configuration information of the source node and migrate it to the target node.
Batch Import: Batch import information about multiple nodes using a template.
 NOTE
NOTE
When nodes are imported in a batch, x2openEuler verifies the imported node information. If the verification fails, modify the imported information as prompted and import the nodes again.On the Batch Import page, click Template Table to obtain the template and enter node information by referring to Table 10.
After entering the node information, click Upload File and agree to the SSH Transmission Note. Select and upload the batch import file.
Add Node: Add information about a single node.
On the Add Node page, set the parameters by referring to Table 10 and click OK.
Table 10 Node information parameters
Parameter Description SSH Transmission Note The default SSH transmission channel of the server is used for node management. To ensure data security and integrity, you are advised to use a secure SSH service, such as a secure SSH version configured with a secure cryptographic algorithm. IP Address IP address of the node to be upgraded
NOTEThe node to be upgraded must be accessible to the environment where the x2openEuler WebUI is deployed.Alias Alias of the node to be upgraded. The alias is used to identify the function of the node. Port SSH port for logging in to the node to be upgraded User User name for logging in to the node to be upgraded Authentication Mode Key authentication: The authentication is performed based on a private key file and its password.
- Private Key File: absolute path of the private key file for logging in to the node to be upgraded
- Passphrase: passphrase of the private key file for logging in to the node to be upgraded. For details about how to configure the key authentication mode, see Generating and Configuring a Key.
NOTE- If you log in to the node as a common user, you need to enter the password of the root user to switch to the root user.
- The root user has all the operation permissions. Logging in to the server as the root user may pose security risks. For security purposes, disable the SSH login of the root user. The configuration procedure is as follows: Log in to the server as a common user, switch to the root user, and check the value of PermitRootlogin in the /etc/ssh/sshd_config file. If the value is no, the root user is not allowed to log in to the server. If the value is yes, change it to no. After modifying the settings, restart the sshd service for the modification to take effect.
- User passwords are involved during node information configuration. You need to maintain user information routinely and ensure environment security.
Password authentication: The authentication is performed based on a password.
br>Password: password for logging in to the node to be upgraded
Note- If you log in to the node as a common user, you need to enter the password of the root user to switch to the root user.
- The root user has all the operation permissions. Logging in to the server as the root user may pose security risks. For security purposes, disable the SSH login of the root user. The configuration procedure is as follows: Log in to the server as a common user, switch to the root user, and check the value of PermitRootlogin in the /etc/ssh/sshd_config file. If the value is no, the root user is not allowed to log in to the server. If the value is yes, change it to no. After modifying the settings, restart the sshd service for the modification to take effect.
Source OS OS of the node to be upgraded. The default value is CentOS 7.6. More OSs can be supported by performing Uploading an OS Database Support Package. Target Node IP Address Target node IP address
NOTE
The target node must be accessible to the environment where the x2openEuler WebUI is deployed.Target Node Port SSH port for logging in to the target node Target Node User User for login to the target node Authentication Mode Key authentication: The authentication is performed based on a private key file and its password. - Private Key File: absolute path of the private key file for logging in to the node to be upgraded
- Passphrase: passphrase of the private key file for logging in to the node to be upgraded. For details about how to configure the key authentication mode, see Generating and Configuring a Key.
Password authentication: The authentication is performed based on a password.
Password: password for logging in to the node to be upgraded
NOTE- If you log in to the node as a common user, you need to enter the password of the root user to switch to the root user. The root user has all the operation permissions. Logging in to the server as the root user may pose security risks. For security purposes, disable the SSH login of the root user. The configuration procedure is as follows: Log in to the server as a common user, switch to the root user, and check the value of PermitRootlogin in the /etc/ssh/sshd_config file. If the value is no, the root user is not allowed to log in to the server. If the value is yes, change it to no. After modifying the settings, restart the sshd service for the modification to take effect.
- User passwords are involved during node information configuration. You need to maintain user information routinely and ensure environment security.
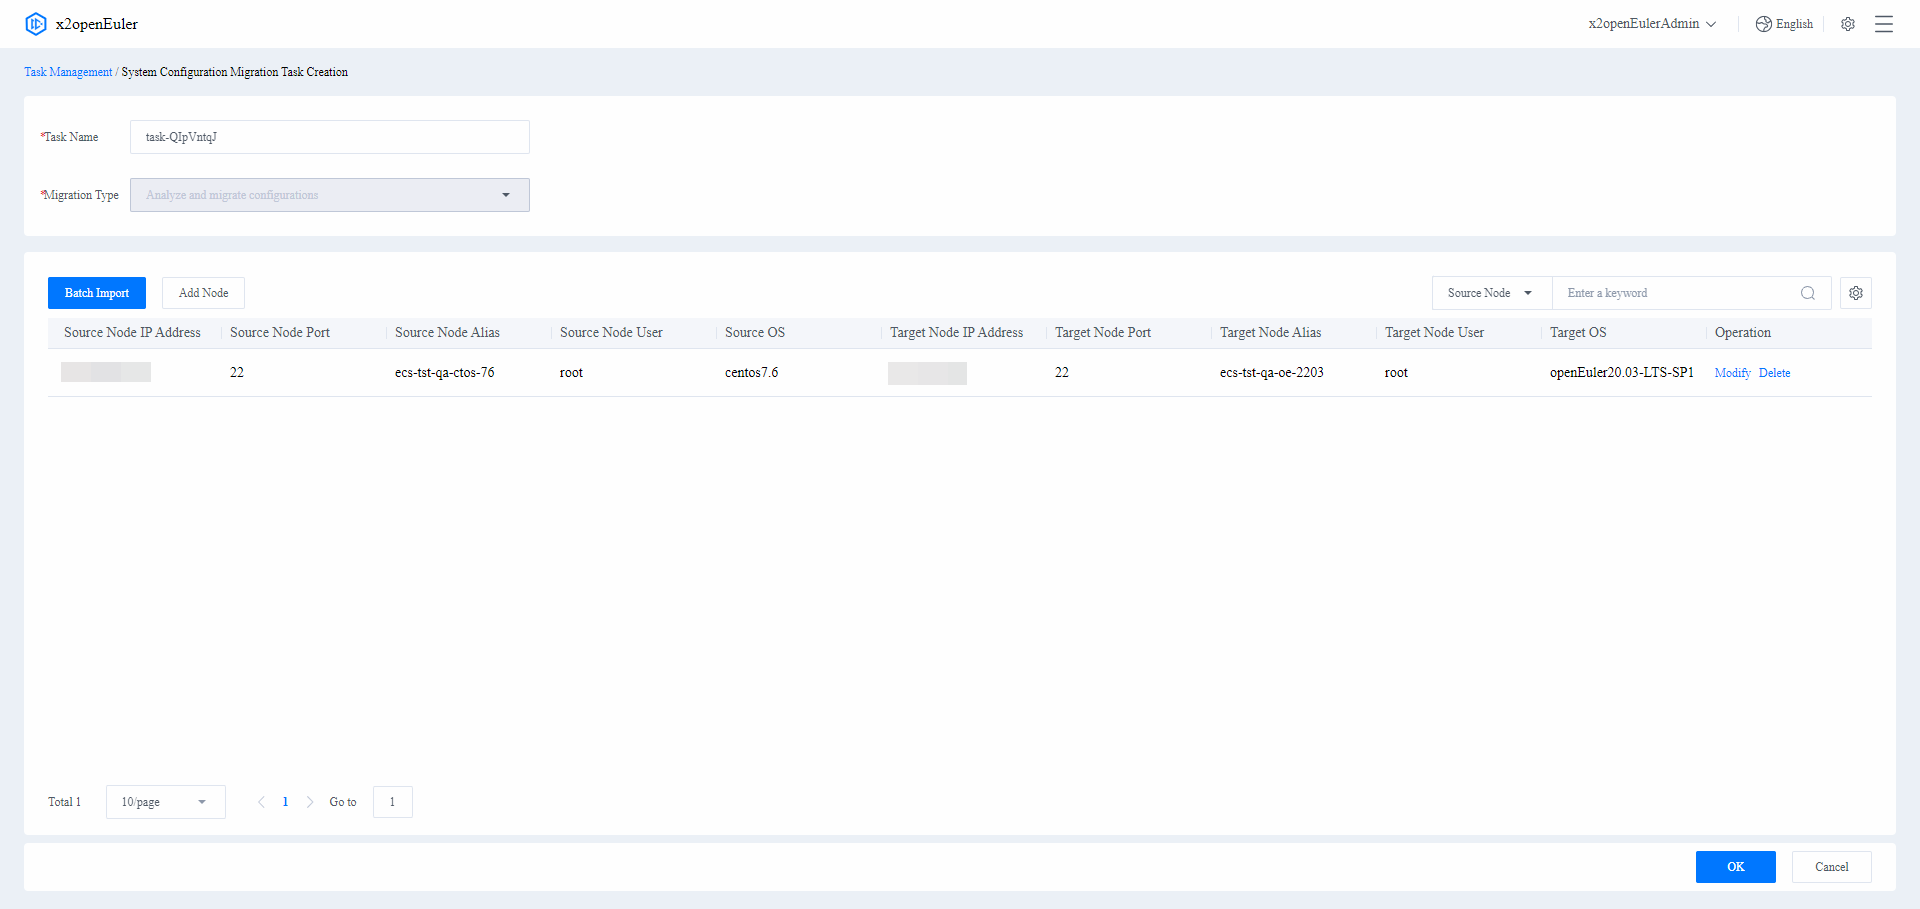
Target OS OS of the target node. The default value is openEuler 20.03 LTS SP1. More OSs can be supported by performing Uploading an OS Database Support Package. After x2openEuler verifies the imported node information (adding a single node is used as an example), the node fingerprint verification page is displayed. Check that the node fingerprint is correct, and then click OK.
After the node is added, confirm the node information and click OK in the lower right corner to complete the system information collection and assessment task creation. To modify or delete a node, click Modify or Delete in the Operation column. Click OK in the lower right corner to start the upgrade task or click Cancel in the lower right corner to cancel the task.
Figure 20 Confirming the configuration migration task information
Performing Configuration Migration
Prerequisites
- You have logged in to x2openEuler.
- A configuration migration task has been created.
Procedure
Under the All Nodes area, select the required configuration migration task and click Details on the right. The task details page is displayed.
Click Start Check on the right of the node information to migrate configurations of a single node. You can select multiple nodes and click Batch Operation in the upper left corner to start configuration migration for multiple nodes.
The configuration analysis and migration process includes four stages. The failure of any stage will terminate the subsequent task process.
Environment check
The environment check analyzes the connectivity between x2openEuler and the source and target nodes and checks whether the environment information is correct. If the environment check fails, modify the node information.
Configuration analysis
The configurations of the source node are analyzed and a configuration analysis report is generated for you to confirm whether the configuration information of the source node can be migrated. For details about the parameters in the configuration analysis report, see Table 11.
Figure 22 Configuration analysis
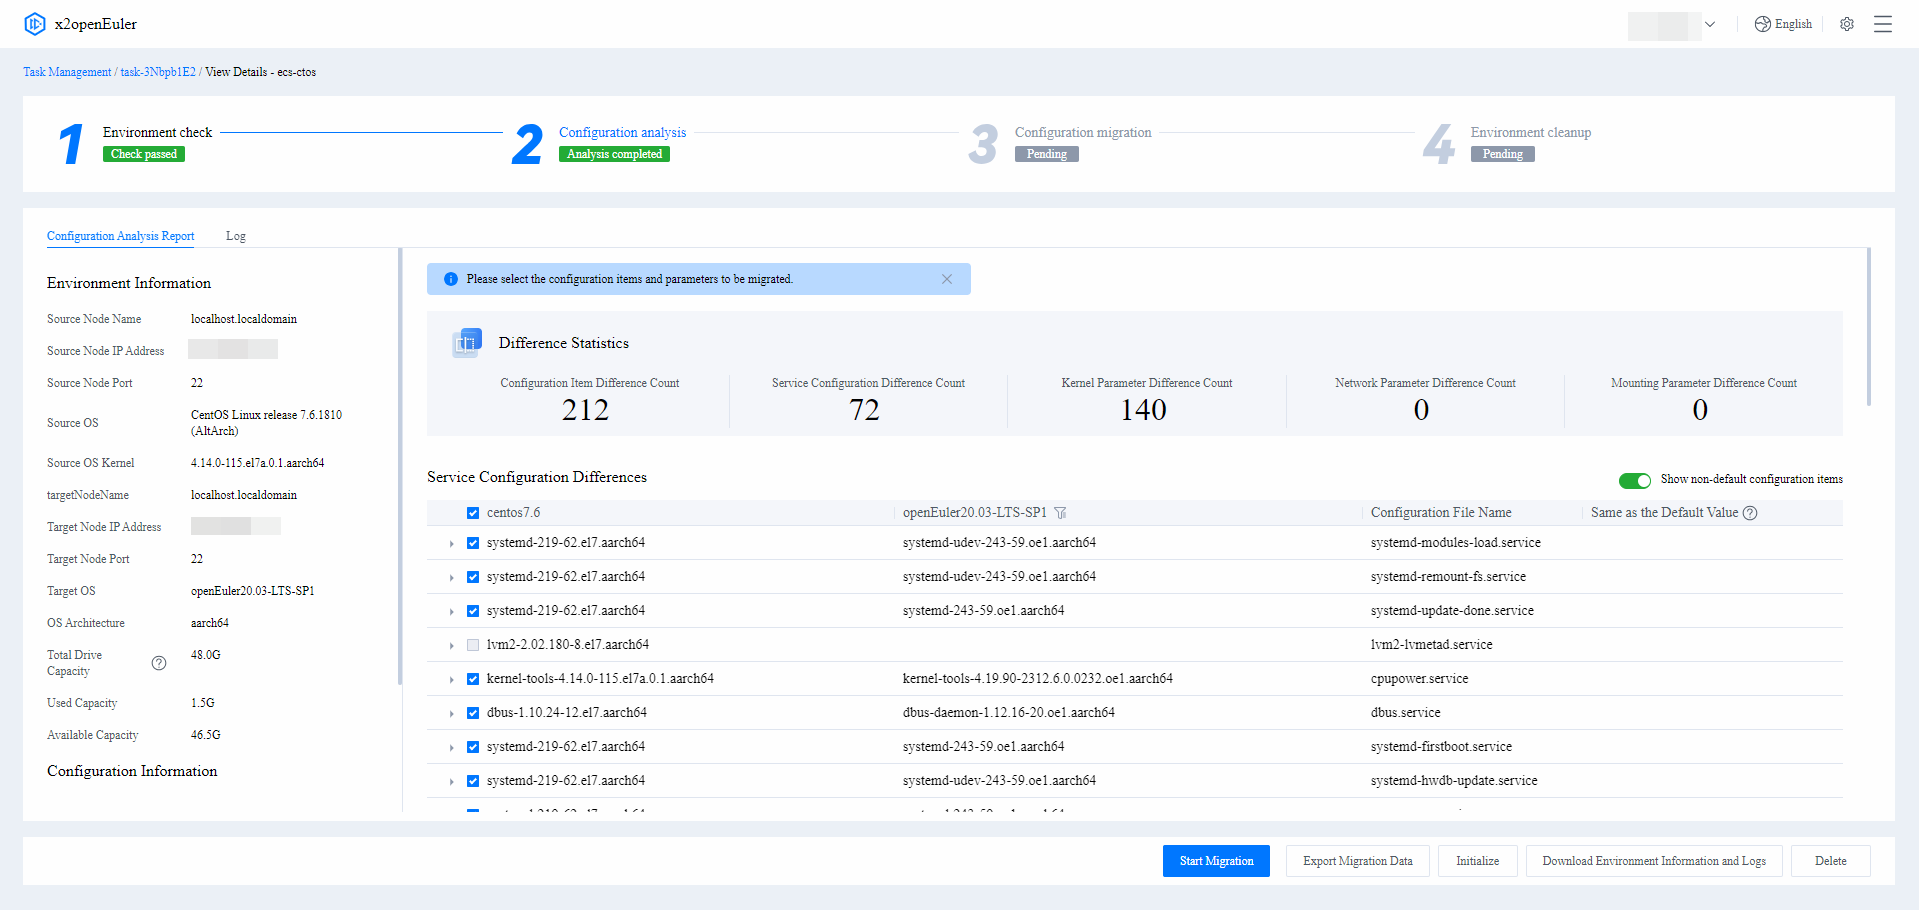 Table 11 Configuration Analysis Report parameters
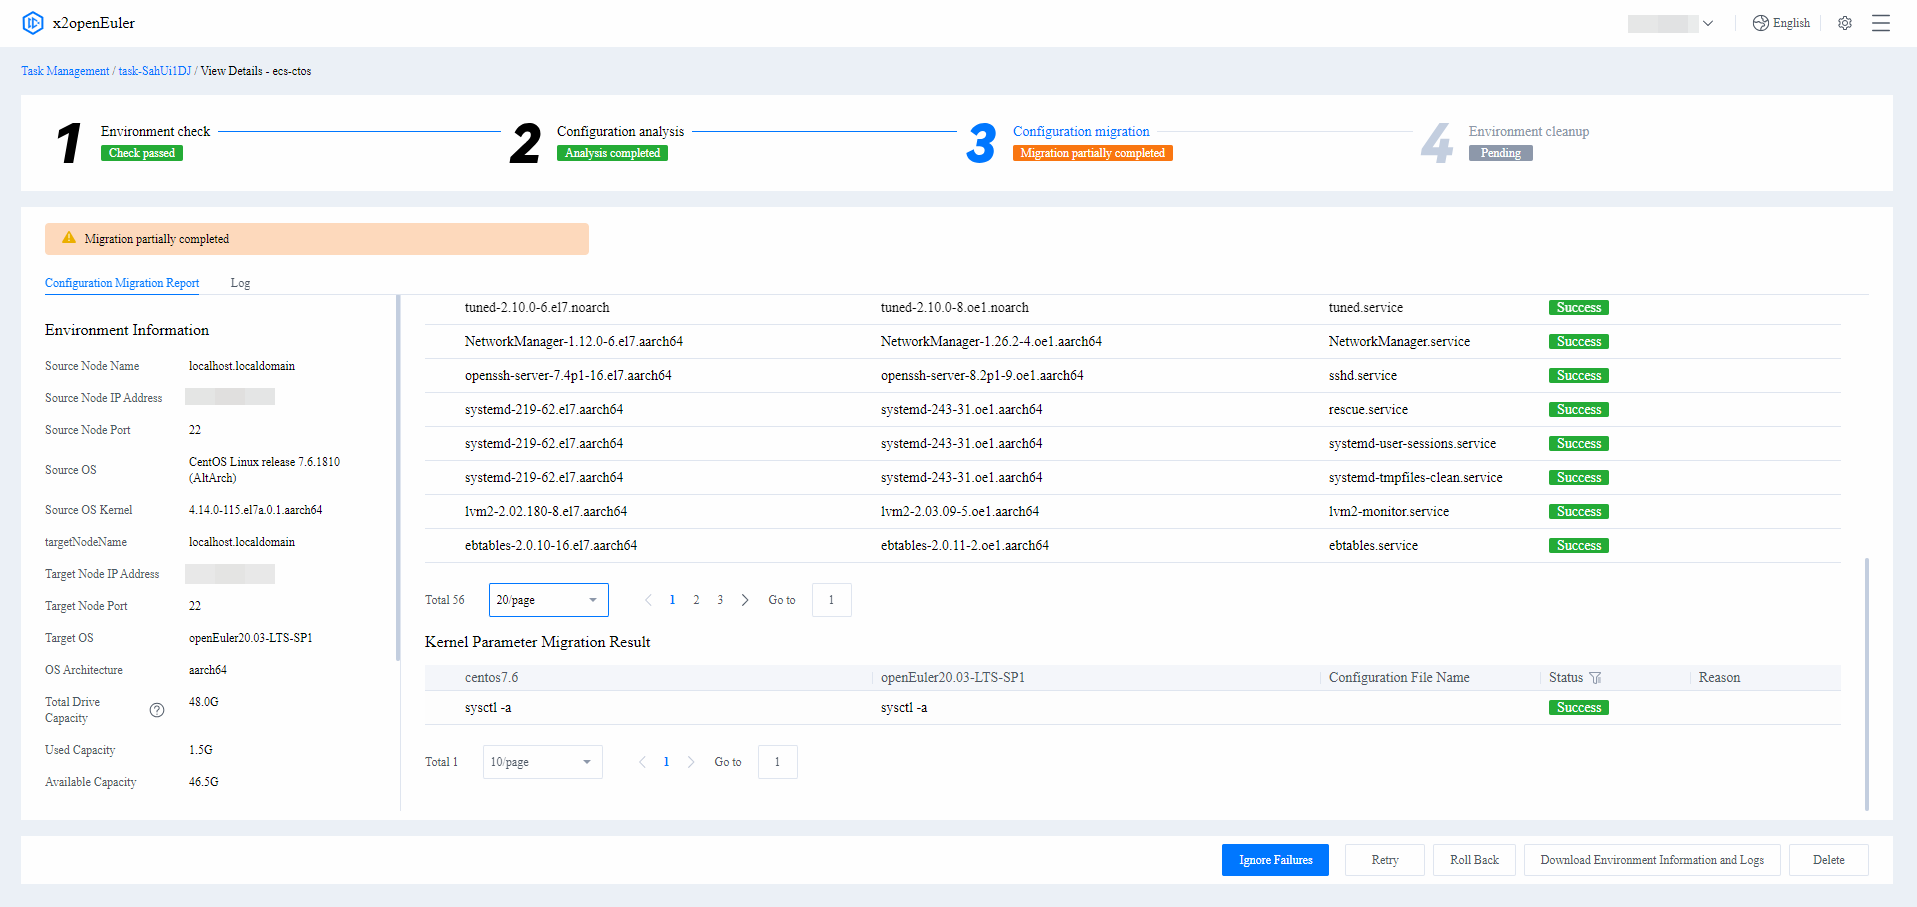
Parameter Description Change Statistics Numbers of configuration item changes, service configuration changes, kernel parameter changes, network parameter changes, and mounting parameter changes on the source node Service Configuration Changes Service configuration changes between the source and target nodes Kernel Parameter Changes Kernel parameter changes between the source and target nodes Network Parameter Changes Network parameter changes between the source and target nodes Mounting Parameter Changes Mounting parameter changes between the source and target nodes Configuration migration Select the configuration information to be migrated and click Start Migration in the lower right corner.
Figure 23 Configuration migration
 NOTE
NOTE
During the configuration migration, some source OS services or application configurations may fail to be migrated due to reasons of their own. You can click Ignore Failed to ignore them and deploy them again in the target OS later.Environment cleanup
You are advised to test the services to ensure stability before performing environment cleanup to save space. If a rollback is required, you can skip environment cleanup.
 NOTE
NOTEAfter the upgrade is complete, verify running of the services. If services are running properly, clean up the environment to release space. During environment cleanup, backup files are deleted and the x2openEuler-client software package is uninstalled.
After the configuration migration is complete, test services on the target node to ensure that the services are running properly. If a rollback is required, go to the node details page and click Rollback in the lower right corner.
Software Package Assessment
Assesses the software packages to be migrated from the source OS to the target OS to ensure that services run properly after the upgrade.
Prerequisites
x2openEuler has been installed.
Procedure
On the left of the page, click New Task and select Software Package Assessment. In the displayed New Software Package Assessment Task dialog box, enter the task name and click OK. The assessment task page is displayed.
Click Select Software Packages in the upper left corner. The page shown in Figure 24 is displayed. Upload the software packages to be assessed by referring to Table 12.
Figure 24 Select Software Packages
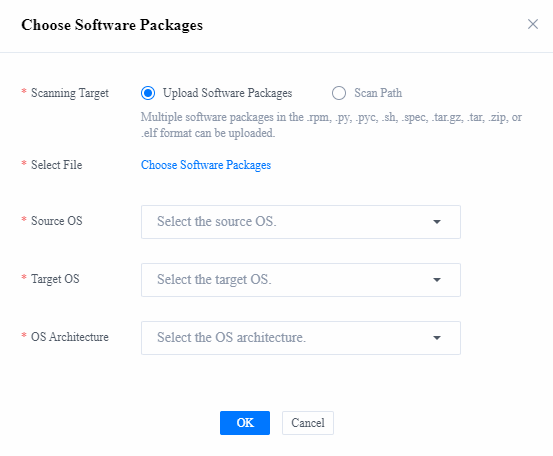
Table 12 Software package scanning parameters
Parameter Description Scanning Target Software Packages: Multiple software packages can be uploaded. Supported software package types include .rpm, .py, .pyc, .sh, .spec, .tar.gz, .tar, .zip, and .elf. Path: The existing software packages on the node where x2openEuler is installed are scanned.
NOTE
Only files in the /opt/x2openEuler/scan directory are scanned.Source OS OS of the node to be upgraded. The default value is CentOS 7.6. More OSs can be supported by performing Uploading an OS Database Support Package. Target OS Target OS of the upgrade. The default value is openEuler 20.03 LTS SP1. More OSs can be supported by performing Uploading an OS Database Support Package. OS Architecture Architecture of the source and target OS - x86_64
- aarch64
Click OK to execute the software assessment task. After the assessment is complete, the analysis result page is displayed. The analysis result consists of the Software Dependencies diagram and Software Assessment Report, as shown in Figure 25. For details about the parameters in the software assessment report, see Table 13.
 NOTE
NOTE- In the list of the software package assessment report, you can click the report name of an analysis task to view the analysis report.
- You can use the software dependency diagram to analyze the software packages dependencies and the replaceable packages provided by openEuler.
- The name of the analysis report consists of the name of the scanned software package and the time when the report is generated.
Figure 25 Software Dependencies
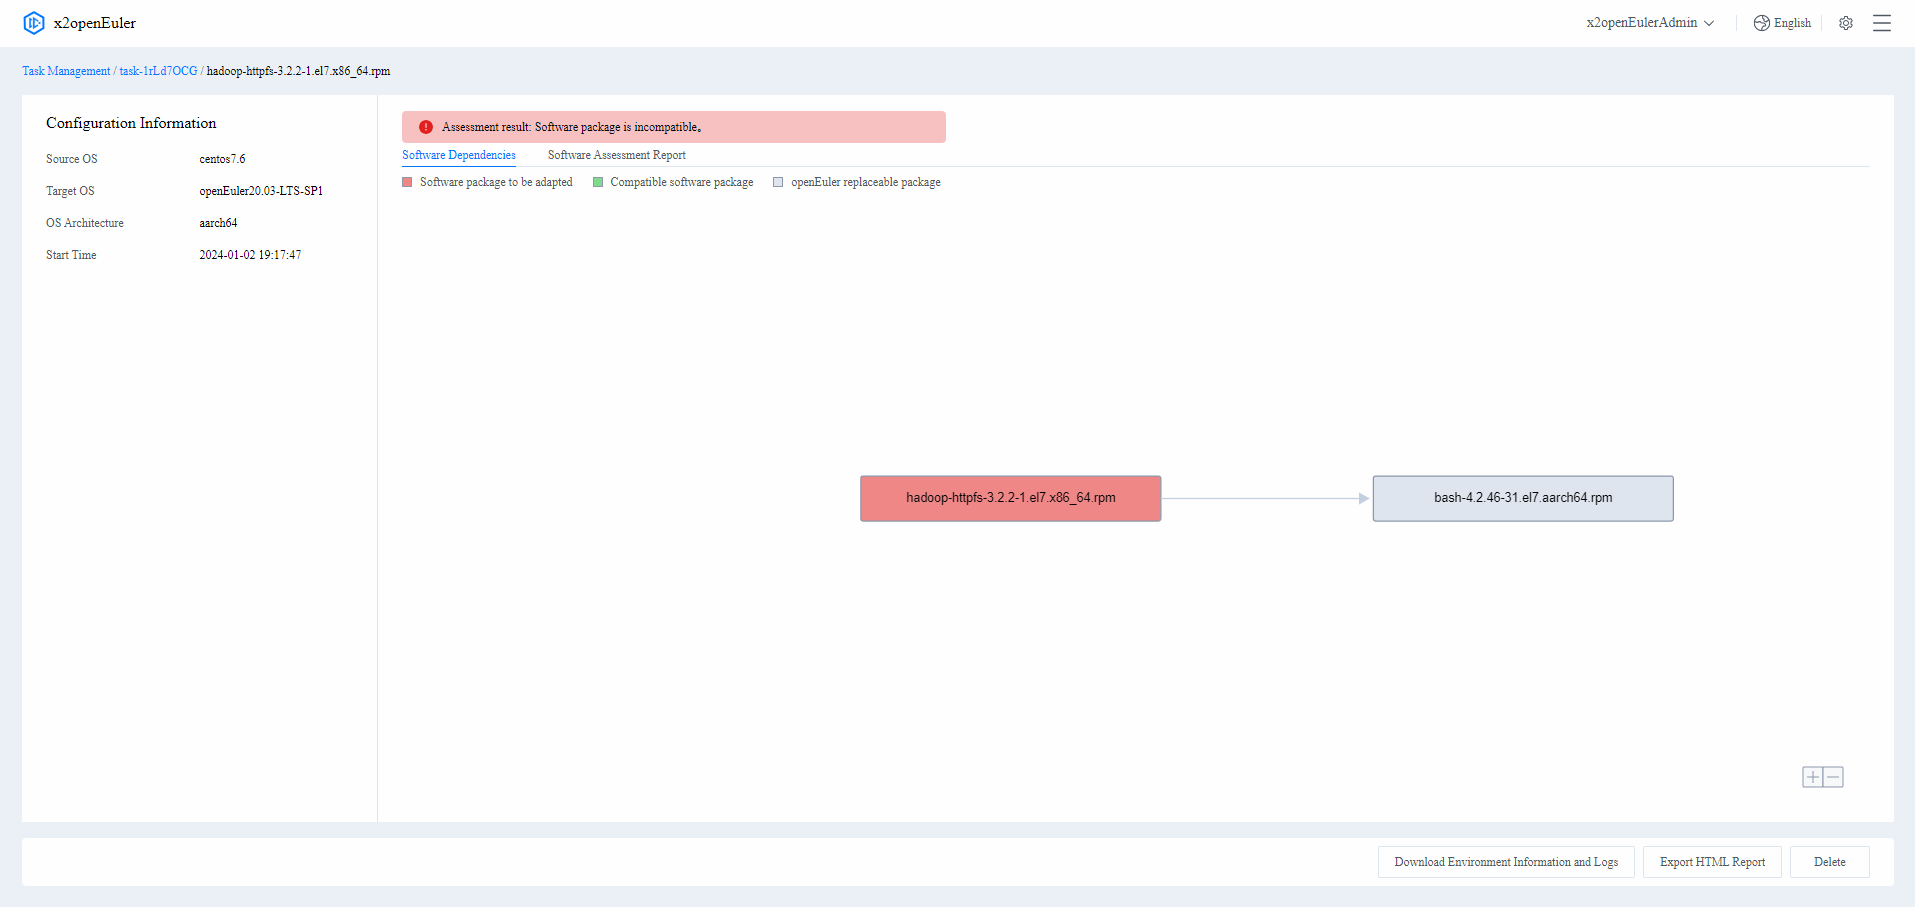
Table 13 Service Software Assessment Report parameters
Parameter Description Result Assessed software name, source OS, target OS, system architecture, evaluation result, and other information related to the assessment task Suggestion Suggested solution based on the compatibility result in the assessment report Dependency Compatibility Direct dependencies required by the software, as well as the RPM packages corresponding to the dependencies in the source and target OSs - If the names and versions of a direct dependent RPM package are not changed, Version not changed is displayed.
- If the version of a direct dependent RPM package is changed but the interfaces are not changed, Version changed is displayed.
- If the name of a direct dependent RPM package is changed but the interfaces are not changed, Package changed is displayed.
- If an RPM package is found in the source OS but not in the target OS, Missing is displayed.
- If an RPM package is not found in the source OS but in the target OS, or any interface of the package is changed, Check required is displayed.
- If an RPM package is not found in the source or target OS, the RPM package is displayed in Others, and Check required is displayed.
Interface Compatibility (C/C++) - Called Function: name of the function called in the assessed software
- Interface Caller: program that is called by a changed external interface in the assessed software
- Results:
- Removed: The interface is missing.
- Changed: The input parameter, return value, or implementation of the function is changed.
- Parameters in the expanded details:
- OS: name of the assessed OS
- Function: representation of the interface
- File: name of the file where the external interface is located
- Dependency Package: external .so library where the interface is located
- Interface Differences: changes in the external interface. If an interface has been removed, this field is left blank.
Interface Compatibility (JDK) Changes between the interfaces found in the JDK of the JAR package scanning and those in the minimum required JDK version in the target OS
- openEuler JDK: minimum version of openEuler JDK that meets the JAR package requirements
- Object Build JDK: JDK version corresponding to the scanned JAR package
- JAR Package: name of the scanned JAR package
- Method: name of the method whose interface is changed
- Function Signature: signature of the function whose interface is changed
- Package: name of the package where the method with a changed interface is located, displayed as the package name and class name
- Difference: difference in the interface
Interface Compatibility (Java) Changes in the interfaces of the JAR package in the source OS
- Invoked JAR package: name of the invoked
- RPM package: RPM package to which the JAR
- Parameters in the expanded details:
- CentOS 7.6 methods: names of the incompatible CentOS 7.6 interfaces
- Package: JAR package to which the incompatible interface belongs
- Class: class to which the incompatible interface belongs
- Changes in openEuler20.03 LTS SP1: changes of the incompatible interface in openEuler 20.03 LTS SP1, including method removal, return parameters, method signatures, method modifiers, and exceptions
Click Download Environment Information and Logs in the lower right corner to obtain the environment information and log files. Click Export HTML Report to export the analysis result of the current assessment task.
Using x2openEuler on the CLI
Environment Preparation
CentOS 7.9 x86_64 is used as an example to demonstrate how to upgrade to openEuler 22.03-LTS-SP4。
Install x2openEuler.
Run
7z x x2openEuler-core-*.rpmto extract thex2openEuler-upgradeRPM package, and upload it to the machine to be upgraded. Note
NoteIf the machine is running
CentOS 6.x, downloadx2openEuler-upgrade-for6. For other OSs, usex2openEuler-upgrade.Ensure that the
yumsource is available in the current system, then install the package:yum install -y x2openEuler-upgrade-*.rpm Note
NoteIf multiple RPM packages exist in the path, use the full file name for installation.
Collect information.
Run the following command to collect local software information:
x2openEuler-client upgrade-check-collectAfter successful execution, the system will generate an information file. Example:
2024-10-23 16:43:37,373 - USER_ID:0 - INFO - Collect Success! The Archive file results are saved: /opt/x2openEuler-client/output/collect/collect-<uuid>.tar.gz
Save
uuidfrom the output, as it will be used in subsequent operations. In this example,uuidisd8cf5ae2-911a-11ef-a25b-00155d306854.
Software Compatibility Check
Run the following command to perform the software compatibility check:
x2openEuler-upgrade-check upgrade-check \
-repo <repository_info> \
-o <compatibility_report_path> \
-target_os_name <target_system_version> \
-os_name <current_system_version> \
-schema 2
Parameter description:
-repo <repository_info>: Repository information of target OS. Separate multiple repositories using commas. Example:http://repo.openeuler.org/openEuler-22.03-LTS-SP4/everything/x86_64/,\ http://repo.openeuler.org/openEuler-22.03-LTS-SP4/EPOL/main/x86_64/,\ http://repo.openeuler.org/openEuler-22.03-LTS-SP4/update/x86_64/ \-o <compatibility_report_path>: Output path for the generated software compatibility report. Example:/opt/x2openEuler-client/output/collect/collect-<uuid>.tar.gz-target_os_name <target_system_version>: Target OS version. Example:openEuler22.03-LTS-SP4-os_name <current_system_version>: Current OS version. Choose fromCentOS6,CentOS7,CentOS8,Ubuntu,openEuler20.03, andopenEuler22.03. Example:CentOS7-schema 2: Upgrade schema 2. Do not change the value.
Example:
x2openEuler-upgrade-check upgrade-check \
-repo \
http://repo.openeuler.org/openEuler-22.03-LTS-SP4/everything/x86_64/,\
http://repo.openeuler.org/openEuler-22.03-LTS-SP4/EPOL/main/x86_64/,\
http://repo.openeuler.org/openEuler-22.03-LTS-SP4/update/x86_64/ \
-o /opt/x2openEuler-client/output/collect/collect-d8cf5ae2-911a-11ef-a25b-00155d306854.tar.gz \
-target_os_name openEuler22.03-LTS-SP4 \
-os_name CentOS7 \
-schema 2
Upgrade
Run the following command to perform the upgrade:
bash /opt/x2openEuler-upgrade/upgrade_entrance.sh upgrade \
<backup_sources> <excluded_directories> <backup_destination> <kernel_parameters> <compatibility_report_path> <dependency_list_path> <current_system_version> <temporary_installation_path> <repository_file_path>
Parameter description
- backup_sources:System directories that need to be backed up, separated by commas.
Example:
/etc,/usr,/boot,/var,/opt,/bin,/sbin,/lib,/lib64 - excluded_directories:Directories to be excluded during backup, separated by commas.
Example:
/var/cache,/var/tmp - backup_destination:Path where backup files will be stored.
Example:
/.osbak - kernel_parameters:Kernel parameters needed for the upgrade.
Example:
crashkernel=512M,net.ifnames=0,biosdevname=0 - compatibility_report_path:Path to the software compatibility report.
Example:
/opt/x2openEuler-upgrade/output/upgrade-check/<uuid>/check_result-<uuid>.json - dependency_list_path:Path to the package dependency list generated before the upgrade.
Example:
/opt/x2openEuler-upgrade/output/upgrade-check/<uuid>/rpm_dep-<uuid>.txt - current_system_version:Choose from
CENTOS6,UBUNTU, andOTHERS(forCentOS 7,CentOS 8,openEuler, etc.). Example:OTHERS - temporary_installation_path:Temporary file path during the upgrade. This path must be under
/root,/home,/data, or/oracle, and cannot be the same as the backup destination. Example:/root - repository_file_path:Repository file path for new system yum source configuration.
Example:
/opt/x2openEuler/repo_files/migrate-oe2203sp4.repo
Example
bash /opt/x2openEuler-upgrade/upgrade_entrance.sh upgrade \
/etc,/usr,/boot,/var,/opt,/bin,/sbin,/lib,/lib64 \
/var/cache,/var/tmp \
/.osbak \
crashkernel=512M,net.ifnames=0,biosdevname=0 \
/opt/x2openEuler-upgrade/output/upgrade-check/d8cf5ae2-911a-11ef-a25b-00155d306854/check_result-d8cf5ae2-911a-11ef-a25b-00155d306854.json \
/opt/x2openEuler-upgrade/output/upgrade-check/d8cf5ae2-911a-11ef-a25b-00155d306854/rpm_dep-d8cf5ae2-911a-11ef-a25b-00155d306854.txt \
OTHERS \
/root \
/opt/x2openEuler/repo_files/migrate-oe2203sp4.repo
Restart
Run the following command to restart the machine:
reboot
Rollback
Rollback After upgrading to the target OS, you can run the following command to roll back (restart the machine after successful execution):
bash /opt/x2openEuler-upgrade/upgrade_entrance.sh rollback <original_system_version>
original_system_version: Choose one from CENTOS6, UBUNTU, and OTHERS (for CentOS 7, CentOS 8, openEuler, etc.).
Example
bash /opt/x2openEuler-upgrade/upgrade_entrance.sh rollback OTHERS


