Installation Guideline
This section describes how to install openEuler using a CD/DVD-ROM. The installation process is the same for other installation modes except the boot option.
- Installation Guideline
- Starting the Installation
- Configuring an Installation Program Language
- Entering the Installation Page
- Setting the Keyboard Layout
- Setting a System Language
- Setting Date and Time
- Setting the Installation Source
- Selecting Installation Software
- Setting the Installation Destination
- Setting the Network and Host Name
- Setting the Root Password
- Creating a User
- Starting the Installation
- Installation Procedure
- Completing the Installation
Starting the Installation
Booting from the CD/DVD-ROM Drive
Load the ISO image of openEuler from the CD/DVD-ROM drive of the server and restart the server. The procedure is as follows:
NOTE:
Before the installation, ensure that the server boots from the CD/DVD-ROM drive preferentially. The following steps describe how to install openEuler using the virtual CD/DVD-ROM drive on the baseboard management controller (BMC). The procedure for installing openEuler from a physical drive is simple and is the same as that of the virtual drive. Therefore, no description is provided in this section.
On the toolbar, click the icon shown in the following figure.
An image dialog box is displayed, as shown in the following figure.
Select Image File and then click Browse. The Open dialog box is displayed.
Select the image file and click Open. In the image dialog box, click Connect. If Connect changes to Disconnect, the virtual CD/DVD-ROM drive is connected to the server.
On the toolbar, click the restart icon shown in the following figure to restart the device.

Installation Wizard
A boot menu is displayed after the system is booted using the boot medium. In addition to options for starting the installation program, some other options are available on the boot menu. During system installation, the Test this media & install openEuler 20.03-LTS-SP2 mode is used by default. Press the arrow keys on the keyboard to change the selection, and press Enter when the desired option is highlighted.
- If you do not perform any operations within 1 minute, the system automatically selects the default option Test this media & install openEuler 20.03-LTS-SP2 and enters the installation page.
- During PM installation, if you cannot use the arrow keys to select boot options and the system does not respond after you press Enter, click
on the BMC page and configure Key & Mouse Reset.

Installation wizard options are described as follows:
Install openEuler 20.03-LTS-SP2: Install openEuler on your server in GUI mode.
Test this media & install openEuler 20.03-LTS-SP2: Default option. Install openEuler on your server in GUI mode. The integrity of the installation medium is checked before the installation program is started.
Troubleshooting: Troubleshooting mode, which is used when the system cannot be installed properly. In troubleshooting mode, the following options are available:
- Install openEuler 20.03-LTS-SP2 in basic graphics mode: Basic graphics installation mode. In this mode, the video driver is not started before the system starts and runs.
- Rescue the openEuler system: Rescue mode, which is used to restore the system. In rescue mode, the installation process is printed to the Virtual Network Computing (VNC) or BMC interface, and the serial port is unavailable. On the installation wizard screen, press e to go to the parameter editing screen of the selected option, and press c to go to the command-line interface (CLI).
Installation in GUI Mode
On the installation wizard page, select Test this media & install openEuler 20.03-LTS-SP2 to enter the GUI installation mode.
Perform graphical installation operations using a keyboard.
- Press Tab or Shift+Tab to move between GUI controls (such as buttons, area boxes, and check boxes).
- Press the up or down arrow key to move a target in the list.
- Press the left or right arrow key to move between the horizontal toolbar and watch bar.
- Press the spacebar or Enter to select or delete highlighted options, expand or collapse a drop-down list.
- Press Alt+a shortcut key (the shortcut key varies for different pages) to select the control where the shortcut key is located. The shortcut key can be highlighted (underlined) by holding down Alt .
Configuring an Installation Program Language
After the installation starts, the system will prompt the language that is used during the configuration installation process. English is configured by default, as shown in Figure 5. Configure another language as required.

After configurations, click Continue. The main installation configuration page is displayed.
If you want to exit the installation, click Exit. The message "Are you sure you want to exit the installation program?" is displayed. Click Yes in the dialog box to go back to the installation wizard page.
Entering the Installation Page
After the installation program starts, the main installation configuration page is displayed, as shown in Figure 6. On the page, you can configure the time, language, installation source, network, and storage device.
Some configuration items are matched with safety symbols. A safety symbol will disappear after the item is configured. Start the installation only when all the safety symbols disappear from the page.
If you want to exit the installation, click Exit. The message "Are you sure you want to exit the installation program?" is displayed. Click Yes in the dialog box to go back to the installation wizard page.

Setting the Keyboard Layout
On the INSTALLATION SUMMARY page, click KEYBOARD. You can add or delete multiple keyboard layouts in the system.
- To view the keyboard layout: On the left white box, click to select the keyboard layout and click the keyboard under the box.
- To test the keyboard layout: On the left white box, click to select the keyboard layout, click the inside of the right text box, and enter the text to ensure that the keyboard layout can work properly.
Figure 7 Setting the keyboard layout
After the setting is complete, click Done in the upper left corner to go back to the INSTALLATION SUMMARY page.
Setting a System Language
On the INSTALLATION SUMMARY page, click LANGUAGE SUPPORT to set the system language, as shown in Figure 8. Set another language as required, such as Chinese.
- If you select Chinese, the system does not support the display of Chinese characters when you log in to the system using VNC, but supports the display of Chinese characters when you log in to the system using a serial port. When you log in to the system using SSH, whether the system supports the display of Chinese characters depends on the SSH client. If you select English, the display is not affected.
Figure 8 Setting a system language
After the setting is complete, click Done in the upper left corner to go back to the INSTALLATION SUMMARY page.
Setting Date and Time
On the INSTALLATION SUMMARY page, click TIME & DATE. On the TIME & DATE page, set the system time zone, date, and time.
When setting the time zone, you can click a specific city on the map with the mouse, or select a region from the drop-down list of Region or a city from the drop-down list of City at the top of the page, as shown in Figure 9.
If your city is not displayed on the map or in the drop-down list, select the nearest city in the same time zone.
- Before manually setting the time zone, disable the network time synchronization function in the upper right corner.
- If you want to use the network time, ensure that the network can connect to the remote NTP server. For details about how to set the network, see Setting the Network and Host Name.
Figure 9 Setting date and time
After the setting is complete, click Done in the upper left corner to go back to the INSTALLATION SUMMARY page.
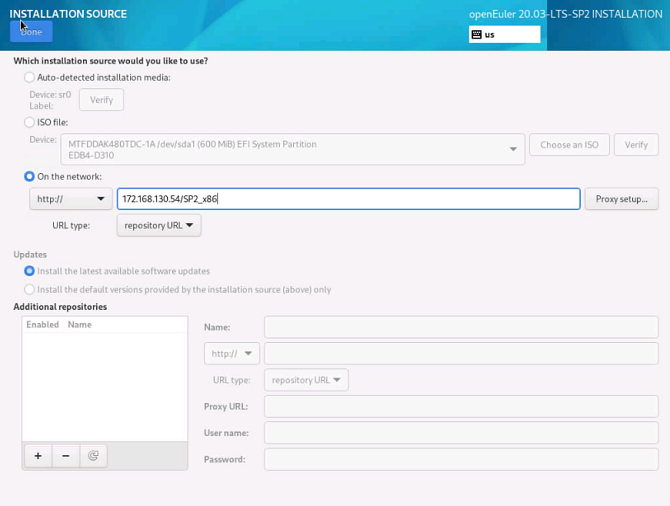
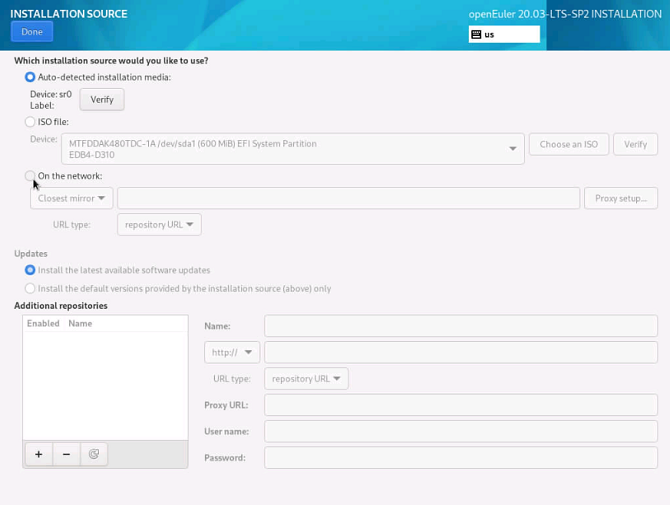
Setting the Installation Source
On the INSTALLATION SUMMARY page, click INSTALLATION SOURCE to locate the installation source.
When you use the complete CD/DVD-ROM for installation, the installation program automatically detects and displays the installation source information. You can use the default settings, as shown in Figure 10:
When the network source is used for installation, you need to set the URL of the network source.
HTTP or HTTPS mode
The following figure shows the installation source in HTTP or HTTPS mode:
If the HTTPS server uses a private certificate, press e on the installation wizard page to go to the parameter editing page of the selected option, and add the inst.noverifyssl parameter.
Enter the actual installation source address, for example, https://repo.openeuler.org/openEuler-20.03-LTS-SP2/OS/x86_64, where openEuler-20.03-LTS-SP2 indicates the version number, and x86_64 indicates the CPU architecture. Use the actual version number and CPU architecture.
FTP mode
The following figure shows the installation source in FTP mode. Enter the FTP address in the text box.
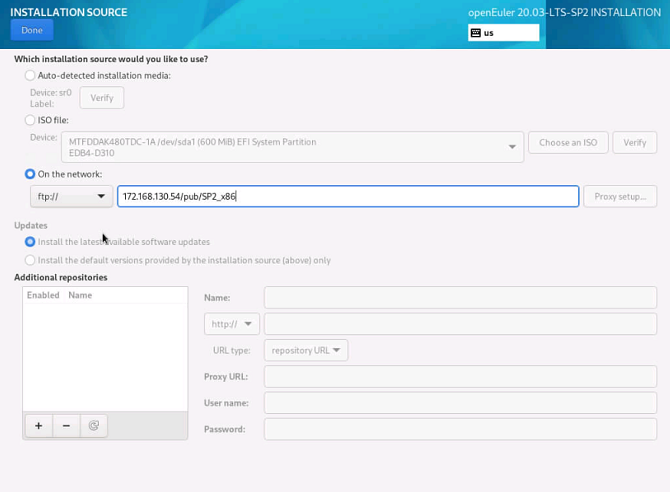
You need to set up an FTP server, mount the openEuler-20.03-LTS-SP2-x86_64-dvd.iso image, and copy the mounted files to the shared directory on the FTP server. x86_64 indicates the CPU architecture. Use the actual image.
NFS mode
The following figure shows the installation source in NFS mode. Enter the NFS address in the text box.
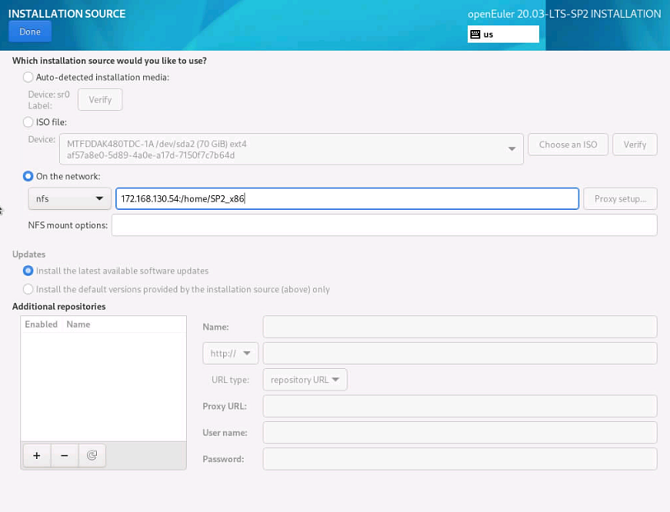
You need to set up an NFS server, mount the openEuler-20.03-LTS-SP2-x86_64-dvd.iso image, and copy the mounted file to the shared directory on the NFS server. x86_64 indicates the CPU architecture. Use the actual image.
During the installation, if you have any questions about configuring the installation source, see An Exception Occurs During the Selection of the Installation Source.
After the setting is complete, click Done in the upper left corner to go back to the INSTALLATION SUMMARY page.
Selecting Installation Software
On the INSTALLATION SUMMARY page, click SOFTWARE SELECTION to specify the software package to be installed.
Based on the actual requirements, select Minimal Install on the left box and select an add-on in the Add-Ons for Selected Environment area on the right, as shown in Figure 11.
Figure 11 Selecting installation software
- In Minimal Install mode, not all packages in the installation source will be installed. If the required package is not installed, you can mount the installation source to the local PC and configure a repo source, and use DNF to install the package.
- If you select Virtual Host, the virtualization components QEMU, libvirt, and edk2 are installed by default. You can select whether to install the OVS component in the add-on area.
After the setting is complete, click Done in the upper left corner to go back to the INSTALLATION SUMMARY page.
Setting the Installation Destination
On the INSTALLATION SUMMARY page, click INSTALLATION DESTINATION to select the OS installation disk and partition.
You can view available local storage devices in Figure 12.
NOTICE: When selecting the device to be installed, you are advised not to use the NVMe SSD storage medium as the OS installation disk.
Figure 12 Setting the installation destination
Storage Configuration
On the INSTALLATION DESTINATION page, configure storage for system partition. You can either manually configure partitions or select Automatic to automatically configure partitioning.
- During partitioning, to ensure system security and performance, you are advised to divide the device into the following partitions: /boot, /var, /var/log, /var/log/audit, /home, and /tmp.
- If the system is configured with the swap partition, the swap partition is used when the physical memory of the system is insufficient. Although the swap partition can be used to expand the physical memory, if it is used due to insufficient memory, the system response slows and the system performance deteriorates. Therefore, you are not advised to configure the swap partition in the system with sufficient physical memory or in the performance sensitive system.
- If you need to split a logical volume group, select Custom to manually partition the logical volume group. On the MANUAL PARTITIONING page, click Modify in the Volume Group area to reconfigure the logical volume group.
Automatic
Select Automatic if the software is installed in a new storage device or the data in the storage device is not required. After the setting is complete, click Done in the upper left corner to go back to the INSTALLATION SUMMARY page.
Custom
If you need to manually partition the disk, click Custom and click Done in the upper left corner. The following page is displayed.
On the MANUAL PARTITIONING page, you can partition the disk in either of the following ways. After the partitioning is completed, the window shown in Figure 14 is displayed.
Automatic creation: Click Click here to create them automatically. The system automatically assigns four mount points according to the available storage space: /boot, /, /boot/efi, and swap.
Manual creation: Click
 to add a mount point. It is recommended that the expected capacity of each mount point not exceed the available space. NOTE:
If the expected capacity of the mount point exceeds the available space, the system allocates the remaining available space to the mount point.
Figure 13 MANUAL PARTITIONING page
If non-UEFI boot is selected, /boot/efi is not required. Otherwise, it is required.
After the setting is complete, click Done in the upper left corner to go back to the SUMMARY OF CHANGES page. click Accept Changes to go back to the INSTALLATION SUMMARY page.
Setting the Network and Host Name
On the INSTALLATION SUMMARY page, select NETWORK & HOST NAME to configure the system network functions.
The installation program automatically detects a local access interface. The detected interface is listed in the left box, and the interface details are displayed in the right-hand area, as shown in Figure 14. You can enable or disable a network interface by clicking the switch in the upper right corner of the page. The switch is turned off by default. If the installation source is set to be the network, turn on the switch. You can also click Configure to configure the selected interface. Select Connect automatically with priority to enable the NIC to start automatically upon system startup, as shown in Figure 15.
In the lower left box, enter the host name. The host name can be the fully quantified domain name (FQDN) in the format of hostname.domainname or the brief host name in the format of hostname.
Figure 14 Setting the network and host name
Figure 15 Configuring the network
After the setting is complete, click Done in the upper left corner to go back to the INSTALLATION SUMMARY page.
Setting the Root Password
Select Root Password on the INSTALLATION SUMMARY page. The Root Password page is displayed, as shown in Figure 16. Enter a password based on Password Complexity requirements and confirm the password.
The root account is used to perform key system management tasks. You are not advised to use the root account for daily work or system access.
If you select Lock root account on the Root Password page, the root account will be disabled.

Password Complexity
The password of the root user or the password of the new user must meet the password complexity requirements. Otherwise, the password configuration or user creation will fail. The password complexity requirements are as follows:
A password must contain at least eight characters.
A password must contain at least three of the following types: uppercase letters, lowercase letters, digits, and special characters.
A password must be different from the account name.
A password cannot contain words in the dictionary.
NOTE:
In the installed openEuler environment, you can run thecracklib-unpacker /usr/share/cracklib/pw_dict > dictionary.txtcommand to export the dictionary library file dictionary.txt, and then check whether the password is in the dictionary.
After the settings are completed, click Done in the upper left corner to return to the INSTALLATION SUMMARY page.
Creating a User
Click User Creation. Figure 17 shows the page for creating a user. Enter a username and set a password. By clicking Advanced, you can also configure a home directory and a user group, as shown in Figure 17.

Figure 17 Advanced user configuration
After configuration, click Done in the left-upper corner to switch back to the installation process page.
Starting Installation
On the installation page, after all the mandatory items are configured, the safety symbols will disappear. Then, you can click Begin Installation to install the system.
Installation Procedure
After the installation starts, the overall installation progress and the progress of writing the software package to the system are displayed.
If you click Exit or reset or power off the server during the installation, the installation is interrupted and the system is unavailable. In this case, you need to reinstall the system.
Figure 18 Installation process
Completing the Installation
openEuler has been installed, Click Reboot to restart the system.
- If the physical DVD-ROM is used to install the OS and the CD/DVD-ROM drive is not automatically ejected during the restart, manually remove the DVD-ROM. Then, the openEuler CLI login page is displayed.
- If the virtual DVD-ROM drive is used to install the OS, change the server boot option to Hard Disk and restart the server. Then, the openEuler CLI login page is displayed.