Guide to Porting Kubernetes to openEuler
- Software Overview
- Environment Configuration
- System Configuration
- Software Installation
- Software Uninstallation
Software Overview
The Kubernetes (K8s for short) is an open source container cluster management platform that implements the automatic deployment, automatic scaling, and maintenance of container clusters. The goal of Kubernetes is to promote a mature ecosystem of components and tools to run applications more easily on the cloud.
The Kubernetes cluster has two types of nodes: master and worker. The master node manages and controls the entire cluster. Control commands executed for the cluster are sent to the master node. The worker node is a workload node in the Kubernetes cluster. The workload on a worker node is allocated by the master node. When a worker node breaks down, the master node transfers the workload on the faulty worker node to other nodes.
This document describes how to use two nodes to set up a Kubernetes cluster. One is the master node, and the other is the worker node.
Environment Configuration
Software Platform
| Software | Version Number | Installation Method |
|---|---|---|
| openEuler | 20.03-LTS-SP2 | ISO |
| gnu | 7.3.0 | |
| python3 | 3.7.4 | |
| bash | 5.0.11 |
Required Dependency Packages
| Software | Version Number | Installation Method |
|---|---|---|
| docker-engine | 18.09.0-101 | Refer to Installing Docker and Configuring the Yum Source |
| kubelet | 1.15.10/1.18/1.16 | Refer to Installing K8s Components |
| kubeadm | 1.15.10/1.18/1.16 | Refer to Installing K8s Components |
| kubectl | 1.15.10/1.18/1.16 | Refer to Installing K8s Components |
| kubernetes-cni | 1.15.10/1.18/1.16 | Refer to Installing K8s Components |
Note
This document applies to K8s 1.15.10, 1.16, and 1.18, and uses K8s 1.15.10 as an example.
System Configuration
Modifying Host Configuration
Edit the /etc/hosts files of the master and worker nodes, and add the IP addresses of the master and worker nodes to the end of the files.
192.168.122.72 master
192.168.122.130 worker
Installing Docker and Configuring the Yum Source
- This operation is optional. The Yum source has been configured in the officially released image. If the openEuler Yum source is not configured in the system, perform the following operations to add a repo file. The
baseurlvalue uses the source address in the released version.
AArch64 architecture
$ vim /etc/yum.repos.d/openEuler_aarch64.repo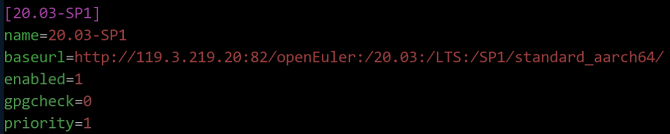
x86 architecture
$ vim /etc/yum.repos.d/openEuler_x86_64.repo
Perform the preceding operation on the master and worker nodes, respectively. Clear the software packages and old headers in the cache and create the cache again.
$ yum clean all
$ yum makecache
Install Docker, start related services, and output the Docker status information.
$ yum -y install docker-engine
$ systemctl daemon-reload
$ systemctl status docker
$ systemctl restart docker
$ systemctl status docker
$ systemctl enable docker
Disabling the Firewall and SELinux
Due to the back-end compatibility issue of nftables, duplicate firewall rules are generated. You need to disable the firewall. To enable the container to access the file system of the host, you need to disable SELinux.
Run the following commands on the master and worker nodes to disable the firewall and SELinux:
$ systemctl stop firewalld
$ systemctl disable firewalld
$ setenforce 0
$ sed -i '/^SELINUX=/s/enforcing/disabled/' /etc/selinux/config
Configuring the Kubernetes Yum Source
Run the following command on the master and worker nodes to configure the Yum source of Kubernetes:
AArch64 architecture
cat <<EOF > /etc/yum.repos.d/kubernetes.repo

[kubernetes]
name=Kubernetes
baseurl=https://mirrors.aliyun.com/kubernetes/yum/repos/kubernetes-el7-aarch64
enable=1
gpgcheck=1
repo_gpgcheck=1
gpgkey=http://mirrors.aliyun.com/kubernetes/yum/doc/yum-key.gpg
       http://mirrors.aliyun.com/kubernetes/yum/doc/rpm-package-key.gpg
EOF
x86 architecture
cat <<EOF > /etc/yum.repos.d/kubernetes.repo

[kubernetes]
name=Kubernetes
baseurl=https://mirrors.aliyun.com/kubernetes/yum/repos/kubernetes-el7-x86_64
enable=1
gpgcheck=1
repo_gpgcheck=1
gpgkey=http://mirrors.aliyun.com/kubernetes/yum/doc/yum-key.gpg
   http://mirrors.aliyun.com/kubernetes/yum/doc/rpm-package-key.gpg
EOF
After the configuration is completed, run the following commands to clear the software packages and old headers in the cache and create the cache again:
$ yum clean all
$ yum makecache
Disabling the Swap Partition
When installing the K8s cluster, you need to disable the swap memory exchange mechanism of the Linux OS. Otherwise, the system performance and stability will be affected due to memory exchange.
Run the following commands on the master and worker nodes to disable the swap partition:
$ swapoff -a
$ cp -p /etc/fstab /etc/fstab.bak$(date '+%Y%m%d%H%M%S')
$ sed -i "s/\/dev\/mapper\/openeuler-swap/\#\/dev\/mapper\/openeuler-swap/g" /etc/fstab
Run the following command to check whether the modification is successful:
$ cat /etc/fstab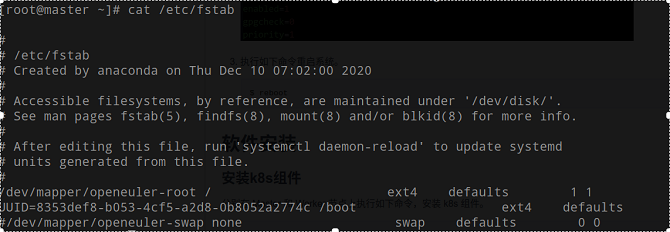
Run the following command to reboot the system:
$ reboot
Software Installation
Installing K8s Components
Run the following command on the master and worker nodes to install the K8s components:
$ yum install -y kubelet-1.15.10 kubeadm-1.15.10 kubectl-1.15.10 kubernetes-cni-0.7.5
Configuring Startup Items
Run the following command on the master and worker nodes to set kubelet to start upon system boot:
$ systemctl enable kubeletCreate the
/etc/sysctl.d/k8s.conffiles on the master and worker nodes and add the following content to the files:net.bridge.bridge-nf-call-ip6tables = 1 net.bridge.bridge-nf-call-iptables = 1 net.ipv4.ip_forward = 1 vm.swappiness=0Run the following commands on the master and worker nodes to make the modification take effect:
$ modprobe br_netfilter
$ sysctl -p /etc/sysctl.d/k8s.conf
Downloading Components Using Docker
The master and worker nodes download other components using Docker. When downloading images, you need to select the version that corresponds to the architecture. Perform the following operations on the two nodes:
Run the following command to view the images required for initialization:
$ kubeadm config images list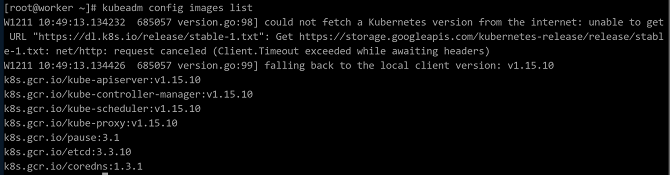 Note
Note
The image versions required by K8s may change. Therefore, you need to check the list to select the proper Docker images to be downloaded. The following image versions are for reference only.Run the following commands to download the images from Docker Hub:
AArch64 architecture
$ docker pull gcmirrors/kube-apiserver-arm64:v1.15.10
$ docker pull gcmirrors/kube-controller-manager-arm64:v1.15.10
$ docker pull gcmirrors/kube-scheduler-arm64:v1.15.10
$ docker pull gcmirrors/kube-proxy-arm64:v1.15.10
$ docker pull gcmirrors/pause-arm64:3.1
$ docker pull gcmirrors/etcd-arm64:3.3.10
$ docker pull coredns/coredns:1.3.1
x86 architecture
$ docker pull gcmirrors/kube-apiserver-amd64:v1.15.10
$ docker pull gcmirrors/kube-controller-manager-amd64:v1.15.10
$ docker pull gcmirrors/kube-scheduler-amd64:v1.15.10
$ docker pull gcmirrors/kube-proxy-amd64:v1.15.10
$ docker pull gcmirrors/pause-amd64:3.1
$ docker pull gcmirrors/etcd-amd64:3.3.10
$ docker pull coredns/coredns:1.3.1
Note
If the Docker image library proxy is configured, you can directly change the tag to k8s.gcr.io and skip the following steps.Run the following commands to tag the downloaded images:
AArch64 architecture
$ docker tag gcmirrors/kube-apiserver-arm64:v1.15.10 k8s.gcr.io/kube-apiserver:v1.15.10
$ docker tag gcmirrors/kube-controller-manager-arm64:v1.15.10 k8s.gcr.io/kube-controller-manager:v1.15.10
$ docker tag gcmirrors/kube-scheduler-arm64:v1.15.10 k8s.gcr.io/kube-scheduler:v1.15.10
$ docker tag gcmirrors/kube-proxy-arm64:v1.15.10 k8s.gcr.io/kube-proxy:v1.15.10
$ docker tag gcmirrors/pause-arm64:3.1 k8s.gcr.io/pause:3.1
$ docker tag gcmirrors/etcd-arm64:3.3.10 k8s.gcr.io/etcd:3.3.10
$ docker tag coredns/coredns:1.3.1 k8s.gcr.io/coredns:1.3.1
x86 architecture
$ docker tag gcmirrors/kube-apiserver-amd64:v1.15.10 k8s.gcr.io/kube-apiserver:v1.15.10
$ docker tag gcmirrors/kube-controller-manager-amd64:v1.15.10 k8s.gcr.io/kube-controller-manager:v1.15.10
$ docker tag gcmirrors/kube-scheduler-amd64:v1.15.10 k8s.gcr.io/kube-scheduler:v1.15.10
$ docker tag gcmirrors/kube-proxy-amd64:v1.15.10 k8s.gcr.io/kube-proxy:v1.15.10
$ docker tag gcmirrors/pause-amd64:3.1 k8s.gcr.io/pause:3.1
$ docker tag gcmirrors/etcd-amd64:3.3.10 k8s.gcr.io/etcd:3.3.10
$ docker tag coredns/coredns:1.3.1 k8s.gcr.io/coredns:1.3.1
Run the following command to check whether the K8s tag is successfully added to the images:
$ docker images | grep k8s
After the tag is added, run the following commands to delete the old images in the current environment:
AArch64 architecture
$ docker rmi gcmirrors/kube-apiserver-arm64:v1.15.10
$ docker rmi gcmirrors/kube-controller-manager-arm64:v1.15.10
$ docker rmi gcmirrors/kube-scheduler-arm64:v1.15.10
$ docker rmi gcmirrors/kube-proxy-arm64:v1.15.10
$ docker rmi gcmirrors/pause-arm64:3.1
$ docker rmi gcmirrors/etcd-arm64:3.3.10
$ docker rmi coredns/coredns:1.3.1
x86 architecture
$ docker rmi gcmirrors/kube-apiserver-amd64:v1.15.10
$ docker rmi gcmirrors/kube-controller-manager-amd64:v1.15.10
$ docker rmi gcmirrors/kube-scheduler-amd64:v1.15.10
$ docker rmi gcmirrors/kube-proxy-amd64:v1.15.10
$ docker rmi gcmirrors/pause-amd64:3.1
$ docker rmi gcmirrors/etcd-amd64:3.3.10
$ docker rmi coredns/coredns:1.3.1
Configuring the Master Node
Run the following commands on the master node to initialize the cluster:
$ systemctl daemon-reload
$ systemctl restart kubelet
$ kubeadm init --kubernetes-version v1.15.10 --pod-network-cidr=10.244.0.0/16
After the cluster is initialized, the following information is displayed:

Save the
kubeadm joincommand in the preceding figure. Run this command when adding the worker node to the cluster. NoteThe Kubernetes installed using kubeadm automatically generates the certificates required by the cluster. All certificates are stored in the
/etc/kubernetes/pkidirectory.Configure the cluster based on the information displayed on the console upon successful initialization, and run the following commands:
$ mkdir -p $HOME/.kube
$ cp -i /etc/kubernetes/admin.conf $HOME/.kube/config
$ chown $(id -u):$(id -g) $HOME/.kube/config
Run the following command on the master node to view the cluster node information:
$ kubectl get nodeThe node is not ready because the Calico network is not configured.
Installing the Calico Network Plug-in
Run the following commands on the master and worker nodes to download the Calico container image:
AArch64 architecture
$ docker pull calico/cni:v3.14.2-arm64
$ docker pull calico/node:v3.14.2-arm64
$ docker pull calico/kube-controllers:v3.14.2-arm64
$ docker pull calico/pod2daemon-flexvol:v3.14.2-arm64
x86 architecture
$ docker pull calico/cni:v3.14.2-amd64
$ docker pull calico/node:v3.14.2-amd64
$ docker pull calico/kube-controllers:v3.14.2-amd64
$ docker pull calico/pod2daemon-flexvol:v3.14.2-amd64
Run the following commands on the master and worker nodes to modify the downloaded image tags:
AArch64 architecture
$ docker tag calico/cni:v3.14.2-arm64 calico/cni:v3.14.2
$ docker tag calico/node:v3.14.2-arm64 calico/node:v3.14.2
$ docker tag calico/kube-controllers:v3.14.2-arm64 calico/kube-controllers:v3.14.2
$ docker tag calico/pod2daemon-flexvol:v3.14.2-arm64 calico/pod2daemon-flexvol:v3.14.2
x86 architecture
$ docker tag calico/cni:v3.14.2-amd64 calico/cni:v3.14.2
$ docker tag calico/node:v3.14.2-amd64 calico/node:v3.14.2
$ docker tag calico/kube-controllers:v3.14.2-amd64 calico/kube-controllers:v3.14.2
$ docker tag calico/pod2daemon-flexvol:v3.14.2-amd64 calico/pod2daemon-flexvol:v3.14.2
Run the following command to check whether the Calico tag is successfully added:
$ docker images | grep calico
Run the following commands on the master and worker nodes to delete the old image:
AArch64 architecture
$ docker rmi calico/cni:v3.14.2-arm64
$ docker rmi calico/node:v3.14.2-arm64
$ docker rmi calico/kube-controllers:v3.14.2-arm64
$ docker rmi calico/pod2daemon-flexvol:v3.14.2-arm64
x86 architecture
$ docker rmi calico/cni:v3.14.2-amd64
$ docker rmi calico/node:v3.14.2-amd64
$ docker rmi calico/kube-controllers:v3.14.2-amd64
$ docker rmi calico/pod2daemon-flexvol:v3.14.2-amd64
Run the following command on the master node to download the YAML file:
$ wget https://docs.projectcalico.org/v3.14/getting-started/kubernetes/installation/hosted/kubernetes-datastore/calico-networking/1.7/calico.yaml --no-check-certificateRun the following command on the master node to deploy Calico:
$ kubectl apply -f calico.yamlRun the following command on the master node to check the node status. If the node status is Ready, the installation is successful.
$ kubectl get nodes
Adding Nodes to the Cluster
Run the command saved in Configuring the Master Node to add the worker node to the cluster.
$ kubeadm join 192.168.122.72:6443 --token 9hyjsw.102m4qpmr93msfdv --discovery-token-ca-cert-hash sha256:ccf9a7762c7ae08fab3ec0649897b1de8e3ef37cf789517f42ea95fad0bd29b1 NoteThe default validity period of a token is 24 hours. If the token times out, run the
kubeadm token create --print-join-commandcommand on the master node to generate a new token.Run the following command on the master node to check the subnodes added to the cluster:
$ kubectl get nodesRun the following command on the master node to check the pod status in the cluster. If the status of all pods is Running, the configuration is successful. The page of successful configuration is shown in the following figure:
$ kubectl get pods -A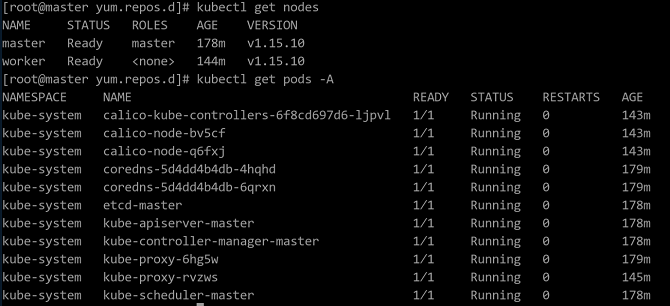
Commands for Viewing Status Information
Information of all pods:
kubectl get pods -AInformation of all pods running in a namespace on the current node:
kubectl get pods -n $namespaceInformation of all pods running in a namespace:
kubectl get pods -n $namespace -o wideInformation of a single pod, which can be used to locate pod status exceptions:
kubectl describe pod $podname -n $namespacePod deletion: After a running pod is deleted, the controller immediately creates a pod.
kubectl delete pods $podname
Software Uninstallation
If you do not need the K8s cluster, perform the operations in this section to delete the K8s cluster. The following commands must be executed on the master and worker nodes.
Run the following commands to clear the K8s cluster settings:
$ kubeadm reset
$ rm –rf $HOME/.kube/config
Run the following commands to delete the basic component image:
$ docker rmi k8s.gcr.io/kube-apiserver:v1.15.10
$ docker rmi k8s.gcr.io/kube-controller-manager:v1.15.10
$ docker rmi k8s.gcr.io/kube-scheduler:v1.15.10
$ docker rmi k8s.gcr.io/kube-proxy:v1.15.10
$ docker rmi k8s.gcr.io/pause:3.1
$ docker rmi k8s.gcr.io/etcd:3.3.10
$ docker rmi k8s.gcr.io/coredns:1.3.1
Run the following command to uninstall the management software:
$ yum erase –y kubelet kubectl kubeadm kubernetes-cni