Setting Up the Database Server
PostgreSQL Server
Software Description
Figure 1 shows the PostgreSQL architecture and Table 1 describes the main processes.
Figure 1 PostgreSQL architecture
Table 1 Main processes in PostgreSQL
Configuring the Environment
NOTE: The following environment configuration is for reference only. Configure the environment based on the site requirements.
Disabling the Firewall and Automatic Startup
Stop the firewall service as the root user.
systemctl stop firewalldDisable the firewall service as the root user.
systemctl disable firewalld NOTE:
The automatic startup is automatically disabled as the firewall is disabled.
Disabling SELinux
Modify the configuration file as the root user.
sed -i 's/SELINUX=enforcing/SELINUX=disabled/g' /etc/sysconfig/selinux
Creating a User Group and a User
Create a PostgreSQL user or user group as the root user.
groupadd postgresuseradd -g postgres postgresSet the postgres user password as the root user. (Enter the password twice for confirmation.)
passwd postgres
Creating Data Drives
- When testing the ultimate performance, you are advised to attach NVMe SSDs with better I/O performance to create PostgreSQL test instances to avoid the impact of disk I/O on the performance test result. This section uses NVMe SSDs as an example. For details, see Step 1 to Step 4.
- In a non-performance test, run the following command as the root user to create a data directory. Then skip this section.
mkdir /data
Create a file system (xfs is used as an example as the root user. Create the file system based on the site requirements.). If a file system has been created for a disk, an error will be reported when you run this command. You can use the -f parameter to forcibly create a file system.
mkfs.xfs /dev/nvme0n1Create a data directory.
mkdir /dataMount disks.
mount -o noatime,nobarrier /dev/nvme0n1 /data
Data Directory Authorization
Modify the directory permission as the root user.
chown -R postgres:postgres /data/
Installing, Running, and Uninstalling PostgreSQL
Installing PostgreSQL
Configure the local yum source. For details, see Configuring the Repo Server.
Clear the cache.
dnf clean allCreate a cache.
dnf makecacheInstall the PostgreSQL server as the root user.
dnf install postgresql-serverCheck the installed RPM package.
rpm -qa | grep postgresql
Running PostgreSQL
Initializing the Database
NOTICE: Perform this step as the postgres user.
Switch to the created PostgreSQL user.
su - postgresInitialize the database. In the command, /usr/bin is the directory where the initdb command is located.
/usr/bin/initdb -D /data/
Starting the Database
Enable the PostgreSQL database.
/usr/bin/pg_ctl -D /data/ -l /data/logfile startCheck whether the PostgreSQL database process is started properly.
ps -ef | grep postgresIf the following information is displayed, the PostgreSQL processes have been started.

Logging In to the Database
Log in to the database.
/usr/bin/psql -U postgres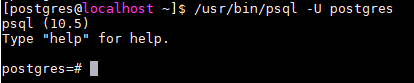 NOTE:
You do not need to enter a password when logging in to the database for the first time.
NOTE:
You do not need to enter a password when logging in to the database for the first time.
Configuring the Database Accounts and Passwords
After login, set the postgres user password.
postgres=#alter user postgres with password '123456';
Exiting the Database
Run
\qto exit from the database.postgres=# \q
Stopping the Database
Stop the PostgreSQL database.
/usr/bin/pg_ctl -D /data/ -l /data/logfile stop
Uninstalling PostgreSQL
Stop the database as the postgres user.
/usr/bin/pg_ctl -D /data/ -l /data/logfile stopRun the
dnf remove postgresql-servercommand as the user root to uninstall the PostgreSQL database.dnf remove postgresql-server
Managing Database Roles
Creating a Role
You can use the CREATE ROLE statement or createuser command to create a role. The createuser command encapsulates the CREATE ROLE statement and needs to be executed on the shell UI instead of the database UI.
CREATE ROLE rolename [ [ WITH ] option [ ... ] ];
createuser rolename
In the preceding information:
- rolename: indicates a role name.
- Parameters of option are as follows:
- SUPERUSER | NOSUPERUSER: determines whether a new role is a superuser. If this parameter is not specified, the default value NOSUPERUSER is used, indicating that the role is not a superuser.
- CREATEDB | NOCREATEDB: specifies whether a role can create a database. If this parameter is not specified, the default value NOCREATEDB is used, indicating that the role cannot create a database.
- CREATEROLE | NOCREATEROLE: determines whether a role can create roles. If this parameter is not specified, the default value NOCREATEROLE is used, indicating that the role cannot create roles.
- INHERIT | NOINHERIT: determines whether a role inherits the other roles' permissions in the group to which the role belongs. A role with the INHERIT attribute can automatically use any permissions that have been assigned to its direct or indirect group. If this parameter is not specified, the default value INHERIT is used.
- LOGIN | NOLOGIN: determines whether a role can log in. A role with the LOGIN attribute can be considered as a user. A role without this attribute can be used to manage database permissions but is not a user. If this attribute is not specified, the default value NOLOGIN is used. However, if CREATE USER instead of CREATE ROLE is used to create a role, the LOGIN attribute is used by default.
- [ENCRYPTED | UNENCRYPTED] PASSWORD'password': password of a role. The password is valid only for roles with the LOGIN attribute. ENCRYPTED | UNENCRYPTED: determines whether to encrypt the password. If this parameter is not specified, the value ENCRYPTED is used, that is, the password is encrypted.
- VALID UNTIL'timestamp': specifies the timestamp when the password of a role expires. If this parameter is not specified, the password is permanently valid.
- IN ROLE rolename1: lists one or more existing roles. The new role rolename will be added to and become a member of rolename1.
- ROLE rolename2: lists one or more existing roles. These roles will be automatically added as members of the new role rolename. That is, the new role is a user group.
To run this command, you must have the CREATEROLE permission or is the database superuser.
Example
Create a role roleexample1 who can log in.
postgres=# CREATE ROLE roleexample1 LOGIN;
Create a role roleexample2 with the password 123456.
postgres=# CREATE ROLE roleexample2 WITH LOGIN PASSWORD '123456';
Create a role named roleexample3.
[postgres@localhost ~]$ createuser roleexample3
Viewing Roles
You can run the SELECT statement or the PostgreSQL meta-command \du to view the role.
SELECT rolename FROM pg_roles;
\du
In the preceding command, rolename indicates the role name.
Example
View the roleexample1 role.
postgres=# SELECT roleexample1 from pg_roles;
View the existing roles.
postgres=# \du
Modifying a Role
Modifying a Username
Use the ALTER ROLE statement to modify an existing role name.
ALTER ROLE oldrolername RENAME TO newrolename;
In the preceding information:
- oldrolername: original role name.
- newrolename: new role name.
Example of Modifying a User
Change the role name roleexample1 to roleexapme2.
postgres=# ALTER ROLE roleexample1 RENAME TO roleexample2;
Modifying a User Password
Use the ALTER ROLE statement to modify the login password of a role.
ALTER ROLE rolename PASSWORD 'password'
In the preceding information:
- rolename: indicates a role name.
- password: password.
Example of Modifying the Password of a Role
Modify the password of roleexample1 to 456789.
postgres=# ALTER ROLE roleexample1 WITH PASSWORD '456789';
Deleting a Role
You can use the DROP ROLE statement or dropuser command to delete a role. The dropuser command encapsulates the DROP ROLE statement and needs to be executed on the shell GUI instead of the database GUI.
DROP ROLE rolename;
dropuser rolename
In the preceding command, rolename indicates the role name.
Example
Delete the userexample1 role.
postgres=# DROP ROLE userexample1;
Delete the userexample2 role.
[postgres@localhost ~]$ dropuser userexample2
Role Permissions
You can use the GRANT statement to grant permissions to a role.
Grant the table operation permission to a role.
GRANT { { SELECT | INSERT | UPDATE | DELETE | REFERENCES | TRIGGER } [,...] | ALL [ PRIVILEGES ] } ON [ TABLE ] tablename [, ...] TO { rolename | GROUP groupname | PUBLIC } [, ...] [ WITH GRANT OPTION ]
Grant the sequence operation permission to a role.
GRANT { { USAGE | SELECT | UPDATE } [,...] | ALL [ PRIVILEGES ] } ON SEQUENCE sequencename [, ...] TO { rolename | GROUP groupname | PUBLIC } [, ...] [ WITH GRANT OPTION ]
Grant the database operation permission to a role.
GRANT { { CREATE | CONNECT | TEMPORARY | TEMP } [,...] | ALL [ PRIVILEGES ] } ON DATABASE databasename [, ...] TO { rolename | GROUP groupname | PUBLIC } [, ...] [ WITH GRANT OPTION ]
Grant the function operation permission to a role.
GRANT { EXECUTE | ALL [ PRIVILEGES ] } ON FUNCTION funcname ( [ [ argmode ] [ argname ] argtype [, ...] ] ) [, ...] TO { rolename | GROUP groupname | PUBLIC } [, ...] [ WITH GRANT OPTION ]
Grant the operation permission of the procedural language to a role.
GRANT { USAGE | ALL [ PRIVILEGES ] } ON LANGUAGE langname [, ...] TO { rolename | GROUP groupname | PUBLIC } [, ...] [ WITH GRANT OPTION ]
Grant the schema operation permission to a role.
GRANT { { CREATE | USAGE } [,...] | ALL [ PRIVILEGES ] } ON SCHEMA schemaname [, ...] TO { rolename | GROUP groupname | PUBLIC } [, ...] [ WITH GRANT OPTION ]
Grant the tablespace operation permission to a role.
GRANT { CREATE | ALL [ PRIVILEGES ] } ON TABLESPACE tablespacename [, ...] TO { rolename | GROUP groupname | PUBLIC } [, ...] [ WITH GRANT OPTION ]
Assign the member relationship of rolename1 to rolename2.
GRANT rolename1 [, ...] TO rolename2 [, ...] [ WITH ADMIN OPTION ]
In the preceding information:
- SELECT, INSERT, UPDATE, DELETE, REFERENCES, TRIGGER, USAGE, CREATE, CONNECT, TEMPORARY, TEMP, EXECUTE, and ALL [PRIVILEGES] indicate user operation permissions. ALL [PRIVILEGES] indicates all permissions, the PRIVILEGES keyword is optional in PostgreSQL, but it is required in strict SQL statements.
- ON clause: specifies the object on which the permission is granted.
- tablename: table name.
- TO clause: specifies the role to which the permission is granted.
- rolename, rolename1, and rolename2: role names.
- groupname: name of a role group.
- PUBLIC: indicates that the permission is granted to all roles, including users who may be created later.
- WITH GRANT OPTION: indicates that the recipient of a permission can grant the permission to others. This option cannot be assigned to PUBLIC.
- sequencename: sequence name.
- databasename: database name.
- funcname ([[argmode] [argname] argtype [, ...]]): function name and its parameters.
- langname: procedural language name.
- schemaname: schema name.
- tablespacename: tablespace name.
- WITH ADMIN OPTION: A member can assign the member relationship of a role to other roles and cancel the member relationship of other roles.
Example
Grant the CREATE permission on database1 to userexample.
postgres=# GRANT CREATE ON DATABASE database1 TO userexample;
Grant all permissions on table1 to all users.
postgres=# GRANT ALL PRIVILEGES ON TABLE table1 TO PUBLIC;
Deleting User Permissions
You can use the REVOKE statement to revoke the permissions previously granted to one or more roles.
Revoke the table operation permission from a role.
REVOKE [ GRANT OPTION FOR ] { { SELECT | INSERT | UPDATE | DELETE | REFERENCES | TRIGGER } [,...] | ALL [ PRIVILEGES ] } ON [ TABLE ] tablename [, ...] FROM { rolename | GROUP groupname | PUBLIC } [, ...]
Revoke the sequence operation permission from a role.
REVOKE [ GRANT OPTION FOR ] { { USAGE | SELECT | UPDATE } [,...] | ALL [ PRIVILEGES ] } ON SEQUENCE sequencename [, ...] FROM { rolename | GROUP groupname | PUBLIC } [, ...] [ CASCADE | RESTRICT ]
Revoke the database operation permission from a role.
REVOKE [ GRANT OPTION FOR ] { { CREATE | CONNECT | TEMPORARY | TEMP } [,...] | ALL [ PRIVILEGES ] } ON DATABASE databasename [, ...] FROM { rolename | GROUP groupname | PUBLIC } [, ...] [ CASCADE | RESTRICT ]
Revoke the function operation permission from a role.
REVOKE [ GRANT OPTION FOR ] { EXECUTE | ALL [ PRIVILEGES ] } ON FUNCTION funcname ( [ [ argmode ] [ argname ] argtype [, ...] ] ) [, ...] FROM { rolename | GROUP groupname | PUBLIC } [, ...] [ CASCADE | RESTRICT ]
Revoke the procedural language operation permission from a role.
REVOKE [ GRANT OPTION FOR ] { USAGE | ALL [ PRIVILEGES ] } ON LANGUAGE langname [, ...] FROM { rolename | GROUP groupname | PUBLIC } [, ...] [ CASCADE | RESTRICT ]
Revoke the schema operation permission from a role.
REVOKE [ GRANT OPTION FOR ] { { CREATE | USAGE } [,...] | ALL [ PRIVILEGES ] } ON SCHEMA schemaname [, ...] FROM { rolename | GROUP groupname | PUBLIC } [, ...] [ CASCADE | RESTRICT ]
Revoke the tablespace operation permission from a role.
REVOKE [ GRANT OPTION FOR ] { CREATE | ALL [ PRIVILEGES ] } ON TABLESPACE tablespacename [, ...] FROM { rolename | GROUP groupname | PUBLIC } [, ...] [ CASCADE | RESTRICT ]
Revoke the member relationship of rolename1 from rolename2.
REVOKE [ ADMIN OPTION FOR ] rolename1 [, ...] FROM rolename2 [, ...] [ CASCADE | RESTRICT ]
In the preceding information:
- GRANT OPTION FOR: The permission cannot be granted to others, but permission itself is not revoked.
- SELECT, INSERT, UPDATE, DELETE, REFERENCES, TRIGGER, USAGE, CREATE, CONNECT, TEMPORARY, TEMP, EXECUTE, and ALL [PRIVILEGES] indicate user operation permissions. ALL [PRIVILEGES] indicates all permissions, the PRIVILEGES keyword is optional in PostgreSQL, but it is required in strict SQL statements.
- ON clause: specifies the object on which the permission is revoked.
- tablename: table name.
- FROM clause: specifies the role whose permission is revoked.
- rolename, rolename1, and rolename2: role names.
- groupname: name of a role group.
- PUBLIC: revokes the implicitly defined groups that have all roles. However, this does not mean that all roles lose the permissions. The permissions directly obtained and the permissions obtained through a group are still valid.
- sequencename: sequence name.
- CASCADE: revokes all dependent permissions.
- RESTRICT: does not revoke all dependent permissions.
- databasename: database name.
- funcname ([[argmode] [argname] argtype [, ...]]): function name and its parameters.
- langname: procedural language name.
- schemaname: schema name.
- tablespacename: tablespace name.
- ADMIN OPTION FOR: The transferred authorization is not automatically revoked.
Example
Grant the CREATE permission on database1 to userexample.
postgres=# GRANT CREATE ON DATABASE database1 TO userexample;
Grant all permissions on table1 to all users.
postgres=# GRANT ALL PRIVILEGES ON TABLE table1 TO PUBLIC;
Managing Databases
Creating a Database
You can use the CREATE DATABASE statement or the createdb command to create a database. The createdb command encapsulates the CREATE DATABASE statement and needs to be executed on the shell GUI instead of the database GUI.
CREATE DATABASE databasename;
createdb databasename
In the preceding command, databasename indicates the database name.
To use this command, you must have the CREATEDB permission.
Example
Create a database named database1.
postgres=# CREATE DATABASE database1;
Selecting a Database
Use the \c statement to select a database.
\c databasename;
In the preceding command, databasename indicates the database name.
Example
Select the databaseexample database.
postgres=# \c databaseexample;
Viewing a Database
Use the \l statement to view the database.
\l;
Example
View all databases.
postgres=# \l;
Deleting a Database
You can run the DROP DATABASE statement or dropdb command to delete a database. The dropdb command encapsulates the DROP DATABASE statement and needs to be executed on the shell GUI instead of the database GUI.
CAUTION: Exercise caution when deleting a database. Once a database is deleted, all tables and data in the database will be deleted.
DROP DATABASE databasename;
dropdb databasename
In the preceding command, databasename indicates the database name.
The DROP DATABASE statement deletes the system directory items of the database and the file directories that contain data.
DROP DATABASE can be executed only by the super administrator or database owner.
Example
Delete the databaseexample database.
postgres=# DROP DATABASE databaseexample;
Backing Up a Database
Run the pg\_dump command to back up the database and dump the database to a script file or another archive file.
pg_dump [option]... [databasename] > outfile
In the preceding information:
- databasename: database name. If this parameter is not specified, the environment variable PGDATABASE is used. If that environment variable is not specified, use the username that initiates the connection.
- outfile: database backup file.
- option: parameter option of the
pg\_dumpcommand. Multiple parameters can be separated by spaces. The common parameters of thepg\_dumpcommand are as follows:- -f, --file= filename: specified output file. If this parameter is ignored, the standard output is used.
- -d, --dbname= databasename: database to be dumped.
- -h, --host= hostname: specifies the hostname.
- -p, --port= portnumber: port number.
- -U, --username= username: username of the connection.
- -W, --password: forces PostgreSQL to prompt for a password before connecting to a database.
Example
Back up the database1 database of user postgres on port 3306 of the host whose IP address is 192.168.202.144 to the db1.sql file.
[postgres@localhost ~]$ pg_dump -h 192.168.202.144 -p 3306 -U postgres -W database1 > db1.sql
Restoring a Database
Run the psql command to restore the database.
psql [option]... [databasename [username]] < infile
In the preceding information:
- databasename: database name. If this parameter is not specified, the environment variable PGDATABASE is used. If that environment variable is not specified, use the username that initiates the connection.
- username: name of a user.
pg\_dumpcommand. - option: parameter option of the
psqlcommand. Multiple parameters can be separated by spaces. The common parameters of thesqlcommand are as follows:- -f, --file= filename: specified output file. If this parameter is ignored, the standard output is used.
- -d, --dbname= databasename: database to be dumped.
- -h, --host= hostname: specifies the hostname.
- -p, --port= portnumber: port number.
- -U, --username= username: username of the connection.
- -W, --password: forces PostgreSQL to prompt for a password before connecting to a database.
The psql command cannot be used to automatically create the databasename database. Therefore, you need to create the databasename database before running the psql command to restore the database.
Example
Import the db1.sql script file to the newdb database of the postgres user on the host 192.168.202.144 through port 3306.
[postgres@localhost ~]$ createdb newdb
[postgres@localhost ~]$ psql -h 192.168.202.144 -p 3306 -U postgres -W -d newdb < db1.sql
MariaDB Server
Software Description
The MariaDB database management system is a branch of MySQL and is maintained by the open-source community. The MariaDB database management system uses the General Public License (GPL). MariaDB is designed to be fully compatible with MySQL, including APIs and command lines, so that it can easily replace MySQL. MariaDB also provides many new features.
Figure 2 shows the MariaDB architecture.
Figure 2 MariaDB logical architecture
When MariaDB receives a SQL statement, the execution process is as follows:
- When a client connects to MariaDB, the hostname, username, and password of the client are authenticated. The authentication function can be implemented as a plug-in.
- If the login is successful, the client sends SQL commands to the server. The parser parses the SQL statements.
- The server checks whether the client has the permission to obtain the required resources.
- If the query has been stored in the query cache, the result is returned immediately.
- The optimizer will find the fastest execution policy or plan. That is, the optimizer can determine which tables will be read, which indexes will be accessed, and which temporary tables will be used. A good policy can reduce a large number of disk access and sorting operations.
- Storage engines read and write data and index files. Caches are used to accelerate these operations. Other features such as transactions and foreign keys are processed at the storage engine layer.
Storage engines manage and control data at the physical layer. They manage data files, data, indexes, and caches, making data management and reading more efficient. Each table has a .frm file that contains table definitions.
Each storage engine manages and stores data in different ways, and supports different features and performance. For example:
- MyISAM: suitable for environments with more reads and fewer writes. It does not support transactions and supports full-text indexes.
- noDB: supports transactions, row locks, and foreign keys.
- MEMORY: stores data in the memory.
- CSV: stores data in CSV format.
Configuring the Environment
Disabling the Firewall and Automatic Startup
Stop the firewall service as the root user.
systemctl stop firewalldDisable the firewall service as the root user.
systemctl disable firewalld NOTE:
The automatic startup is automatically disabled as the firewall is disabled.
Disabling SELinux
Modify the configuration file as the root user.
sed -i 's/SELINUX=enforcing/SELINUX=disabled/g' /etc/sysconfig/selinux
Creating a User Group and a User
Create a MySQL user or user group as the root user.
groupadd mysqluseradd -g mysql mysqlSet the user password as the root user.
passwd mysqlEnter the password twice for confirmation.
Creating Data Drives
- If a performance test needs to be performed, an independent drive is required for the data directory. You need to format and mount the drive. For details, see Method 1 or Method 2.
- In a non-performance test, run the following command as the root user to create a data directory. Then skip this section.
# mkdir /data
Method 1: Using fdisk for Drive Management as the root user
Create a partition, for example, /dev/sdb.
fdisk /dev/sdbEnter n and press Enter.
Enter p and press Enter.
Enter 1 and press Enter.
Retain the default settings and press Enter.
Retain the default settings and press Enter.
Enter w and press Enter.
Create a file system, for example, xfs.
mkfs.xfs /dev/sdb1Mount the partition to /data for the OS.
mkdir /datamount /dev/sdb1 /dataRun the
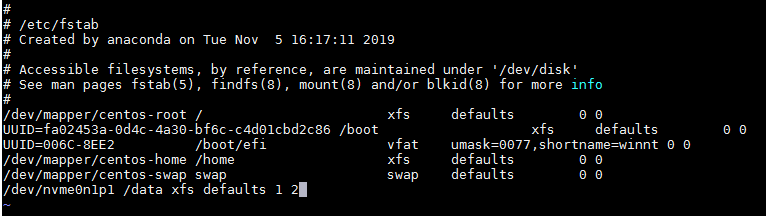
vi /etc/fstabcommand and edit the /etc/fstab file to enable the data drive to be automatically mounted after the system is restarted. For example, add the content in the last line, as shown in the following figure.In the last line, /dev/nvme0n1p1 is only an example.
Method 2: Using LVM for Drive Management as the root user
- Configure the local yum source. For details, see Configuring the Repo Server. If the repository has been configured, skip this step.
- Install LVM2.
\# yum install lvm2
Create a physical volume, for example, sdb.
pvcreate /dev/sdbCreate a physical volume group, for example, datavg.
vgcreate datavg /dev/sdbCreate a logical volume, for example, datalv of 600 GB.
lvcreate -L 600G -n datalv datavgCreate a file system.
mkfs.xfs /dev/datavg/datalvCreate a data directory and mount it.
mkdir /datamount /dev/datavg/datalv /dataRun the
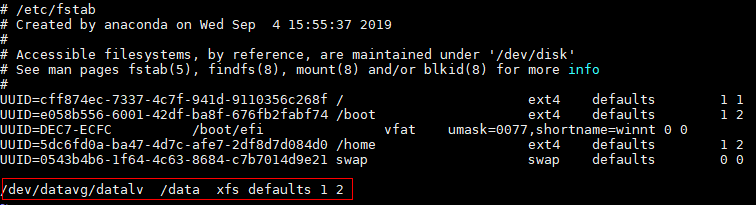
vi /etc/fstabcommand and edit the /etc/fstab file to enable the data drive to be automatically mounted after the system is restarted. For example, add the content in the last line, as shown in the following figure.In the last line, /dev/datavg/datalv is only an example.
Creating a Database Directory and Granting Permissions
In the created data directory /data, create directories for processes and grant permissions to the MySQL group or user created as the root user.
mkdir -p /data/mariadb
cd /data/mariadb
mkdir data tmp run log
chown -R mysql:mysql /data
Installing, Running, and Uninstalling MariaDB Server
Installing MariaDB
Configure the local yum source. For details, see Configuring the Repo Server.
Clear the cache.
dnf clean allCreate a cache.
dnf makecacheInstall the MariaDB server.
dnf install mariadb-serverCheck the installed RPM package.
rpm -qa | grep mariadb
Running MariaDB Server
Start the MariaDB server as the root user.
systemctl start mariadbInitialize the database as the root user.
/usr/bin/mysql_secure_installationDuring the command execution, you need to enter the password of the database user root. If no password is set, press Enter. Then, set the password as prompted.
Log in to the database.
mysql -u root -pAfter the command is executed, the system prompts you to enter the password. The password is the one set in 2.
NOTE:
Run the \\qorexitcommand to exit the database.
Uninstalling MariaDB
Stop the database process as the root user.
systemctl stop mariadbRun the
dnf remove mariadb-servercommand as the root user to uninstall MariaDB.dnf remove mariadb-server
Managing Database Users
Creating Users
Run the CREATE USER statement to create one or more users and set corresponding passwords.
CREATE USER 'username'@'hostname' IDENTIFIED BY 'password';
In the preceding information:
- username: name of a user.
- host: hostname, that is, the name of the host where the user connects to the database. As a local user, you can set the parameter to localhost. If the host name is not specified during user creation, the host name is % by default, indicating a group of hosts.
- password: password for logging in to the server. The password can be null. If the password is null, the user can log in to the server without entering the password. This method, however, is not recommended because it provides low security.
To use the CREATE USER statement, you must have the INSERT permission on the database or the global CREATE USER permission.
After a user account is created using the CREATE USER statement, a record is added to the user table in the database. If the account to be created exists, an error will occur during statement execution.
A new user has few permissions and can perform only operations that do not require permissions. For example, a user can run the SHOW statement to query the list of all storage engines and character sets.
Example
Create a local user whose password is 123456 and username is userexample1.
> CREATE USER 'userexample1'@'localhost' IDENTIFIED BY '123456';
Create a user whose password is 123456, username is userexample2, and hostname is 192.168.1.100.
> CREATE USER 'userexample2'@'192.168.1.100' IDENTIFIED BY '123456';
Viewing Users
Run the SHOW GRANTS or SELECT statement to view one or more users.
View a specific user:
SHOW GRANTS [FOR 'username'@'hostname'];
SELECT USER,HOST,PASSWORD FROM mysql.user WHERE USER='username';
View all users:
SELECT USER,HOST,PASSWORD FROM mysql.user;
In the preceding information:
- username: name of a user.
- hostname: host name.
Example
View the user userexample1.
> SHOW GRANTS FOR 'userexample1'@'localhost';
View all users in the MySQL database.
> SELECT USER,HOST,PASSWORD FROM mysql.user;
Modifying Users
Modifying a Username
Run the RENAME USER statement to change one or more existing usernames.
RENAME USER 'oldusername'@'hostname' TO 'newusername'@'hostname';
In the preceding information:
- oldusername: original username.
- newusername: new username.
- hostname: host name.
The RENAME USER statement is used to rename an existing account. If the original account does not exist in the system or the new account exists, an error will occur when the statement is executed.
To use the RENAME USER statement, you must have the UPDATE permission on the database or the global CREATE USER permission.
Example of Modifying a User
Change the username userexample1 to userexample2 and change the hostname to locahost.
> RENAME USER 'userexample1'@'localhost' TO 'userexample2'@'localhost';
Modifying a User Password
Use the SET PASSWORD statement to modify the login password of a user.
SET PASSWORD FOR 'username'@'hostname' = PASSWORD('newpassword');
In the preceding information:
- FOR 'username'@'hostname': specifies the username and hostname whose password is to be changed. This parameter is optional.
- PASSWORD('newpassword'): indicates that the PASSWORD() function is used to set a new password. That is, the new password must be transferred to the PASSWORD() function for encryption.
If the FOR clause is not added to the SET PASSWORD statement, the password of the current user is changed.
The FOR clause must be given in the format of 'username'@'hostname', where username indicates the username of the account and hostname indicates the hostname of the account.
The account whose password is to be changed must exist in the system. Otherwise, an error occurs when the statement is executed.
Example of Changing a User Password
Change the password of user userexample whose hostname is locahost to 0123456.
> SET PASSWORD FOR 'userexample'@'localhost' = PASSWORD('0123456') ;
Deleting Users
Use the DROP USER statement to delete one or more user accounts and related permissions.
DROP USER 'username1'@'hostname1' [,'username2'@'hostname2']...;
The DROP USER statement can be used to delete one or more database accounts and their original permissions.
To use the DROP USER statement, you must have the DELETE permission on the database or the global CREATE USER permission.
In the DROP USER statement, if the hostname of an account is not specified, the hostname is % by default.
Example
Delete the local user userexample.
> DROP USER 'userexample'@'localhost';
Granting Permissions to a User
Run the GRANT statement to grant permissions to a new user.
GRANT privileges ON databasename.tablename TO 'username'@'hostname';
In the preceding information:
- ON clause: specifies the object and its level on which the permission is granted.
- privileges: indicates the operation permissions of a user, such as SELECT, INSERT, and UPDATE. To grant all permissions to a user, use ALL.
- databasename: database name.
- tablename: table name.
- TO clause: sets the user password and specifies the user to whom the permission is granted.
- username: name of a user.
- hostname: host name.
To grant the user the permission to operate all databases and tables, use asterisks (*), for example, *.*.
If you specify a password for an existing user in the TO clause, the new password will overwrite the original password.
If the permission is granted to a non-existent user, a CREATE USER statement is automatically executed to create the user, but the password must be specified for the user.
Example
Grant the SELECT and INSERT permissions to local user userexample.
> GRANT SELECT,INSERT ON *.* TO 'userexample'@'localhost';
Deleting User Permissions
Run the REVOKE statement to delete the permissions of a user, but the user will not be deleted.
REVOKE privilege ON databasename.tablename FROM 'username'@'hostname';
The parameters in the REVOKE statement are the same as those in the GRANT statement.
To use the REVOKE statement, you must have the global CREATE USER or UPDATE permission for the database.
Example
Delete the INSERT permission of local user userexample.
> REVOKE INSERT ON *.* FROM 'userexample'@'localhost';
Managing Databases
Creating a Database
Run the CREATE DATABASE statement to create a database.
CREATE DATABASE databasename;
In the preceding command, databasename can be replaced with the database name, which is case insensitive.
Example
Create a database named databaseexample.
> CREATE DATABASE databaseexample;
Viewing a Database
Run the SHOW DATABASES statement to view a database.
SHOW DATABASES;
Example
View all databases.
> SHOW DATABASES;
Selecting a Database
Generally, you need to select a target database before creating or querying a table. Use the USE statement to select a database.
USE databasename;
In the preceding command, databasename indicates the database name.
Example
Select the databaseexample database.
> USE databaseexample;
Deleting a Database
You can run the DROP DATABASE statement to delete a database.
DROP DATABASE databasename;
In the preceding command, databasename indicates the database name.
The DROP DATABASE command is used to delete an existing database. After this command is executed, all tables in the database are deleted, but the user permissions of the database are not automatically deleted.
To use DROP DATABASE, you need the DROP permission on the database.
DROP SCHEMA is a synonym of DROP DATABASE.
Example
Delete the databaseexample database.
> DROP DATABASE databaseexample;
Backing Up a Database
Run the mysqldump command as the root user to back up the database.
Back up one or more tables.
mysqldump [options] databasename [tablename ...] > outfile
Back up one or more databases:
mysqldump [options] -databases databasename ... > outfile
Back up all databases:
mysqldump [options] -all-databases > outputfile
In the preceding information:
- databasename: database name.
- tablename: name of a data table.
- outfile: database backup file.
- options: parameter option of the
mysqldumpcommand. Multiple parameters can be separated by spaces. The common parameters of themysqldumpcommand are as follows:- -u, --user= username: specifies the username.
- -p, --password[= password]: specifies the password.
- -P, --port= portnumber: specifies the port number.
- -h, --host= hostname: specifies the hostname.
- -r, --result-file= filename: saves the export result to a specified file, which is equivalent to >.
- -t: backs up data only.
- -d: backs up the table structure only.
Example
Back up all the databases of the user root on the host 192.168.202.144 through port 3306 to the alldb.sql file.
mysqldump -h 192.168.202.144 -P 3306 -uroot -p123456 --all-databases > alldb.sql
Back up the db1 database of the user root on the host 192.168.202.144 through port 3306 to the db1.sql file.
mysqldump -h 192.168.202.144 -P 3306 -uroot -p123456 --databases db1 > db1.sql
Back up the tb1 table of the db1 database of the user root on the host 192.168.202.144 through port 3306 to the db1tb1.sql file.
mysqldump -h 192.168.202.144 -P 3306 -uroot -p123456 db1 tb1 > db1tb1.sql
Back up only the table structure of the db1 database of user root on port 3306 of the host whose IP address is 192.168.202.144 to the db1.sql file.
mysqldump -h 192.168.202.144 -P 3306 -uroot -p123456 -d db1 > db1.sql
Back up only the data of the db1 database of the user root on the host 192.168.202.144 through port 3306 to the db1.sql file.
mysqldump -h 192.168.202.144 -P 3306 -uroot -p123456 -t db1 > db1.sql
Restoring a Database
Run the mysql command as the root user to restore the database.
Restore one or more tables:
mysql -h hostname -P portnumber -u username -ppassword databasename < infile
In the preceding information:
- hostname: host name.
- portnumber: port number.
- username: name of a user.
- password: password.
- databasename: database name.
- infile: outfile parameter in the
mysqldumpcommand.
Example
Restore a database.
mysql -h 192.168.202.144 -P 3306 -uroot -p123456 -t db1 < db1.sql
MySQL Server
Software Description
MySQL is a relational database management system (RDBMS) developed by the Swedish company MySQL AB, which was bought by Sun Microsystems (now Oracle). It is one of the most popular Relational Database Management Systems (RDBMSs) in the industry, especially for web applications.
A relational database stores data in different tables instead of in a large data warehouse to improve efficiency and flexibility.
The Structured Query Language (SQL) used by MySQL is the most common standard language for accessing databases. MySQL uses dual-licensing distribution and is available in two editions: Community Edition and Commercial Edition. MySQL is optimal for small or medium-sized websites because of its small size, fast speed, low cost, and especially the open source code.
Configuring the Environment
Disabling the Firewall and Automatic Startup
Stop the firewall service as the root user.
systemctl stop firewalldDisable the firewall service as the root user.
systemctl disable firewalld NOTE:
The automatic startup is automatically disabled as the firewall is disabled.
Disabling SELinux
Modify the configuration file as the root user.
sed -i 's/SELINUX=enforcing/SELINUX=disabled/g' /etc/sysconfig/selinux
Creating a User Group and a User
Create a MySQL user or user group as the root user.
groupadd mysqluseradd -g mysql mysqlSet the user password as the root user.
passwd mysqlEnter the password twice for confirmation.
Creating Data Drives
- If a performance test needs to be performed, an independent drive is required for the data directory. You need to format and mount the drive. For details, see Method 1 or Method 2.
- In a non-performance test, run the following command as the root user to create a data directory. Then skip this section.
# mkdir /data
Method 1: Using fdisk for Drive Management as the root user
Create a partition, for example, /dev/sdb.
fdisk /dev/sdbEnter n and press Enter.
Enter p and press Enter.
Enter 1 and press Enter.
Retain the default settings and press Enter.
Retain the default settings and press Enter.
Enter w and press Enter.
Create a file system, for example, xfs.
mkfs.xfs /dev/sdb1Mount the partition to /data for the OS.
mkdir /datamount /dev/sdb1 /dataRun the
vi /etc/fstabcommand and edit the /etc/fstab file to enable the data drive to be automatically mounted after the system is restarted. For example, add the content in the last line, as shown in the following figure.In the last line, /dev/nvme0n1p1 is only an example.

Method 2: Using LVM for Drive Management as the root user
- Configure the local yum source. For details, see Configuring the Repo Server. If the repository has been configured, skip this step.
- Install LVM2.
\# yum install lvm2
Create a PV, for example, sdb.
pvcreate /dev/sdbCreate a physical VG, for example, datavg.
vgcreate datavg /dev/sdbCreate an LV, for example, datalv of 600 GB.
lvcreate -L 600G -n datalv datavgCreate a file system.
mkfs.xfs /dev/datavg/datalvCreate a data directory and mount it.
mkdir /datamount /dev/datavg/datalv /dataRun the
vi /etc/fstabcommand and edit the /etc/fstab file to enable the data drive to be automatically mounted after the system is restarted. For example, add the content in the last line, as shown in the following figure.In the last line, /dev/datavg/datalv is only an example.

Creating a Database Directory and Granting Permissions
In the created data directory /data, create directories for processes and grant permissions to the MySQL group or user created as the root user.
mkdir -p /data/mysql
# cd /data/mysql
# mkdir data tmp run log
# chown -R mysql:mysql /data
Installing, Running, and Uninstalling MySQL
Installing MySQL
rpm -Uvh XXXcommand (XXX indicates the version, for example, mysql-8.0.21-1.oe1.aarch64.rpm) to upgrade mysql-8.0.17-3.oe1 to the latest version, the functions are unavailable after the upgrade. You can use either of the following methods to upgrade the version. The following uses the upgrade from mysql-8.0.17-3.oe1 to mysql-8.0.21-1.oe1 as an example:Method 1: Run the following upgrade command:
rpm -Uvh mysql-8.0.21-1.oe1.aarch64.rpm --noscripts
Method 2: Run the following commands to uninstall the MySQL of the earlier version and then install the MySQL of the new version:
rpm -e mysql-8.0.17-3.oe1
# rpm -ivh mysql-8.0.21-1.oe1.aarch64.rpm
Configure the local yum source. For details, see Configuring the Repo Server.
Clear the cache.
dnf clean allCreate a cache.
dnf makecacheInstall the MySQL server as the root user.
dnf install mysql-serverCheck the installed RPM package.
rpm -qa | grep mysql-server
Running MySQL
Modify the configuration file.
Create the my.cnf file as the root user and change the file paths (including the software installation path basedir and data path datadir) based on the actual situation.
vi /etc/my.cnfEdit the my.cnf file as follows:
[mysqld_safe]
log-error=/data/mysql/log/mysql.log
pid-file=/data/mysql/run/mysqld.pid
[mysqldump]
quick
[mysql]
no-auto-rehash
[client]
default-character-set=utf8
[mysqld]
basedir=/usr/local/mysql
socket=/data/mysql/run/mysql.sock
tmpdir=/data/mysql/tmp
datadir=/data/mysql/data
default_authentication_plugin=mysql_native_password
port=3306
user=mysql
Ensure that the my.cnf file is correctly modified.
cat /etc/my.cnf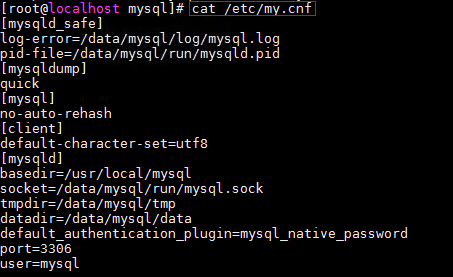 CAUTION:
In the configuration file, basedir specifies the software installation path. Change it based on actual situation.
CAUTION:
In the configuration file, basedir specifies the software installation path. Change it based on actual situation.Change the group and user of the /etc/my.cnf file to mysql:mysql as the root user.
chown mysql:mysql /etc/my.cnf
Configure environment variables.
Add the path of the MySQL binary files to the PATH parameter as the root user.
echo export PATH=$PATH:/usr/local/mysql/bin >> /etc/profile CAUTION:
In the command, /usr/local/mysql/bin is the absolute path of the bin files in the MySQL software installation directory. Change it based on actual situation.Run the following command as the root user to make the environment variables take effect:
source /etc/profile
Initialize the database as the root user.
NOTE:
The second line from the bottom contains the initial password, which will be used when you log in to the database.$ mysqld --defaults-file=/etc/my.cnf --initialize 2020-03-18T03:27:13.702385Z 0 [System] [MY-013169] [Server] /usr/local/mysql/bin/mysqld (mysqld 8.0.17) initializing of server in progress as process 34014 2020-03-18T03:27:24.112453Z 5 [Note] [MY-010454] [Server] A temporary password is generated for root@localhost: iNat=)#V2tZu 2020-03-18T03:27:28.576003Z 0 [System] [MY-013170] [Server] /usr/local/mysql/bin/mysqld (mysqld 8.0.17) initializing of server has completedIf the command output contains "initializing of server has completed", the database has been initialized. In the command output, "iNat=)#V2tZu" in "A temporary password is generated for root@localhost: iNat=)#V2tZu" is the initial password.
Start the database.
CAUTION:
Start MySQL as user mysql if it is the first time to start the database service. If you start MySQL as user root, a message will be displayed indicating that the mysql.log file is missing. If you start MySQL as user mysql, the mysql.log file will be generated in the /data/mysql/log directory. No error will be displayed if you start the database as user root again.Modify the file permission as the root user.
chmod 777 /usr/local/mysql/support-files/mysql.serverStart MySQL as the root user.
cp /usr/local/mysql/support-files/mysql.server /etc/init.d/mysql
chkconfig mysql on
Start MySQL as user mysql.
su - mysql
service mysql start
Log in to the database.
NOTE:- Enter the initial password generated during database initialization (3).
- If MySQL is installed by using an RPM package obtained from the official website, the mysqld file is located in the /usr/sbin directory. Ensure that the directory specified in the command is correct.
/usr/local/mysql/bin/mysql -uroot -p -S /data/mysql/run/mysql.sock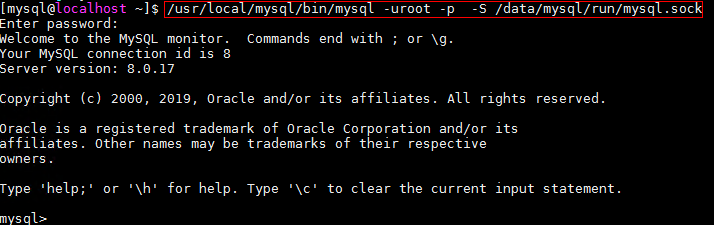
Configure the database accounts and passwords.
After logging in to the database, change the password of user root for logging in to the database.
mysql>alter user 'root'@'localhost' identified by "123456";Create a user root for all the other hosts in the domain.
mysql>create user 'root'@'%' identified by '123456';Grant permissions to the user root.
mysql>grant all privileges on *.* to 'root'@'%';
mysql>flush privileges;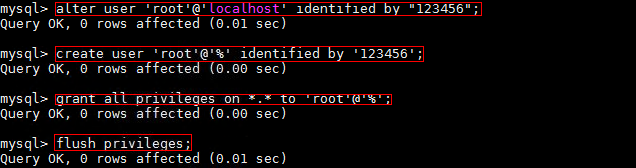
Exit the database.
Run the
\\qorexitcommand to exit the database.mysql>exit
Uninstalling MySQL
Stop the database process as the root user.
systemctl stop mysqlRun the
dnf remove mysqlcommand as the root user to uninstall MySQL.dnf remove mysql
Managing Database Users
Creating Users
Run the CREATE USER statement to create one or more users and set corresponding passwords.
CREATE USER 'username'@'hostname' IDENTIFIED BY 'password';
In the preceding information:
- username: name of a user.
- host: hostname, that is, the name of the host where the user connects to the database. As a local user, you can set the parameter to localhost. If the host name is not specified during user creation, the host name is % by default, indicating a group of hosts.
- password: password for logging in to the server. The password can be null. If the password is null, the user can log in to the server without entering the password. This method, however, is not recommended because it provides low security.
To use the CREATE USER statement, you must have the INSERT permission on the database or the global CREATE USER permission.
After a user account is created using the CREATE USER statement, a record is added to the user table in the database. If the account to be created exists, an error will occur during statement execution.
A new user has few permissions and can perform only operations that do not require permissions. For example, a user can run the SHOW statement to query the list of all storage engines and character sets.
Example
Create a local user whose password is 123456 and username is userexample1.
> CREATE USER 'userexample1'@'localhost' IDENTIFIED BY '123456';
Create a user whose password is 123456, username is userexample2, and hostname is 192.168.1.100.
> CREATE USER 'userexample2'@'192.168.1.100' IDENTIFIED BY '123456';
Viewing Users
Run the SHOW GRANTS or SELECT statement to view one or more users.
View a specific user:
SHOW GRANTS [FOR 'username'@'hostname'];
SELECT USER,HOST,PASSWORD FROM mysql.user WHERE USER='username';
View all users:
SELECT USER,HOST FROM mysql.user;
In the preceding information:
- username: name of a user.
- hostname: host name.
Example
View the user userexample1.
> SHOW GRANTS FOR 'userexample1'@'localhost';
View all users in the MySQL database.
> SELECT USER,HOST FROM mysql.user;
Modifying Users
Modifying a Username
Run the RENAME USER statement to change one or more existing usernames.
RENAME USER 'oldusername'@'hostname' TO 'newusername'@'hostname';
In the preceding information:
- oldusername: original username.
- newusername: new username.
- hostname: host name.
The RENAME USER statement is used to rename an existing account. If the original account does not exist in the system or the new account exists, an error will occur when the statement is executed.
To use the RENAME USER statement, you must have the UPDATE permission on the database or the global CREATE USER permission.
Example of Modifying a User
Change the username userexample1 to userexample2 and change the hostname to locahost.
> RENAME USER 'userexample1'@'localhost' TO 'userexample2'@'localhost';
Modifying a User Password
Use the SET PASSWORD statement to modify the login password of a user.
SET PASSWORD FOR 'username'@'hostname' = 'newpassword';
In the preceding information:
- FOR'username'@'hostname': specifies the username and hostname whose password is to be changed. This parameter is optional.
- newpassword: new password.
If the FOR clause is not added to the SET PASSWORD statement, the password of the current user is changed.
The FOR clause must be given in the format of 'username'@'hostname', where username indicates the username of the account and hostname indicates the hostname of the account.
The account whose password is to be changed must exist in the system. Otherwise, an error occurs when the statement is executed.
Example of Changing a User Password
Change the password of user userexample whose hostname is locahost to 0123456.
> SET PASSWORD FOR 'userexample'@'localhost' = '0123456';
Deleting Users
Use the DROP USER statement to delete one or more user accounts and related permissions.
DROP USER 'username1'@'hostname1' [,'username2'@'hostname2']...;
The DROP USER statement can be used to delete one or more database accounts and their original permissions.
To use the DROP USER statement, you must have the DELETE permission on the database or the global CREATE USER permission.
In the DROP USER statement, if the hostname of an account is not specified, the hostname is % by default.
Example
Delete the local user userexample.
> DROP USER 'userexample'@'localhost';
Granting Permissions to a User
Run the GRANT statement to grant permissions to a new user.
GRANT privileges ON databasename.tablename TO 'username'@'hostname';
In the preceding information:
- ON clause: specifies the object and level on which the permission is granted.
- privileges: indicates the operation permissions of a user, such as SELECT, INSERT, and UPDATE. To grant all permissions to a user, use ALL.
- databasename: database name.
- tablename: table name.
- TO clause: sets the user password and specifies the user to whom the permission is granted.
- username: name of a user.
- hostname: host name.
To grant the user the permission to operate all databases and tables, use asterisks (*), for example, *.*.
If you specify a password for an existing user in the TO clause, the new password will overwrite the original password.
If the permission is granted to a non-existent user, a CREATE USER statement is automatically executed to create the user, but the password must be specified for the user.
Example
Grant the SELECT and INSERT permissions to local user userexample.
> GRANT SELECT,INSERT ON *.* TO 'userexample'@'localhost';
Deleting User Permissions
Run the REVOKE statement to delete the permissions of a user, but the user will not be deleted.
REVOKE privilege ON databasename.tablename FROM 'username'@'hostname';
The parameters in the REVOKE statement are the same as those in the GRANT statement.
To use the REVOKE statement, you must have the global CREATE USER or UPDATE permission for the database.
Example
Delete the INSERT permission of local user userexample.
> REVOKE INSERT ON *.* FROM 'userexample'@'localhost';
Managing Databases
Creating a Database
Run the CREATE DATABASE statement to create a database.
CREATE DATABASE databasename;
In the preceding command, databasename can be replaced with the database name, which is case insensitive.
Example
Create a database named databaseexample.
> CREATE DATABASE databaseexample;
Viewing a Database
Run the SHOW DATABASES statement to view a database.
SHOW DATABASES;
Example
View all databases.
> SHOW DATABASES;
Selecting a Database
Generally, you need to select a target database before creating or querying a table. Use the USE statement to select a database.
USE databasename;
In the preceding command, databasename indicates the database name.
Example
Select the databaseexample database.
> USE databaseexample;
Deleting a Database
Run the DROP DATABASE statement to delete a database.
DROP DATABASE databasename;
In the preceding command, databasename indicates the database name.
The DROP DATABASE command is used to delete an existing database. After this command is executed, all tables in the database are deleted, but the user permissions of the database are not automatically deleted.
To use DROP DATABASE, you need the DROP permission on the database.
DROP SCHEMA is a synonym of DROP DATABASE.
Example
Delete the databaseexample database.
> DROP DATABASE databaseexample;
Backing Up a Database
Run the mysqldump command as the root user to back up the database.
Back up one or more tables:
mysqldump [options] databasename [tablename ...] > outfile
Back up one or more databases:
mysqldump [options] -databases databasename ... > outfile
Back up all databases:
mysqldump [options] -all-databases > outputfile
In the preceding information:
- databasename: database name.
- tablename: name of a data table.
- outfile: database backup file.
- options: parameter option of the
mysqldumpcommand. Multiple parameters can be separated by spaces. The common parameters of themysqldumpcommand are as follows:- -u, --user= username: specifies the username.
- -p, --password[= password]: specifies the password.
- -P, --port= portnumber: specifies the port number.
- -h, --host= hostname: specifies the hostname.
- -r, --result-file= filename: saves the export result to a specified file, which is equivalent to >.
- -t: backs up data only.
- -d: backs up the table structure only.
Example
Back up all the databases of user root on port 3306 of the host whose IP address is 192.168.202.144 to the alldb.sql file.
mysqldump -h 192.168.202.144 -P 3306 -uroot -p123456 --all-databases > alldb.sql
Back up the db1 database of user root on port 3306 of the host whose IP address is 192.168.202.144 to the db1.sql file.
mysqldump -h 192.168.202.144 -P 3306 -uroot -p123456 --databases db1 > db1.sql
Back up the tb1 table of the db1 database of user root on port 3306 of the host whose IP address is 192.168.202.144 to the db1tb1.sql file.
mysqldump -h 192.168.202.144 -P 3306 -uroot -p123456 db1 tb1 > db1tb1.sql
Back up only the table structure of the db1 database of user root on port 3306 of the host whose IP address is 192.168.202.144 to the db1.sql file.
mysqldump -h 192.168.202.144 -P 3306 -uroot -p123456 -d db1 > db1.sql
Back up only the table structure of the db1 database of user root on port 3306 of the host whose IP address is 192.168.202.144 to the db1.sql file.
mysqldump -h 192.168.202.144 -P 3306 -uroot -p123456 -t db1 > db1.sql
Restoring a Database
Run the mysql command as the root user to restore the database.
Restore one or more tables:
mysql -h hostname -P portnumber -u username -ppassword databasename < infile
In the preceding information:
- hostname: host name.
- portnumber: port number.
- username: name of a user.
- password: password.
- databasename: database name.
- infile: outfile parameter in the
mysqldumpcommand.
Example
Restore a database.
mysql -h 192.168.202.144 -P 3306 -uroot -p123456 -t db1 < db1.sql