Guide to Porting Spring Framework to openEuler
- Software Overview
- Environment Configuration
- System Configuration
- Software Compilation
- Software Running
- FAQs
Software Overview
Spring Framework
Spring Framework is an open source framework that aims to solve problems that occur when a Java EE application is developed using the Enterprise JavaBean (EJB), such as redundant code and complex configurations. Spring is a container that supports multiple technologies, such as JMS, MQ, and UnitTest. It also uses aspect oriented programming (AOP) to facilitate transaction and log management, indicating its solid support for mainstream frameworks.
Figure 1 shows the Spring Framework architecture.
Figure 1 Spring Framework structure 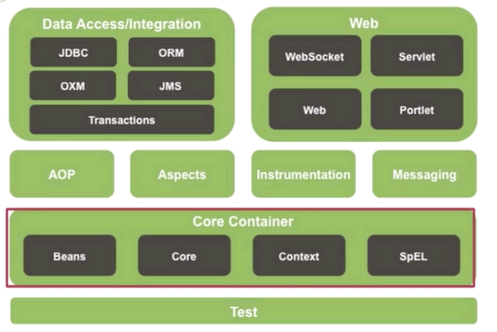
The Spring Framework consists of three core modules: Spring-Core, Spring-Context, and Spring-Beans. It also incorporates basic modules such as Spring-AOP, Spring-Web, and Spring-Webmvc. The functions of each module are described as follows:
Spring-Core
The core container provides basic functions of the Spring Framework, including the main module BeanFactory that manages the Bean.
Spring-Context
A configuration file that provides context for the Spring Framework. The context includes enterprise services such as JNDI, EJB, e-mail, internationalization, validation, and scheduling.
Spring-Beans
The package that implements the inversion of control (IoC), which is a key feature of the Spring Framework.
Spring-AOP
This module integrates the aspect-oriented programming (AOP) into the Spring Framework, making it easy to manage any object with the Spring Framework. The Spring-AOP module provides a transaction management service for objects in Spring-based applications, allowing applications to perform declarative transaction management without EJB components.
Spring-Web
This module is built on top of the Spring-Context module and provides context for web-based applications.
Spring-Webmvc
This module implements all the basic features of a core spring framework. It helps build web applications and incorporates a large number of view technologies. The MVC framework becomes highly configurable using the policy interface.
According to the preceding description, the Spring-Beans (implementation package of IOC) and the Spring-AOP (implementation package of AOP) are the basis of the entire framework, and Spring-Core is the core of the entire framework. Spring-Context provides the context environment and binds each module. The web functions are implemented by Spring-Web and Spring-Webmvc.
Spring Boot and Spring Cloud
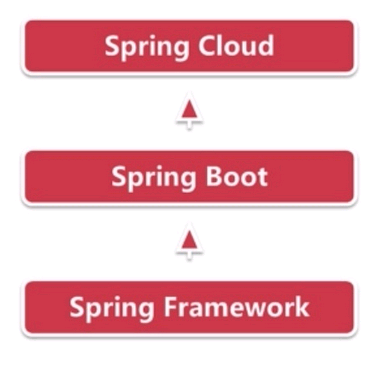
After introducing the Spring Framework to the local Maven repository, you can use this framework to build Maven for Java programs. However, Spring build requires configuring a large number of XML files, which is complex. Building Spring Boot based on the Spring Framework helps quickly build Spring applications. Spring Cloud is a distributed environment for building Spring Boot, that is, cloud applications. Spring Boot connects the upper layer to the lower layer.
Figure 2 shows the relationship between Spring Framework, Spring Boot, and Spring Cloud.
Spring Boot is a quick configuration solution of Spring and can be used to quickly develop a single microservice. It focuses on conveniently deploying services on a single server. Spring Cloud is a cloud application development tool based on Spring Boot, and is the global service governance framework. Spring Boot can be used for development projects without Spring Cloud, but Spring Cloud cannot be used without Spring Boot.
Environment Configuration
It is recommended that the memory of the deployment environment be greater than 2 GB.
Software platform
| Software | Version Number | Installation Method |
|---|---|---|
| openEuler | 20.03-LTS-SP3 | ISO |
| tar | 1.32 | Yum install |
| wget | 1.20.3 | Yum install |
| git | 2.27 | Yum install |
Required dependency packages
| Software | Version Number | Installation Method |
|---|---|---|
| jdk | 1.8.0 | Refer to Basic Software Installation |
| maven | 3.5.4 | Refer to Basic Software Installation |
System Configuration
Configuring the Local Yum Source
If the Internet is available in the environment, you can use the configured source or add other network sources without configuring the local source.
Run the following command to configure the source file and view the repo file of the configured Yum source:
# cat /etc/yum.repos.d/openEuler.repo
[base]
name=base
baseurl=file:///mnt
enable=1
gpgcheck=0
Run the following command to mount the source image:
# mount /root/openEuler-20.03-LTS-SP3-everything-aarch64-dvd.iso /mnt
Software Compilation
Using the Local Yum Source to Install Basic Software
Run the following command to install the Maven build tool:
# yum -y install mavenRun the following command to install JDK using the Yum source:
# yum -y install java-1.8.0-openjdk-develVerify the installation. After the installation is completed, run the following commands to check the Maven and Java versions and the javac usage:
# mvn -version
# java -version
# javac -help
Installing Spring Framework to the Local Maven Repository
Run the following commands to obtain the Spring Framework source code package:
# cd /home
# wget https://github.com/Spring-projects/Spring-framework/archive/v5.2.10.RELEASE.tar.gz
# tar -xvf v5.2.10.RELEASE.tar.gz
Run the following commands to compile the Spring Framework source code package. If the compilation is successful, the following information is displayed:
# cd /home/spring-framework-5.2.10.RELEASE
# ./gradlew build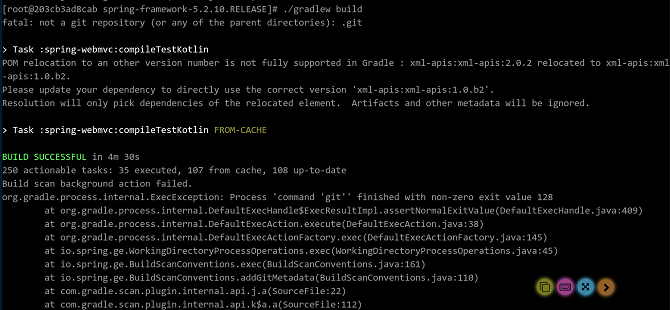
Run the following command to install Spring Framework to the local Maven repository:
# ./gradlew publishToMavenLocal -x javadoc -x dokka -x asciidoctorAfter the installation is completed, the
springframeworkfolder is generated in/root/.m2/repository/org/.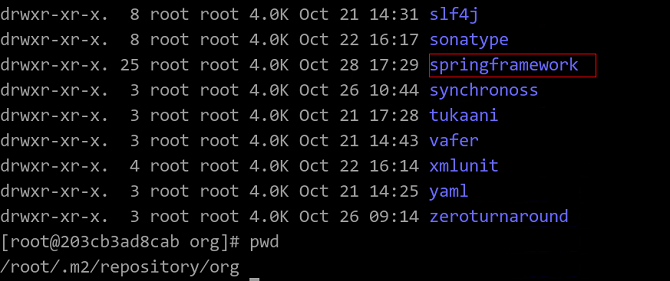
Compiling Tomcat Cases of the Spring Boot Project
Run the following commands to obtain the case source code:
# cd /home
# wget https://github.com/Spring-projects/Spring-boot/archive/v1.5.4.RELEASE.tar.gz
# tar -xvf v1.5.4.RELEASE.tar.gz
# cd /home/spring-boot-1.5.4.RELEASE/spring-boot-samples/spring-boot-sample-tomcat
Run the following command to compile the project:
# mvn package -DskipTests
Compiling Cases of the Spring Cloud Project
Run the following commands to compile the Spring-cloud-gateway-sample project:
# cd /home
# git clone https://github.com/Spring-cloud-samples/Spring-cloud-gateway-sample.git
# cd /home/Spring-cloud-gateway-sample
# mvn package -DskipTests
Run the following commands to compile the zuul-server-1.0.0.BUILD-SNAPSHOT project:
# cd /home
# git clone https://github.com/Spring-cloud-samples/zuul-server.git
# cd /home/zuul-server
# mvn package -DskipTests
Run the following commands to compile the eureka-0.0.1-SNAPSHOT project:
# cd /home
# git clone https://github.com/Spring-cloud-samples/eureka.git
# cd /home/eureka
# mvn package -DskipTests
Run the following commands to compile the feign-eureka project:
# cd /home
# git clone https://github.com/Spring-cloud-samples/feign-eureka.git
# cd /home/feign-eureka
# mvn package -DskipTests
Software Running
Examples of Running Spring Boot on a Single-Node System
If the spring-boot-sample-tomcat is compiled successfully, the
spring-boot-sample-tomcat-1.5.4.RELEASE.jarfile is generated in the/home/spring-boot-1.5.4.RELEASE/spring-boot-samples/spring-boot-samples-tomcat/targetfolder in the project directory. Run the following command to execute the JAR file:# java -jar spring-boot-sample-tomcat-1.5.4.RELEASE.jarAfter tomcat start is displayed on the console, open a new window and run the following command to check the running status of the Tomcat service:
# curl http://localhost:8080If helloworld is displayed in the command output, the execution is successful.
To disable the Spring-Boot service, press Ctrl+C in the window displayed in Step 1.
Examples of Running Spring Cloud on a Single-Node System
Example of running the spring-cloud-gateway-sample project
If the spring-cloud-gateway-sample project is compiled successfully, the
spring-cloud-gateway-sample-0.0.1-SNAPSHOT.jarfile is generated in the/home/Spring-cloud-gateway-sample/targetfolder in the project directory. Run the following commands:# java -jar spring-cloud-gateway-sample-0.0.1-SNAPSHOT.jarAfter the message Started DemogatewayApplication is displayed on the console, start a new window and run the following command to check the service running status.If the command output shown in the following figure is displayed, the execution is successful.
# curl http://localhost:8080/get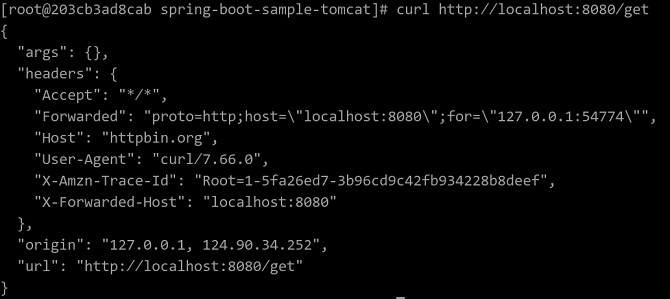
To stop the service, press Ctrl+C in the windows in Step 1.
Example of running the zuul-server project
Run the zuul-server service after running the eureka project. In the
/home/eureka/targetdirectory, run the following command to start the eureka service:# java -jar eureka-0.0.1-SNAPSHOT.jarAfter the message Started EurekaApplicattion is displayed on the console, start a new window and run the following command in the project directory
/home/zuul-server/targetto start the zuul-server service:# java -jar zuul-server-1.0.0.BUILD-SNAPSHOT.jarAfter the message Started ZuulServerApplicatttion is displayed on the console, start a new window and run the following command to check the service running status:
# curl http://localhost:8765After the zuul-server service is started, the console displays the access port 8765. When you access the local port 8765 using curl, the 404 information with the timestamp is returned, and an access event is recorded on the server.
The following figure shows how to access the port 8765 using curl:

The following figure shows the log information printed by the server when the user accesses the port:

To stop the service, press Ctrl+C in the windows in Step 2 and Step 3.
Example of running the feign-eureka project
Run the zuul-server service after running the eureka project. In the
/home/eureka/targetdirectory, run the following command to start the eureka service:# java -jar eureka-0.0.1-SNAPSHOT.jarAfter the message Started EurekaApplicattion is displayed on the console, start a new window and run the following command in the project directory
/home/feign-eureka/server/targetto start the zuul-server service:# java -jar feign-eureka-hello-server-0.0.1-SNAPSHOT.jarAfter the message Started HelloServerApplication is displayed on the console, start a new window and run the following command in the project directory
/home/feign-eureka/client/targetto start the zuul-server service:# java -jar feign-eureka-hello-client-0.0.1-SNAPSHOT.jarAfter the message Started HelloClientApplication is displayed on the console, start a new window and run the following command to check the service running status:
# curl http://localhost:7211After the service is started, you can see that port 7211 is enabled on the client console. Access this port using curl to obtain the Hello Server information.
The following figure shows the opened port 7211 of the feign-eureka project:

Access the feign-eureka service to view the returned result, as shown in the following figure:

FAQs
Spring-webmvc:test Fails During Spring Framework Compilation
Symptom
The assertion in MvcNamespaceTests.java fails to pass the test. The following figure shows the failure message:

Cause Analysis
There is an 8-hour difference between the message return time displayed on two servers.
Solution
Modify the spring-webmvc/src/test/java/org/springframework/web/servlet/config/MvcNamespaceTests.java file in the project directory.
Forcibly set the date member time of the handler to 0, which is the same as the default time converted from the local date.

Fails to Execute the asciidoctor Task
Symptom
The system prompts that the /root/.gem/jruby/1.9 folder cannot be found.

Cause Analysis
The Gradle release used by some Spring Framework versions may have problems when running on JDK 9 (due to the upgrade from AspectJ to 1.9).
Solution
Run the ./gradlew clean test command to build the environment.
Fails to Execute the Spring-test:compileJava Task
Symptom
The Spring-test:compileJava task fails to be executed, and the error message in the following figure is displayed:

Cause Analysis
The error message is displayed due to the warning. According to the cause analysis, some old packages do not exist in the repo (the repo source is specified by the build.gradle script). As a result, a warning is reported during compilation.
Solution
Edit the build.gradle script of the project and delete the -Werror option from the compilation parameters.

The repo Source Is Invalid
Symptom
The repo source is invalid, and the error message in the following figure is displayed:

Cause Analysis
This issue occasionally occurs because the network is unstable or the repo source specified in the compilation script fails to provide the required package.
Solution
Check whether the repo source settings of the build.gradle file are correct. Log in to the repo source and check whether any file is missing.

The following valid repo sources are for reference:
https://repo.Spring.io/plugins-release
https://repo.Springsource.org/plugins-release
Build Failed Due to Timeout Error
Symptom
The network-related modules fail to pass the test, and the message Task: spring-webflux:test FAILED is displayed. In addition, the code line that fails is not reported in each time of compilation.
Cause Analysis
According to the code analysis, the build fails because the response from the remote service is not received within the specified period and a timeout error occurs.
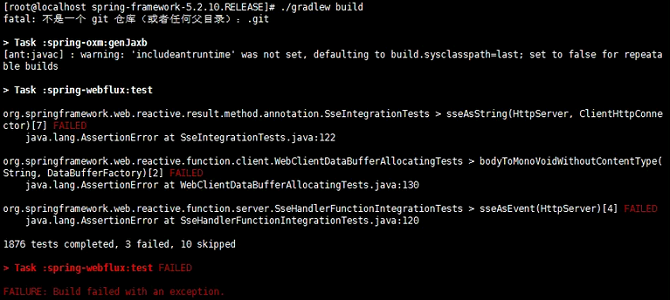
Solution
Prolong the timeout period based on the code line prompted in the error message. You can modify .verify(Duration.ofSeconds(TIMEOUT)) or .block(TIMEOUT) in the code prompted to double the value of TIMEOUT. For example, the timeout period is changed from 5 seconds to 10 seconds in the following figure:


