Building an RPM Package
This section describes how to build an RPM software package on a local PC or using OBS. For details, see the openEuler Packaging Guide.
Packaging Description
Principles
During RPM packaging, the source code needs to be compiled. The compiled configuration files and binary command files need to be placed in proper positions. The RPM packages need to be tested as required. A workspace is required for these operations. The rpmbuild command uses a set of standard workspaces.
$ rpmdev-setuptree
The rpmdev-setuptree command is used to install rpmdevtools. After the command is executed, the rpmbuild folder is generated in the /root directory (or the /home/username directory for non-root users). The directory structure is as follows:
$ tree rpmbuild
rpmbuild
├── BUILD
├── RPMS
├── SOURCES
├── SPECS
└── SRPMS
The content is described as follows:
The ~/rpmbuild/SPECS directory contains the configuration file of the RPM package, which is the drawing of the RPM package. This file tells the rpmbuild command how to build the RPM package. The Macro Code column contains the corresponding directories in the .spec file, which is similar to the macro or global variable in the programming language.
Packaging Process
The packaging process is as follows:
- Place the source code in %_sourcedir.
- Compile the source code in %_builddir. Generally, the source code is compressed and needs to be decompressed first.
- Install the RPM package. The installation is similar to pre-assembling the software package. Copy the contents (such as binary files, configuration files, and man files) that should be contained in the software package to %_buildrootdir and assemble the contents based on the actual directory structure after installation. For example, if binary commands are stored in /usr/bin, copy the directory structure to %_buildrootdir.
- Perform necessary configurations, such as preparations before installation and cleanup after installation. These are configured in the SPEC file to tell the rpmbuild command how to build.
- Check whether the software is running properly.
- The generated RPM package is stored in %_rpmdir, and the source code package is stored in %_srcrpmdir.
In the SPEC file, each phase is described as follows:
Packaging Options
Run the rpmbuild command to build the software package. The rpmbuild command can be used to build software packages by building .spec, .tar, and source files.
The format of the rpmbuild command is rpmbuild [option...]
Table 1 describes the common rpmbuild packaging options.
Table 1 rpmbuild Packaging Options
Building an RPM Package Locally
This section uses an example to describe how to build an RPM software package locally.
Setting Up the Development Environment
Prerequisites
You have obtained the root permission, and have configured a repo source for openEuler.
Procedure
You can use the DNF tool to install rpmdevtools, including the rpm-build command and related dependencies (such as make and gdb). Run the following command:
# dnf install rpmdevtools*
Creating a Hello World RPM Package
The following uses the packaging process of the GNU Hello World project as an example. The package contains the most common peripheral components related to the typical Free and Open Source Software (FOSS) project, including the configuration, compilation, and installation environments, documents, and internationalization (i18n) information.
Obtaining the Source Code
Run the following command to download the source code of the official example:
$ cd ~/rpmbuild/SOURCES
$ wget http://ftp.gnu.org/gnu/hello/hello-2.10.tar.gz
Editing the SPEC File
Run the following command to create the .spec file in the ~/rpmbuild/SPECS directory:
$ cd ~/rpmbuild/SPECS
$ vi hello.spec
Write the corresponding content to the file and save the file. The following is an example of the file content. Modify the corresponding fields based on the actual requirements.
Name:     hello
Version:  2.10
Release:  1%{?dist}
Summary:  The "Hello World" program from GNU
Summary(zh_CN): GNU Hello World program
License:  GPLv3+
URL:      http://ftp.gnu.org/gnu/hello
Source0:  http://ftp.gnu.org/gnu/hello/%{name}-%{version}.tar.gz

BuildRequires:  gettext
Requires(post): info
Requires(preun): info

%description
The "Hello World" program, done with all bells and whistles of a proper FOSS
project, including configuration, build, internationalization, help files, etc.

%description -l zh_CN
The Hello World program contains all parts required by the FOSS project, including configuration, build, i18n, and help files.

%prep
%setup -q

%build
%configure
make %{?_smp_mflags}

%install
make install DESTDIR=%{buildroot}
%find_lang %{name}
rm -f %{buildroot}/%{_infodir}/dir

%post
/sbin/install-info %{_infodir}/%{name}.info %{_infodir}/dir || :

%preun
if [ $1 = 0 ] ; then
/sbin/install-info --delete %{_infodir}/%{name}.info %{_infodir}/dir || :
fi

%files -f %{name}.lang
%doc AUTHORS ChangeLog NEWS README THANKS TODO
%license COPYING
%{_mandir}/man1/hello.1.*
%{_infodir}/hello.info.*
%{_bindir}/hello

%changelog
* Thu Dec 26 2019 Your Name <youremail@xxx.xxx> - 2.10-1
- Update to 2.10
* Sat Dec 3 2016 Your Name <youremail@xxx.xxx> - 2.9-1
- Update to 2.9
- The Name tag indicates the software name, the Version tag indicates the version number, and the Release tag indicates the release number.
- The Summary tag is a brief description. The first letter of the tag must be capitalized to prevent the rpmlint tool (packaging check tool) from generating alarms.
- The License tag describes the protocol version of the software package. The packager is responsible for checking the license status of the software, which can be implemented by checking the source code or license file or communicating with the author.
- The Group tag is used to classify software packages by /usr/share/doc/rpm/GROUPS. Currently, this tag has been discarded. However, the VIM template still has this tag. You can delete it. However, adding this tag does not affect the system. The %changelog tag should contain the log of changes made for each release, especially the description of the upstream security/vulnerability patches. The %changelog tag should contain the version string to avoid the rpmlint tool from generating alarms.
- If multiple lines are involved, such as %changelog or %description, start from the next line of the instruction and end with a blank line.
- Some unnecessary lines (such as BuildRequires and Requires) can be commented out with a number sign (#) at the beginning of the lines.
- The default values of %prep, %build, %install, and %files are retained.
Building an RPM Package
Run the following command in the directory where the .spec file is located to build the source code, binary files, and software packages that contain debugging information:
$ rpmbuild -ba hello.spec
Run the following command to view the execution result:
$ tree ~/rpmbuild/*RPMS

/home/testUser/rpmbuild/RPMS
└── aarch64
    ├── hello-2.10-1.aarch64.rpm
    ├── hello-debuginfo-2.10-1.aarch64.rpm
    └── hello-debugsource-2.10-1.aarch64.rpm
/home/testUser/rpmbuild/SRPMS
└── hello-2.10-1.src.rpm
Building an RPM Package Using the OBS
This section describes how to build RPM software packages using the OBS on the web page or with OSC. There are two methods:
- Modifying an existing software package: Modify the source code of an existing software package and build the modified source code into an RPM software package.
- Adding a software package: A new software source file is developed from scratch, and the newly developed source file is used to build an RPM software package.
OBS Overview
OBS is a general compilation framework based on the openSUSE distribution. It is used to build source code packages into RPM software packages or Linux images. OBS uses the automatic distributed compilation mode and supports the compilation of images and installation packages of multiple Linux OS distributions (such as openEuler, SUSE, and Debian) on multiple architecture platforms (such as x86 and ARM64).
OBS consists of the backend and frontend. The backend implements all core functions. The frontend provides web applications and APIs for interaction with the backend. In addition, OBS provides an API command line client OSC, which is developed in an independent repository.
OBS uses the project organization software package. Basic permission control, related repository, and build targets (OS and architecture) can be defined in the project. A project can contain multiple subprojects. Each subproject can be configured independently to complete a task.
Building an RPM Software Package Online
This section describes how to build an RPM software package online on OBS.
Building an Existing Software Package
NOTE:
- If you use OBS for the first time, register an individual account on the OBS web page.
- With this method, you must copy the modified code and commit it to the code directory before performing the following operations. The code directory is specified in the _service file.
To modify the source code of the existing software and build the modified source file into an RPM software package on the OBS web client, perform the following steps:
Log in to OBS at https://build.openeuler.org/.
Click All Projects. The All Projects page is displayed.
Click the project to be modified. The project details page is displayed. For example, click openEuler:Mainline.
On the project details page, search for the software package to be modified and click the software package name. The software package details page is displayed.
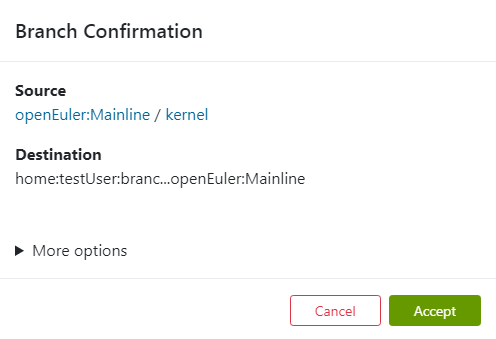
Click Branch package. In the displayed dialog box, click Accept, as shown in Figure 1.
Click the _service file to go to the editing page, modify the file content, and click Save. An example of the _service file content is as follows. userCodeURL and userCommitID indicate the user code path and commission version number or branch, respectively.
<services>
    <service name="tar_scm_kernel">
        <param name="scm">git</param>
        <param name="url">userCodeURL</param>
	<param name="revision">userCommitID</param>
    </service>
    <service name="recompress">
	<param name="compression">bz2</param>
	<param name="file">*.tar</param>
     </service>
</services>
NOTE:
NOTE:
Click Save to save the _service file. OBS downloads the source code from the specified URL to the software directory of the corresponding OBS project based on the _service file description and replaces the original file. For example, the kernel directory of the openEuler:Mainline project in the preceding example.After the files are copied and replaced, OBS automatically starts to build the RPM software package. Wait until the build is complete and view the build status in the status bar on the right.
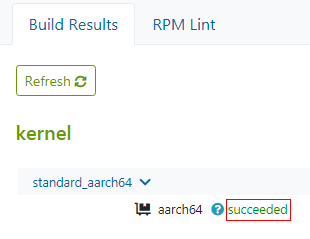
succeeded: The build is successful. You can click succeeded to view the build logs, as shown in Figure 2.
failed: The build failed. Click failed to view error logs, locate the fault, and rebuild again.
unresolvable: The build is not performed. The possible cause is that the dependency is missing.
disabled: The build is manually closed or is queuing for build.
excluded: The build is prohibited. The possible cause is that the .spec file is missing or the compilation of the target architecture is prohibited in the .spec file.
Adding a Software Package
To add a new software package on the OBS web page, perform the following steps:
Log in to the OBS console.
Select a project based on the dependency of the new software package. That is, click All Projects and select the corresponding project, for example, openEuler:Mainline.
Click a software package in the project. The software package details page is displayed.
Click Branch package. On the confirmation page that is displayed, click Accept.
Click Delete package to delete the software package in the new subproject, as shown in Figure 3.
Figure 3 Deleting a software package from a subproject

 NOTE:
NOTE:
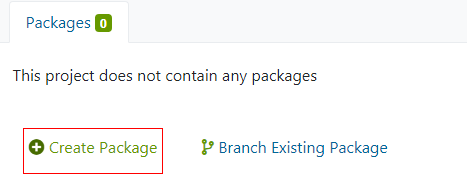
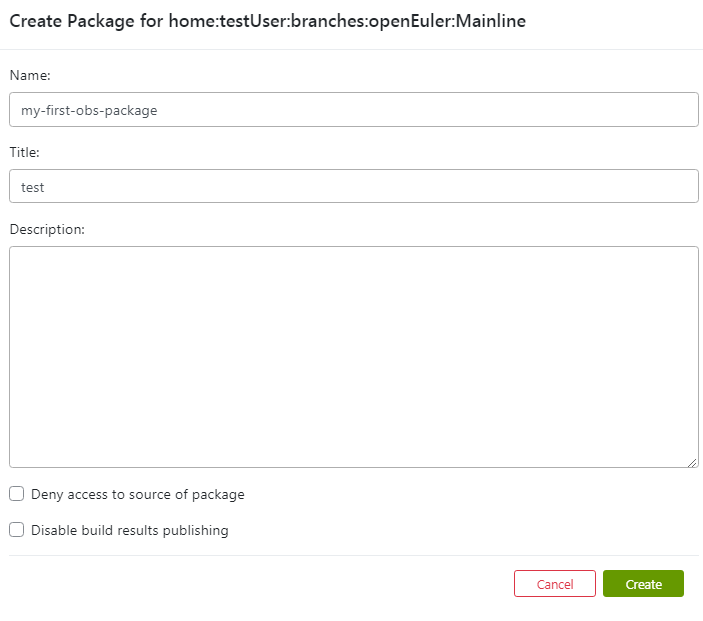
The purpose of creating a project by using existing software is to inherit the dependency such as the environment. Therefore, you need to delete these files.Click Create Package. On the page that is displayed, enter the software package name, title, and description, and click Create to create a software package, as shown in Figure 4 and Figure 5.
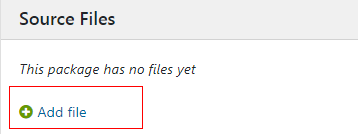
Click Add file to upload the .spec file and the file to be compiled (specified in the .spec file), as shown in Figure 6.
After the file is uploaded, OBS automatically starts to build the RPM software package. Wait until the build is complete and view the build status in the status bar on the right.
- succeeded: The build is successful. You can click succeeded to view the build logs.
- failed: The build failed. Click failed to view error logs, locate the fault, and rebuild again.
- unresolvable: The build is not performed. The possible cause is that the dependency is missing.
- disabled: The build is manually closed or is queuing for build.
- excluded: The build is prohibited. The possible cause is that the .spec file is missing or the compilation of the target architecture is prohibited in the .spec file.
Obtaining the Software Package
After the RPM software package is built, perform the following operations to obtain the RPM software package on the web page:
Log in to the OBS console.
Click All Projects and find the project corresponding to the required software package, for example, openEuler:Mainline.
Click the name of the required software package in the project. The software package details page is displayed, for example, the kernel page in the preceding example.
Click the Repositories tab. On the software repository management page that is displayed, click Enable in Publish Flag to enable the RPM software package download function (the status changes from
 to
to  ), as shown in Figure 7.
Click the project name in the Repository column. On the RPM software package download page that is displayed, click Download on the right of the RPM software package to download the RPM software package, as shown in Figure 8.
Building a Software Package Using OSC
This section describes how to use the OBS command line tool OSC to create a project and build an RPM software package.
Installing and Configuring the OSC
Prerequisites
You have obtained the root permission, and have configured a repo source for openEuler.
Procedure
Install the OSC command line tool and its dependency as the root user.
# dnf install osc build NOTE:
NOTE:
The compilation of RPM software packages depends on build.Configure the OSC.
Run the following command to open the ~/.oscrc file:
$ vi ~/.oscrcAdd the user and pass fields to ~/.oscrc. The values of userName and passWord are the account and password registered on the OBS website (https://build.openeuler.org/).
[general]
apiurl = https://build.openeuler.org/
[https://build.openeuler.org/]
user=userName
pass=passWord
Building an Existing Software Package
Creating a Project
You can copy an existing project to create a subproject of your own. For example, to copy the zlib software package in the openEuler:Mainline project to the new branch, run the following command:
$ osc branch openEuler:Mainline zlibIf the following information is displayed, a new branch project home:testUser:branches:openEuler:Mainline is created for user testUser.
A working copy of the branched package can be checked out with:
osc co home:testUser:branches:openEuler:Mainline/zlib
Download the configuration file (for example, _service) of the software package to be modified to the local directory. In the preceding command, testUser indicates the account name configured in the ~/.oscrc configuration file. Change it based on the actual requirements.
$ osc co home:testUser:branches:openEuler:Mainline/zlibInformation similar to the following is displayed:
A    home:testUser:branches:openEuler:Mainline
A    home:testUser:branches:openEuler:Mainline/zlib
A    home:testUser:branches:openEuler:Mainline/zlib/_service
Go to the local subproject directory and synchronize the remote code of the software package to the local host.
$ cd home:testUser:branches:openEuler:Mainline/zlib
$ osc up -S
Information similar to the following is displayed:
A    _service:tar_scm_kernel_repo:0001-Neon-Optimized-hash-chain-rebase.patch
A    _service:tar_scm_kernel_repo:0002-Porting-optimized-longest_match.patch
A    _service:tar_scm_kernel_repo:0003-arm64-specific-build-patch.patch
A    _service:tar_scm_kernel_repo:zlib-1.2.11-optimized-s390.patch
A    _service:tar_scm_kernel_repo:zlib-1.2.11.tar.xz
A    _service:tar_scm_kernel_repo:zlib-1.2.5-minizip-fixuncrypt.patch
A    _service:tar_scm_kernel_repo:zlib.spec
Building an RPM Package
Rename the source file and add the renamed source file to the temporary storage of OBS.
$ rm -f _service;for file in `ls | grep -v .osc`;do new_file=${file##*:};mv $file $new_file;done
$ osc addremove *
Modify the source code and .spec file, and run the following command to update the file.
$ osc upSynchronize all modifications of the corresponding software package to the OBS server. The following is an example of command. The information after the -m parameter indicates the submmission record.
$ osc ci -m "commit log"Run the following command to obtain the repository name and architecture of the current project:
$ osc repos home:testUser:branches:openEuler:MainlineAfter the modification is committed, OBS automatically compiles the software package. You can run the following command to view the compilation logs of the corresponding repository. In the command, standard_aarch64 and aarch64 indicate the repository name and architecture obtained in the command output.
$ osc buildlog standard_aarch64 aarch64 NOTE:
NOTE:
You can also open the created project on the web client to view the build logs.
Adding a Software Package
To use the OSC tool of OBS to add a new software package, perform the following steps:
Creating a Project
Create a project based on the dependency of the new software package and a proper project. For example, to create a project based on zlib of the openEuler:Mainline project, run the following command (zlib is any software package in the project):
$ osc branch openEuler:Mainline zlibDelete unnecessary software packages added during project creation. For example, to delete the zlib software package, run the following command:
$ cd home:testUser:branches:openEuler:Mainline
$ osc rm zlib
$ osc commit -m "commit log"
Create a software package in your own project. For example, to add the my-first-obs-package software package, run the following command:
$ mkdir my-first-obs-package
$ cd my-first-obs-package
Building an RPM Package
Add the prepared source file and .spec file to the software package directory.
Modify the source code and .spec file, and upload all files of the corresponding software package to the OBS server. The following is a command example. The information after the -m parameter is the commission record.
$ cd home:testUser:branches:openEuler:Mainline
$ osc add my-first-obs-package
$ osc ci -m "commit log"
Run the following command to obtain the repository name and architecture of the current project:
$ osc repos home:testUser:branches:openEuler:MainlineAfter the modification is committed, OBS automatically compiles the software package. You can run the following command to view the compilation logs of the corresponding repository. In the command, standard_aarch64 and aarch64 indicate the repository name and architecture obtained in the command output.
$ cd home:testUser:branches:openEuler:Mainline/my-first-obs-package
$ osc buildlog standard_aarch64  aarch64
NOTE:
NOTE:
You can also open the created project on the web client to view the build logs.
Obtaining the Software Package
After the RPM software package is built, run the following command to obtain the RPM software package using the OSC:
$ osc getbinaries home:testUser:branches:openEuler:Mainline my-first-obs-package standard_aarch64 aarch64
The parameters in the command are described as follows. You can modify the parameters according to the actual situation.
- home:testUser:branches:openEuler:Mainline: name of the project to which the software package belongs.
- my-first-obs-package: name of the software package.
- standard_aarch64: repository name.
- aarch64: repository architecture name.
NOTE:
You can also obtain the software package built using OSC from the web page. For details, see Obtaining the Software Package.


