Managing VMs
VM Life Cycle
Introduction
Overview
To leverage hardware resources and reduce costs, users need to properly manage VMs. This section describes basic operations during the VM lifecycle, such as creating, using, and deleting VMs.
VM Status
A VM can be in one of the following status:
- undefined: The VM is not defined or created. That is, libvirt considers that the VM does not exist.
- shut off: The VM has been defined but is not running, or the VM is terminated.
- running: The VM is running.
- paused: The VM is suspended and its running status is temporarily stored in the memory. The VM can be restored to the running status.
- saved: Similar to the paused status, the running state is stored in a persistent storage medium and can be restored to the running status.
- crashed: The VM crashes due to an internal error and cannot be restored to the running status.
Status Transition
VMs in different status can be converted, but certain rules must be met. Figure 1 describes the common rules for transiting the VM status.
Figure 1 Status transition diagram![]()
VM ID
In libvirt, a created VM instance is called a domain, which describes the configuration information of resources such as the CPU, memory, network device, and storage device of the VM. On a host, each domain has a unique ID, which is represented by the VM Name, UUID, and Id. For details, see Table 1. During the VM lifecycle, an operation can be performed on a specific VM by using a VM ID.
Table 1 Domain ID description
NOTE: Run the virsh command to query the VM ID and UUID. For details, see Querying VM Information.
Management Commands
Overview
You can use the virsh command tool to manage the VM lifecycle. This section describes the commands related to the lifecycle.
Prerequisites
- Before performing operations on a VM, you need to query the VM status to ensure that the operations can be performed. For details about the conversion between status, see Status Transition.
- You have administrator rights.
- The VM XML configuration files are prepared.
Command Usage
You can run the virsh command to manage the VM lifecycle. The command format is as follows:
virsh <operate> <obj> <options>
The parameters are described as follows:
- operate: manages VM lifecycle operations, such as creating, deleting, and starting VMs.
- obj: specifies the operation object, for example, the VM to be operated.
- options: command option. This parameter is optional.
Table 1 describes the commands used for VM lifecycle management. VMInstance indicates the VM name, VM ID, or VM UUID, XMLFile indicates the XML configuration file of the VM, and DumpFile indicates the dump file. Change them based on the site requirements.
Table 1 VM Lifecycle Management Commands
Example
This section provides examples of commands related to VM life cycle management.
Create a VM.
The VM XML configuration file is openEulerVM.xml. The command and output are as follows:
$ virsh define openEulerVM.xml
Domain openEulerVM defined from openEulerVM.xml
Start a VM.
Run the following command to start the openEulerVM:
$ virsh start openEulerVM
Domain openEulerVM started
Reboot a VM.
Run the following command to reboot the openEulerVM:
$ virsh reboot openEulerVM
Domain openEulerVM is being rebooted
Shut down a VM.
Run the following command to shut down the openEulerVM:
$ virsh shutdown openEulerVM
Domain openEulerVM is being shutdown
Destroy a VM.
If the nvram file is not used during the VM startup, run the following command to destroy the VM:
virsh undefine <VMInstance>If the nvram file is used during the VM startup, run the following command to specify the nvram processing policy when destroying the VM:
virsh undefine <VMInstance> <strategy>strategy indicates the policy for destroying a VM. The values can be:
--nvram: delete the corresponding nvram file when destroying a VM.
--keep-nvram: destroy a VM but retain the corresponding nvram file.
For example, to delete the openEulerVM and its nvram file, run the following command:
$ virsh undefine openEulerVM --nvram
Domain openEulerVM has been undefined
Modifying VM Configurations Online
Overview
After a VM is created, users can modify VM configurations. This process is called online modification of VM configuration. After the configuration is modified online, the new VM configuration file is persistent and takes effect after the VM is shut down and restarted.
The format of the command for modifying VM configuration is as follows:
virsh edit <VMInstance>
The virsh edit command is used to edit the XML configuration file corresponding to domain to update VM configuration. virsh edit uses the vi program as the default editor. You can specify the editor type by modifying the environment variable EDITOR or VISUAL. By default, virsh edit preferentially uses the text editor specified by the environment variable VISUAL.
Procedure
(Optional) Set the editor of the virsh edit command to vim.
export VISUAL=vimRun the virsh edit command to open the XML configuration file of the openEulerVM.
virsh edit openEulerVMModify the VM configuration file.
Save the VM configuration file and exit.
Shut down the VM.
virsh shutdown openEulerVMStart the VM for the modification to take effect.
virsh start openEulerVM
Querying VM Information
Overview
The libvirt provides a set of command line tools to query VM information. This section describes how to use commands to obtain VM information.
Prerequisites
To query VM information, the following requirements must be met:
The libvirtd service is running.
Only the administrator has the permission to execute command line.
Querying VM Information on a Host
Query the list of running and paused VMs on a host.
virsh listFor example, the following command output indicates that three VMs exist on the host. openEulerVM01 and openEulerVM02 are running, and openEulerVM03 is paused.
 Id    Name                           State
----------------------------------------------------
 39    openEulerVM01                   running
 40    openEulerVM02                   running
 69    openEulerVM03                   paused
Query the list of VM information defined on a host.
virsh list --allFor example, the following command output indicates that four VMs are defined on the current host. openEulerVM01 is running, openEulerVM02 is paused, and openEulerVM03 and openEulerVM04 are shut down.
 Id    Name                           State
----------------------------------------------------
 39    openEulerVM01                  running
 69    openEulerVM02                  paused
 -     openEulerVM03                  shut off
 -     openEulerVM04                  shut off
Querying Basic VM Information
Libvirt component provides a group of commands for querying the VM status, including the VM running status, device information, and scheduling attributes. For details, see Table 1.
Table 1 Querying basic VM information
Example
Run the virsh dominfo command to query the basic information about a created VM. The query result shows that the VM ID is 5, UUID is ab472210-db8c-4018-9b3e-fc5319a769f7, memory size is 8 GiB, and the number of vCPUs is 4.
$ virsh dominfo openEulerVM
Id:             5
Name:           openEulerVM
UUID:           ab472210-db8c-4018-9b3e-fc5319a769f7
OS Type:        hvm
State:          running
CPU(s):         4
CPU time:       6.8s
Max memory:     8388608 KiB
Used memory:    8388608 KiB
Persistent:     no
Autostart:      disable
Managed save:   no
Security model: none
Security DOI:   0
Run the virsh domstate command to query the VM status. The query result shows that VM openEulerVM is running.
$ virsh domstate openEulerVM
running
Run virsh schedinfo to query the VM scheduling information. The query result shows that the CPU reservation share of the VM is 1024.
$ virsh schedinfo openEulerVM
Scheduler      : posix
cpu_shares     : 1024
vcpu_period    : 100000
vcpu_quota     : -1
emulator_period: 100000
emulator_quota : -1
global_period  : 100000
global_quota   : -1
iothread_period: 100000
iothread_quota : -1
Run the virsh vcpucount command to query the number of vCPUs. The query result shows that the VM has four CPUs.
$ virsh vcpucount openEulerVM
maximum      live           4
current      live           4
Run the virsh domblklist command to query the VM disk information. The query result shows that the VM has two disks. sda is a virtual disk in qcow2 format, and sdb is a cdrom device.
 $ virsh domblklist openEulerVM
 Target   Source
---------------------------------------------------------------------
 sda      /home/openeuler/vm/openEuler_aarch64.qcow2
 sdb      /home/openeuler/vm/openEuler-21.03-aarch64-dvd.iso
Run the virsh domiflist command to query the VM NIC information. The query result shows that the VM has one NIC, the backend is vnet0, which is on the br0 bridge of the host. The MAC address is 00:05:fe:d4:f1:cc.
$ virsh domiflist openEulerVM
Interface  Type       Source     Model       MAC
-------------------------------------------------------
vnet0      bridge     br0        virtio      00:05:fe:d4:f1:cc
Run the virsh iothreadinfo command to query the VM I/O thread information. The query result shows that the VM has five I/O threads, which are scheduled on physical CPUs 7-10.
$ virsh iothreadinfo openEulerVM
 IOThread ID     CPU Affinity
---------------------------------------------------
 3               7-10
 4               7-10
 5               7-10
 1               7-10
 2               7-10
Logging In to a VM
This section describes how to log in to a VM using VNC.
Logging In Using VNC Passwords
Overview
After the OS is installed on a VM, you can remotely log in to the VM using VNC to manage the VM.
Prerequisites
Before logging in to a VM using a client, such as RealVNC or TightVNC, ensure that:
You have obtained the IP address of the host where the VM resides.
The environment where the client resides can access the network of the host.
You have obtained the VNC listening port of the VM. This port is automatically allocated when the client is started. Generally, the port number is 5900 + x (x is a positive integer and increases in ascending order based on the VM startup sequence. 5900 is invisible to users.)
If a password has been set for the VNC, you also need to obtain the VNC password of the VM.
NOTE:
To set a password for the VM VNC, edit the XML configuration file of the VM. That is, add the passwd attribute to the graphics element and set the attribute value to the password to be configured. For example, to set the VNC password of the VM to n8VfjbFK, configure the XML file as follows:
>```xml
>    <graphics type='vnc' port='5900' autoport='yes' listen='0.0.0.0' keymap='en-us' passwd='n8VfjbFK'>
>      <listen type='address' address='0.0.0.0'/>
>    </graphics>
>```
Procedure
Procedure
Query the VNC port number used by the VM. For example, if the VM name is openEulerVM, run the following command:
$ virsh vncdisplay openEulerVM
:3
NOTE:
To log in to the VNC, you need to configure firewall rules to allow the connection of the VNC port. The reference command is as follows, where X is 5900 + Port number, for example, 5903.firewall-cmd --zone=public --add-port=X/tcpStart the VncViewer software and enter the IP address and port number of the host. The format is host IP address:port number, for example, 10.133.205.53:3.
Click OK and enter the VNC password (optional) to log in to the VM VNC.
Configuring VNC TLS Login
Overview
By default, the VNC server and client transmit data in plaintext. Therefore, the communication content may be intercepted by a third party. To improve security, openEuler allows the VNC server to configure the Transport Layer Security (TLS) mode for encryption and authentication. TLS implements encrypted communication between the VNC server and client to prevent communication content from being intercepted by third parties.
- To use the TLS encryption authentication mode, the VNC client must support the TLS mode (for example, TigerVNC). Otherwise, the VNC client cannot be connected.
- The TLS encryption authentication mode is configured at the host level. After this feature is enabled, the TLS encryption authentication mode is enabled for the VNC clients of all VMs running on the host.
Procedure
To enable the TLS encryption authentication mode for the VNC, perform the following steps:
Log in to the host where the VNC server resides, and edit the corresponding configuration items in the /etc/libvirt/qemu.conf configuration file of the server. The configuration is as follows:
vnc_listen = "x.x.x.x"                    # "x.x.x.x" indicates the listening IP address of the VNC. Set this parameter based on the site requirements. The VNC server allows only the connection requests from clients whose IP addresses are in this range.
vnc_tls = 1                        # If this parameter is set to 1, VNC TLS is enabled.
vnc_tls_x509_cert_dir = "/etc/pki/libvirt-vnc"                           # Specify /etc/pki/libvirt-vnc as the path for storing the certificate.
vnc_tls_x509_verify = 1                              #If this parameter is set to 1, the X509 certificate is used for TLS authentication.
Create a certificate and a private key file for the VNC. The following uses GNU TLS as an example.
NOTE:
To use GNU TLS, install the gnu-utils software package in advance.Create a certificate file issued by the Certificate Authority (CA).
certtool --generate-privkey > ca-key.pemCreate a self-signed public and private key for the CA certificate. Your organization name indicates the organization name, which is specified by the user.
$ cat > ca.info<<EOF
cn = Your organization name
ca
cert_signing_key
EOF
certtool --generate-self-signed \ --load-privkey ca-key.pem \ --template ca.info \ --outfile ca-cert.pemIn the preceding generated file, ca-cert.pem is the generated CA public key, andca-key.pem is the generated CA private key. The CA must keep them properly to prevent disclosure.
Issue a certificate to the VNC server. Client Organization Name indicates the actual service name, for example, cleint.foo.com. Set this parameter based on the site requirements.
$ cat > server.info<<EOF
cn = Server Organization Name
tls_www_server
encryption_key
signing_key
EOF
certtool --generate-privkey > server-key.pem certtool --generate-certificate \ --load-ca-certificate ca-cert.pem \ --load-ca-privkey ca-key.pem \ --load-privkey server-key.pem \ --template server.info \ --outfile server-cert.pemIn the preceding generated file, server-key.pem is the private key of the VNC server, and server-cert.pem is the public key of the VNC server.
Issue a certificate to the VNC client.
$ cat > client.info<<EOF
cn = Client Organization Name
tls_www_client
encryption_key
signing_key
EOF
certtool --generate-privkey > client-key.pem certtool --generate-certificate \ --load-ca-certificate ca-cert.pem \ --load-ca-privkey ca-key.pem \ --load-privkey client-key.pem \ --template client.info \ --outfile client-cert.pemIn the preceding generated file, client-key.pem is the private key of the VNC client, and client-cert.pem is the public key of the VNC client. The generated public and private key pairs need to be copied to the VNC client.
Shut down the VM to be logged in to and restart the libvirtd service on the host where the VNC server resides.
systemctl restart libvirtdSave the generated server certificate to the specified directory on the VNC server and grant the read and write permissions on the certificate only to the current user.
sudo mkdir -m 750 /etc/pki/libvirt-vnc
cp ca-cert.pem /etc/pki/libvirt-vnc/ca-cert.pem
cp server-cert.pem /etc/pki/libvirt-vnc/server-cert.pem
cp server-key.pem /etc/pki/libvirt-vnc/server-key.pem
chmod 0600 /etc/pki/libvirt-vnc/*
Copy the generated client certificates ca-cert.pem, client-cert.pem, and client-key.pem to the VNC client. After the TLS certificate of the VNC client is configured, you can use VNC TLS to log in to the VM.
NOTE:- For details about how to configure the VNC client certificate, see the usage description of each client.
- For details about how to log in to the VM, see Logging In Using VNC Passwords.
VM Secure Boot
General Introduction
Overview
Secure boot uses public and private key pairs to sign and validate boot components. During the startup, the previous component validates the digital signature of the next component. If the validation is successful, the next component starts. If the validation fails, the startup fails. Secure boot is used to detect whether the firmware and software during startup of the device are tampered with to prevent malware from intrusion and modification. Secure boot ensures the integrity of each component during system startup and prevents unauthorized components from being loaded and running, thereby preventing security threats to the system and user data. Secure boot is implemented based on the UEFI boot mode. It is not supported by the legacy boot mode. According to UEFI specifications, some reliable public keys can be built in the mainboard before delivery. Any operating system or hardware drivers that you want to load on this mainboard must be authenticated by these public keys. The secure boot of a physical machine is implemented by the physical BIOS, while the secure boot of a VM is simulated by software. The process of the VM secure boot is the same as that of the host secure boot, both complying with the open-source UEFI specifications. The UEFI on the virtualization platform is provided by the edk component. When a VM starts, QEMU maps the UEFI image to the memory to simulate the firmware startup process for the VM. Secure boot is a security protection capability provided by edk during the VM startup to protect the OS kernel of the VM from being tampered with. The sequence of signature validation for the secure boot is as follows: UEFI BIOS->shim->GRUB->vmlinuz (signature validation is passed and loaded in sequence).
| English | Acronyms and Abbreviations | Description |
|---|---|---|
| Secure boot | - | Secure boot indicates that a component validates the digital signature of the next component during startup. If the validation is successful, the component runs. If the validation fails, the component stops running. It ensures the integrity of each component during system startup. |
| Platform key | PK | Platform key is owned by the OEM vendor and must be RSA2048 or stronger. The PK establishes a trusted relationship between the platform owner and the platform firmware. The platform owner registers the PKpub, public key of the PK, with the platform firmware. The platform owner can use the PKpriv, private part of the PK, to change the ownership of the platform or register the KEK key. |
| Key exchange key | KEK | Key exchange key creates a trusted relationship between the platform firmware and the OS. Each OS and third-party application that communicates with the platform firmware register the KEKpub, public part of the KEK key, in the platform firmware. |
| Database trustlist | DB | Database trustlist stores and validates the keys of components such as shim, GRUB, and vmlinuz. |
| Database blocklist | DBx | Database blocklist stores revoked keys. |
Function Description
The VM secure boot feature is implemented based on the edk open-source project. In non-secure boot mode, the basic Linux process is as follows:
Figure 1 System startup process
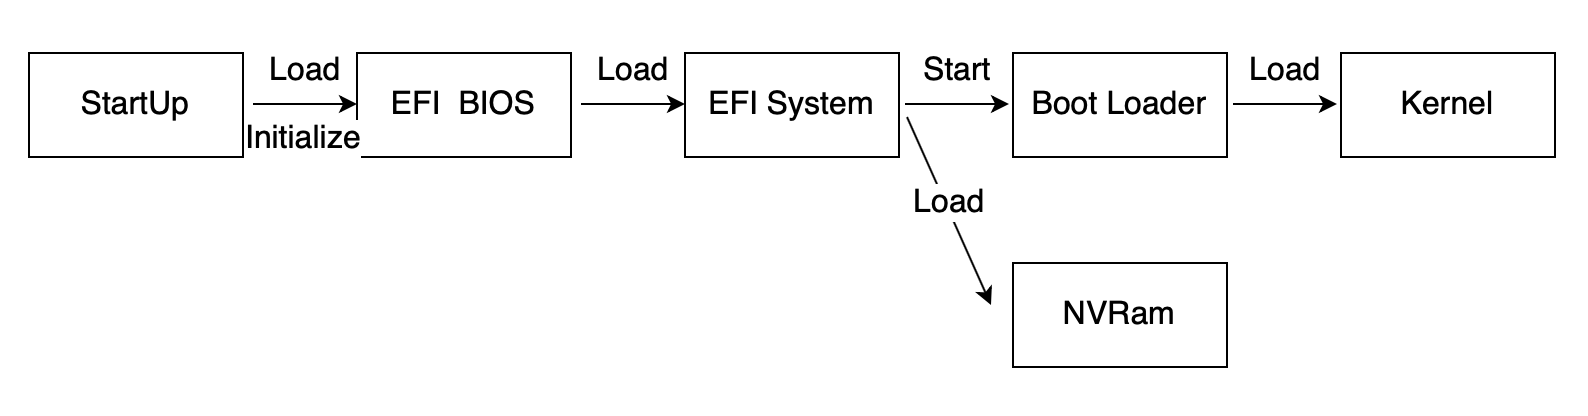
In secure boot mode, the first component loaded after UEFI BIOS starts is shim in the system image. By interacting with UEFI BIOS, shim obtains the key stored in the variable DB of UEFI BIOS to validate GRUB. After GRUB is loaded, the key and the authentication API are also called to validate the kernel. The Linux boot process is as follows:
Figure 2 Secure boot process
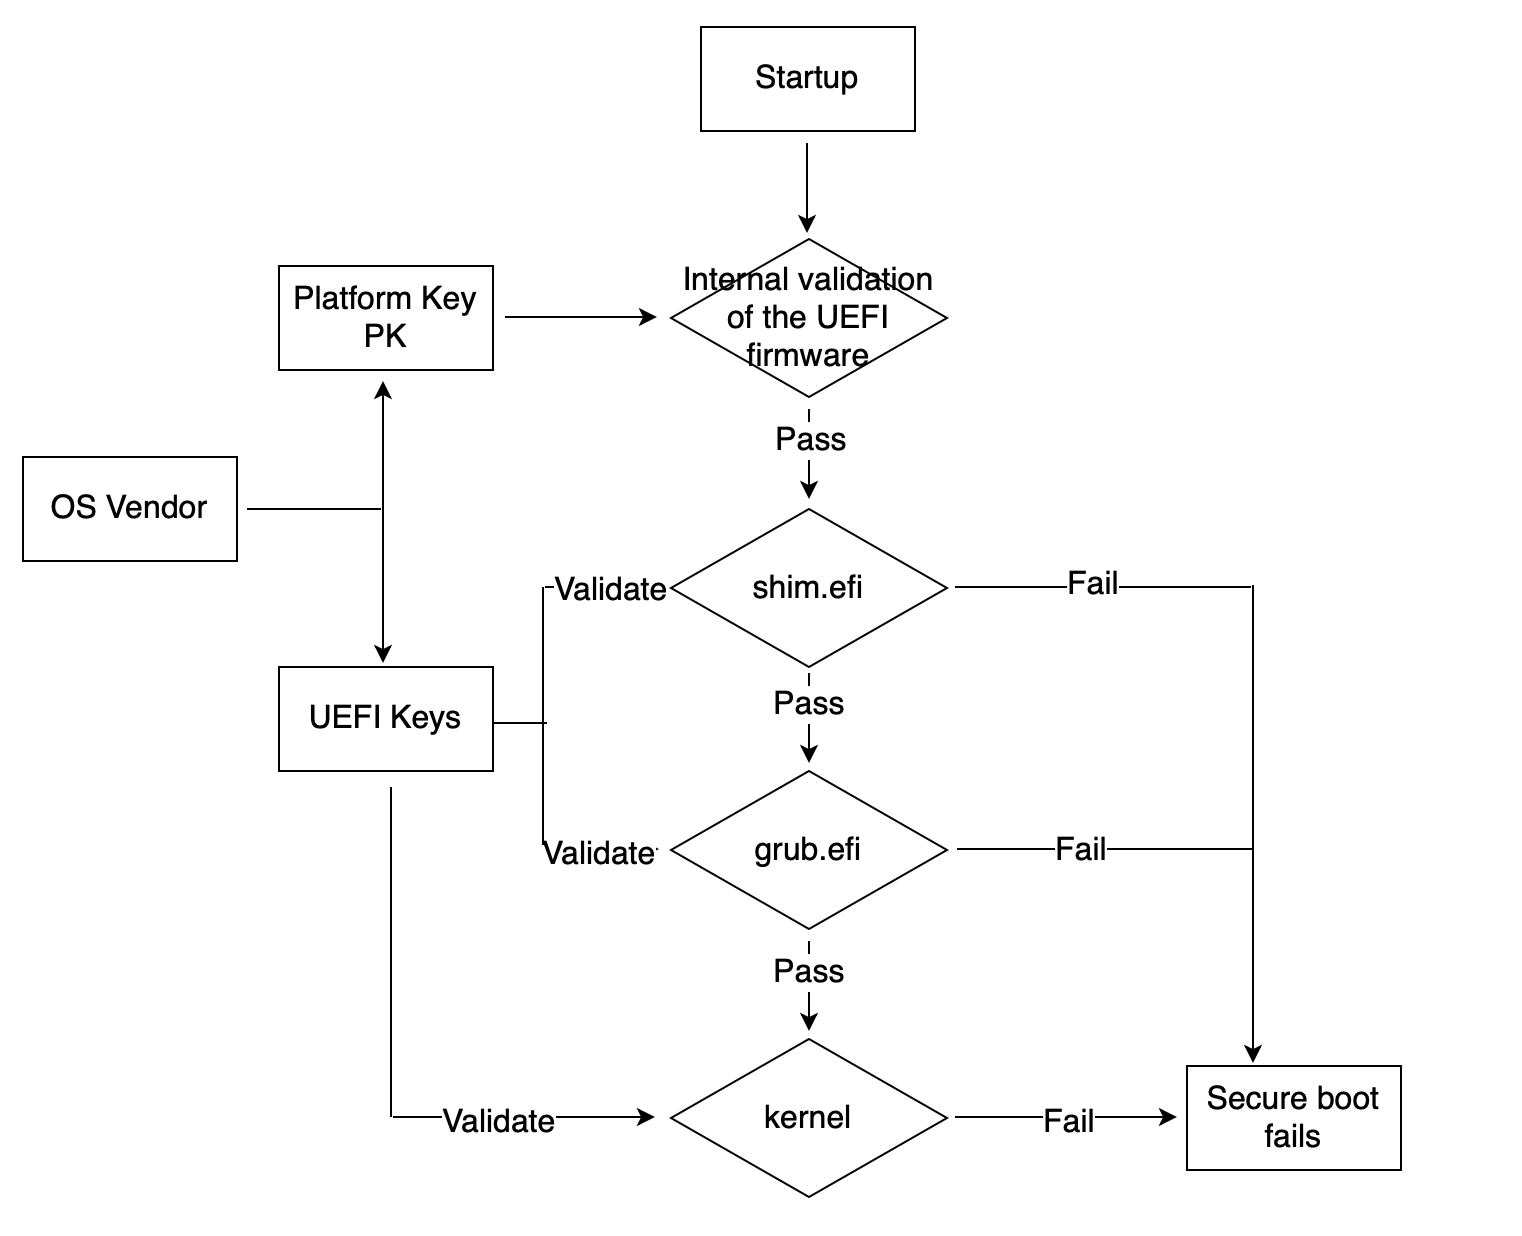
The secure boot feature involves multiple key scenarios. Based on the scenario analysis and system breakdown, the secure boot feature involves the following subsystems: UEFI BIOS validating shim, shim validating GRUB, and GRUB validating kernel. When UEFI BIOS validates shim, if the validation is successful, shim is started. If the validation fails, an error message is displayed and shim fails to start. Shim needs to use the private key for signature during image compilation and creation, and the public key certificate needs to be imported to the variable area DB of UEFI BIOS. After shim is started, validate the startup of GRUB. If the validation is successful, GRUB is started. If the validation fails, an error message is displayed and GRUB fails to start. GRUB needs to be signed during image compilation and creation. The public and private key pairs are the same as those of shim. After GRUB is started, it calls the key and the authentication API key registered in UEFI BIOS to validate the kernel. If the validation is successful, GRUB starts the kernel. If the validation fails, an error message is displayed. GRUB needs to sign the image during compilation and creation and uses the public and private key pair that is the same as that of shim.
Constraints
- Running on the UEFI BIOS that does not support secure boot does not affect existing functions and services.
- The secure boot feature depends on the UEFI BIOS and takes effect only when the UEFI supports this feature.
- When secure boot is enabled in the UEFI BIOS, the system cannot be started if the related components have no signature or the signature is incorrect.
- If secure boot is disabled in the UEFI BIOS, the validation function during the boot process is disabled.
- The second half of the secure boot validation chain, that is, shim->GRUB->kernel, guides the kernel to start. This part of the validation chain is implemented by the OS image. If the OS does not support guiding the kernel for secure boot, the VM secure boot fails.
- Currently, the x86 architecture do not provide nvram file configuration to configure VM secure boot.
Secure Boot Practice
VM secure boot depends on UEFI BIOS. The UEFI BIOS image is installed using the edk rpm package. This section uses AArch64 as an example to describe how to configure VM secure boot.
Configuring VM
The components in the edk rpm package are installed in the /usr/share/edk2/aarch64 directory, including QEMU_EFI-pflash.raw and vars-template-pflash.raw. The following describes the XML configuration of the UEFI BIOS during VM startup.
<os>
    <type arch='aarch64' machine='virt'>hvm</type>
    <loader readonly='yes' type='pflash'>/usr/share/edk2/aarch64/QEMU_EFI-pflash.raw</loader>
    <nvram template='/usr/share/edk2/aarch64/vars-template-pflash.raw'>/path/to/QEMU-VARS.fd</nvram>
</os>
In the preceding configuration, /usr/share/edk2/aarch64/QEMU_EFI-pflash.raw indicates the path of the UEFI BIOS image. /usr/share/edk2/aarch64/vars-template-pflash.raw is the path of the NVRAM image template, and /path/to/QEMU-VARS.fd is the path of the NVRAM image file of the current VM, which is used to store environment variables in the UEFI BIOS.
Importing Certificate
The certificate for VM secure boot is imported from the BIOS page. Before importing the certificate, you need to import the certificate file to the VM. You can mount the directory where the certificate file is located to the VM by mounting a disk. For example, you can create an image that contains the certificate and mount the image in the XML configuration file of the VM.
Create a certificate file image.
dd of='/path/to/data.img' if='/dev/zero' bs=1M count=64
mkfs.vfat -I /path/to/data.img
mkdir /path/to/mnt
mount path/to/data.img /path/to/mnt/
cp -a /path/to/certificates/* /path/to/mnt/
umount /path/to/mnt/
In the preceding command, /path/to/certificates/ indicates the path where the certificate file is located, /path/to/data.img indicates the path where the certificate file image is located, and /path/to/mnt/ indicates the image mounting path.
Mount the image in the XML file of the VM.
<devices>
 <disk type='file' device='disk'>
  <driver name='qemu' type='raw' cache='none' io='native'/>
  <source file='/path/to/data.img'/>
  <target dev='sdc' bus='scsi'/>
  <boot order='2'/>
  <readonly/>
 </disk>
</devices>
Start the VM and import the PK certificate. The procedure is as follows (the procedure for importing the KEK certificate is the same as that for importing the DB certificate):
After the VM is started, press F2 to go to the BIOS screen.
Figure 1 BIOS screen
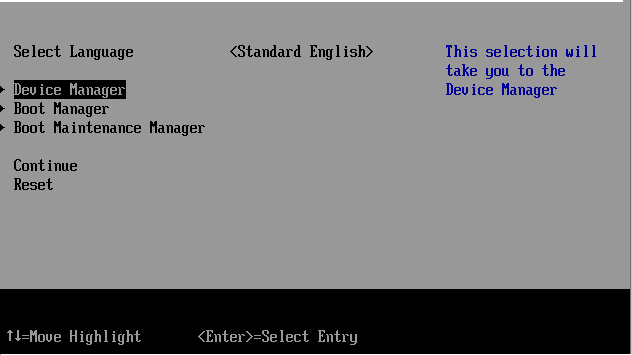
Figure 2 Device Manager
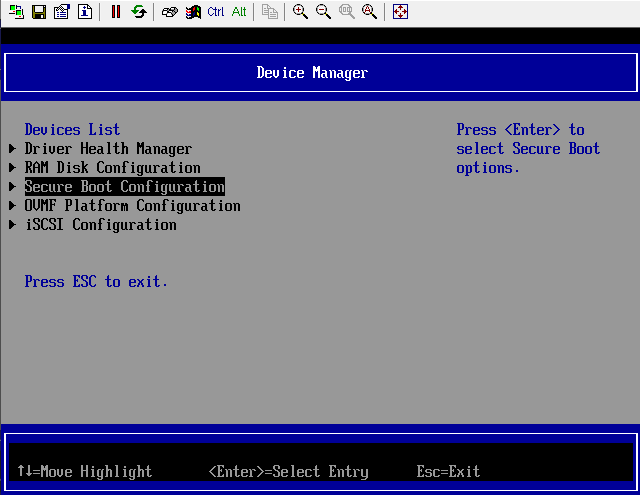
Figure 3 Custom Secure Boot Options
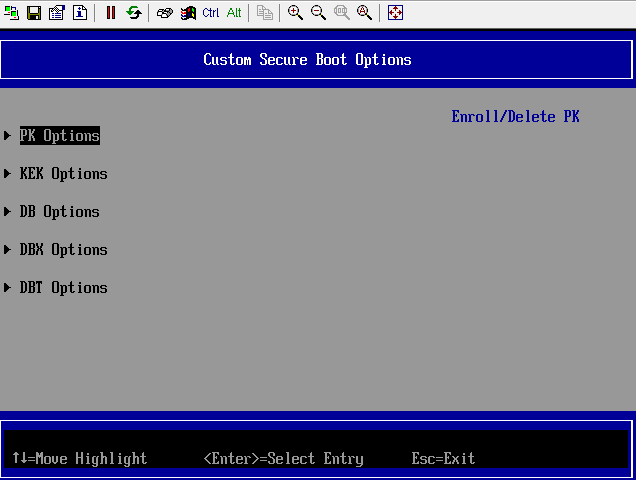
Figure 4 PK Options
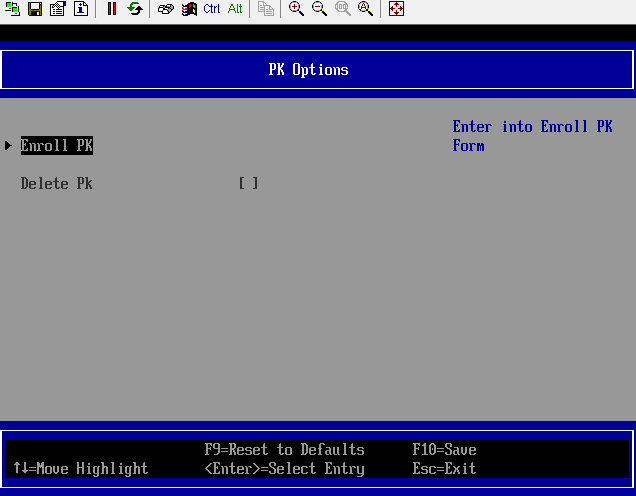
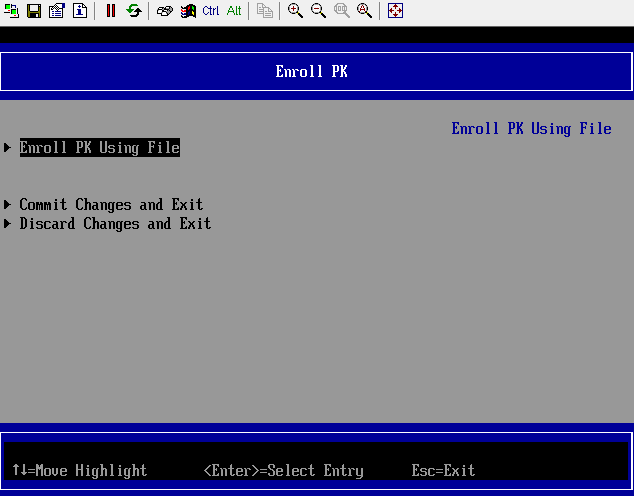
Figure 5 Enrolling PK
In the File Explorer window, many disk directories are displayed, including the certificate file directory mounted through the disk.
Figure 6 File Explorer
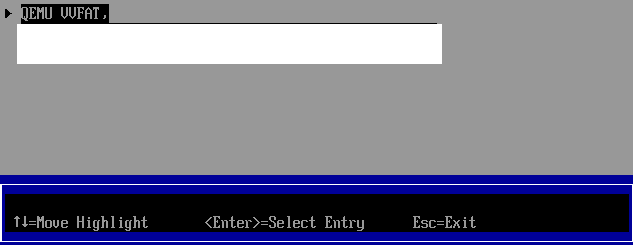
Select the PK certificate to be imported in the disk directory.
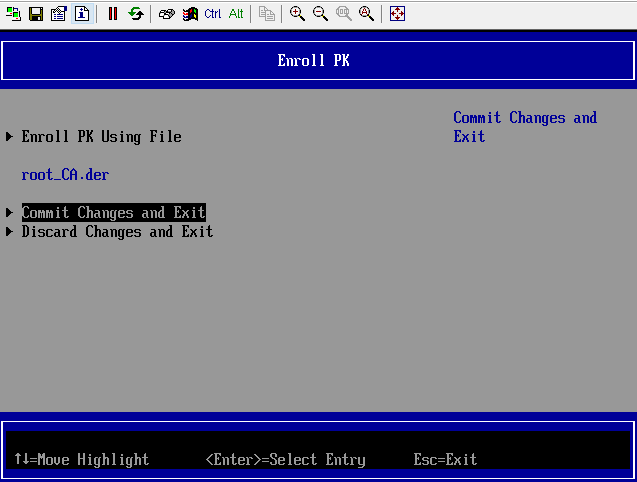
Figure 7 Disk where the certificate is stored
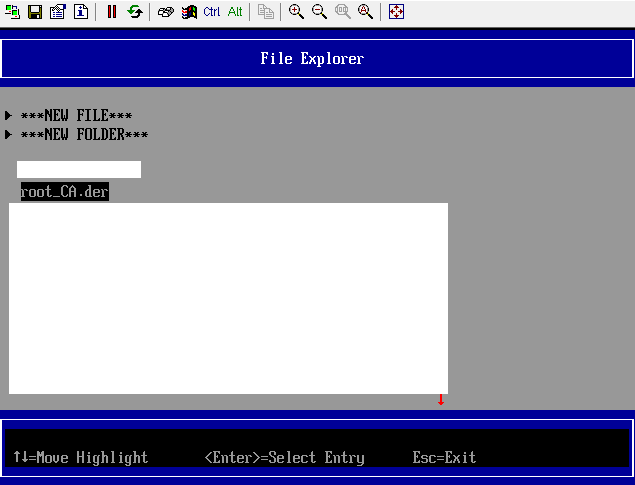
Figure 8 Selecting Commit Changes and Exit to save the imported certificate
After the certificate is imported, the UEFI BIOS writes the certificate information and secure boot attributes to the NVRAM configuration file /path/to/QEMU-VARS.fd. Upon the next startup, the VM reads related configurations from the /path/to/QEMU-VARS.fd file, initializes certificate information and secure boot attributes, automatically imports the certificate, and enables secure boot. Similarly, you can use /path/to/QEMU-VARS.fd as the UEFI BIOS boot configuration template file of other VMs with the same configuration. Modify the nvram template field so that the certificate is automatically imported and the secure boot option is enabled when other VMs are started. The VM XML configuration is modified as follows:
<os>
    <type arch='aarch64' machine='virt'>hvm</type>
    <loader readonly='yes' type='pflash'>/usr/share/edk2/aarch64/QEMU_EFI-pflash.raw</loader>
    <nvram template='/path/to/QEMU-VARS.fd'></nvram>
</os>
Secure Boot Observation
After the VM is correctly configured and the PK, KEK, and DB certificates are imported, the VM runs in secure boot mode. You can configure the serial port log file in the VM configuration file in XML format to check whether the VM is in the secure boot mode. The following figure shows how to configure the serial port log file.
<serial type='file'>
 <source path='/path/to/log_file' append='on'/>
</serial>
After the OS image is successfully loaded to the VM, if "UEFI Secure Boot is enabled" is displayed in the serial port log file, the VM is in the secure boot state.