A-Ops Service Deployment Manual
1 Description
A-Ops is an intelligent O&M tool. It implements the basic intelligent O&M framework and provides configuration source tracing, architecture awareness, and the basic capabilities of fault locating. A-Ops supports quick troubleshooting and reduces O&M costs.
2 Architecture

3 Operating Environment
- Hardware configuration:
Configuration Item Recommended Specification CPU 8 cores Memory 3 GB Network bandwidth 300 Mbps I/O 375 MB/s - Software configuration:
Software Version Python 3.8 or later MySQL 8.0.26 Elasticsearch 7.14.0-1 Kafka 2.4.0 Prometheus 2.20.0
4 Download and Installation
4.1 Downloading and Installing Using Yum
Configure the Yum sources openEuler 22.03 and openEuler 22.03:Epol. The repo source is stored as the /etc/yum.repos.d/openEuler.repo file.
[everything] # openEuler 22.03 officially released repository
name=openEuler22.03
baseurl=https://repo.openeuler.org/openEuler-22.03-LTS/everything/$basearch/
enabled=1
gpgcheck=1
gpgkey=https://repo.openeuler.org/openEuler-22.03-LTS/everything/$basearch/RPM-GPG-KEY-openEuler

[Epol] # openEuler 22.03:Epol officially released repository
name=Epol
baseurl=https://repo.openeuler.org/openEuler-22.03/EPOL/main/$basearch/
enabled=1
gpgcheck=1
gpgkey=https://repo.openeuler.org/openEuler-22.03/OS/$basearch/RPM-GPG-KEY-openEuler
Install using
yum install:# On the management node: yum install aops-utils # A-Ops infrastructure, which is the dependency of the other A-Ops services. yum install aops-manager # A-Ops management center service, including host management, deployment management, template management, and task management. yum install aops-database # A-Ops data center service, which is used for data storage and database management. yum install aops-cli # A-Ops basic CLI, which is used for, host management, deployment management, template management, and task management. yum install aops-web # A-Ops WebUI, which provides information for users and receives their operations. yum install gala-ragdoll # A-Ops configuration tracing service, which is used for configuration domain management and configuration file management
4.2 Downloading and Installing RPM Packages
To download the RPM packages, visit https://repo.openeuler.org/openEuler-22.03-LTS/EPOL/main/aarch64/Packages/ (for AArch64) or https://repo.openeuler.org/openEuler-22.03-LTS/EPOL/main/x86_64/Packages/ (for x86_64).
Search for the key word aops and download the following RPM packages:
- aops-cli-vx.x.x.x-x.oe2203.arch.rpm
- aops-database-vx.x.x.x-x.oe2203.arch.rpm
- aops-manager-vx.x.x.x-x.oe2203.arch.rpm
- aops-utils-vx.x.x.x-x.oe2203.arch.rpm
- aops-web-vx.x.x.x-x.oe2203.arch.rpm
- gala-ragdoll-vx.x.x.x-x.oe2203.arch.rpm
Run the following commands to install the packages. (x.x.x-x in the command indicates the version. Replace it with the actual version number.)
# On the management node:

rpm -ivh aops-utils-vx.x.x-x.oe2203.arch.rpm

rpm -ivh aops-manager-vx.x.x-x.oe2203.arch.rpm

rpm -ivh aops-database-vx.x.x-x.oe2203.arch.rpm

rpm -ivh aops-cli-vx.x.x-x.oe2203.arch.rpm

rpm -ivh gala-ragdoll-vx.x.x-x.oe2203.arch.rpm
4.3 Downloading the Source Code
- Source code download address: https://gitee.com/openeuler/A-Ops.
5 Database Configuration After the Installation
If Elasticsearch or MySQL is not installed in the environment, you can run the automatic installation script after installing aops-utils.
aops-basedatabase mysql # Install and start the MySQL database in the 22.03 source.
aops-basedatabase elasticsearch # Install and start the Elasticsearch database from the Elasticsearch official source.
Note: A-Ops connects to the database in the password-free mode. Elasticsearch and MySQL installed using the RPM packages are in password-free mode by default. For security purposes, you are advised to install Elasticsearch and MySQL on the same management node. After this command is executed, a Yum repository is created. If the Yum repository cannot be downloaded, check the network proxy configuration.
6 Configuration Parameters
6.1 System Configuration
The system configuration file is stored as /etc/aops/system.ini by default. Modify the configuration as required.
vim /etc/aops/system.ini
# Log module configurations
[log]
log_level=INFO # Log level. You can set it to DEBUG to view the running details.
log_dir=/var/log/aops # The directory for storing logs.
max_bytes=31457280 # Maximum storage size of the logs.
backup_count=40 # Number of backups.

# The IP addresses and port numbers of the services. Set these parameters as required. These parameters are mainly used for the RESTful requests of the CLI.
[manager] # aops-manager port.
ip=172.16.0.0
port=11111

[database] # aops-database port.
ip=172.16.0.0
port=11119

[check_scheduler] # aops-check-scheduler port.
ip=172.16.0.0
port=11112

[diag_scheduler] # aops-diag-scheduler port.
ip=172.16.0.0
port=11113
6.2 Management Center Configuration
The management center configuration file is stored as /etc/aops/manager.ini by default. Modify the configuration as required.
vim /etc/aops/manager.ini
[manager]
ip=172.16.0.0 # IP address of the management center.
port=11111 # Port of the management center.
host_vault_dir=/opt/aops # Encryption file folder.
host_vars=/opt/aops/host_vars/ # Encryption host folder.

[database]
ip=172.16.0.0 # IP address of the data center.
port=11112 # Port of the data center.

[uwsgi]
wsgi-file=manage.py # Flask startup script.
daemonize=/var/log/aops/uwsgi/manager.log # Path of the management center log file.
http-timeout=600 # Response timeout interval.
harakiri=600 # Backend running timeout interval.
6.3 Data Center Configuration
The data center configuration file is stored as /etc/aops/database.ini by default. Modify the configuration as required.
vim /etc/aops/database.ini
[database]
ip=172.16.0.0 # IP address of the data center.
port=11119 # Port of the data center.

[elasticsearch]
ip=172.16.0.0 # IP address of elasticsearch.
port=9200 # Port of elasticsearch.
max_es_query_num=10000000 # Maximum number of Elasticsearch queries.

[mysql]
ip=172.16.0.0 # IP address of mysql.
port=3306 # Port of mysql.
database_name=aops # A-Ops database name.
engine_format=mysql+pymysql://@%s:%s/%s # mysql connection. This is in password-free mode by default.
pool_size=10000 # Maximum number of connections in the mysql connection pool.
pool_recycle=7200 # Maximum keepalive time of mysql DBAPI.

[prometheus]
ip=172.16.0.0 # IP address of prometheus.
port=9090 # Port of prometheus.
disable_ssl=True # Disable SSL authentication.

[uwsgi]
wsgi-file=manage.py # Flask startup script.
daemonize=/var/log/aops/uwsgi/database.log # Data center log file path.
http-timeout=600 # Response timeout interval.
harakiri=600 # Backend running timeout interval.
6.4 Other Configurations
Default task configuration: /etc/aops/default.json is used to change the IP address list of the hosts that execute the tasks by default. You need to change the IP addresses before starting the database. If the database service is started before changing the IP addresses, you need to run the
task deletecommand to delete the tasks, then restart the database to import the default tasks properly.vim /etc/aops/default.json{ "tasks": [ { "task_id": "95c3e692ff3811ebbcd3a89d3a259eef", "task_name": "Default deployment", "username": "admin", "host_list": [ { "host_name": "xx.xx.xx.xx", "host_id": "xxxxxxxxxxxxxxxxxxxxxxxxxxxxxxxxxxx" }, { "host_name": "xx.xx.xx.xx", "host_id": "xxxxxxxxxxxxxxxxxxxxxxxxxxxxxxxxxxxx" }, { "host_name": "xx.xx.xx.xx", "host_id": "xxxxxxxxxxxxxxxxxxxxxxxxxxxxxxxxxxxxx" } ] } ] }Open the /etc/ansible/ansible.cfg file and uncomment host_key_checking.
vim /etc/ansible/ansible.cfg# uncomment this to disable SSH key host checking host_key_checking = FalseChange the IP address in the /etc/ragdoll/gala-ragdoll file as required.
$ cat /etc/ragdoll/gala-ragdoll.conf
[git]                                       // Defines the Git information, including the directory and user information of the Git repository.
git_dir = "/home/confTraceTestConf"
user_name = "user"
user_email = "email"

[collect]                                  // collect interface provided by A-OPS for external systems.
collect_address = "172.16.0.0:11111"
collect_api = "/manage/config/collect"

[ragdoll]
port = 11114
7 Starting and Stopping Services
The A-Ops services can be started, stopped, and restarted using systemd.
systemctl start aops-database # Start the service.
systemctl stop aops-database # Stop the service.
systemctl restart aops-database # Restart the service.

# Other options are as follows:
aops-manager
aops-web
8 Starting the Web Service
8.1 Configuring and Starting the Web Service
The web service configuration file is /etc/nginx/aops-nginx.conf.
The following contents need to be modified:
- The port number of the web service. The default value is 80.
- Backend service route addresses, which must correspond to each backend service. /api/ indicates the host management and user management services. /api/domain, /api/host, /api/confs, and /api/management indicate the configuration source tracing service. /api/check indicates the anomaly detection service. /api/diag indicates the diagnosis service, /api/gala-spider indicates the architecture awareness service. Set the IP addresses based on the actual service deployment.
  server {
         # Set the front-end port number. The default value is 80.
         listen       80 default_server;
         listen       [::]:80 default_server;
         # Set the IP address or domain name.
         server_name  localhost;

         location /api/ {
             proxy_pass http://172.16.0.0:11111/;
         }

         location /api/domain {
             proxy_pass http://172.16.0.0:11114/;
             rewrite ^/api/(.*) /$1 break;
         }

         location /api/host {
             proxy_pass http://172.16.0.0:11114/;
             rewrite ^/api/(.*) /$1 break;
         }

         location /api/confs {
             proxy_pass http://172.16.0.0:11114/;
             rewrite ^/api/(.*) /$1 break;
         }

         location /api/management {
             proxy_pass http://172.16.0.0:11114/;
             rewrite ^/api/(.*) /$1 break;
         }

         location /api/check {
             proxy_pass http://172.16.0.0:11112/;
             rewrite ^/api/(.*) /$1 break;
         }

         location /api/diag {
             proxy_pass http://172.16.0.0:11113/;
             rewrite ^/api/(.*) /$1 break;
         }

         location /api/gala-spider {
             proxy_pass http://172.16.0.0:11115/;
             rewrite ^/api/(.*) /$1 break;
         }
  }
Disable SELinux:
setenforce 0Disable the firewall:
systemctl stop firewalldStart the web service:
systemctl start aops-webAccess the service.
Method 1: Assuming the web service is started at 172.16.0.0:80, you can access the page by visiting 172.16.0.0:80. (Note that the host where the web service is hosted must be reachable from the PC where the browser is running.)
Method 2: Use VSCode for port forwarding.
Install the remote_ssh extension in VSCode.
Modify the remote_ssh configuration.
Modify the /etc/ssh/sshd_config file on the host where the web service is deployed.
StricModes yes
AllowTcpForwarding yes
AllowAgentForwarding yes
GatewayPorts yes
PermitTunnel yes
systemctl restart sshd.serviceStart remote_ssh to use the VSCode extension to forward the port 80 of the host where the web service is deployed.
Log in.
The default user name is admin, and the default password is changeme.
8.2 Web Service Pages
8.2.1 Workbench
The data dashboard page. This page is displayed after you log in.
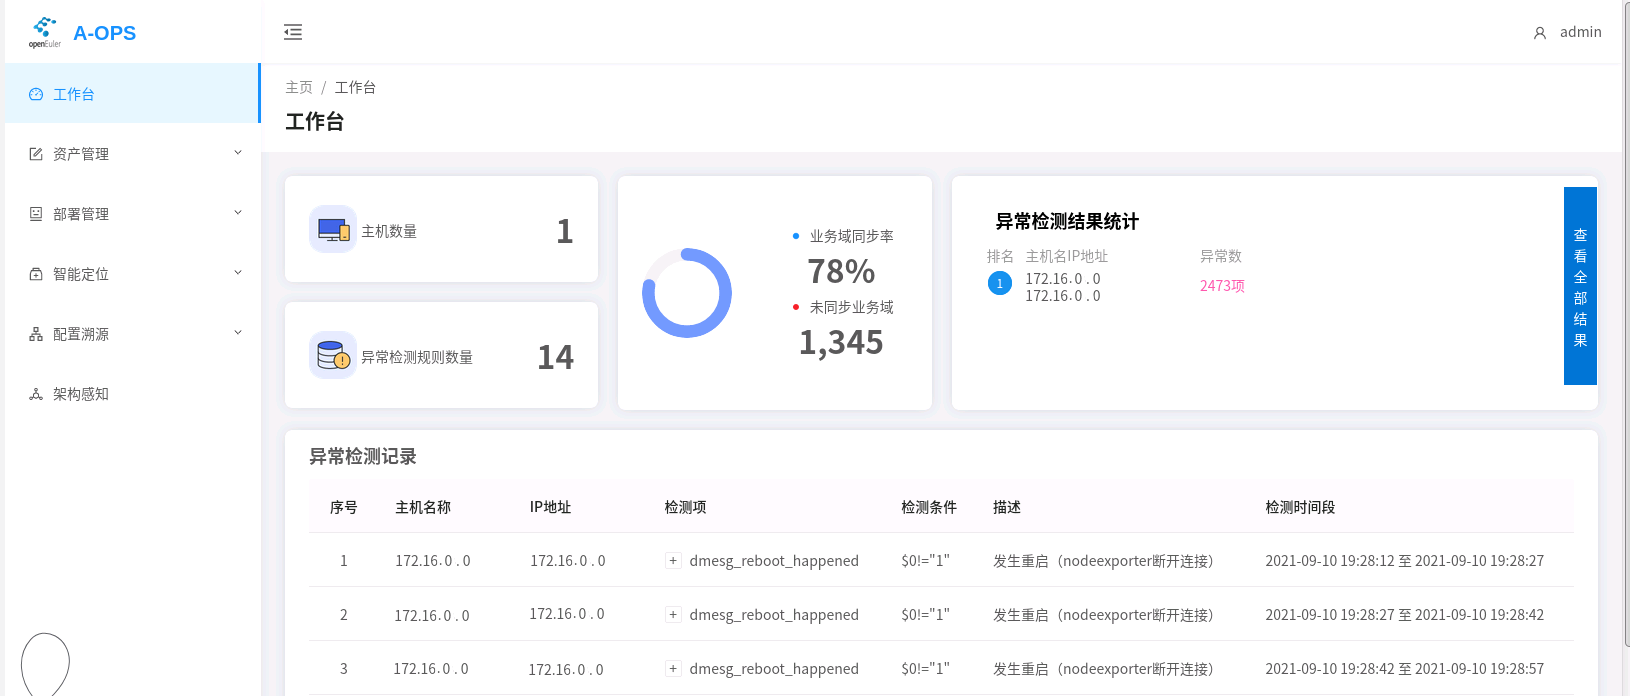
(1) You can view the information of the following data:
Number of current managed hosts.
Number of anomaly detection rules.
Statistics on anomalies of each host.
Detailed records of the anomalies.
Currently, service domain information is not included.
(2) User account operations (upper right corner):
Changing the password.
Entering the decryption key.
Logging out.
8.2.2 Asset Management
For operation guides related to host management, see the Asset Management Manual.
(1) You can perform the following operations on the Host Group Management page:
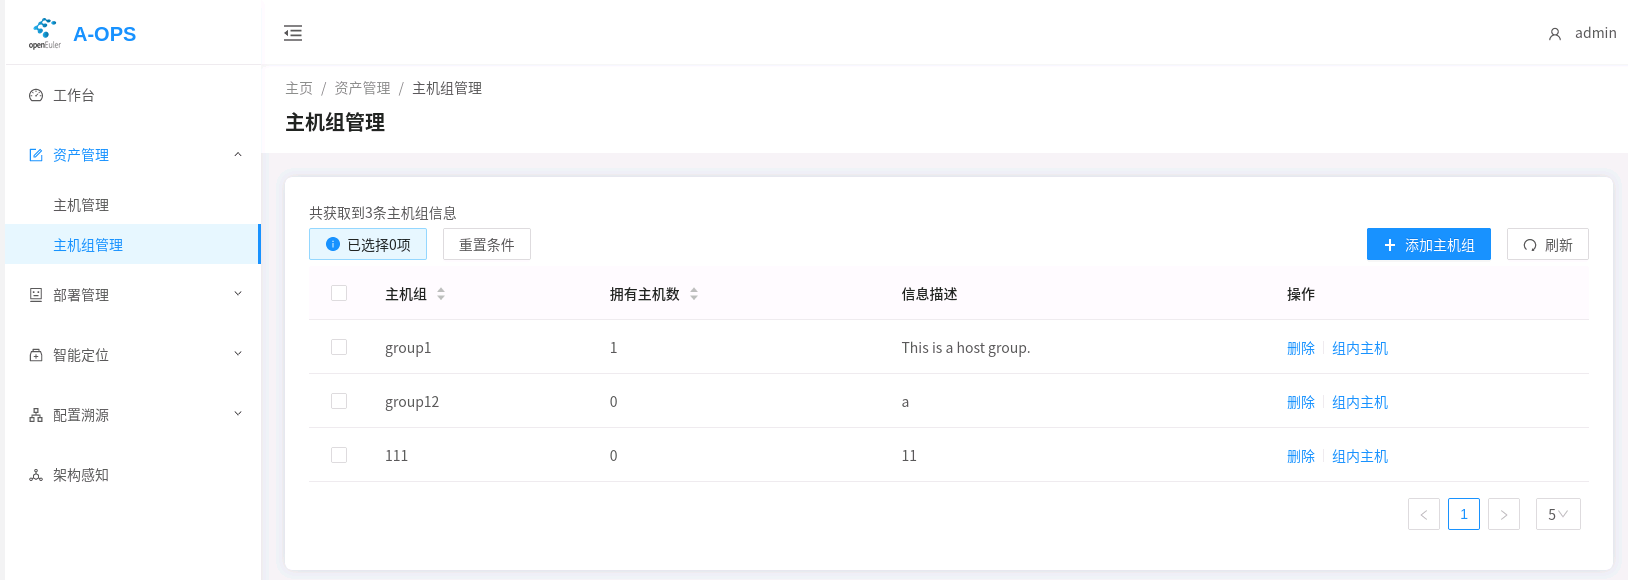
Adding host groups.
Viewing all host groups (sorting by host group name or the amount of hosts in the group).
Viewing information about hosts in each host group.
Deleting host groups.
(2) You can perform the following operations on the Host Management page:
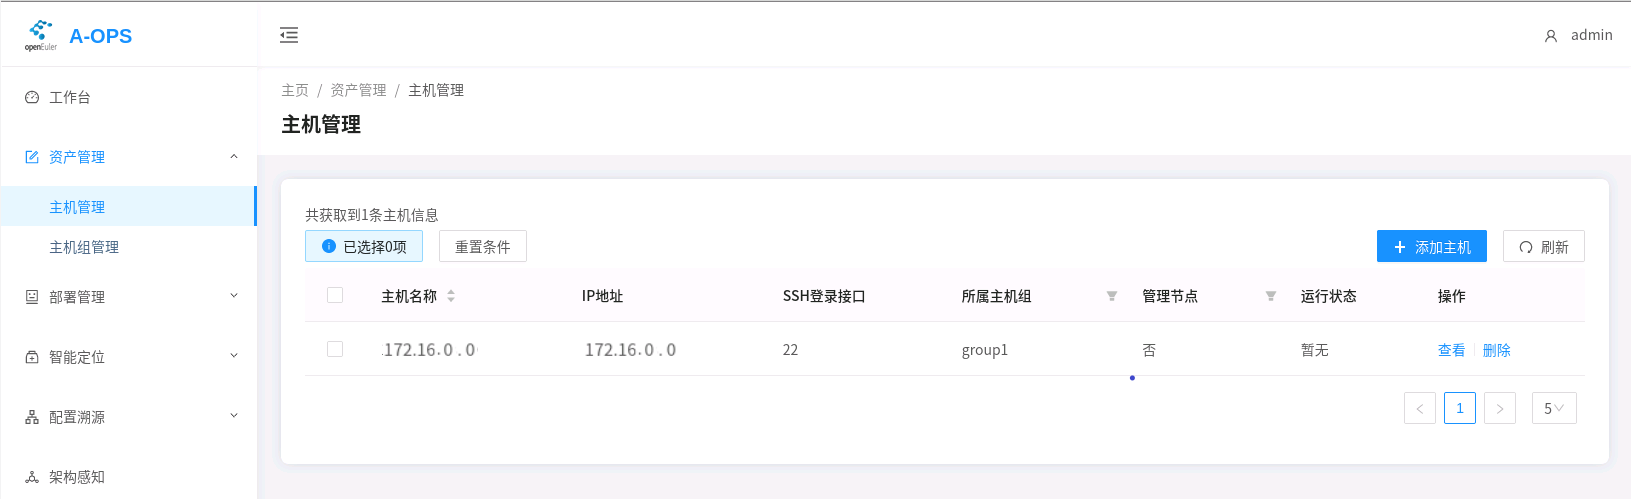
Adding hosts.
Viewing hosts (filtering by host group or management node, and sorting by host name).
Deleting hosts.
8.2.3 Deployment Management
For details about deployment management, see the Deployment Management Manual.
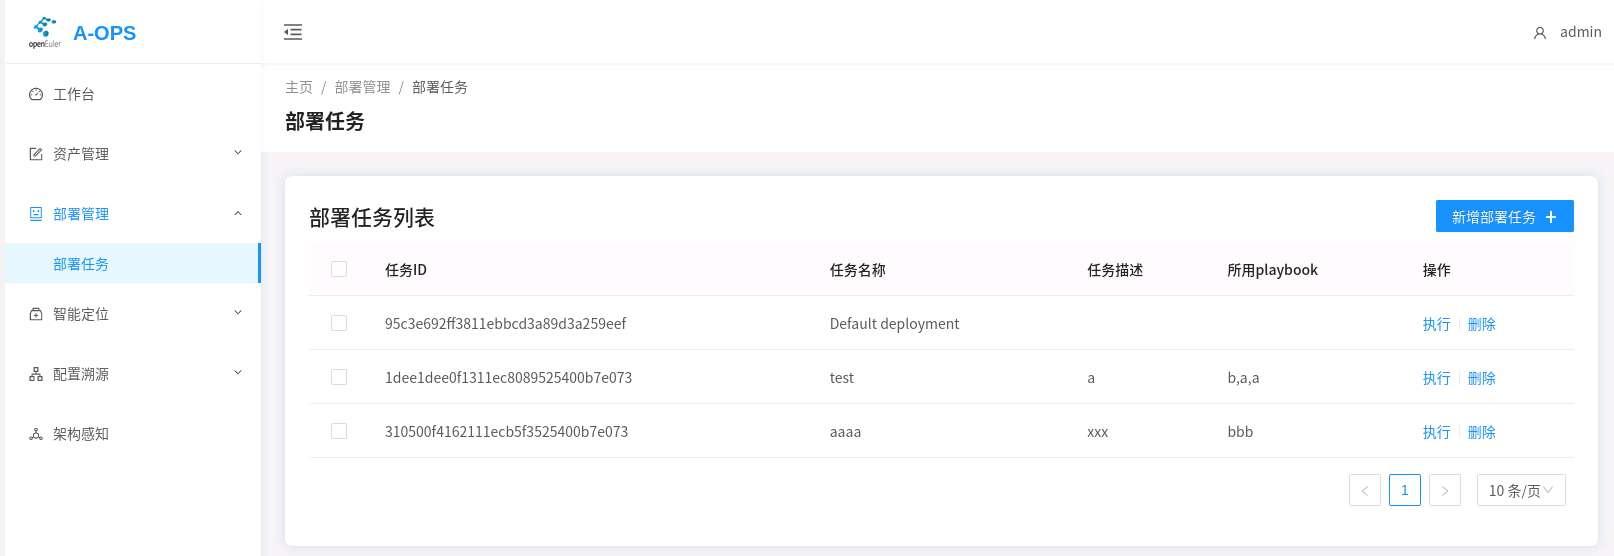
The following deployment management operations are supported:
- Viewing the deployment task list.
- Creating deployment tasks.
- Adding templates (in YAML format).
- Viewing the current template.
- Deleting templates.
- Deleting tasks.
- Executing tasks. (Only the default tasks can be executed. Currently, there is no API for querying the task progress. Therefore, a foreground message will display, indicating that the task is successfully executed, but the task is still being executed in the background.)
8.2.4 Intelligent Diagnosis
You need to install the anomaly detection and fault diagnosis services before using intelligent diagnosis. For details about anomaly detection, see the Anomaly Detection Service Manual. For details about fault diagnosis, see the Fault Diagnosis Manual.
(1) You can perform the following operations on the Anomaly Detection page:
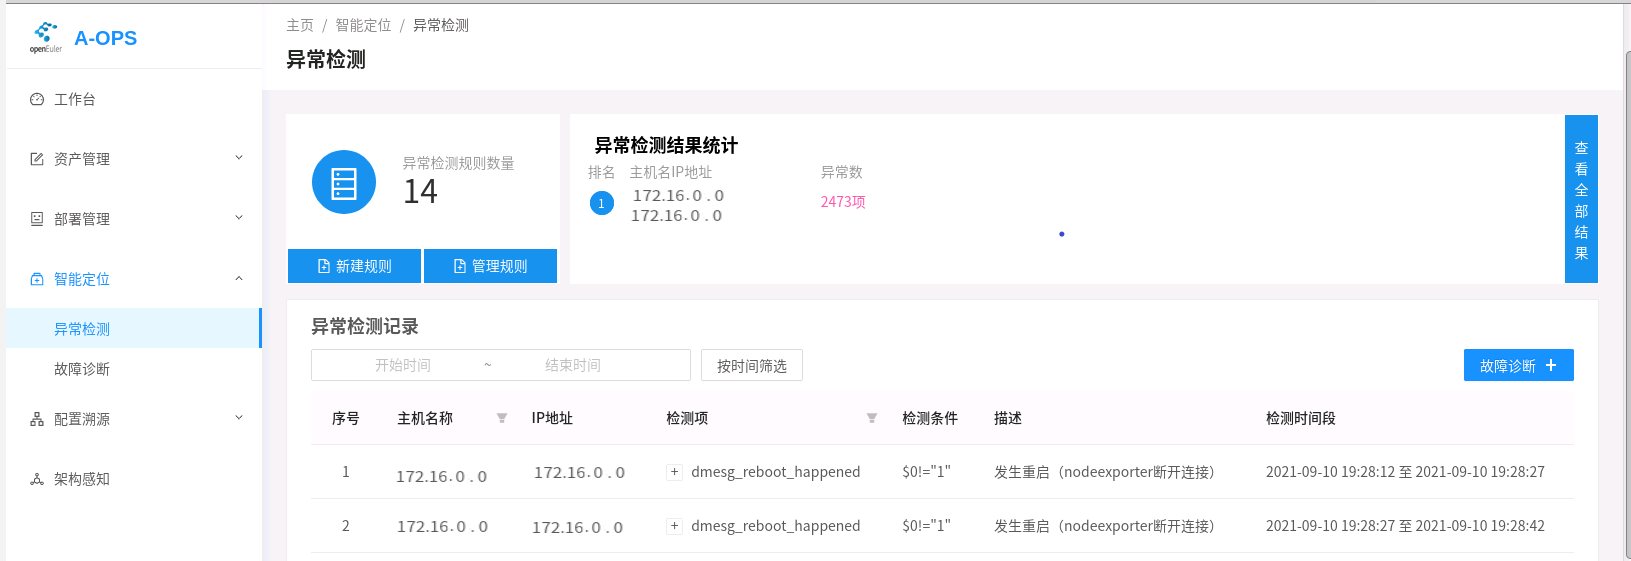
Viewing the number of existing anomaly detection rules.
Viewing the statistics of the anomaly detection results.
Creating rules (by importing JSON files).
Viewing all rules.
Viewing all anomaly detection records.
(2) You can perform the following operations on the Fault Diagnosis page:
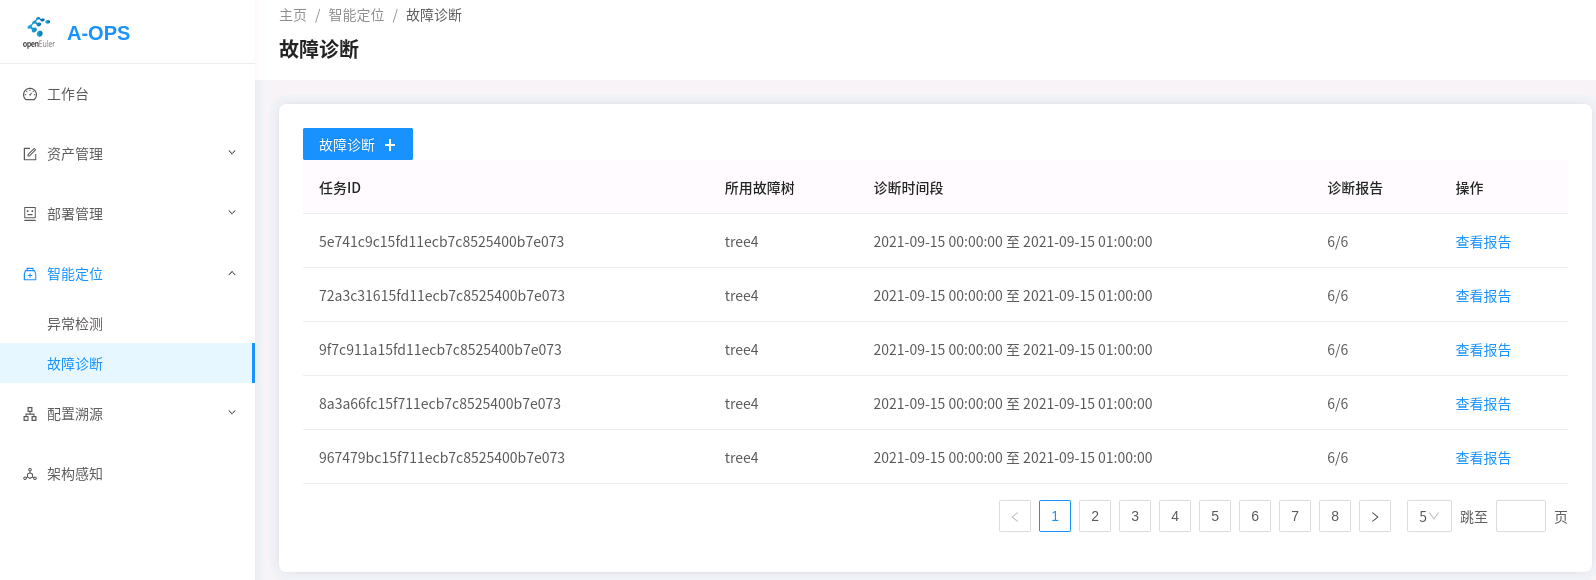
Viewing all Tasks.
Creating and executing fault diagnosis tasks.
Viewing the progress of a task.
Viewing the report of a Task.
Deletion is currently not supported using web.
Adding fault trees (JSON files).
Viewing the current fault tree.
Deleting fault trees.
Viewing the details of a report.
8.2.5 Configuration Management
You need to install the configuration source tracing service before using configuration management. For details about configuration source tracing, see the Configuration Source Tracing Service Manual.
(1) You can perform the following operations on the Service Domain Management page:
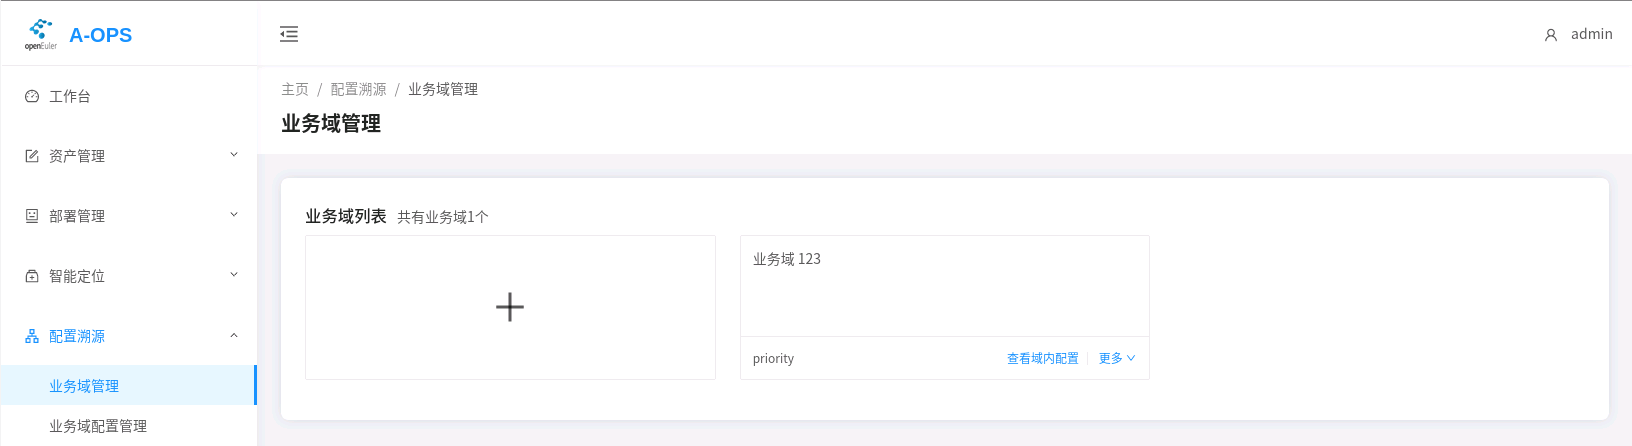
Viewing the current service domain.
Adding service domains.
Adding hosts to a domain.
Viewing the list of hosts in the service domain.
Entering the host list to view the current configuration (collecting configurations).
Deleting service domains.
(2) You can perform the following operations on the Service Domain Configuration Management page:
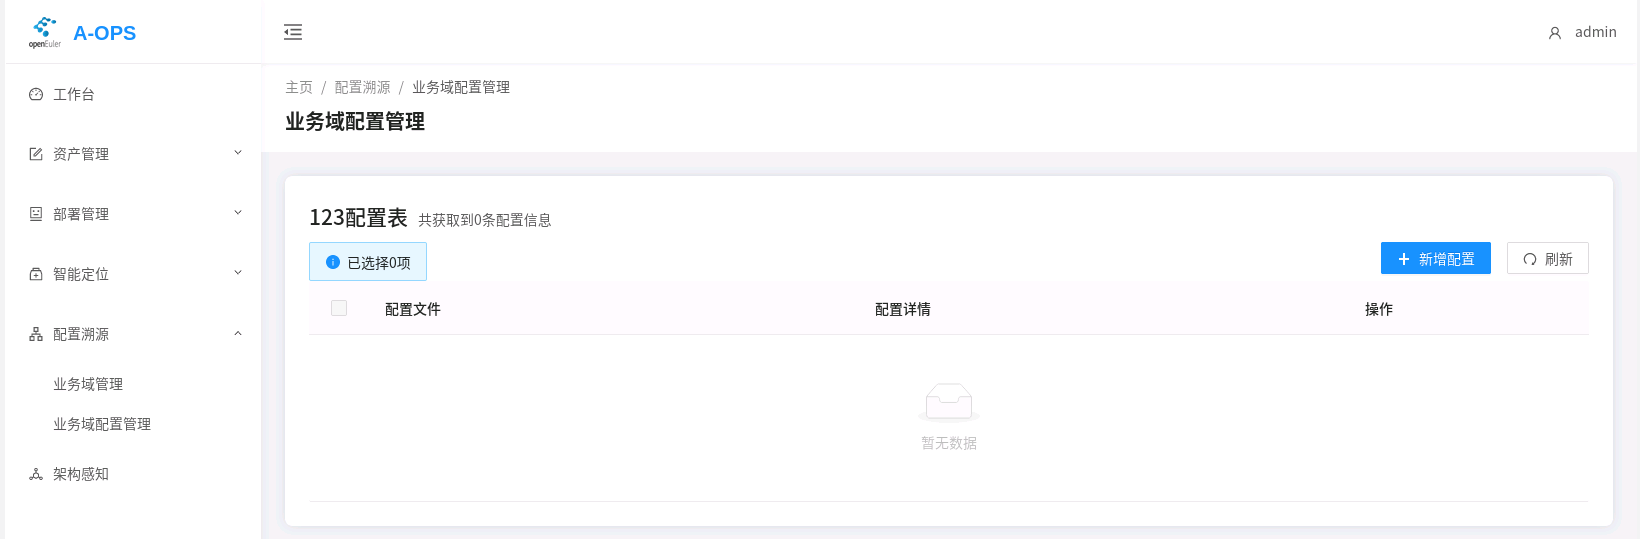
Viewing configuration items.
Adding configuration items. (Currently, you can only add /etc/yum.repos.d/openEuler.repo and /etc/coremail/coremail.conf. The format must be correct.)
Viewing the configuration file (the expected configuration).
Viewing configuration change logs.
8.2.6 Architecture Awareness
You need to install the architecture awareness service to use this function. For details about architecture awareness, see the Architecture Awareness Service Manual.
You can perform the following operations on the Architecture Awareness page:
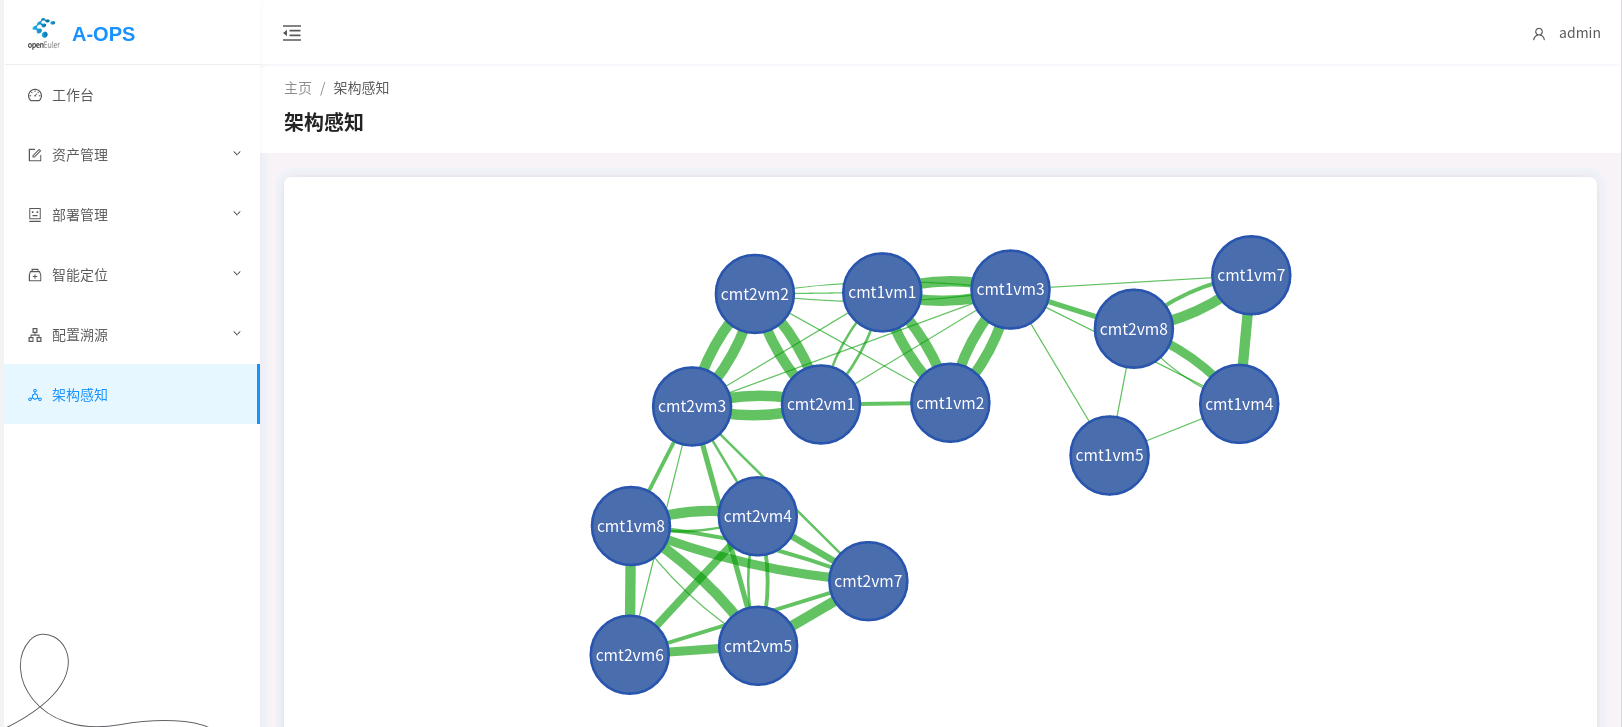
Viewing the overall cluster architecture.
Viewing details about nodes and links.
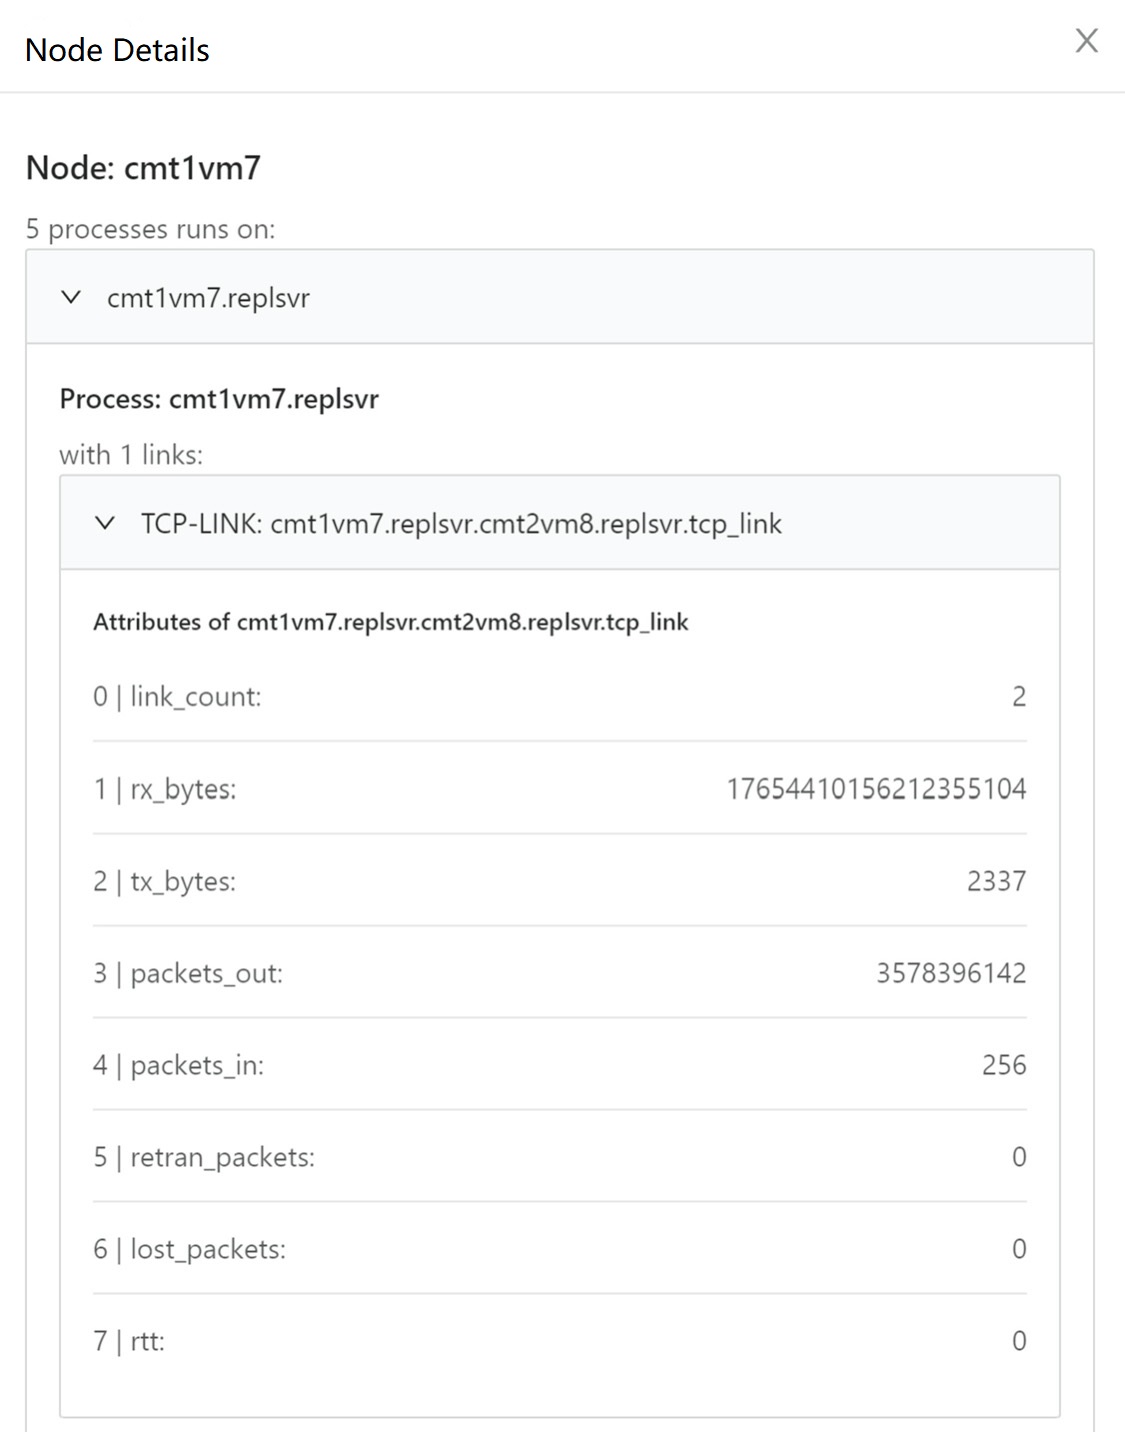
The probe collects real-time TCP connection information, including the connection status of middleware such as LVS and Nginx, and draws the topology to display the connection status between the nodes and between the processes.
The upper layer can locate and delimitate faults based on the topology and the link indicator data.
9 Viewing Logs
9.1 A-Ops Logs
Path: /var/log/aops/
A-Ops logs record information about A-Ops operations and internal running status for easy maintenance and fault checks. You can use the logging module of Python to set the log size and the number of backups.
; Maximum capacity of each file, the unit is byte, default is 30 M
max_bytes=31457280
; Number of old logs to keep;default is 30
backup_count=40
aops.log: A-Ops overall running log.
Displays the overall running logs of A-Ops, including the management center and data center.
manager.log: The log of the management center.
Displays running logs of the host management, host group management, template management, and task management modules.
database.log: The log of the data center.
Displays the logs of the interactions between other function modules and the database.
check_scheduler.log: Anomaly detection log.
Displays running logs of the anomaly detection module.
diag_scheduler.log: Fault diagnosis log.
Displays the running logs of the anomaly diagnosis module.
Architecture awareness logs can be viewed by running
journalandsystemctl status.Configure source tracing logs can be viewed by running
journalandsystemctl status.