1 Framework Overview
The deployment management is mainly about installing components using Ansible.
│
├─ansible_handler
│  │  README.md
│  │
│  ├─example # Template example.
│  │  │  example_playbooks.yml # Playbook example.
│  │  │  example_vars.yml # Variable file example.
│  │  │
│  │  └─example # Role task example.
│  │      ├─files # The directory of files required by the component. The files can be software packages or other files required for running the component.
│  │      │      readme.md
│  │      │
│  │      ├─tasks # Task examples.
│  │      │      config_example.yml # Configuration example.
│  │      │      install_example.yml # Installation example.
│  │      │      main.yml # Task entry example.
│  │      │      start_example.yml # Startup example.
│  │      │
│  │      └─templates # Template file.
│  │              example.j2 # Template configuration example.
│  │
│  ├─inventory # The list of the hosts of the component.
│  │      elasticsearch
│  │      fluentd
│  │      ...
│  │
│  ├─playbooks # The playbook entry files of the component.
│  │      elasticsearch.yml
│  │      fluentd.yml
│  │      ...
│  │
│  ├─roles # Role tasks of the component.
│  │  ├─elasticsearch
│  │  │  ├─tasks # Task steps in the playbook of the component.
│  │  │  │      config_elasticsearch.yml # Defines the steps of configuration.
│  │  │  │      install_elasticsearch.yml # Defines the steps of installation.
│  │  │  │      main.yml # Main script file executed by the task. The file includes the yml files for installing, configuring, and starting the role, and custom yml files.
│  │  │  │      start_elasticsearch.yml # Defines the steps of startup.
│  │  │  │
│  │  │  └─templates # Template file required during the component installation. The actual file is generated based on the configured value.
│  │  │          elasticsearch.j2
│  │  │
│  │  └─...
│  │
│  └─vars # Variable files of the component.
│          elasticsearch_vars.yml
│          fluentd_vars.yml
│          ...
│
├─ansible_runner # Python APIs to invoke Ansible to execute the tasks.
│      ansible_runner.py
│      inventory_builder.py
│      vault_handler.py
│      __init__.py
│
└─tasks # Task file consisting of a sequence of component installation steps.
        XXX_task.yml
2 Steps for Adding Components
2.1 Default Component Template
2.1.1 List of Default Components
Currently, the following default components are provided:
| Component | Installation Method | Version | Deployment Location |
|---|---|---|---|
| zookeeper | DNF | 3.6.2 | all |
| kafka | DNF | 2.6.0 | all |
| prometheus | DNF | 2.20.0 | master |
| node_exporter | DNF | 1.0.1 | all |
| mysql | DNF | 8.0.26 | master |
| elasticsearch | DNF (official image) | 7.14.0 (updated with the official website) | master |
| fluentd | DNF | 1.13.3 | all |
| fluent-plugin-elasticsearch | DNF | 5.0.5 | all |
| adoctor-check-executor | DNF | 1.0.1 | master |
| adoctor-check-scheduler | DNF | 1.0.1 | master |
| adoctor-diag-executor | DNF | 1.0.1 | master |
| adoctor-diag-scheduler | DNF | 1.0.1 | master |
| gala-ragdoll | DNF | 1.0.1 | master |
| gala-gopher | DNF | 1.0.1 | all |
| gala-spider | DNF | 1.0.1 | master |
2.1.2 Dependencies Among Default Components

- The figure shows the dependencies among the components provided by default. To ensure that the services run properly, you need to install the dependencies in advance.
- Elasticsearch has been installed on the master node during the installation of A-Ops framework. If there is no need to create a cluster, you can simply use the component after modifying the configuration. No additional deployment is required.
- Other components provided in the A-Ops framework are not shown in the figure.
2.1.3 Default Task Configuration
(1) Zookeeper
Zookeeper is used for cluster management and is the basis for Kafka. Zookeeper must be configured on each node in the cluster.
- Host configuration
In the host list, configure the IP address and node ID of each node in the cluster.
zookeeper_hosts:
  hosts:
    192.168.1.1: # Host name
      ansible_host: 192.168.1.1 # Host IP address
      ansible_python_interpreter: /usr/bin/python3
      myid: 2 # ZooKeeper node ID
    192.168.1.2:
      ansible_host: 192.168.1.2
      ansible_python_interpreter: /usr/bin/python3
      myid: 1
    192.168.1.3:
      ansible_host: 192.168.1.3
      ansible_python_interpreter: /usr/bin/python3
      myid: 3
- Variable configuration
The variables of Zookeeper are as follows:
---
# Zookeeper user name and user group
user: "zookeeper"
group: "zookeeper"

# Zookeeper data path
data_dir: "data"
# Zookeeper log path
zookeeper_log_path: "log"
# Zookeeper installation path
install_dir: "/opt/zookeeper"

# Zookeeper port configuration
leader_port: 2888
vote_port: 3888
client_port: 2181
(2) Kafka
Host configuration
Kafka must be installed after ZooKeeper. The port and ID of Kafka need to be configured in the host list. You also need to configure the IP address and ID of ZooKeeper in the host list.
kafka_hosts:
  hosts:
    192.168.1.1: # Host name
      ansible_host: 192.168.1.1 # Host IP address
      ansible_python_interpreter: /usr/bin/python3
      kafka_id: 2 # Kafka id
      kafka_port: 9092 # Kafka listening port
    192.168.1.2:
      ansible_host: 192.168.1.2
      ansible_python_interpreter: /usr/bin/python3
      kafka_id: 1
      kafka_port: 9092
    192.168.1.3:
      ansible_host: 192.168.1.3
      ansible_python_interpreter: /usr/bin/python3
      kafka_id: 3
      kafka_port: 9092
zookeeper_hosts: # IP address of the ZooKeeper cluster
  hosts:
    192.168.1.1: # Host name
      ansible_host: 192.168.1.1 # Host IP address
      ansible_python_interpreter: /usr/bin/python3
      myid: 2 # ZooKeeper id
    192.168.1.2:
      ansible_host: 192.168.1.2
      ansible_python_interpreter: /usr/bin/python3
      myid: 1
    192.168.1.3:
      ansible_host: 192.168.1.3
      ansible_python_interpreter: /usr/bin/python3
      myid: 3
- Variable configuration
---
# Zookeeper user name and user group
user: "kafka"
group: "kafka"

# Log path
kafka_log_path: "log"

# Installation path
install_dir: "/opt/kafka"

# Zookeeper client port
zk_client_port: 2181
(3) Prometheus
Host configuration
Prometheus collects KPI data items. It needs to be installed only on the server node. In addition, Prometheus captures data from node_exporter. You need to configure a node IP address that can reach the node_exporter.
node_exporter_hosts:
  hosts:
    192.168.1.1:
      ansible_host: 192.168.1.1
      ansible_python_interpreter: /usr/bin/python3
    192.168.1.2:
      ansible_host: 192.168.1.2
      ansible_python_interpreter: /usr/bin/python3
    192.168.1.3:
      ansible_host: 192.168.1.3
      ansible_python_interpreter: /usr/bin/python3
prometheus_hosts:
  hosts:
    192.168.1.2:
      ansible_host: 192.168.1.2
      ansible_python_interpreter: /usr/bin/python3
- Variable configuration
---
# Prometheus user name and user group
user: "prometheus"
group: "prometheus"

# Prometheus listening port
prometheus_listen_port: 9090

# node_exporter listening port
node_exporter_listen_port: 9100

# Prometheus configuration file path
prometheus_conf_dir: "/etc/prometheus"
(4) node_exporter
- Host configuration
node_exporter needs to be installed on all the nodes whose data needs to be collected. Configure the IP addresses of the hosts.
node_exporter_hosts:
  hosts:
    192.168.1.1:
      ansible_host: 192.168.1.1
      ansible_python_interpreter: /usr/bin/python3
    192.168.1.2:
      ansible_host: 192.168.1.2
      ansible_python_interpreter: /usr/bin/python3
    192.168.1.3:
      ansible_host: 192.168.1.3
      ansible_python_interpreter: /usr/bin/python3
- Variable configuration
---
# node_exporter user name and user group
user: "node_exporter"
group: "node_exporter"

# Listening port
node_exporter_listen_port: 9100
(5) MySQL
- Host configuration
The MySQL database needs to be installed only on the server node.
mysql_hosts:
  hosts:
    192.168.1.2:
      ansible_host: 192.168.1.2
      ansible_python_interpreter: /usr/bin/python3
- Variable configuration
---
# MySQL user name and user group
user: "mysql"
group: "mysql"
(6) Elasticsearch
- Host configuration
The Elasticsearch database needs to be installed only on the server node. You need to configure the server node and specify the node ID. If a distributed cluster configuration is required, you need to modify the host list and configuration file elasticsearch.j2.
elasticsearch_hosts:
  hosts:
    192.168.1.2:
      ansible_host: 192.168.1.2
      ansible_python_interpreter: /usr/bin/python3
      elasticsearch_id: elasticsearch_node1
- Variable configuration
---
# Elasticsearch user and user group
user: elasticsearch
group: elasticsearch

# Elasticsearch official repo configuration
repo_name: "Elasticsearch"
repo_description: "Elasticsearch repository for 7.x packages"
repo_base_url: "https://artifacts.elastic.co/packages/7.x/yum"
repo_gpgkey: "https://artifacts.elastic.co/GPG-KEY-elasticsearch"
repo_file: "elasticsearch"

# Elasticsearch installation directory
install_dir: /etc/elasticsearch/

# Elasticsearch cluster name
elasticsearch_cluster_name: myApp

# IP address of the Elasticsearch initial master node
elasticsearch_cluster_init_master: 192.168.1.2

# Elasticsearch listening port
elasticsearch_listen_port: 9200

# Elasticsearch data directory
elasticsearch_data_path: "/var/lib/elasticsearch"

# Elasticsearch log directory
elasticsearch_log_path: "/var/log/elasticsearch"

# IP address of the Elasticsearch network host
elasticsearch_network_host: "{{elasticsearch_cluster_init_master}}"
(7) Fluentd
- Host configuration
Fluentd collects logs. It is deployed on all nodes whose logs need to be collected and sends the logs to Elasticsearch.
fluentd_hosts:
  hosts:
    192.168.1.1: # Host name
      ansible_python_interpreter: /usr/bin/python3
      elasticsearch_host: 192.168.1.1 # Elasticsearch listening IP
    192.168.1.2:
      ansible_python_interpreter: /usr/bin/python3
      elasticsearch_host: 192.168.1.1 # Elasticsearch listening IP
    192.168.1.3:
      ansible_python_interpreter: /usr/bin/python3
      elasticsearch_host: 192.168.1.1 # Elasticsearch listening IP
- Variable configuration
---
# Fluentd configuration file path
fluentd_config_dir: /etc/fluentd/
# Script for modifying history records
change_history_format: true
change_history_format_scripts:
  - zzz_openEuler_history.csh
  - zzz_openEuler_history.sh
# Script for modifying demsg records
change_dmesg_format: true
change_dmesg_format_scripts: fluentd_dmesg.sh
# demsg port
fluentd_demsg_port: 61122
(8) adoctor-check-executor and adoctor-check-scheduler
- Host configuration
adoctor-check-executor and adoctor-check-scheduler depend on the A-Ops framework and are deployed on the master node by default. The executor and scheduler communicate with each other through Kafka.
Configure the host list of adoctor-check-executor:
adoctor_check_executor_hosts:
  hosts:
    192.168.1.1: # Host name
      ansible_host: 192.168.1.1 # Host IP address
      ansible_python_interpreter: /usr/bin/python3
Configure the host list of adoctor-check-scheduler:
adoctor_check_scheduler_hosts:
  hosts:
    192.168.1.1: # Host name
      ansible_host: 192.168.1.1  # Host IP address
      ansible_python_interpreter: /usr/bin/python3
- Variable configuration
Configure the variables of adoctor-check-executor:
# Configuration file directory of check executor
check_executor_conf_dir: "/etc/aops"
# HOST:PORT of the list of Kafka hosts connected to the check executor. The default IP address is the IP address of the current host. The default port number is 9092.
kafka_server_list: 192.168.1.1:9092
Configure the variables of adoctor-check-scheduler:
# Configuration file directory of check scheduler
check_scheduler_conf_dir: "/etc/aops"
# HOST:PORT of the list of Kafka hosts connected to the check scheduler. The default IP address is the IP address of the current host. The default port number is 9092.
kafka_server_list: 90.90.64.64:9092
# Listening port of the check scheduler service. The default value is 11112.
check_scheduler_port: 11112
(9) adoctor-diag-scheduler and adoctor-diag-executor
- Host configuration
adoctor-diag-executor and adoctor-diag-scheduler depend on the A-Ops framework and are deployed on the master node by default. The executor and scheduler communicate with each other through Kafka.
Configure the host list of adoctor-diag-executor:
adoctor_diag_executor_hosts:
  hosts:
    192.168.1.1: # Host name
      ansible_host: 192.168.1.1 # Host IP address
      ansible_python_interpreter: /usr/bin/python3
Configure the host list of adoctor-diag-scheduler:
adoctor_diag_scheduler_hosts:
  hosts:
    192.168.1.1: # Host name
      ansible_host: 192.168.1.1 # Host IP address
      ansible_python_interpreter: /usr/bin/python3
- Variable configuration
Configure the variables of adoctor-diag-executor:
# Configuration file directory of diag executor
diag_executor_conf_dir: "/etc/aops"
# HOST:PORT of the list of Kafka hosts connected to the diag executor. The default IP address is the IP address of the current host. The default port number is 9092.
kafka_server_list: 192.168.1.1:9092
Configure the variables of adoctor-diag-scheduler:
# Configuration file directory of diag scheduler
diag_scheduler_conf_dir: "/etc/aops"
# HOST:PORT of the list of Kafka hosts connected to the diag scheduler. The default IP address is the IP address of the current host. The default port number is 9092.
kafka_server_list: 192.168.1.1:9092
# Listening port of the diag scheduler service. The default value is 11112.
diag_scheduler_port: 11113
(10) gala-ragdoll
- Host configuration
gala-ragdoll is the main component of the configuration source tracing module, and is deployed on the master node.
gala_ragdoll_hosts:
  hosts:
    192.168.1.1: # Host name
      ansible_host: 192.168.1.1 # Host IP address
      ansible_python_interpreter: /usr/bin/python3
- Variable configuration
---
# Listening port of the gala-ragdoll service
gala_ragdoll_port: 11114
(11) gala-gopher and gala-spider
- Host Configuration
gala-gopher and gala-spider are the main components of the architecture awareness module. gala-gopher is deployed on each remote host to collect information and pushes messages to gala-spider on the master node through Kafka.gala-spider is deployed on the master node and analyzes the collected data.
Configure the host list of gala-gopher:
gala_gopher_hosts:
  hosts:
    192.168.1.1: # Host name
      ansible_host: 192.168.1.1 # Host IP address
      ansible_python_interpreter: /usr/bin/python3
    192.168.1.2:
      ansible_host: 192.168.1.2
      ansible_python_interpreter: /usr/bin/python3
    192.168.1.3:
      ansible_host: 192.168.1.3
      ansible_python_interpreter: /usr/bin/python3
Configure the host list of gala-spider:
gala_spider_hosts:
  hosts:
   192.168.1.1: # Host name
      ansible_host: 192.168.1.1 # Host IP address
      ansible_python_interpreter: /usr/bin/python3
- Variable configuration
Configure the variables of gala-gopher:
---
# gala gopher installation directory
install_dir: "/opt/gala-gopher/"
# The Kafka host connected to gala-gopher. Set this parameter to the host IP address of the management node.
gala_gopher_kafka_host: 192.168.1.1
# The listening Kafka port of gala-gopher
gala_gopher_listening_kafka_port: 9092
# Configuration of the gala-gopher probe
probes_example_switch: "off"
probes_system_meminfo: "off"
probes_system_vmstat: "off"
probes_system_tcp: "off"
probes_system_inode: "off"
extend_probes_redis: "off"
Configure the variables of gala-spider:
---
# Log directory
log_path: "/var/log/spider"
# Installation directory
install_dir: "/opt/spider/"
# The Kafka host. The default value is the host IP address.
gala_spider_kafka_host: 192.168.1.1
# Listening port
gala_spider_listening_kafka_port: 9092

# Excluded IP addresses
exclude_addr: ["192.168.x.x"]
# The base table name. Do not delete the items initially contained in the list. Append items in order as required.
base_table_name: ["tcp_link", "lvs_link"]
other_table_name: ["nginx_statistic" , "lvs_link" , "haproxy_link" , "dnsmasq_link"]
# gala-spider listening port
gala_spider_port: 11115
3 Deployment Task Execution
3.1 Configuration Modification
Run the
task querycommand to query the default task ID. Ensure that the host where the default task is executed is correctly added.Default task configuration: /etc/aops/default.json。Set the parameters by referring to section 4 in the A-Ops Framework Manual. If the parameters have been configured, skip this step.
vim /etc/aops/default.json
- Open /etc/ansible/ansible.cfg and uncomment the configuration item host_key_checking.
vim /etc/ansible/ansible.cfg
# uncomment this to disable SSH key host checking

host_key_checking = False
3.2 Task Component Step Configuration
A task consists of multiple steps. Basically, one component is installed in each step. A task is completed by finishing a sequence of steps. To modify a task, you need to modify tasks/TASK_NAME.yml. The format is as follows:
---
step_list: # Step list
 zookeeper: # The first step is to install Kafka. You can use the default template.
  enable: true  # false indicates that the installation is skipped. true indicates that the installation is performed.
  continue: false # false indicates that the task is aborted if the installation fails. true indicates that the next component is installed if the installation fails.
 kafka:
  enable: false
  continue: false
 prometheus:
  enable: false
  continue: false
 node_exporter:
   enable: false
   continue: false
 mysql:
   enable: false
   continue: false
 elasticsearch:
   enable: false
   continue: false
 fluentd:
   enable: false
   continue: false
 adoctor_check_executor:
   enable: false
   continue: false
 adoctor_check_scheduler:
   enable: false
   continue: false
 adoctor_diag_executor:
   enable: false
   continue: false
 adoctor_diag_scheduler:
   enable: false
   continue: false
 gala_gopher:
   enable: false
   continue: false
 gala_spider:
   enable: false
   continue: false
 gala_ragdoll:
   enable: false
   continue: false
3.3 Component Deployment Option Configuration
The configurations of some key options are defined in the playbook of a component as follows:
---
- hosts: example_hosts # The host names configured for the components to be installed. (It is recommended that you use the names generated in a unified manner.)
  gather_facts: no
  user: root
  vars_files: # Add the vars file path to reference the variable file.
    - "../vars/example_vars.yml"
  vars: # Variables used to define the steps of installation. You can enable or disable the variables as required.
    install_example: true # Install the example.
    config_example: true # Configure the example.
    start_example: true # Start the example service.
    create_user: true # Create a user and a group.
  roles: # Role scripts to be completed in the playbook. You can customize the scripts. The scripts must be in the correct order.
    - ../roles/user # (1) Playbook for creating the user
    - ../roles/example # (2) Playbook for installing the example
3.4 Authentication
Certificate the account. key must be the one used when the host is added. The certificate command must be executed each time the manager component is restarted.
ps certificate --key xxxx --access_token xxxx
3.5 Executing the Deployment Task
Using the CLI:
xxxxxxxxxx aops task --action execute --task_list 95c3e692ff3811ebbcd3a89d3a259eef --access_token xxx
Using the web UI:
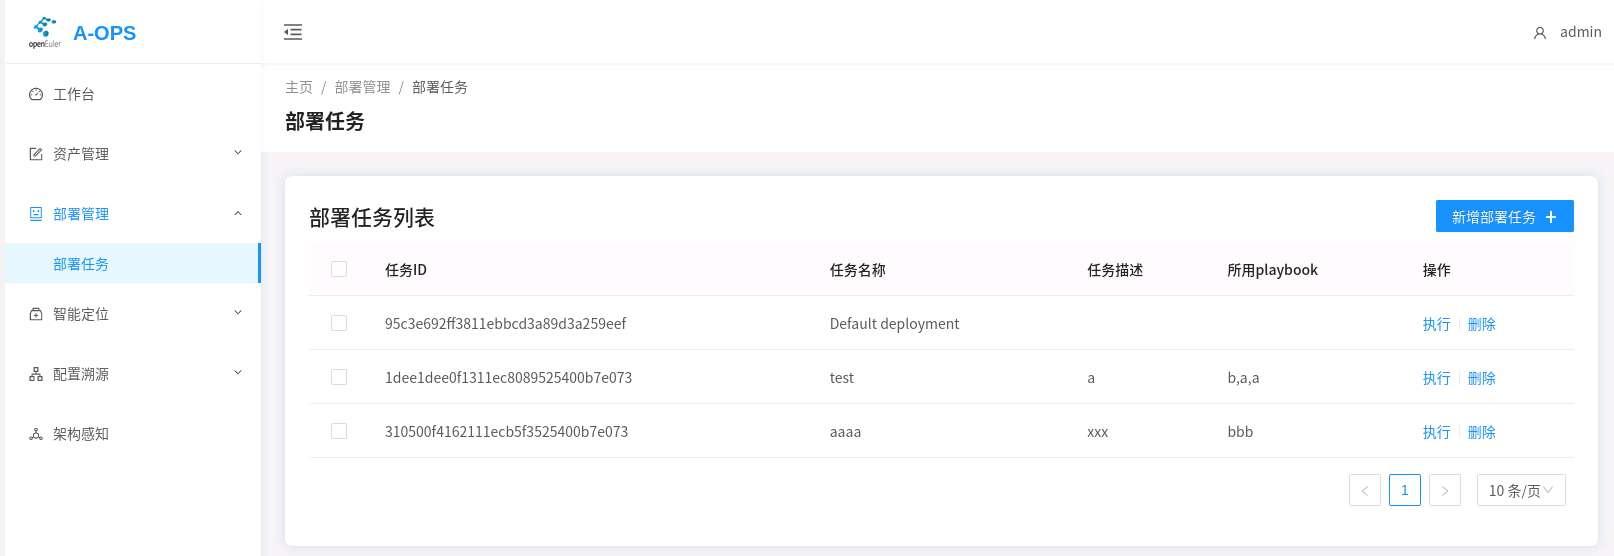
Click the Execute button after the task to be executed on the deployment task page. Currently, the system directly returns a success response. You can view the execution progress and detailed results in the /var/log/aops/manager.log file.