Kubernetes+iSulad Environment Deployment
Preparing Cluster Servers
Prepare at least 3 machines running openEuler 20.03 LTS or later versions. The following table lists information about the machines.
| Host Name | IP Address | OS | Role | Component |
|---|---|---|---|---|
| lab1 | 197.xxx.xxx.xxx | openEuler 20.03 LTS SP3 | Control node | iSulad/Kubernetes |
| lab2 | 197.xxx.xxx.xxx | openEuler 20.03 LTS SP3 | Worker node 1 | iSulad/Kubernetes |
| lab3 | 197.xxx.xxx.xxx | openEuler 20.03 LTS SP3 | Worker node 2 | iSulad/Kubernetes |
Preparing Images and Software Packages
The following table lists software packages and images used in the example. The versions are for reference only.
| Software | Version |
|---|---|
| iSulad | 2.0.17-2 |
| kubernetes-client | 1.20.2-9 |
| kubernetes-kubeadm | 1.20.2-9 |
| kubernetes-kubelet | 1.20.2-9 |
| Image | Version |
|---|---|
| k8s.gcr.io/kube-proxy | v1.20.2 |
| k8s.gcr.io/kube-apiserver | v1.20.2 |
| k8s.gcr.io/kube-controller-manager | v1.20.2 |
| k8s.gcr.io/kube-scheduler | v1.20.2 |
| k8s.gcr.io/etcd | 3.4.13-0 |
| k8s.gcr.io/coredns | 1.7.0 |
| k8s.gcr.io/pause | 3.2 |
| calico/node | v3.14.2 |
| calico/pod2daemon-flexvol | v3.14.2 |
| calico/cni | v3.14.2 |
| calico/kube-controllers | v3.14.2 |
If you perform the deployment in without an Internet connection, download the software packages, dependencies, and images in advance.
- Download software packages: https://repo.openeuler.org/openEuler-22.03-LTS-SP1/
- Download images from Docker Hub: https://hub.docker.com
Modifying the hosts File
Change the host name of the machine, for example, lab1.
hostnamectl set-hostname lab1
sudo -i
Configure host name resolution by modifying the /etc/hosts file on each machine.
vim /etc/hostsAdd the following content (IP address and host name) to the hosts file:
197.xxx.xxx.xxx lab1
197.xxx.xxx.xxx lab2
197.xxx.xxx.xxx lab3
Preparing the Environment
Disable the firewall/
systemctl stop firewalld
systemctl disable firewalld
Disable SELinux.
setenforce 0Disable memory swapping.
swapoff -a
sed -ri 's/.*swap.*/#&/' /etc/fstab
Configure the network and enable forwarding.
$ cat > /etc/sysctl.d/kubernetes.conf <<EOF
net.bridge.bridge-nf-call-iptables = 1
net.ipv4.ip_forward = 1
net.bridge.bridge-nf-call-ip6tables = 1
vm.swappiness=0
EOF
Enable the rules.
modprobe overlay
modprobe br_netfilter
sysctl -p /etc/sysctl.d/kubernetes.conf
Configure the startup script.
vim /etc/init.d/k8s.shAdd the following content to the k8s.sh script:
#!/bin/sh
modprobe br_netfilter
sysctl -w net.bridge.bridge-nf-call-ip6tables = 1
sysctl -w net.bridge.bridge-nf-call-iptables = 1
Change the permissions aon the script.
chmod +x /etc/init.d/k8s.sh
Create the configuration file.
$ vim br_netfilte.service

[Unit]
Description=To enable the core module br_netfilter when reboot
After=default.target
[Service]
ExecStart=/etc/init.d/k8s.sh
# The path can be customized.
[Install]
WantedBy=default.target
Start the service.
systemctl daemon-reload
systemctl enable br_netfilter.service
Configure sysctl.
sed -i "s/net.ipv4.ip_forward=0/net.ipv4.ip_forward=1/g" /etc/sysctl.conf
sed -i 12a\vm.swappiness=0 /etc/sysctl.conf
Installing kubeadm, kubectl, kubelet, and iSulad
- Install the software packages using Yum.
yum install -y kubernetes-kubeadm
yum install -y kubernetes-client
yum install -y kubernetes-kubelet
yum install -y iSulad
- Enable kubelet to start upon system startup.
systemctl enable kubelet
Modifying iSulad Configurations
- Open the /etc/isulad/deamon.json file.
vi /etc/isulad/daemon.json
- Modify the file as follows:
{
    "group": "isula",
    "default-runtime": "lcr",
    "graph": "/var/lib/isulad",
    "state": "/var/run/isulad",
    "engine": "lcr",
    "log-level": "ERROR",
    "pidfile": "/var/run/isulad.pid",
    "log-opts": {
        "log-file-mode": "0600",
        "log-path": "/var/lib/isulad",
        "max-file": "1",
        "max-size": "30KB"
    },
    "log-driver": "stdout",
    "container-log": {
        "driver": "json-file"
    },
    "hook-spec": "/etc/default/isulad/hooks/default.json",
    "start-timeout": "2m",
    "storage-driver": "overlay2",
    "storage-opts": [
        "overlay2.override_kernel_check=true"
    ],
    "registry-mirrors": [
                "docker.io"
    ],
    "insecure-registries": [
                 "k8s.gcr.io",
                 "quay.io",
                 "oci.inhuawei.com",
                 "rnd-dockerhub.huawei.com",
                 "registry.aliyuncs.com",
                 "<IP address of the local image repository>"
    ],
    "pod-sandbox-image": "k8s.gcr.io/pause:3.2",
    "native.umask": "normal",
    "network-plugin": "cni",
    "cni-bin-dir": "/opt/cni/bin",
    "cni-conf-dir": "/etc/cni/net.d",
    "image-layer-check": false,
    "use-decrypted-key": true,
    "insecure-skip-verify-enforce": false,
    "cri-runtimes": {
        "kata": "io.containerd.kata.v2"
    }
}
Restart the isulad service.
systemctl restart isulad
Loading the isulad Images
Check the required system images.
kubeadm config images list
Pay attention to the versions in the output, as shown in the figure.
Pull the images using the
isulacommand.Note: The versions in the following commands are for reference only. Use the versions in the preceding output.
isula pull k8simage/kube-apiserver:v1.20.15
isula pull k8simage/kube-controller-manager:v1.20.15
isula pull k8simage/kube-scheduler:v1.20.15
isula pull k8simage/kube-proxy:v1.20.15
isula pull k8smx/pause:3.2
isula pull k8smx/coredns:1.7.0
isula pull k8smx/etcd:3.4.13-0
Modify the tags of the pulled images.
isula tag k8simage/kube-apiserver:v1.20.15 k8s.gcr.io/kube-apiserver:v1.20.15
isula tag k8simage/kube-controller-manager:v1.20.15 k8s.gcr.io/kube-controller-manager:v1.20.15
isula tag k8simage/kube-scheduler:v1.20.15 k8s.gcr.io/kube-scheduler:v1.20.15
isula tag k8simage/kube-proxy:v1.20.15 k8s.gcr.io/kube-proxy:v1.20.15
isula tag k8smx/pause:3.2 k8s.gcr.io/pause:3.2
isula tag k8smx/coredns:1.7.0 k8s.gcr.io/coredns:1.7.0
isula tag k8smx/etcd:3.4.13-0 k8s.gcr.io/etcd:3.4.13-0
Remove the old images.
isula rmi k8simage/kube-apiserver:v1.20.15
isula rmi k8simage/kube-controller-manager:v1.20.15
isula rmi k8simage/kube-scheduler:v1.20.15
isula rmi k8simage/kube-proxy:v1.20.15
isula rmi k8smx/pause:3.2
isula rmi k8smx/coredns:1.7.0
isula rmi k8smx/etcd:3.4.13-0
View pulled images.
isula images
Installing crictl
yum install -y cri-tools
Installing conntrack
yum install -y conntrack
Initializing the Master Node
Initialize the master node.
kubeadm init --kubernetes-version v1.20.2 --cri-socket=/var/run/isulad.sock --pod-network-cidr=<IP address range of the pods>
--kubernetes-versionindicates the current Kubernetes version.--cri-socketspecifies the engine, that is, isulad.--pod-network-cidrspecifies the IP address range of the pods.
Enter the following commands as prompted:
mkdir -p $HOME/.kube
sudo cp -i /etc/kubernetes/admin.conf $HOME/.kube/config
sudo chown $(id -u):$(id -g) $HOME/.kube/config
After the initialization, copy the last two lines of the output and run the copied commands on the nodes to add them to the master cluster. The commands can also be generated using the following command:
kubeadm token create --print-join-command
Adding Nodes
Paste the kubeadm join command generated on Master, add --cri-socket=/var/run/isulad.sock before --discovery-token-ca-cert-hash, and then run the command.
kubeadm join <IP address> --token bgyis4.euwkjqb7jwuenwvs --cri-socket=/var/run/isulad.sock --discovery-token-ca-cert-hash sha256:3792f02e136042e2091b245ac71c1b9cdcb97990311f9300e91e1c339e1dfcf6
Installing Calico Network Plugins
Pull Calico images.
Configure the Calico network plugins on the Master node and pull the required images on each node.
isula pull calico/node:v3.14.2
isula pull calico/cni:v3.14.2
isula pull calico/kube-controllers:v3.14.2
isula pull calico/pod2daemon-flexvol:v3.14.2
Download the configuration file on Master.
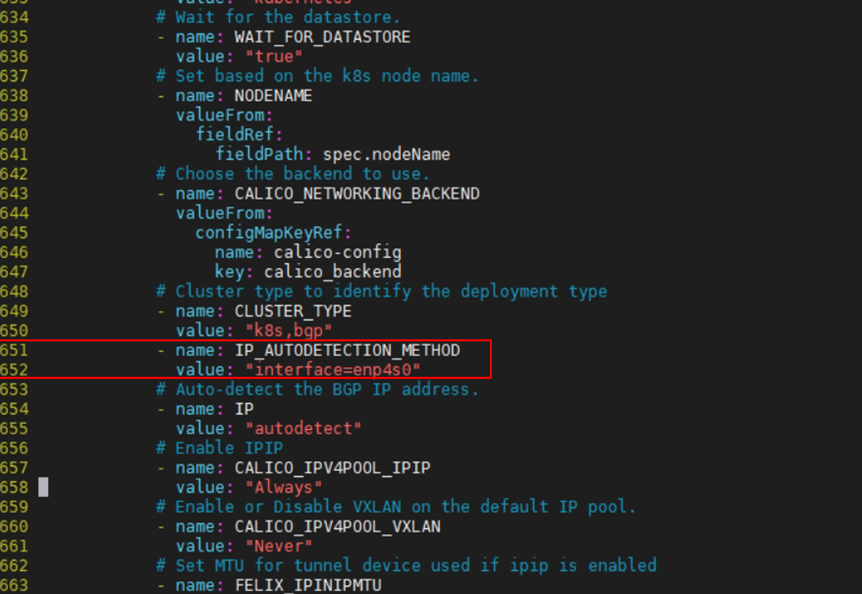
wget https://docs.projectcalico.org/v3.14/manifests/calico.yamlModify calico.yaml.
# vim calico.yaml

# Modify the following parameters.

- name: IP_AUTODERECTION_METHOD
Value: ”can-reach=197.3.10.254”

- name: CALICO_IPV4POOL_IPIP
Value: ”CrossSubnet”
If the default CNI of the pod is Flannel, add the following content to flannel.yaml:
--iface=enp4s0
Create a pod.
ubectl apply -f calico.yamlIf you want to delete the configuration file, run the following command:
kubectl delete -f calico.yaml
View pod information.
kubectl get pod -A -o wide
Checking the Master Node Information
kubectl get nodes -o wide
To reset a node, run the following command:
kubeadm reset


