1 Hardware Preparation
Test Mode
Prepare two physical machines that connect to each other. One emulates the DPU, the other emulates the host. The two machines are referred to as the DPU and host in this document, respectively.
VMs have not been tested.
Note: Network ports are exposed without authentication in test mode, posing security risks. Do not use test mode in production.
vsock Mode
Prepare a host with a DPU that supports vsock communication through VirtIO.
vsock mode has not been debugged in the actual DPU environment. This document describes the method based on test mode.
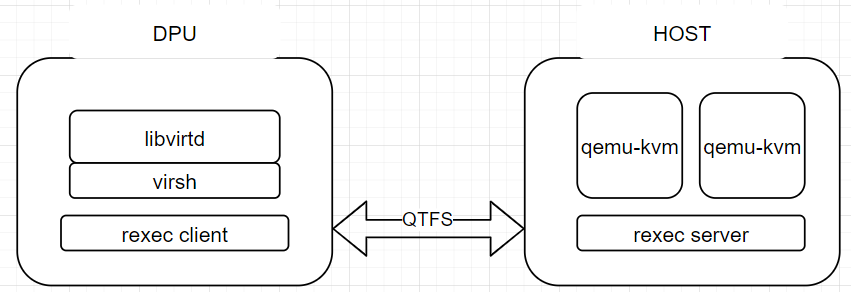
2 libvirt Offload Architecture
3 Environment Preparation
3.1 qtfs Deployment
Deploy qtfs by referring to the qtfs project repository.
The firewall must be disabled for qtfs to establish connections.
3.2 udsproxyd Deployment
3.2.1 Introduction
udsproxyd is a cross-host UDS proxy service, which needs to be deployed on both the host and DPU. The udsproxyd components on the host and dpu are peers. They implement seamless UDS communication between the host and DPU, which means that if two processes can communicate with each other through UDS on the same host, they can do the same between the host and DPU. The code of the processes does not need to be modified, only that the client process needs to run with the LD_PRELOAD=libudsproxy.so environment variable. udsproxyd can work with qtfs seamlessly with an allowlist configured. The configuration methods will be described later.
3.2.2 Deploying udsproxyd
Build udsproxyd in the dpu-utilities project:
cd qtfs/ipc
make -j UDS_TEST_MODE=1 && make install
The engine service on the qtfs server has incorporated the udsproxyd feature. You do not need to manually start udsproxyd if the qtfs server is deployed. However, you need to start udsproxyd on the client by running the following command:
nohup /usr/bin/udsproxyd <thread num> <addr> <port> <peer addr> <peer port> 2>&1 &
Parameters:
thread num: number of threads. Currently, only one thread is supported.
addr: IP address of the host.
port: Port used on the host.
peer addr: IP address of the udsproxyd peer
peer port: port used on the udsproxyd peer
Example:
nohup /usr/bin/udsproxyd 1 192.168.10.10 12121 192.168.10.11 12121 2>&1 &
If the qtfs engine service is not started, you can start udsproxyd on the server to test udsproxyd separately. Run the following command:
nohup /usr/bin/udsproxyd 1 192.168.10.11 12121 192.168.10.10 12121 2>&1 &
3.2.3 Using udsproxyd
3.2.3.1 Using udsproxyd Separately
Run the client process of the Unix socket program that uses the UDS service with the LD_PRELOAD=libudsproxy.so environment variable. This allows the connect API of glibc to connect through UDS. In the libvirt offload scenario, copy libudsproxy.so, which will be used by the libvirtd service, to the /usr/lib64 directory in the changed root directory of libvirt.
3.2.3.2 Using udsproxyd with qtfs
Configure an UDS allowlist for qtfs. The allowlist contains the sock file paths bound to the Unix socket servers. For example, The Unix socket file of a server established by a libvirt VM is in /var/lib/libvirt, which can be added to the allowlist using either of the following methods:
Build the qtfs configuration tool qtcfg in the qtfs/qtinfo directory, then configure the allowlist.
Run the following commands on the client of qtfs.
make role=client
make install
Run the following commands on the server of qtfs.
make role=server
make install
After the tool is built and installed, run
qtcfgto configure the allow list. Assuming that /var/lib/libvirt/ needs to be added to the allowlist, run the following command:qtcfg -x /var/lib/libvirt/To query the allowlist content:
qtcfg -zTo delete an allowlist entry (the parameter is the index of the entry queried by the previous command):
qtcfg -y 0Add the path to the configuration file before qtfs or the qtfs_server kernel module is loaded. The configuration file will be read when the kernel module is initialized.
3.3 rexec Deployment
3.3.1 Introduction
rexec is a C-based tool that allows you to remotely execute commands on a peer server. rexec consists of the rexec client and rexec server. The server runs as a daemon. The client binary file connects to the server through unix domain socket (UDS) using the udsproxyd service. The server daemon then starts a specified program on the server. During libvirt virtualization offload, libvirtd is offloaded to the DPU. When libvirtd needs to start a QEMU process on the host, it calls the rexec client to remotely start the process.
3.3.2 Deploying rexec
3.3.2.1 Configuring Environment Variables and the Allowlist
On the host, save the allowlist of rexec_server as whitelist in the /etc/rexec/ directory and then set whitelist as read-only.
chmod 400 /etc/rexec/whitelist
In a test environment, the allowlist is not mandatory. You can delete the file and restart the rexec_server process to remove the allowlist.
Download the source code of dpu-utilities and run make && make install in qtfs/rexec to install binary files required by rexec, including rexec and rexec_server, to /usr/bin.
Before starting rexec_server on the server, create the /var/run/rexec directory if it does not exists.
mkdir /var/run/rexec
3.3.2.2 Starting rexec_server
You can start rexec_server on the server by using either of the following methods:
Configure rexec_server as a systemd service.
In /usr/lib/systemd/system/, create a rexec.service file.
Then, you can run
systemctlto manage the rexec service.Configure the service for the first time:
systemctl daemon-reload
systemctl enable --now rexec
Restart the service:
systemctl stop rexec
systemctl start rexec
Manually start rexec_server.
nohup /usr/bin/rexec_server 2>&1 &
3.4 libvirt服务部署
3.4.1 HOST侧部署
HOST无需额外部署,只需要安装虚拟机启动环境以及libvirt即可(安装libvirt主要是为了创建对应的目录):
yum install -y qemu libvirt edk2-aarch64 #(arm环境虚拟机启动需要)
HOST需要放置虚拟机镜像,后面通过qtfs挂载到client端共享给libvirt。
3.4.2 DPU侧部署
3.4.2.1 创建chroot环境
a) 从openEuler官网下载qcow镜像,例如2203LTS版本https://repo.openeuler.org/openEuler-22.03-LTS/virtual_machine_img/。
b) 将qcow2挂载出来:
cd /root/
mkdir p2 new_root_origin new_root
modprobe nbd maxport=8
qemu-nbd -c /dev/nbd0 xxx.qcow2
mount /dev/nbd0p2 /root/p2
cp -rf /root/p2/* /root/new_root_origin/
umount /root/p2
qemu-nbd -d /dev/nbd0
c) 此时new_root_origin有解压出来的镜像根目录,再将new_root绑定挂载到该目录上,作为chroot的根目录挂载点:
mount --bind /root/new_root_origin /root/new_root
3.4.2.2 安装libvirt
此处介绍patch方式源码编译,如果计算提供rpm包则参考计算提供的安装方法。
a) 进入chroot环境,安装编译环境和常用工具:
yum groupinstall "Development tools" -y
yum install -y vim meson qemu qemu-img strace edk2-aarch64 tar
其中edk2-aarch64是arm环境下虚拟机启动需要的。
b) 安装libvirt编译需要的依赖包:
yum install -y rpcgen python3-docutils glib2-devel gnutls-devel libxml2-devel libpciaccess-devel libtirpc-devel yajl-devel systemd-devel dmidecode glusterfs-api numactl
c) 下载libvirt-6.9.0源码包:https://libvirt.org/sources/libvirt-6.9.0.tar.xz。
d) 获取直连聚合libvirt patch:
https://gitee.com/openeuler/dpu-utilities/tree/master/usecases/transparent-offload/patches/libvirt
e) 将源码包解压到chroot环境下的目录,如/home。将patch打上。
f) 进入libvirt-6.9.0目录
meson build --prefix=/usr -Ddriver_remote=enabled -Ddriver_network=enabled -Ddriver_qemu=enabled -Dtests=disabled -Ddocs=enabled -Ddriver_libxl=disabled -Ddriver_esx=disabled -Dsecdriver_selinux=disabled -Dselinux=disabled
g) 安装成功
ninja -C build install
3.4.2.3 启动libvirtd服务
libvirt直连聚合卸载模式,需要从chroot内启动libvirtd服务,首先需要把chroot之外的libvirtd服务停掉。
a) 放置虚拟机跳板脚本在chroot环境下的/usr/bin和/usr/libexec下:qemu-kvm。替换原同名二进制,这个跳板脚本就是用于调用rexec拉起远端虚拟机。
下面的 需要填qemu-kvm,如果是填的其他,则需要修改为qemu-kvm,或者将跳板脚本替换 指代的二进制,且跳板脚本内容需要对应地更改。
b) 将udsproxyd编译时附带产生的libudsproxy.so拷贝到本chroot目录下/usr/lib64下,如果配置qtfs的uds白名单方式使用udsproxyd服务,则不需要。
c) 将前面rexec编译产生的rexec二进制放置到本chroot的/usr/bin/目录下。
d) 配置chroot的挂载环境,需要挂载一些目录,使用如下配置脚本:
- virt_start.sh为配置脚本,virt_start.sh脚本中需要手动修改qtfs ko dir为编译的ko位置,host ip address为正确的host地址。
- virt_umount.sh为消除配置脚本。
e) 脚本中挂载目录位置都是按照本文档前文创建目录位置与名称为准,如果有修改需要同步适配修改脚本。
f) 配置好chroot环境后,进入chroot环境,手动拉起libvirtd。
未配置qtfs使用udsproxyd白名单的拉起方式:
LD_PRELOAD=/usr/lib64/libudsproxy.so virtlogd -d
LD_PRELOAD=/usr/lib64/libudsproxy.so libvirtd -d
如果已配置qtfs使用udsproxyd白名单,则不需要增加LD_PRELOAD前缀:
virtlogd -d
libvirtd -d
查看是否已配置白名单的方式,在chroot之外的窗口,执行:
qtcfg -z
查看列举出来的白名单是否包含/var/lib/libvirt/。
3.5 拉起虚拟机
服务部署完成后,即可以在DPU侧进行虚拟机的生命周期管理。
3.5.1 虚拟机define
a) 将虚拟机启动镜像放置在HOST侧某目录,例如
/home/VMs/Domain_name
b) 使用qtfs将这个目录挂载到DPU侧:
mount -t qtfs /home/VMs /home/VMs
c) xml中使用/home/VMs/Domain_name作为启动镜像,这样在DPU和HOST侧看到的都是同一个镜像文件(Domain_name是虚拟机domain的名字)。
d) 检查xml中
e) 执行
virsh define xxx.xml
3.5.2 虚拟机start
virsh start domain
4 环境重置
由于libvirt在DPU和HOST之间共享了部分目录,卸载环境时需要先将这部分目录全部umount。一般先停掉libvirtd和virtlogd进程,调用virt_umount脚本即可。如果HOST还有虚拟机运行,也需要先杀掉才能umount。
5 部分问题定位思路
1、 libvirt编译失败:检查依赖包安装是否完全,如果chroot挂载了外部目录或者host目录,也可能导致编译失败,需先解除挂载。
2、 QTFS挂载失败:可能server端engine进程没拉起、防火墙没关导致qtfs建联失败。
3、 虚拟机define失败:检查xml里的项目仿真器是否指向跳板脚本、虚拟机镜像是否已经通过qtfs挂载到DPU上可见,且路径与HOST一致。
4、 虚拟机启动失败:libvirtd和virtlogd服务是否拉起、rexec服务是否拉起、跳板进程是否拉起、是否qemu-kvm拉起时报错。