isocut Usage Guide
- isocut Usage Guide
Introduction
The size of an openEuler image is large, and the process of downloading or transferring an image is time-consuming. In addition, when an openEuler image is used to install the OS, all RPM packages contained in the image are installed. You cannot choose to install only the required software packages.
In some scenarios, you do not need to install the full software package provided by the image, or you need to install additional software packages. Therefore, openEuler provides isocut, an image tailoring and customization tool. You can use this tool to customize an ISO image that contains only the required RPM packages based on an openEuler image. The software packages can be the ones contained in an official ISO image or specified in addition to meet custom requirements.
This document describes how to install and use isocut.
Software and Hardware Requirements
The hardware and software requirements of the computer to make an ISO file using isocut are as follows:
- CPU architecture: AArch64 or X86_64
- OS: openEuler 22.03 LTS SP2
- 60 GB or more drive space for running isocut and storing ISO images.
Installation
The following uses openEuler 22.03 LTS on the AArch64 architecture as an example to describe how to install isocut.
Ensure that openEuler 22.03 LTS has been installed on the computer.
$ cat /etc/openEuler-release
openEuler release 22.03 LTS
Download the ISO image (must be an everything image) of the corresponding architecture and save it to any directory (it is recommended that the available space of the directory be greater than 20 GB). In this example, the ISO image is saved to the /home/isocut_iso directory.
The download address of the AArch64 image is as follows:
Note: The download address of the x86_64 image is as follows:
Create a /etc/yum.repos.d/local.repo file to configure the Yum repository. The following is an example of the configuration file. baseurl is the directory for mounting the ISO image.
[local]
name=local
baseurl=file:///home/isocut_mount
gpgcheck=0
enabled=1
Run the following command as the root user to mount the image to the /home/isocut_mount directory (ensure that the mount directory is the same as baseurl configured in the repo file) as the Yum repository:
sudo mount -o loop /home/isocut_iso/openEuler-22.03-LTS-everything-aarch64-dvd.iso /home/isocut_mountMake the Yum repository take effect.
yum clean all
yum makecache
Install isocut as the root user.
sudo yum install -y isocutRun the following command as the root user to verify that the tool has been installed successfully:
$ sudo isocut -h
Checking input ...
usage: isocut [-h] [-t temporary_workspace] [-r rpm_path] [-k kickstart_file_path] [-p product_name] [-v version_number] [-i install_picture_path] source_iso dest_iso

Cut openEuler iso to small one

positional arguments:
    source_iso                source iso image
    dest_iso                  destination iso image

optional arguments:
    -h, --help                show this help message and exit
    -t temporary_workspace    temporary workspace
    -r rpm_path               extern rpm packages path
    -k kickstart_file_path    kickstart file path
    -p product_name           The product name
    -v version_number         The version number
    -i install_picture_path   The path of background pictures during the installation
Tailoring and Customizing an Image
This section describes how to use isocut to create an image by tailoring or adding RPM packages to an openEuler image.
Command Description
Format
Run the isocut command to use the tool. The command format is as follows:
isocut [ --help | -h ] [ -t <temporary_workspace> ] [ -r <rpm_path> ] [ -k <kickstart_file_path> ] [-p <product_name> ] [-v <version_number>] [-i <install_picture_path> ] < source_iso > < dest_iso >
Parameter Description
| Parameter | Mandatory | Description |
|---|---|---|
| --help | -h | No | Queries the help information about the command. |
| -t <temporary_workspace> | No | Specifies the temporary directory temp_path for running the tool, which is an absolute path. The default value is /tmp. |
| -r <rpm_path> | No | Specifies the path of the RPM packages to be added to the ISO image. |
| -k <kickstart_file_path> | No | Specifies the kickstart template path if kickstart is used for automatic installation. |
| -p <product_name> | No | Product name |
| -v <version_number> | No | Product version |
| -i <install_picture_path> | No | Path of background pictures used during the installation |
| source_iso | Yes | Path and name of the ISO source image to be tailored. If no path is specified, the current path is used by default. |
| dest_iso | Yes | Specifies the path and name of the new ISO image created by the tool. If no path is specified, the current path is used by default. |
Background pictures used during the installation must meet the following naming and resolution requirements:
- Left side bar background during installation: sidebar-bg.png, 290x780
- Logo at the upper left corner during installation: sidebar-logo.png, 132x32
- Upper tool bar background of the settings page: topbar-bg.png, 831x105
Software Package Source
The RPM packages of the new image can be:
Packages contained in an official ISO image. In this case, the RPM packages to be installed are specified in the configuration file /etc/isocut/rpmlist. The configuration format is software_package_name.architecture. For example, kernel.aarch64.
Specified in addition. In this case, use the
-rparameter to specify the path in which the RPM packages are stored when running theisocutcommand and add the RPM package names to the /etc/isocut/rpmlist configuration file. (See the name format above.) NOTE:- During image customization, if an RPM package specified in the configuration file cannot be found, the RPM package will not be added to the image.
- If the dependency of the RPM package is incorrect, an error may be reported when running isocut.
kickstart Functions
You can use kickstart to install images automatically by using the -k parameter to specify a kickstart file when running the isocut command.
isocut provides a kickstart template (/etc/isocut/anaconda-ks.cfg). You can modify the template as required.
Modifying the kickstart Template
If you need to use the kickstart template provided by isocut, perform the following modifications:
- Configure the root user password and the GRUB2 password in the /etc/isocut/anaconda-ks.cfg file. Otherwise, the automatic image installation will pause during the password setting process, waiting for you to manually enter the passwords.
- If you want to specify additional RPM packages and use kickstart for automatic installation, specify the RPM packages in the %packages field in both the /etc/isocut/rpmlist file and the kickstart file.
See the next section for details about how to modify the kickstart file.
Configuring Initial Passwords
Setting the Initial Password of the root User
Set the initial password of the root user as follows in the /etc/isocut/anaconda-ks.cfg file. Replace ${pwd} with the encrypted password.
rootpw --iscrypted ${pwd}
Obtain the initial password of the root user as follows (root permissions are required):
Add a user for generating the password, for example, testUser.
sudo useradd testUserSet the password for the testUser user. Run the following command to set the password as prompted:
$ sudo passwd testUser
Changing password for user testUser.
New password:
Retype new password:
passwd: all authentication tokens updated successfully.
View the /etc/shadow file to obtain the encrypted password. The encrypted password is the string between the two colons (:) following the testUser user name. (******* is used as an example.)
$ sudo cat /etc/shadow | grep testUser
testUser:***:19052:0:90:7:35::
Run the following command to replace the pwd field in the /etc/isocut/anaconda-ks.cfg file with the encrypted password (replace ******* with the actual password):
rootpw --iscrypted ***
Configuring the Initial GRUB2 Password
Add the following configuration to the /etc/isocut/anaconda-ks.cfg file to set the initial GRUB2 password: Replace ${pwd} with the encrypted password.
%addon com_huawei_grub_safe --iscrypted --password='${pwd}'
%end
The root permissions are required for configuring the initial GRUB password.
The default user corresponding to the GRUB password is root.
The
grub2-set-passwordcommand must exist in the system. If the command does not exist, install it in advance.
Run the following command and set the GRUB2 password as prompted:
$ sudo grub2-set-password -o ./
Enter password:
Confirm password:
grep: .//grub.cfg: No such file or directory
WARNING: The current configuration lacks password support!
Update your configuration with grub2-mkconfig to support this feature.
After the command is executed, the user.cfg file is generated in the current directory. The content starting with grub.pbkdf2.sha512 is the encrypted GRUB2 password.
$ sudo cat user.cfg
GRUB2_PASSWORD=grub.pbkdf2.sha512.***
Add the following information to the /etc/isocut/anaconda-ks.cfg file. Replace ******* with the encrypted GRUB2 password.
%addon com_huawei_grub_safe --iscrypted --password='grub.pbkdf2.sha512.***'
%end
Configuring the %packages Field
If you want to specify additional RPM packages and use kickstart for automatic installation, specify the RPM packages in the %packages field in both the /etc/isocut/rpmlist file and the kickstart file.
This section describes how to specify RPM packages in the /etc/isocut/anaconda-ks.cfg file.
The default configurations of %packages in the /etc/isocut/anaconda-ks.cfg file are as follows:
%packages --multilib --ignoremissing
acl.aarch64
aide.aarch64
......
NetworkManager.aarch64
%end
Add specified RPM packages to the %packages configurations in the following format:
software_package_name.architecture. For example, kernel.aarch64.
%packages --multilib --ignoremissing
acl.aarch64
aide.aarch64
......
NetworkManager.aarch64
kernel.aarch64
%end
Operation Guide
- Do not modify or delete the default configuration items in the /etc/isocut/rpmlist file.
- All
isocutoperations require root permissions.- The source image to be tailored can be a basic image or everything image. In this example, the basic image openEuler-22.03-LTS-aarch64-dvd.iso is used.
- In this example, assume that the new image is named new.iso and stored in the /home/result directory, the temporary directory for running the tool is /home/temp, and the additional RPM packages are stored in the /home/rpms directory.
Open the configuration file /etc/isocut/rpmlist and specify the RPM packages to be installed (from the official ISO image).
sudo vi /etc/isocut/rpmlistEnsure that the space of the temporary directory for running isocut is greater than 8 GB. The default temporary directory is**/tmp**. You can also use the
-tparameter to specify another directory as the temporary directory. The path of the directory must be an absolute path. In this example, the /home/temp directory is used. The following command output indicates that the available drive space of the /home directory is 38 GB, which meets the requirements.$ df -h Filesystem Size Used Avail Use% Mounted on devtmpfs 1.2G 0 1.2G 0% /dev tmpfs 1.5G 0 1.5G 0% /dev/shm tmpfs 1.5G 23M 1.5G 2% /run tmpfs 1.5G 0 1.5G 0% /sys/fs/cgroup /dev/mapper/openeuler_openeuler-root 69G 2.8G 63G 5% / /dev/sda2 976M 114M 796M 13% /boot /dev/mapper/openeuler_openeuler-home 61G 21G 38G 35% /homeTailor and customize the image.
Scenario 1: All RPM packages of the new image are from the official ISO image.
$ sudo isocut -t /home/temp /home/isocut_iso/openEuler-22.03-LTS-SP2-aarch64-dvd.iso /home/result/new.iso
  Checking input ...
  Checking user ...
  Checking necessary tools ...
  Initing workspace ...
  Copying basic part of iso image ...
  Downloading rpms ...
  Finish create yum conf
  finished
  Regenerating repodata ...
  Checking rpm deps ...
  Getting the description of iso image ...
  Remaking iso ...
  Adding checksum for iso ...
  Adding sha256sum for iso ...
  ISO cutout succeeded, enjoy your new image "/home/result/new.iso"
  isocut.lock unlocked ...
If the preceding information is displayed, the custom image new.iso is successfully created.
Scenario 2: The RPM packages of the new image are from the official ISO image and additional packages in /home/rpms.
sudo isocut -t /home/temp -r /home/rpms /home/isocut_iso/openEuler-22.03-LTS-SP2-aarch64-dvd.iso /home/result/new.isoScenario 3: The kickstart file is used for automatic installation. You need to modify the /etc/isocut/anaconda-ks.cfg file.
sudo isocut -t /home/temp -k /etc/isocut/anaconda-ks.cfg /home/isocut_iso/openEuler-22.03-LTS-SP2-aarch64-dvd.iso /home/result/new.iso
FAQs
The System Fails to Be Installed Using an Image Tailored Based on the Default RPM Package List
Context
When isocut is used to tailor an image, the /etc/isocut/rpmlist configuration file is used to specify the software packages to be installed.
Images of different OS versions contain different software packages. As a result, some packages may be missing during image tailoring. Therefore, the /etc/isocut/rpmlist file contains only the kernel software package by default, ensuring that the image can be successfully tailored.
Symptom
The ISO image is successfully tailored using the default configuration, but fails to be installed.
An error message is displayed during the installation, indicating that packages are missing:
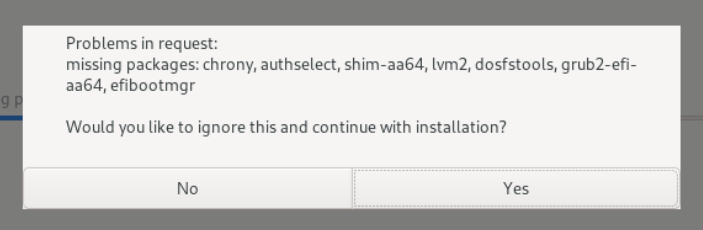
Possible Cause
The ISO image tailored based on the default RPM package list lacks necessary RPM packages during installation. The missing RPM packages are displayed in the error message, and may vary depending on the version.
Solution
Add the missing packages.
- Find the missing RPM packages based on the error message.
- Add the missing RPM packages to the /etc/isocut/rpmlist configuration file.
- Tailor and install the ISO image again.
For example, if the missing packages are those in the example error message, modify the rpmlist configuration file as follows:
$ cat /etc/isocut/rpmlist
kernel.aarch64
lvm2.aarch64
chrony.aarch64
authselect.aarch64
shim.aarch64
efibootmgr.aarch64
grub2-efi-aa64.aarch64
dosfstools.aarch64