1 CFGO
1.1 Feature Description
- Concept: Continuous feature-guided optimization (CFGO) is a feature that continuously optimizes multimodal files (source code and binaries) and full lifecycle (covering compilation, linking, post-linking, runtimes, OSs, and libraries) of programs.
- Core idea: Assuming that the program functions remain unchanged, runtime profiling data is used to guide optimizations, resulting in a more refined program with better performance.
- Major optimizations include:
- Code layout optimization: The binary layout of the target program is optimized by using techniques such as basic block reordering, function rearrangement, and hot/cold splitting to improve the I-cache and I-TLB hits.
- Advanced compiler optimization: Optimization techniques such as inlining, loop unrolling, vectorization, and indirect calling enable the compiler to make more informed decisions on optimization.
1.2 BOLTUSE
1.2.1 Option Description
Option -fbolt-use
This option uses Binary Optimization and Layout Tool (BOLT) for profiling to complete post-linking optimization. Prepare the profiling file required for BOLT optimization in advance. You can obtain the profiling file either by using the AutoBOLT mode or by collecting data with perf and then converting it to a BOLT-compatible format with perf2bolt.
1.2.2 Common Application Enabling Methods
MySQL
cmake .. -DCMAKE_INSTALL_PREFIX=/home/install/mysql-8.0.25 -DBUILD_CONFIG=mysql_release -DWITH_BOOST=../boost -DCMAKE_C_FLAGS="-Wl,-q" -DCMAKE_CXX_FLAGS="-Wl,-q" -DCMAKE_C_LINK_FLAGS="-Wl,-q" -DCMAKE_CXX_LINK_FLAGS="-Wl,-q -fbolt-use=/path/to/mysqld.profile -fbolt-target=mysqld" -DCMAKE_EXE_LINKER_FLAGS="-Wl,-q"MongoDB
# Build a baseline version with relocation information.
python3 buildscripts/scons.py MONGO_VERSION=6.1.0 DESTDIR=/usr/local/mongo install-all-meta CFLAGS="-march=armv8-a+crc -mtune=generic -Wl,-q" CXXFLAGS="-march=armv8-a+crc -mtune=generic -Wl,-q" LINKFLAGS="-Wl,-q" -j 128 --disable-warnings-as-errors
# Use perf and perf2bolt to generate a BOLT-compatible profiling file.
# Use BOLTUSE to build an optimized version. Note that if the LLVM-BOLT version does not support PIEs, you need to manually delete the pie option from SConstruct.
python3 buildscripts/scons.py MONGO_VERSION=6.1.0 DESTDIR=/usr/local/mongo install-devcore CFLAGS="-march=armv8-a+crc -mtune=generic -Wl,-q" CXXFLAGS="-march=armv8-a+crc -mtune=generic -Wl,-q" LINKFLAGS="-Wl,-q -fbolt-use=./mongod.profile -fbolt-target=mongod" -j 128 --disable-warnings-as-errors
Redis
make CFLAGS="-Wl,-q" LDFLAGS="-fbolt-use=/path/to/redis.profile -fbolt-target=redis-server"Note:
- By default, the profiling file named data.fdata in the current path is used for optimization. You can use
-fbolt-use=FILEto specify the profiling file to be used, for example,-fbolt-use=/tmp/a.fdata. - It can be used together with
-fbolt-targetand-fbolt-option=<options>.
- By default, the profiling file named data.fdata in the current path is used for optimization. You can use
1.3 AutoBOLT
1.3.1 Option Description
In the instrumentation feedback-directed optimization scenario, two compilations are required. The first compilation is performed with compilation option -fprofile-generate[=path]. After a series of typical scenario tests, the profiling data is generated. The second compilation is performed with compilation option -fprofile-use[=path], during which AutoBOLT converts the instrumentation data to a BOLT-compatible profiling file and automatically enables post-link optimization.
Application Scenarios
Scenarios that are insensitive to performance loss in the instrumentation phase, or those insensitive to the build and test time but pursue ultimate performance.
How to Use
# Perform instrumentation to generate gcno.
gcc -O3 -fprofile-generate[=path] -fprofile-update=atomic -o test test.c
# Perform tests to obtain gcda./test.
# Use the generated gcda to build a new executable file.
gcc -O3 -fprofile-use[=path] -fprofile-correction -Wno-error=coverage-mismatch -Wno-error=missing-profile -fauto-bolt -fbolt-target=test_pgoed -o test_pgoed test.c
1.3.2 Automatic (Sampling) Feedback-Directed Optimization
Different from instrumentation feedback-directed optimization, automatic feedback-directed optimization (AutoFDO) uses perf to collect program runtime information, create_gcov to resolve the sampling information from perf to the profiling data required by the compiler, and -fauto-profile to read the profiling data to complete optimization. The -fprofile-correction option is used to enable the MCF algorithm to smooth the basic block count imbalance caused by sampling.
Application Scenarios
Scenarios where versions are frequently released and the entire system needs to be deployed in the production environment.
How to Use
# Compile an executable file with debugging information.
gcc -O3 -g -o test_prof test.c
# Use perf to collect profiling data.
perf record -e br_retired -- ./test_prof
# Use create_gcov to resolve perf.data to a gcov file.
create_gcov --binary=./test_prof --profile=perf.data --gcov=test.gcov -gcov_version=2
# Use gcov to compile profiling data to generate a new executable file.
gcc -O3 -fauto-profile=test.gcov test.c -o test_autofdo
Additional Information
- By default, the converted profiling file is saved in the current path. You can use
-fauto-bolt=PATHto specify the path for saving the BOLT-compatible profiling file, for example,-fauto-bolt=/tmp. - In instrumentation feedback-directed optimization, the gcov-tool tool can be used to combine instrumentation feedback-directed optimization files to generate a high-performance kernel that improves performance in multiple scenarios.
- When
-fprofile-generate[=path]is used in instrumentation feedback-directed optimization for multi-thread applications,-fprofile-update=atomiccan be added to generate more accurate data. - In scenarios where instrumentation feedback-directed optimization is used to optimize applications,
-fprofile-correctioncan be used to automatically correct some profiling data, and-Wno-error=coverage-mismatch -Wno-error=missing-profilecan be used to mask errors reported when the profiling file cannot be matched or does not exist.
Typical Application Enabling Methods
Applications built using CMake, such as MySQL and RocksDB
# Build a baseline version with relocation information.
cmake .. -DCMAKE_INSTALL_PREFIX=/usr/local/mysql -DBUILD_CONFIG=mysql_release -DWITH_BOOST=../boost -DCMAKE_C_FLAGS="-Wl,-q" -DCMAKE_CXX_FLAGS="-Wl,-q" -DCMAKE_C_LINK_FLAGS="-Wl,-q" -DCMAKE_CXX_LINK_FLAGS="-Wl,-q" -DCMAKE_EXE_LINKER_FLAGS="-Wl,-q"
# Use AutoBOLT to build an optimized version.
Applications built using Make, such as Redis and Memcached
# Build a baseline version with relocation information.
make CFLAGS="-Wl,-q" CXXFLAGS="-Wl,-q"
# Build an optimized version.
make CFLAGS="-fprofile-use=./profile -fauto-bolt -fbolt-target=redis-server -Wl,-q -Wno-missing-profile" LDFLAGS="-Wl,-q"
Performance Boosts for Typical Applications
| MySQL | openGauss | Nginx | Ceph | Redis | kernel |
|---|---|---|---|---|---|
| +15% | +5% | +15% | +7% | +5% | +5% |
FAQs
- When
-fauto-boltand-fbolt-targetare used, message "The linker[2] is not for exec, just skip." displayed. In versions earlier than openEuler 22.03 LTS SP3, GCC does not support PIE or SO optimization. You can use openEuler 22.03 LTS SP4 or later.
Common Options for AutoBOLT and BOLTUSE
- -
fbolt-target=NAMEspecifies the BOLT optimization object. If this option is used, the binaries and dynamic libraries except that specified byNAMEwill not be optimized. To use this option,NAMEmust be specified. - -
fbolt-option=PARAMspecifies the BOLT optimization option. Different options must be separated by commas (,). For example,-fbolt-option="-reorder-blocks=cache+,-reorder-functions=hfsort+". To use this option,PARAMmust be specified. You can usellvm-bolt --helpto query details about the optimization option.
1.4 Profile-Guided Optimization (PGO)
Feature Description
PGO enhances program performance by leveraging runtime information (profiling files) gathered through instrumentation. The compiler utilizes these profiling files to make more informed optimization decisions during the compilation process, resulting in a more optimized executable file.
PGO primarily encompasses two optimization methods:
- Edge profiling: Counters are inserted along the edges of the control flow graph (CFG) of the function to collect program execution count information.
- Value profiling: This optimization inserts code during instrumentation to gather statistics on frequently occurring values of expressions and variables, providing the compiler with insights for better optimization decisions. After program execution, the generated profiling file is read back by the compiler to guide corresponding optimization passes. GCC currently supports various value profile counting functionalities, including frequently used variable values, identification of powers of two, common indirect call addresses, and function first run IDs.
1.4.1 Compilation Options
-fprofile-generate[=path]
This option enables both -fprofile-arcs and -fprofile-values. -fprofile-generate optionally accepts a path argument, specifying the directory for storing profiling feedback data files. This function is equivalent to -fprofile-dir.
-fprofile-correction
This option employs heuristics for error correction or smoothing to mitigate inconsistencies in the profiling feedback data.
-Wno-coverage-mismatch
By default, profile mismatches with the source code are treated as errors. This option downgrades such errors to warnings, recommended only for situations with minimal code changes, particularly in cold code paths.
-fprofile-use[=path]
This option instructs the compiler to use profiling files stored at the specified path for optimization guidance.
1.4.2 Kernel Feedback Optimization
Background
As most servers today are dedicated to running a single or a limited set of applications, optimizing the OS based on the execution profile of these specific programs can yield significant performance gains.
Example
Download the kernel source code.
yum install -y kernel-sourceCompile the instrumented kernel.
Go to the kernel source directory and configure the kernel options. This example uses kernel 5.10.
cd /usr/src/linux-5.10.0***
make openeuler_defconfig
make menuconfig
Within the menu:
- Go to General setup > Local Version-append to kernel release, and provide a suitable suffix (such as -test-going).
- Press Esc twice to return to the main menu.
- Go to General architecture-dependent options > GCOV-based kernel profiling.
- Press Esc twice to return to the main menu.
- Go to Kernel hacking > Compile-time checks and compiler options profiling and disable Compile the kernel with debug info.
- Save and exit.
Build the RPM package (replace 96 with the maximum core count).
make binrpm-pkg -j 96Deploy the instrumented kernel.
Install the instrumented kernel on the server, set it as the default, and reboot.
rpm -ivh kernel*** --forcegrub2-set-default 0 rebootExecute target application workload for profiling. This example uses the wrk testing suite of Nginx.
Start the Nginx server.
nginx -c nginx.confRun the Nginx wrk test suite on the client.
wrk -c 2000 -d 60s -t 20 --latency --timeout 5s -H "Connection: close" http://192.168.1.10:10000/index.htmlExecute the profile collection script to write the profiling information from memory to the drive.
(Optional) To optimize the kernel for multiple applications, you can merge multiple application profiling files. Here is an example with applications A and B:
gcov-tool merge a/gcovdata b/gcovdataCompile the optimized kernel. Go to the kernel source directory and configure the kernel options.
make openeuler_defconfig
make menuconfig
Within the menu:
- Go to General setup > Local version-append to kernel release and provide a suitable suffix (such as -test-pgoed).
- Press Esc to return to the main menu.
- Disable Compile the kernel with debug info.
- Save and exit.
Build the RPM package (replace 96 with the maximum core count).
make binrpm-pkg -j 96 KCFLAGS="-fprofile-use -fprofile-correction -Wno-error=coverage-mismatch -Wno-error=missing-profile -fprofile-dir=gcovdata"Note:
The
-fprofile-dirparameter should point to the absolute path of the gcovdata directory generated in step 6.
Common Issues
Profiling files are not generated correctly.
- Possible cause 1: The program does not have sufficient permissions to write in the directory specified by
-fprofile-generatefor profile generation. Runchmod 777 [absolute path to the directory]to grant permissions. - Possible cause 2: The program did not exit normally. The
__gcov_exit()function is responsible for flushing profile information upon application exit. You can attach to the application using GDB and manually call__gcov_exit()to resolve this.
- Possible cause 1: The program does not have sufficient permissions to write in the directory specified by
1.5 Link-Time Optimization (LTO)
1.5.1 Introduction
Background
Traditional compilation processes, like those using GCC, compile and optimize individual source files (compilation units) into object files (.o) containing assembly code. The linker then resolves symbols and relocates code from these object files to create an executable file. However, while the linker has access to cross-file function call information, it operates on assembly code, limiting its ability to perform optimizations. This traditional framework, while efficient for incremental compilation, misses optimization opportunities that span multiple files.
LTO process
LTO aims to overcome these limitations by enabling optimization across compilation units at link time. To achieve this, LTO preserves intermediate representation (IR) information needed for optimization. During linking, the linker invokes an LTO plugin which performs program-wide analysis, resulting in more effective optimization decisions. The optimized IR is then transformed back into object files containing assembly code, and finally, the linker performs the usual linking process.
Partitioning and parallelism
LTO often requires longer compilation times due to the need to analyze the global call graph. To speed up LTO compilation, partitioning is introduced. In partitioned mode, the global call graph is divided into partitions based on module dependencies. Each partition is optimized independently and in parallel, striking a balance between compilation time and optimization effectiveness.
1.5.2 Usage
-flto=
Enable LTO by adding this option to the compilation command. The number of parallel LTO jobs can be specified using -flto=n. Using -flto=auto automatically determines the appropriate number of jobs based on the environment (such as GNU Make configuration or available CPU cores).
-ffat-lto-objects
This option generates object files containing both assembly code and LTO information. When -ffat-lto-objects is enabled, -fno-lto can be used to perform regular linking using the assembly code of the object file, bypassing LTO.
-flto-partion=1to1|balanced|max|one|none
This option controls the partitioning strategy used to speed up compilation:
1to1: corresponds each source file to a partition.balanced: makes partitions roughly equal in size.max: creates a partition for each symbol.one: attempts to create a single partition.none: disables partitioning.
-flto-compresson-level=n
This option controls the compression level of the IR information stored in the object files.
Example
# four.cint four() {  return 4;}
# five.cint five() {  return 5;}
# test.cextern int four();extern int five();int main() {  return four() + five();}
gcc -O2 -flto test.c four.c five.c
# Or
gcc -O2 -flto -c test.cgcc -O2 -flto -c four.cgcc -O2 -flto -c five.cgcc test.o four.o five.o
Explanation
In this example, LTO enables the compiler to perform inlining and constant folding across files. The expression four() + five() is optimized to the immediate value 9, eliminating the function calls and calculation overhead. This optimization would not be possible without LTO. Note that if only four.c and test.c are compiled with LTO, the optimization would be limited to those files, resulting in 4 + five().
1.5.3 Common Issues
plugin needed to handle lto objectThis error occurs when the linker or related tools lack the necessary LTO plugin to process LTO object files. It commonly arises when using tools like
ar,ranlib, ornmwithout LTO support. Switching to their GCC counterparts (gcc-ar,gcc-ranlib,gcc-nm) usually resolves the issue.undefined symbolThis issue can have multiple causes, for example:
Symbol versioning: GCC does not support symbol versioning using
__asm__. Use__attribute__((.symver))instead.Incompatible tools: Tools like
objcopymay not fully support LTO object files. This can lead to issues with symbol renaming and result in undefined symbol errors.Link-time instrumentation: Using
-Wl,--wrap=foowith LTO might lead to an undefined symbol error for__wrap_foo. This is a known issue being addressed upstream.
multi-defined symbolThis issue is often caused by tools like
objcopythat lack full LTO support. Symbols intended to be hidden might not be properly handled, leading to multiple definitions.
1.6 Static Compilation Options
1.6.1 -fipa-struct-reorg
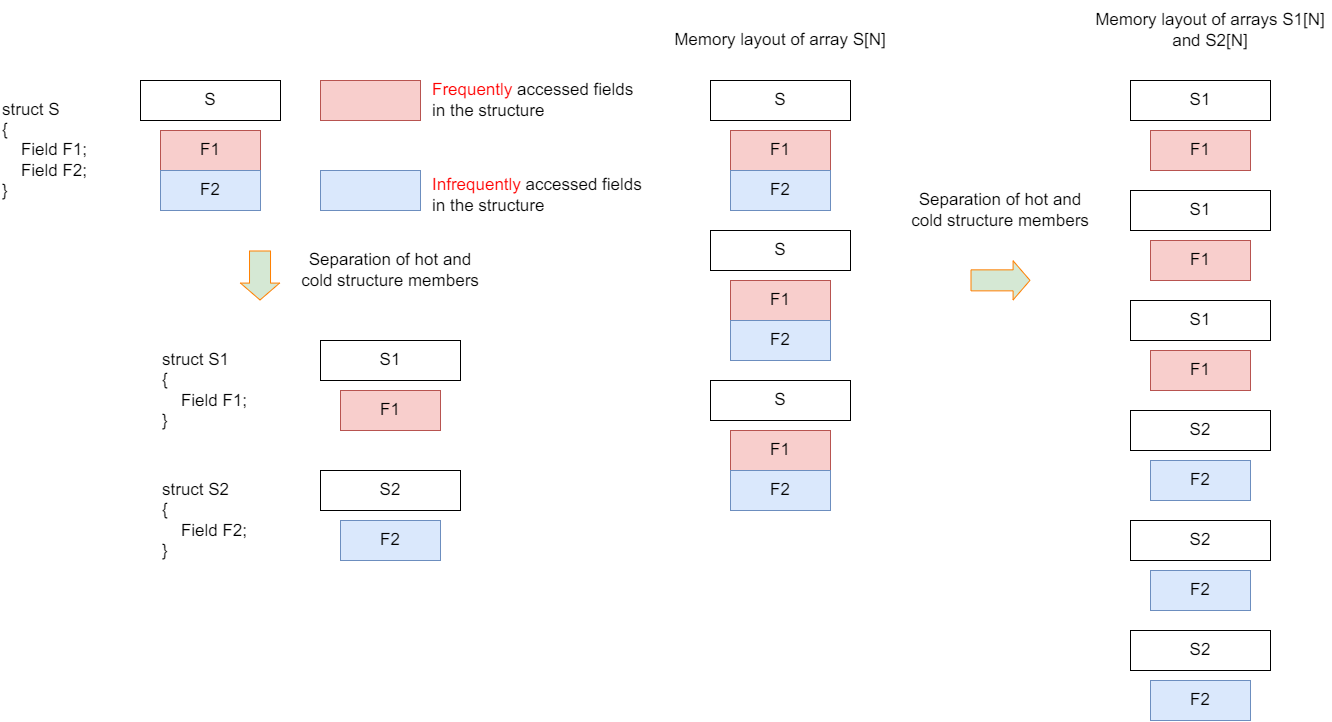
The -fipa-struct-reorg option enables structure reorganization optimizations to improve cache hit rate by re-arranging the layout of structure members in memory.
Structure splitting: splits a structure into separate structures based on the access frequency (hot and cold) of its members.
Figure 1 Structure splitting optimization
Example:
Original structure:
struct S
  {
    type1 field1;
    // Hot field
    type2 field2;
  };S *v;
Transformed structure:
struct S_hot
  {
    type1 field1;
  };
struct S_cold
  {
    type2 field2;
  };
S_hot *v_hot;
S_cold *v_cold;
Structure array optimization: transforms an array of structures into a structure of arrays.
Figure 1 Structure array optimization
Example:
Original structure:
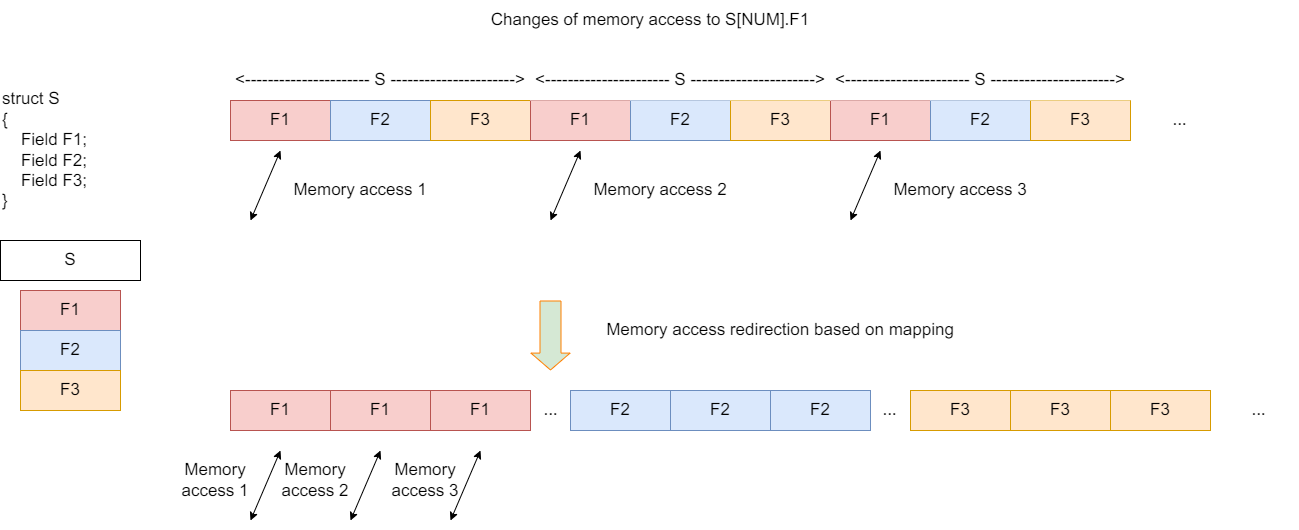
struct
  {
    type1 field1;
    type2 field2;
    type3 field3;
  } arr[N];
Transformed structure:
struct
  {
    type1 field1[N];
    type2 field2[N];
    type3 field3[N];
  } arr;
How to Use
Add the following options during compilation:
-O3 -flto -flto-partition=one -fipa-struct-reorg
Note:
The -fipa-struct-reorg option requires the -O3 -flto -flto-partition=one options to be enabled globally.
Optimization effect: Up to 20% performance improvement is observed on the SPECCPU2017 intrate 505.mcf benchmark.
1.6.2 -fipa-reorder-fields
The -fipa-reorder-fields option reorders the fields within a structure based on their size (from largest to smallest). This minimizes padding due to alignment requirements, reduces the overall memory footprint of the structure, and improves cache hit rate.
Original structure:
struct S
  {
    double a;
    int b;double c;
    double d;
    short e;
    double f;
    double g;
    double h;
    double i;
  };
Reordered structure:
struct S.reorder
  {
    double a;
    double i;
    double c;
    double d;
    double f;
    double g;
    double h;
    int b;
    short e;
  }
How to Use
Add the following options during compilation:
-O3 -flto -flto-partition=one -fipa-reorder-fields
Note:
The -fipa-reorder-fields option requires the -O3 -flto -flto-partition=one options to be enabled globally.
Optimization effect: Up to 20% performance improvement is observed on the SPECCPU2017 intrate 505.mcf benchmark.
1.6.3 -fipa-struct-reorg=n
This option provides granular control over a series of structure layout optimizations. The value of n determines the level of optimization:
-fipa-struct-reorg=0: disables all structure layout optimizations.-fipa-struct-reorg=1: enables structure splitting and structure array optimization (equivalent to using-fipa-struct-reorg).-fipa-struct-reorg=2: includes all optimizations from level 1, and additionally enables structure member reordering (-fipa-reorder-fields).-fipa-struct-reorg=3: includes all optimizations from level 2, and additionally enables structure redundant member elimination. This optimization removes unread structure members and their corresponding write statements.Example:
Original structure:
struct S
  {
    type1 field1;
    // Never read in whole program
    type2 field2;};
Transformed structure:
struct S.layout { type2 field2; };-fipa-struct-reorg=4: includes all optimizations from level 3, and additionally enables safe structure pointer compression.This optimization compresses structure pointers within structure fields to 8, 16, or 32 bits (configurable), reducing memory footprint and bandwidth pressure.
- Safe structure pointer compression supports only scenarios where the size of the structure array is known at compile time.
- Use
--param compressed-pointer-size=[8,16,32]to control the compressed size (the default value is 32).
Example:
Original structure:
struct S
  {
    struct S* field1;
    type2 field2;
  };
Optimized structure:
struct S.layout { uint32_t field1.pc; type2 field2; };-fipa-struct-reorg=5: includes all optimizations from level 4, and relaxes the constraints for structure pointer compression.This level supports scenarios where the size of the structure array is unknown at compile time. Users must ensure the legality of the compression level. The following table shows the maximum supported structure array size for different compression levels.
Pointer Size Maximum Supported Array Range 8 254 (0xff-1) 16 65534 (0xffff-1) 32 4294967294 (0xffffffff-1) -fipa-struct-reorg=6: includes all optimizations from level 5, and additionally enables structure array semi-relayout optimization.Semi-relayout packs and re-arranges members of structures within a certain range, improving data locality and enhancing performance.
Control the relayout scale with
--param semi-relayout-level=[11,12,13,14,15](the default value is 13). A value of 13 means semi-relayout will re-arrange every 1024 structures as a group. If there are fewer than 1024 structures, padding is added to reach 1024. Calculation:(1 << semi-relayout-level) / 8.The figure below illustrates the transformation of structure array layout in memory from consecutive structures after applying semi-relayout.
Figure 1 Semi-relayout optimization principle diagram
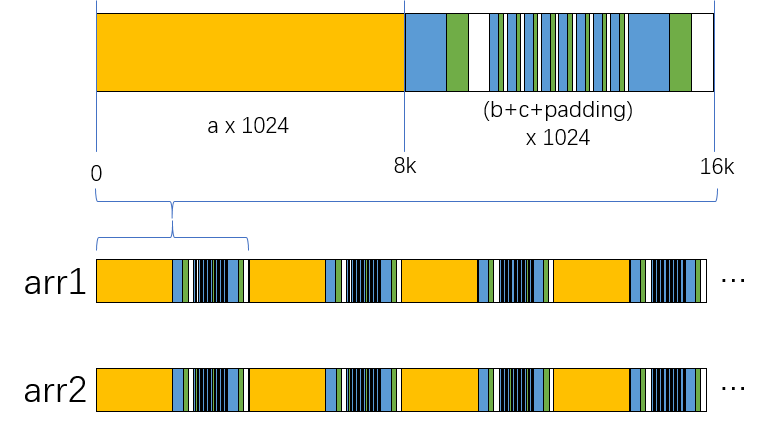
struct S
  {
    long a,
    int b,
    short c
  };
How to Use
Add the following options during compilation:
-O3 -flto -flto-partition=one -fipa-struct-reorg=n
Where n can be between 0 and 6.
Note:
The -fipa-struct-reorg=n option requires the -O3 -flto -flto-partition=one options to be enabled globally.
1.6.4 -ftree-slp-transpose-vectorize
This option improves the analysis of loops with consecutive memory reads by inserting temporary arrays to split the loop during loop splitting, and adds analysis to transpose grouped stores in the superword level parallelism (SLP) vectorization stage.
Example:
Consider the following code:
int foo (unsigned char *oxa, int ia, unsigned char *oxb, int ib)
  {
    unsigned tmp[4][4];
    unsigned a0, a1, a2, a3;int sum = 0;
    for (int i = 0; i < 4; i++, oxa += ia, oxb += ib)
      {
        a0 = (oxa[0] - oxb[0]) + ((oxa[4] - oxb[4]) << 16);
        a1 = (oxa[1] - oxb[1]) + ((oxa[5] - oxb[5]) << 16);
        a2 = (oxa[2] - oxb[2]) + ((oxa[6] - oxb[6]) << 16);
        a3 = (oxa[3] - oxb[3]) + ((oxa[7] - oxb[7]) << 16);
        int t0 = a0 + a1;int t1 = a0 - a1;int t2 = a2 + a3;
        int t3 = a2 - a3;tmp[i][0] = t0 + t2;
        tmp[i][2] = t0 - t2;tmp[i][1] = t1 + t3;
        tmp[i][3] = t1 - t3;
      }
    for (int i = 0; i < 4; i++)
      {
        int t0 = tmp[0][i] + tmp[1][i];
        int t1 = tmp[0][i] - tmp[1][i];
        int t2 = tmp[2][i] + tmp[3][i];
        int t3 = tmp[2][i] - tmp[3][i];
        a0 = t0 + t2;
        a2 = t0 - t2;
        a1 = t1 + t3;
        a3 = t1 - t3;
        sum += a0 + a1 + a2 + a3;
      }
    return sum;
  }
The first loop can be split as follows:
for (int i = 0; i < 4; i++, oxa += ia, oxb += ib)
  {
    a00[i] = (oxa[0] - oxb[0]) + ((oxa[4] - oxb[4]) << 16);
    a11[i] = (oxa[1] - oxb[1]) + ((oxa[5] - oxb[5]) << 16);
    a22[i] = (oxa[2] - oxb[2]) + ((oxa[6] - oxb[6]) << 16);
    a33[i] = (oxa[3] - oxb[3]) + ((oxa[7] - oxb[7]) << 16);
  }
for (int i = 0; i < 4; i++)
  {
    int t0 = a00[i] + a11[i];
    int t1 = a00[i] - a11[i];
    int t2 = a22[i] + a33[i];
    int t3 = a22[i] - a33[i];
    tmp[i][0] = t0 + t2;
    tmp[i][2] = t0 - t2;
    tmp[i][1] = t1 + t3;
    tmp[i][3] = t1 - t3;
  }
The calculations on the right side of the first split loop are isomorphic and involve consecutive loads, making them suitable for vectorization. However, the memory addresses of a00[i], a11[i], a22[i], and a33[i] on the left side are not consecutive, preventing them from being the root node of the vectorized SLP tree. Ideally, the register content after each iteration should be:
| register | values |
|---|---|
| vec0 | a00[0] a00[1] a00[2] a00[3] |
| vec1 | a11[0] a11[1] a11[2] a11[3] |
| vec2 | a22[0] a22[1] a22[2] a22[3] |
| vec3 | a33[0] a33[1] a33[2] a33[3] |
However, the actual content calculated within each iteration is:
| register | values |
|---|---|
| vec0 | a00[0] a11[0] a22[0] a33[0] |
| vec1 | a00[1] a11[1] a22[1] a33[1] |
| vec2 | a00[2] a11[2] a22[2] a33[2] |
| vec3 | a00[3] a11[3] a22[3] a33[3] |
By transposing the grouped stores, the desired SLP tree root node can be obtained. Subsequently, leveraging the existing capabilities of SLP, further vectorization analysis can be performed.
In addition, for scenarios like the second split loop and the last loop in the example, where the tmp two-dimensional array is written to memory and immediately read, this optimization transforms the memory access into permutation operations between registers. This optimization is enabled by default.
How to Use
Add the following option during compilation:
-O3 -ftree-slp-transpose-vectorize
Note:
The -ftree-slp-transpose-vectorize option requires -O3 to be enabled.
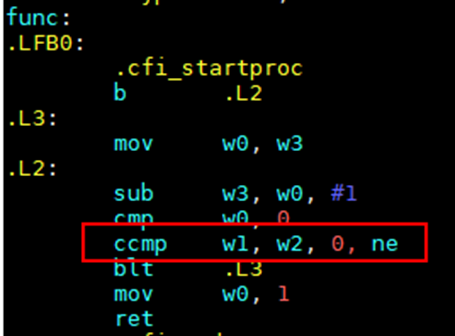
1.6.5 -fccmp2
This option enhances the usage scenarios for the Arm CCMP instruction, streamlining instruction pipelining and improving performance.
For code like the following:
int f(int a, int b, int c) { while(1) { if (a--==0||b>=c){ return 1; } }}
Enabling the -fccmp2 option can result in the following assembly code that leverages the CCMP instruction:
Figure 1 Assembly code with the CCMP instruction
How to Use
Add the following option during compilation:
-fccmp2
Note:
Optimization effect: Approximately 1% performance improvement observed on SPECCPU2017 intrate 557.xz_r benchmark.
1.6.6 -farray-widen-compare
This option enables array widening during comparison operations. It allows the compiler to use wider data types to dereference array pointers (where the array elements are of a narrower type), effectively comparing multiple elements at once and enhancing performance.
Example:
Original code:
#define my_min(x, y) ((x) < (y) ? (x) : (y))
uint32_t func (uint32_t n0, uint32_t n1, const uint32_t limit, const uint8_t * a, const uint8_t * b)
  {
    uint32_t n = my_min(n0, n1);
    while (++n != limit)
    if (a[n] != b[n])
      break;
    return n;}
Optimized code with -farray-widen-compare:
#define my_min(x, y) ((x) < (y) ? (x) : (y))
uint32_t func (uint32_t n0, uint32_t n1, const uint32_t limit, const uint8_t * a, const uint8_t * b)
  {
    uint32_t n = my_min(n0, n1);
    for (++n; n + sizeof(uint64_t) <= limit; n += sizeof(uint64_t))
      {
        uint64_t k1 = *((uint64_t*)(a+n));
        uint64_t k2 = *((uint64_t*)(b+n));
        if(k1 != k2)
          {
            int lz = __builtin_ctzll(k1 ^ k2);
            n += lz/8;
            return n;
           }
       }
     for (;n != limit; ++n)
       {
         if (a[n] != b[n])
           break;
       }
    return n;
  }
How to Use
Add the following options during compilation:
-O3 -farray-widen-compare
2 AI for Compiler
2.1 Sampling Feedback-Directed Optimization Enhancement
2.1.1 Feature Description
Using relevant algorithms and a framework, AI for compiler can further enhance the sampling feedback-directed optimization, more accurately predict key values in the compilation optimization process, assist the compiler in making more reasonable optimization decisions, and improve the compilation optimization effect. Using AI for compiler algorithms such as code representation learning, AI for compiler trains a basic block precision correction model for BOLT sampling, builds a framework integrated with GCC for openEuler, and achieves performance improvement.
By optimizing the code and data layout in the binary file, BOLT reduces the CPU cache miss rate and branch prediction error, thus providing further optimization after the compiler has applied LTO and feedback-directed optimization (FDO). BOLT has two ways to use dynamic profiling data for program performance improvement: instrumentation and sampling. The instrumentation method has high performance overhead but high precision, while the sampling method has very low performance overhead but low precision. The basic block precision correction model of BOLT sampling aims to predict the Count value of a basic block by exploring multi-granularity code information such as the included instructions/variables and the function/file the basic block belongs, so as to improve the accuracy of CFG and make the sampling BOLT achieve the optimization effect close to that of the instrumentation BOLT.
2.1.2 Installation
Install rpmbuild and rpmdevtools using root privileges.
##  Install rpmbuild.
yum install rpm-build
##  Install rpmdevtools.
yum install rpmdevtools
Download code from the target repository.
git clone https://gitee.com/src-openeuler/AI4C.gitGenerate the rpmbuild directory.
rpmbuild-setuptree
# Place AI4C-v0.2.0-alpha.tar.gz and related patch files in the SOURCES directory under the rpmbuild directory.
# Place AI4C.spec to the SPECS directory.
Install AI4C.
rpm -ivh <built RPM package>If a file conflict occurs due to an installed package of an older version, add the
--forceoption torpm -ivh <built RPM package>to force the installation of the new version. Alternatively, update the package by runningrpm -Uvh <built RPM package>.After the installation is complete, you can find the related dynamic library under /usr/lib64 and the related model under the /usr/lib64/AI4C directory.
2.1.3 Usage
AI4C empowers users with two inference methods: utilizing custom models via API calls or leveraging preset models with sampling feedback optimization and tuning options provided by compilation flags.
To use custom models for inference:
Developers first need to build their models and save them as ONNX models using ONNX Runtime.
Users need to call the APIs provided by AI4C within the adaptation layer of their target optimization backend to perform model inference, as shown in the table below. The interfaces listed are available in the dynamic library, libONNXRunner.so, and are used for model inference configuration, inference execution, and resource cleanup after inference.
API Name Description extern ONNXRunnercreateONNXRunner(const char model_path) Takes the model path as a parameter and creates a session to initialize and configure the inference. extern void deleteONNXRunner(ONNXRunner* instance) Deletes the ONNXRunner object. extern float runONNXModel(ONNXRunner* instance, std::vectorstd::string input_string, std::vector<int64_t> input_int64, std::vector input_float) Takes the model inputs as parameters and performa inference to obtain the corresponding results.
2.1.4 Performance Boosts in Common Applications
This test uses the MySQL as the test program. MySQL is a popular open source relational database management system (RDBMS), widely used in various applications. The AI for Compiler algorithm and framework enable more accurate estimations of critical values during the BOLT optimization phase, assisting the compiler in making more reasonable optimization decisions and enhancing the optimization effect. This ultimately leads to improved MySQL performance. Based on the tpmC throughput test results for MySQL, the AI for Compiler framework, combined with tuning options, can help achieve a 5% performance improvement in MySQL.
3 PIN
3.1 Feature Description
The Plug-IN (PIN) framework is a plug-in development platform that helps develop plug-ins once but apply to multiple compilers, thereby reducing development costs. It also supports and maintains common capabilities. PIN uses the proxy mode and consists of two key components: server and client. The PIN server bears the plug-in logic and enables developers to develop plug-ins based on the relatively neutral MLIR and a series of plug-in APIs, allowing developers to focus on designing the plug-in logic. The server connects to clients of different compilers, transfers intermediate representations (IRs) and operations through cross-process communication, converts and maps plug-in logic, and executes the logic on the client compiler. In this way, one piece of code can be implemented on multiple compilers.
Plug-in users only need to download the library file and verification file of the required plug-in and enable the plug-in on the compiler client through the PIN configuration file. The PIN client is loaded as a GCC/LLVM plug-in. New functions can be implemented without modifying the source code of the GCC compiler. In this way, users can use the plug-in more flexibly while enjoying various common capabilities supported and maintained by PIN.
3.2 Download and Installation
Install dependencies.
##  Install dependencies for the GCC client.
yum install -y gityum install -y makeyum install -y cmakeyum install -y grpcyum install -y grpc-develyum install -y grpc-pluginsyum install -y protobuf-develyum install -y jsoncppyum install -y jsoncpp-develyum install -y gcc-plugin-develyum install -y llvm-mliryum install -y llvm-mlir-develyum install -y llvm-devel
## Install dependencies for the PIN server.
yum install -y gityum install -y makeyum install -y cmakeyum install -y grpcyum install -y grpc-develyum install -y grpc-pluginsyum install -y protobuf-develyum install -y jsoncppyum install -y jsoncpp-develyum install -y llvm-mliryum install -y llvm-mlir-develyum install -y llvm-devel
Use either of the following methods to install or build PIN:
Build
## Build the GCC client on PIN.
git clone https://gitee.com/openeuler/pin-gcc-client.gitcd pin-gcc-clientmkdir buildcd buildcmake ../ -DMLIR_DIR=${MLIR_PATH} -DLLVM_DIR=${LLVM_PATH}make
## Build the PIN server.
git clone https://gitee.com/openeuler/pin-server.gitcd pin-servermkdir buildcd buildcmake ../ -DMLIR_DIR=${MLIR_PATH} -DLLVM_DIR=${LLVM_PATH}make
Install through Yum
## Install the GCC client.
yum install -y pin-gcc-client
## Install the PIN server.
yum install -y pin-server
4 GCC Toolset
4.1 Feature Description
To ensure the robustness of the OS, the foundational software selection policy prefers the version that has been verified and is relatively stable instead of the latest version. This policy helps avoid potential instability caused by version changes and ensures that the OS remains relatively stable throughout the long-term support (LTS) cycle. For this reason, GCC 12.3.1 is used as the baseline for openEuler 24.03 LTS development throughout its lifecycle.
Such a selection may cause the following problems: On one hand, many hardware features require the support of the basic GCC toolchain. If the GCC of a non-latest version is selected, new features cannot be enabled on the newly released OS in a timely manner. On the other hand, some users tend to use the latest compiler to enable the latest features for improved performance compared with earlier compilers.
To enable new features of various computing cases and meet different users' requirements for different hardware features, openEuler GCC Toolset comes with openEuler 24.09. This toolchain is designed to support compilation with multiple versions of GCC on openEuler. Typically, it provides a minor GCC that is later than the major GCC of the OS, enabling you to flexibly select the compilation environment. By using openEuler GCC Toolset, you can easily switch between GCC of different versions to make full use of new hardware features and enjoy the improved performance brought by the latest GCC optimization.
4.2 Restrictions
In openEuler 24.09, the default major GCC is GCC 12.3.1 and the minor GCC is gcc-toolset-14. This sets up a compilation environment that supports both GCC 12 and GCC 14.
- OS: openEuler 24.09
- Hardware architecture: AArch64/x86_64
4.3 Download and Installation
4.3.1 Installing SCL
yum install scl-utils scl-utils-build
4.3.2 Installing GCC Toolset
Install gcc-toolset-14 in /opt/openEuler/gcc-toolset-14/.
yum install -y gcc-toolset-14-gcc*
yum install -y gcc-toolset-14-binutils*
4.4 How to Use
With Software Collections (SCL), you can manage multiple versions of compilation toolchains.
4.4.1 Registering gcc-toolset-14
## Register gcc-toolset-14.
scl register /opt/openEuler/gcc-toolset-14/
##Deregister gcc-toolset-14.
scl deregister gcc-toolset-14
Run scl list-collections. If gcc-toolset-14 is displayed, the toolset has been registered with SCL.
4.4.3 Switching to gcc-toolset-14
Start a new Bash shell session to use gcc-toolset-14 instead of the default GCC. In the new Bash shell session, you do not need to explicitly use the scl command.
scl enable gcc-toolset-14 bash
To exit the gcc-toolset-14 compilation environment, enter exit to exit the Bash shell session. GCC is switched to the default version.
SCL automatically sets environment variables for different GCC versions. For details, see the /opt/openEuler/gcc-toolset-14/enable file, in which the environment variables of gcc-toolset-14 are set. If SCL is unavailable in the OS, switch the toolchain version as follows:
## Solution 1: Use a script to switch the compilation toolchain if SCL is unavailable.
source /opt/openEuler/gcc-toolset-14/enable

## Solution 2: If SCL is available, use it to switch the compilation toolchain and activate the operating environment.
scl enable gcc-toolset-14 bash
4.5 Application Scenarios
Major GCC: The default GCC 12.3.1 is used for compilation.
Minor GCC: If the features of GCC 14 are required to build related applications, use SCL to switch the Bash environment to that of gcc-toolset-14.