Test Procedure for astream-Enabled MySQL
1. Environment Requirements
1.1 Hardware
A server and a client are required.
| Server | Client | |
|---|---|---|
| CPU | 2 x Kunpeng 920-6426 | 2 x Kunpeng 920-6426 |
| Number of Cores | 2 x 64 | 2 x 64 |
| CPU Frequency | 2600 MHz | 2600 MHz |
| Memory | 16 x Samsung 32 GB 2666 MHz | 16 x Samsung 32 GB 2666 MHz |
| Network | SP580 10GE | SP580 10GE |
| System Drive | 1.2 TB TOSHIBA HDD | 1.2 TB TOSHIBA HDD |
| Data Drive | 2 x 1.6 TB ES3000 V5 NVMe PCIe SSDs | NA |
1.2 Software
| Software | Version |
|---|---|
| MySQL | 8.0.20 |
| BenchmarkSQL | 5.0 |
1.3 Networking

2. Deployment on the Server
2.1 Installing MySQL Dependencies
yum install -y cmake doxygen bison ncurses-devel openssl-devel libtool tar rpcgen libtirpc-devel bison bc unzip git gcc-c++ libaio libaio-devel numactl
2.2 Compiling and Installing MySQL
Download the source package from the official website.
Download the optimization patches for fine-grained locking, NUMA affinity scheduling, and lock-free tuning.
Compile MySQL. Ensure that the libaio-devel package has been installed in advance.
tar zxvf mysql-boost-8.0.20.tar.gz
cd mysql-8.0.20/
patch -p1 < ../0001-SHARDED-LOCK-SYS.patch
patch -p1 < ../0001-SCHED-AFFINITY.patch
patch -p1 < ../0002-LOCK-FREE-TRX-SYS.patch
cd cmake
make clean
cmake .. -DCMAKE_INSTALL_PREFIX=/usr/local/mysql-8.0.20  -DWITH_BOOST=../boost -DDOWNLOAD_BOOST=1
make -j 64
make install
2.3 Configuring MySQL Parameters
To produce enough drive load, two MySQL instances run simultaneously during the test. The configuration file of instance 1 is /etc/my-1.cnf, and the configuration file of instance 2 is /etc/my-2.cnf.
- /etc/my-1.cnf
[mysqld_safe]
log-error=/data/mysql-1/log/mysql.log
pid-file=/data/mysql-1/run/mysqld.pid

[client]
socket=/data/mysql-1/run/mysql.sock
default-character-set=utf8

[mysqld]
server-id=3306
#log-error=/data/mysql-1/log/mysql.log
#basedir=/usr/local/mysql
socket=/data/mysql-1/run/mysql.sock
tmpdir=/data/mysql-1/tmp
datadir=/data/mysql-1/data
default_authentication_plugin=mysql_native_password
port=3306
user=root
#innodb_page_size=4k

max_connections=2000
back_log=4000
performance_schema=OFF
max_prepared_stmt_count=128000
#transaction_isolation=READ-COMMITTED
#skip-grant-tables

#file
innodb_file_per_table
innodb_log_file_size=2048M
innodb_log_files_in_group=32
innodb_open_files=10000
table_open_cache_instances=64

#buffers
innodb_buffer_pool_size=150G # Adjust the value based on the system memory size.
innodb_buffer_pool_instances=16
innodb_log_buffer_size=2048M
#innodb_undo_log_truncate=OFF

#tune
default_time_zone=+8:00
#innodb_numa_interleave=1
thread_cache_size=2000
sync_binlog=1
innodb_flush_log_at_trx_commit=1
innodb_use_native_aio=1
innodb_spin_wait_delay=180
innodb_sync_spin_loops=25
innodb_flush_method=O_DIRECT
innodb_io_capacity=30000
innodb_io_capacity_max=40000
innodb_lru_scan_depth=9000
innodb_page_cleaners=16
#innodb_spin_wait_pause_multiplier=25

#perf special
innodb_flush_neighbors=0
innodb_write_io_threads=24
innodb_read_io_threads=16
innodb_purge_threads=32

sql_mode=STRICT_TRANS_TABLES,NO_ENGINE_SUBSTITUTION,NO_AUTO_VALUE_ON_ZERO,STRICT_ALL_TABLES

#skip_log_bin
log-bin=mysql-bin # Enable mysql-bin.
binlog_expire_logs_seconds=1800 # Set a value so that the generated data volume meets the requirement for long-time running.
ssl=0
table_open_cache=30000
max_connect_errors=2000
innodb_adaptive_hash_index=0

mysqlx=0
- /etc/my-2.cnf
[mysqld_safe]
log-error=/data/mysql-2/log/mysql.log
pid-file=/data/mysql-2/run/mysqld.pid

[client]
socket=/data/mysql-2/run/mysql.sock
default-character-set=utf8

[mysqld]
server-id=3307
#log-error=/data/mysql-2/log/mysql.log
#basedir=/usr/local/mysql
socket=/data/mysql-2/run/mysql.sock
tmpdir=/data/mysql-2/tmp
datadir=/data/mysql-2/data
default_authentication_plugin=mysql_native_password
port=3307
user=root
#innodb_page_size=4k

max_connections=2000
back_log=4000
performance_schema=OFF
max_prepared_stmt_count=128000
#transaction_isolation=READ-COMMITTED
#skip-grant-tables

#file
innodb_file_per_table
innodb_log_file_size=2048M
innodb_log_files_in_group=32
innodb_open_files=10000
table_open_cache_instances=64

#buffers
innodb_buffer_pool_size=150G # Adjust the value based on the system memory size.
innodb_buffer_pool_instances=16
innodb_log_buffer_size=2048M
#innodb_undo_log_truncate=OFF

#tune
default_time_zone=+8:00
#innodb_numa_interleave=1
thread_cache_size=2000
sync_binlog=1
innodb_flush_log_at_trx_commit=1
innodb_use_native_aio=1
innodb_spin_wait_delay=180
innodb_sync_spin_loops=25
innodb_flush_method=O_DIRECT
innodb_io_capacity=30000
innodb_io_capacity_max=40000
innodb_lru_scan_depth=9000
innodb_page_cleaners=16
#innodb_spin_wait_pause_multiplier=25

#perf special
innodb_flush_neighbors=0
innodb_write_io_threads=24
innodb_read_io_threads=16
innodb_purge_threads=32

sql_mode=STRICT_TRANS_TABLES,NO_ENGINE_SUBSTITUTION,NO_AUTO_VALUE_ON_ZERO,STRICT_ALL_TABLES

log-bin=mysql-bin
#skip_log_bin # Enable mysql-bin.
binlog_expire_logs_seconds=1800 # Set a value so that the generated data volume meets the requirement for long-time running.
ssl=0
table_open_cache=30000
max_connect_errors=2000
innodb_adaptive_hash_index=0

mysqlx=0
2.4 Deploying MySQL
#!/bin/bash
systemctl stop firewalld
systemctl disable irqbalance
echo 3 > /proc/sys/vm/drop_caches
mysql=mysql-8.0.20
prepare_mysql_data()
{
    umount /dev/nvme0n1
    rm -rf /data
    mkfs.xfs /dev/nvme0n1 -f
    groupadd mysql
    useradd -g mysql mysql
    mkdir /data
    mount /dev/nvme0n1 /data
    mkdir -p /data/{mysql-1,mysql-2}
    mkdir -p /data/mysql-1/{data,run,share,tmp,log}
    mkdir -p /data/mysql-2/{data,run,share,tmp,log}
    chown -R mysql:mysql /data
    chown -R mysql:mysql /data/mysql-1
    chown -R mysql:mysql /data/mysql-2
    touch /data/mysql-1/log/mysql.log
    touch /data/mysql-2/log/mysql.log
    chown -R mysql:mysql /data/mysql-1/log/mysql.log
    chown -R mysql:mysql /data/mysql-2/log/mysql.log
}
init_mysql()
{
    /usr/local/$mysql/bin/mysqld --defaults-file=/etc/my.cnf --user=root --initialize
    /usr/local/$mysql/support-files/mysql.server start
    sed -i 's/#skip-grant-tables/skip-grant-tables/g' /etc/my.cnf
    /usr/local/$mysql/support-files/mysql.server restart
    /usr/local/$mysql/bin/mysql -u root -p123456 <<EOF
    use mysql;
    Select * from user where user='root' \G;
    update user set password_expired='N' where user='root';
    flush privileges;
    alter user 'root'@'localhost' identified by '123456';
    flush privileges;
    update user set host='%' where user='root';
    flush privileges;
    create database tpcc;
    quit
EOF
    sed -i 's/skip-grant-tables/#skip-grant-tables/g' /etc/my.cnf
    /usr/local/$mysql/support-files/mysql.server restart
}
prepare_mysql_data
init_mysql
3. BenchmarkSQL Deployment on the Client
3.1 Installing BenchmarkSQL
Download BenchmarkSQL.
# Install the dependency package of BenchmarkSQL.
yum install -y java

unzip benchmarksql5.0-for-mysql.zip
cd benchmarksql5.0-for-mysql/run
chmod +x *.sh
3.2 Configuring BenchmarkSQL Parameters
Configure the configuration file benchmarksql5.0-for-mysql/run/props.conf as follows:
db=mysql
driver=com.mysql.cj.jdbc.Driver
conn=jdbc:mysql://192.168.1.10:3306/tpcc?useSSL=false&useServerPrepStmts=true&useConfigs=maxPerformance&rewriteBatchedStatements=true
user=root
password=123456
profile=/etc/my-1.cnf

warehouses=4050
loadWorkers=100
terminals=330
terminalWarehouseFixed=true
runMins=720

runTxnsPerTerminal=0
limitTxnsPerMin=1000000000
newOrderWeight=45
paymentWeight=43
orderStatusWeight=4
deliveryWeight=4
stockLevelWeight=4
Copy the props.conf file in the directory and rename it props-2.conf, which is used as the configuration file of MySQL instance 2.
db=mysql
driver=com.mysql.cj.jdbc.Driver
conn=jdbc:mysql://192.168.1.10:3307/tpcc?useSSL=false&useServerPrepStmts=true&useConfigs=maxPerformance&rewriteBatchedStatements=true
user=root
password=123456
profile=/etc/my-2.cnf

warehouses=4050
loadWorkers=100
terminals=330
terminalWarehouseFixed=true
runMins=720

runTxnsPerTerminal=0
limitTxnsPerMin=1000000000
newOrderWeight=45
paymentWeight=43
orderStatusWeight=4
deliveryWeight=4
stockLevelWeight=4
The value of warehouses is set based on the current NVMe SSD specifications. 4050 warehouses of data ares generated as the operation data of each MySQL instance. The general principle is as follows: Two copies of generated data, which occupy 60% to 70% of the drive space, are used as the operation data of both MySQL instances. In this way, the drive space usage can surpass 90% after the system runs stably for 720 minutes (12 hours).
3.3 Creating MySQL Test Data
# Start the service.
/usr/local/mysql-8.0.20/support-files/mysql.server start

# Create test data. (After the test data is created, you are advised to back up the data in the /data/mysql-1/data directory on the server and copy the backup dataduring the test.)
./runDatabaseBuild.sh props.conf

# Stop the database service.
/usr/local/mysql-8.0.20/support-files/mysql.server stop
3.4 Backing Up Data to the Standby Drive
After the test data for MySQL is created, back up the data to the standby drive /dev/nvme1n1. Assume that the drive is mounted to /bak:
cp -r /data/mysql-1/data/* /bak
4 Execution Environment Configuration
4.1 Enabling STEAL Optimization
Enable STEAL optimization on the server to maximize the CPU usage during the MySQL test and improve the CPU efficiency.
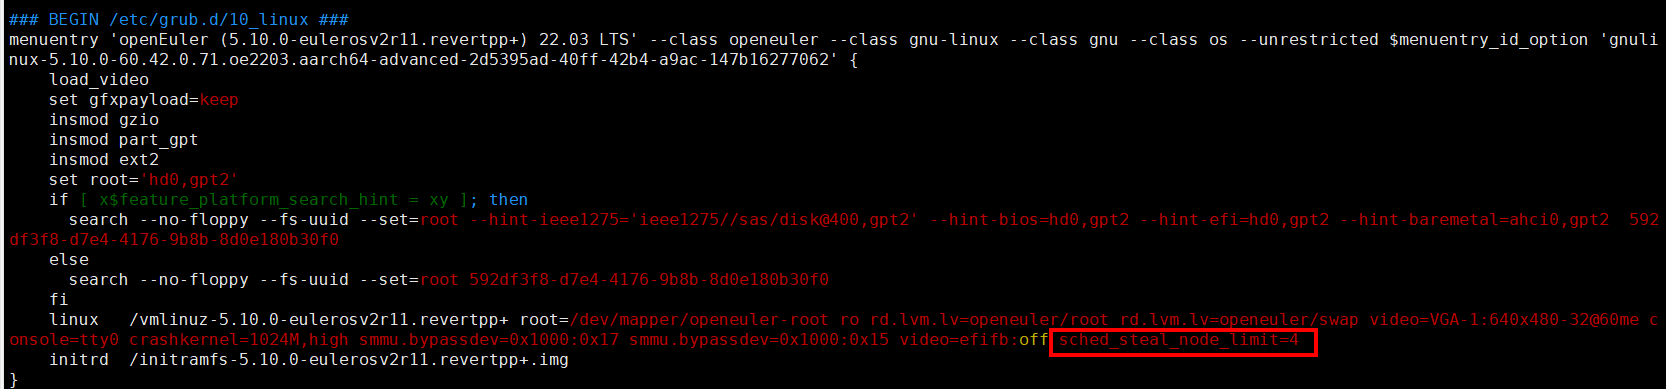
In the /etc/grub2-efi.cfg file, add sched_steal_node_limit=4 to the system boot options, and then reboot the system for the modification to take effect.
After the restart, enable the STEAL mode.
echo STEAL > /sys/kernel/debug/sched_features
4.2 Stopping Services That Affect the Test
# Stop irqbalance.
systemctl stop irqbalance.service
systemctl disable irqbalance.service

# Stop the firewall.
systemctl stop iptables
systemctl stop firewalld
4.3 Configuring NIC Interrupt-Core Binding
# Bind the interrupts on the server. (Replace the NIC name and CPU cores to be bound based on the system configuration.)
ethtool -L enp4s0 combined 6
irq1=`cat /proc/interrupts| grep -E enp4s0 | head -n5 | awk -F ':' '{print $1}'`
cpulist=(61 62 63 64 65 66) ## Set the cores for handling NIC interrupts.
c=0
for irq in $irq1
do
echo ${cpulist[c]} "->" $irq
echo ${cpulist[c]} > /proc/irq/$irq/smp_affinity_list
let "c++"
done
4.4 Installing the nvme-cli Tool
nvme-cli is a command-line tool used to monitor, configure, and manage NVMe devices. nvme-cli can be used to enable the multi-stream feature for NVMe SSDs and obtain controller logs using related commands.
yum install nvme-cli
4.5 Enabling the Multi-Stream Feature for an NVMe SSD
Check the multi-stream feature status of an NVMe SSD:
nvme dir-receive /dev/nvme0n1 -n 0x1 -D 0 -O 1 -H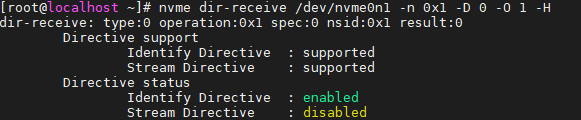
The command output indicates that the NVMe SSD supports Stream Directive, that is, the multi-stream feature, which is currently disabled.
Enable the multi-stream feature.
modprobe -r nvme
modprobe nvme-core streams=1
modprobe nvme
Check the multi-stream feature status of the NVMe SSD again.
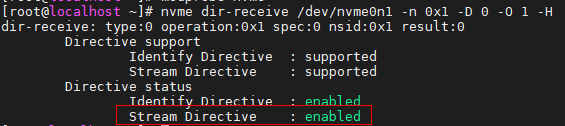
The command output indicates that the multi-stream feature has been enabled for the NVMe SSD.
4.6 Preparing Data for the MySQL Instances
To unify the baseline test and multi-stream test processes, format the drive before each test and copy data from the /bak directory to the data directory of each MySQL instance.
prepare_mysql_data()
{
    umount /dev/nvme0n1
    rm -rf /data
    mkfs.xfs /dev/nvme0n1 -f
    mkdir /data
    mount /dev/nvme0n1 /data
    mkdir -p /data/{mysql-1,mysql-2}
    mkdir -p /data/mysql-1/{data,run,share,tmp,log}
    mkdir -p /data/mysql-2/{data,run,share,tmp,log}
    chown -R mysql:mysql /data
    chown -R mysql:mysql /data/mysql-1
    chown -R mysql:mysql /data/mysql-2
    touch /data/mysql-1/log/mysql.log
    touch /data/mysql-2/log/mysql.log
    chown -R mysql:mysql /data/mysql-1/log/mysql.log
    chown -R mysql:mysql /data/mysql-2/log/mysql.log
}

prepare_mysql_data()
# After formatting, create the data directories of both MySQL instances and start astream.
astream -i /data/mysql-1/data /data/mysql-2/data -r rule1.txt rule2.txt # ----> Delete this step when testing the baseline version.
cp -r /bak/* /data/mysql-1/data
cp -r /bak/* /data/mysql-2/data
Run the df -h command to check whether the drive space usage of the /dev/nvme0n1 drive is between 60% to 70%.
4.7 Starting and Binding the MySQL Services
# Start both MySQL instances.
numactl -C 0-60 -i 0-3  /usr/local/bin/mysqld --defaults-file=/etc/my-1.cnf &
numactl -C 67-127 -i 0-3  /usr/local/bin/mysqld --defaults-file=/etc/my-2.cnf &
4.8 Setting a Scheduled Task
After data is successfully copied or generated, to measure the WAF of the drive before the MySQL test. Use the crontab timer to execute the calculate_wa.sh script to calculate the drive WAF every hour during the 12-hour test. The script content is as follows:
#!/bin/bash

source /etc/profile
source ~/.bash_profile

BASE_PATH=$(cd $(dirname $0);pwd)
diskName=$1

echo 0x`/usr/bin/nvme get-log /dev/${diskName}n1 -i 0xc0 -n 0xffffffff -l 800|grep "01c0:"|awk '{print $13$12$11$10$9$8$7$6}'` >> ${BASE_PATH}/host_tmp
echo 0x`/usr/bin/nvme get-log /dev/${diskName}n1 -i 0xc0 -n 0xffffffff -l 800|grep "01d0:"|awk '{print $9$8$7$6$5$4$3$2}'` >> ${BASE_PATH}/gc_tmp

# IO write counts,unit:4K #
hostWriteHexSectorTemp=`tail -1 ${BASE_PATH}/host_tmp`
# GC write counts,unit 4k #
gcWriteHexSectorTemp=`tail -1 ${BASE_PATH}/gc_tmp`
hostWriteDecSectorTemp=`printf "%llu" ${hostWriteHexSectorTemp}`
gcWriteDecSectorTemp=`printf "%llu" ${gcWriteHexSectorTemp}`
preHostValue=`tail -2 ${BASE_PATH}/host_tmp|head -1`
preGcValue=`tail -2 ${BASE_PATH}/gc_tmp|head -1`
preHostValue=`printf "%llu" ${preHostValue}`
preGcValue=`printf "%llu" ${preGcValue}`

# IO write counts for a period of time
hostWrittenSector=$(echo ${hostWriteDecSectorTemp}-${preHostValue} | bc -l)
# Gc write counts for a period of time
gcWrittenSector=$(echo ${gcWriteDecSectorTemp}-${preGcValue} | bc -l)
nandSector=$(echo ${hostWrittenSector}+${gcWrittenSector} | bc -l)

# unit from kB->MB
hostWrittenMB=$((${hostWrittenSector}/256))
nandWrittenMB=$((${nandSector}/256))

# compute the WA
WA=$(echo "scale=5;${nandSector}/${hostWrittenSector}" | bc)
echo $nandWrittenMB $hostWrittenMB $WA >> ${BASE_PATH}/result_WA.txt
Run the crontab -e command to add a scheduled task for executing the script command every hour. The crontab entry is as follows:
0 */1 * * * bash /root/calculate_wa.sh nvme0
If the device name of the tested NVMe drive is /dev/nvme0n1, pass nvme0 to the script as the parameter of the scheduled task.
4.9 Testing the MySQL Instances
Before the test, ensure that the multi-stream feature of the NVMe SSD has been enabled.
Enter the root directory of the tool on the client and start the test:
cd benchmarksql5.0-for-mysql
./runBenchmark.sh props.conf
./runBenchmark.sh props-2.conf
4.10 Stopping the astream Process
You do not need to perform this step after the baseline test. After the multi-stream test is complete, run the following command to stop the astream process:
astream stop
5 Test Results
The result generated by the scheduled task script is in the result_WA.txt file in the same directory as the script. After each test is complete, select the latest 12 non-zero data records in the file.
When data is written to the drive, a line containing the following three values is written to the result_WA.txt file:
- Amount of data that is actually written to the drive within one hour.
- Write amount submitted by the machine within one hour.
- Current drive WAF. The drive WAF in each hour is calculated using the formula in the appendix.
According to the current test results, when astream is used and MySQL runs stably for a long time, the WAF of an NVMe SSD decreases by 12%, indicating that the performance is improved by 12%.
6 Appendix
Write amplification (WA) is an undesirable phenomenon associated with flash memory and SSDs where the actual amount of data physically written to the drive is a multiple of the logical amount intended to be written. WAF is the mathematical representation of this phenomenon.
$$ WAF=\frac{\text{Actual amount of data written to the drive}}{\text{Amount of data submitted by the machine}} $$
Generally, as data storage and drive fragmentation become more severe, the WAF increases. Delaying the WAF increase helps prolong the service life of the drive.