Trusted Computing
Trusted Computing Basics
What Is Trusted Computing
The definition of being trusted varies with international organizations.
Trusted Computing Group (TCG):
An entity that is trusted always achieves the desired goal in an expected way.
International Organization for Standardization (ISO) and International Electrotechnical Commission (IEC) (1999):
The components, operations, or processes involved in computing are predictable under any conditions and are resistant to viruses and a certain degree of physical interference.
IEEE Computer Society Technical Committee on Dependable Computing:
Being trusted means that the services provided by the computer system can be proved to be reliable, and mainly refers to the reliability and availability of the system.
In short, being trusted means that the system operates according to a pre-determined design and policy.
A trusted computing system consists of a root of trust, a trusted hardware platform, operating system (OS), and application. The basic idea of the system is to create a trusted computing base (TCB) first, and then establish a trust chain that covers the hardware platform, OS, and application. In the trust chain, authentication is performed from the root to the next level, extending trust level by level and building a secure and trusted computing environment.

Unlike the traditional security mechanism that eliminates viruses without solving the root of the problem, trusted computing adopts the whitelist mechanism to allow only authorized kernels, kernel modules, and applications to run on the system. The system will reject the execution of a program that is unknown or has been changed.
Kernel Integrity Measurement Architecture (IMA)
Overview
IMA
The integrity measurement architecture (IMA) is a subsystem in the kernel. The IMA can measure files accessed through execve(), mmap(), and open() systems based on user-defined policies. The measurement result can be used for local or remote attestation, or can be compared with an existing reference value to control the access to files.
According to the Wiki definition, the function of the kernel integrity subsystem includes three parts:
- Measure: Detects accidental or malicious modifications to files, either remotely or locally.
- Appraise: Measures a file and compares it with a reference value stored in the extended attribute to control the integrity of the local file.
- Audit: Writes the measurement result into system logs for auditing.
Figuratively, IMA measurement is an observer that only records modification without interfering in it, and IMA appraisal is more like a strict security guard that rejects any unauthorized access to programs.
EVM
The extended verification module (EVM) is used to calculate a hash value based on the security extended attributes of a file in the system, including security.ima and security.selinux. Then this value is signed by the key stored in the TPM or other trusted environments. The signature value is stored in security.evm and cannot be tampered with. If the value is tampered with, the signature verification fails when the file is accessed again.
In summary, the EVM is used to provide offline protection for security extended attributes by calculating the digest of the attributes and signing and storing them in security.evm.
IMA Digest Lists
IMA Digest Lists are an enhancement of the original kernel integrity protection mechanism provided by openEuler. It replaces the original IMA mechanism to protect file integrity.
Digest lists are binary data files in a special format. Each digest list corresponds to an RPM package and records the hash values of protected files (executable files and dynamic library files) in the RPM package.
After the startup parameters are correctly configured, the kernel maintains a hash table (invisible to the user space) and provides interfaces (digest_list_data and digest_list_data_del) that update the hash table using securityfs. The digest lists are signed by the private key when they are built. When uploaded to the kernel through the interface, the digest lists need to be verified by the public key in the kernel.

When IMA appraisal is enabled, each time an executable file or dynamic library file is accessed, the hook in the kernel is invoked to calculate the hash values of the file content and extended attributes and search in the kernel hash table. If the calculated hash values match the one in the table, the file is allowed to be executed. Otherwise, the access is denied.

The IMA Digest Lists extension provided by the openEuler kernel provides higher security, performance, and usability than the native IMA mechanism of the kernel community, facilitating the implementation of the integrity protection mechanism in the production environment.
A complete trust chain for high security
The native IMA mechanism requires that the file extended attribute be generated and marked in advance on the live network. When the file is accessed, the file extended attribute is used as a reference value, resulting in an incomplete trust chain.
The IMA Digest Lists extension saves the reference digest value of the file in the kernel space. During the construction, the reference digest value of the file is carried in the released RPM package in the form of a digest list. When the RPM package is installed, the digest list is imported and the signature is verified, ensuring that the reference value comes from the software publisher and implementing a complete trust chain.
Superior performance
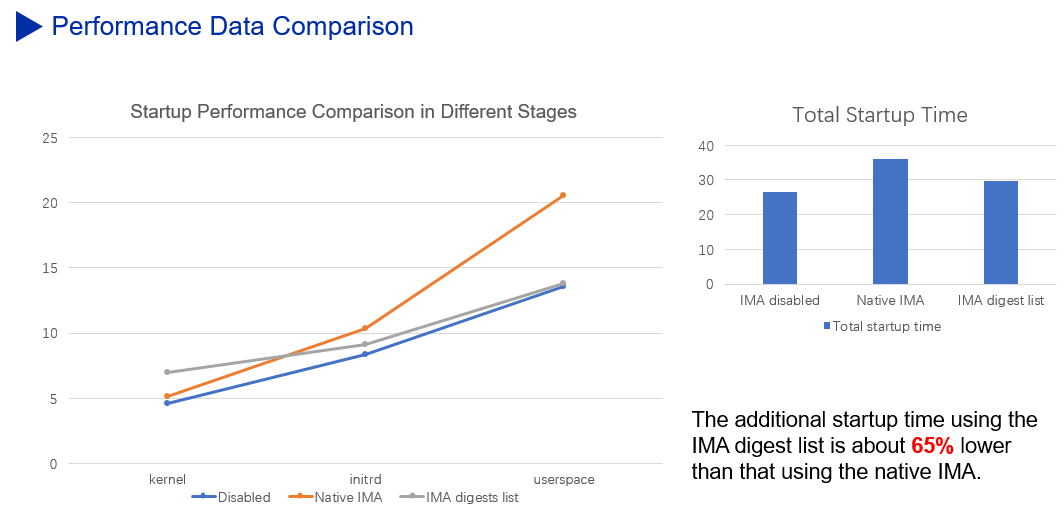
The trusted platform module (TPM) chip is a low-speed chip, making the PCR extension operation a performance bottleneck in the IMA measurement scenario. To shatter this bottleneck, the Digest Lists extension reduces unnecessary PCR extension operations while ensuring security, providing 65% higher performance than the native IMA mechanism.
In the IMA appraisal scenario, the Digest Lists extension performs signature verification in the startup phase to prevent signature verification from being performed each time the file is accessed. This helps deliver a 20% higher file access performance in the operation phase than that in the native IMA appraisal scenario.
Fast deployment and smooth upgrade
When the native IMA mechanism is deployed for the first time or the software package is updated, you need to switch to the fix mode, manually mark the extended attributes of the file, and then restart the system to enter the enforcing mode. In this way, the installed program can be accessed normally.
The Digest Lists extension can be used immediately after the installation is completed. In addition, the RPM package can be directly installed or upgraded in the enforcing mode without restarting the system or manually marking the extended attributes of the file. This minimizes user perception during the operation, allowing for quick deployment and smooth upgrade on the live network.
Note: The IMA Digest Lists extension advances the signature verification of the native IMA to the startup phase. This causes the assumption that the memory in the kernel space cannot be tampered with. As a result, the IMA depends on other security mechanisms (secure startup of kernel module and dynamic memory measurement) to protect the integrity of the kernel memory.
However, either the native IMA mechanism of the community or the IMA Digest Lists extension is only a link in the trust chain of trusted computing, and cannot ensure the system security alone. Security construction is always a systematic project that builds in-depth defense.
Constraints
- The current IMA appraisal mode can only protect immutable files in the system, including executable files and dynamic library files.
- The IMA provides integrity measurement at the application layer. The security of the IMA depends on the reliability of the previous links.
- Currently, the IMA does not support the import of the third-party application digest lists.
- The startup log may contain
Unable to open file: /etc/keys/x509_ima.der. This error is reported from the open source community and does not affect the use of the IMA digest lists feature. - In the ARM version, audit errors may occur when the log mode is enabled for the IMA. This occurs because the modprobe loads the kernel module before the digest lists are imported, but does not affect the normal functions.
Application Scenario
IMA Measurement
The purpose of IMA measurement is to detect unexpected or malicious modifications to system files. The measurement result can be used for local or remote attestation.
If a TPM chip exists in the system, the measurement result is extended to a specified PCR register of the TPM chip. Due to the unidirectional PCR extension and the hardware security of the TPM chip, a user cannot modify the extended measurement result, thereby ensuring authenticity of the measurement result.
The file scope and triggering conditions of IMA measurement can be configured by the user using the IMA policy.
By default, IMA is disabled. However, the system searches for the ima-policy policy file in the /etc/ima/ path. If the file is found, the system measures the files in the system based on the policy during startup. If you do not want to manually compile the policy file, you can configure the ima_policy=tcb in the startup parameters using the default policy. For details about more policy parameters, see the section IMA Startup Parameters in Appendix.
You can check the currently loaded IMA policy in the /sys/kernel/security/ima/policy file. The IMA measurement log is located in the /sys/kernel/security/ima/ascii_runtime_measurements file, as shown in the following figure:
$ head /sys/kernel/security/ima/ascii_runtime_measurements
10 ddee6004dc3bd4ee300406cd93181c5a2187b59b ima-ng sha1:9797edf8d0eed36b1cf92547816051c8af4e45ee boot_aggregate
10 180ecafba6fadbece09b057bcd0d55d39f1a8a52 ima-ng sha1:db82919bf7d1849ae9aba01e28e9be012823cf3a /init
10 ac792e08a7cf8de7656003125c7276968d84ea65 ima-ng sha1:f778e2082b08d21bbc59898f4775a75e8f2af4db /bin/bash
10 0a0d9258c151356204aea2498bbca4be34d6bb05 ima-ng sha1:b0ab2e7ebd22c4d17d975de0d881f52dc14359a7 /lib64/ld-2.27.so
10 0d6b1d90350778d58f1302d00e59493e11bc0011 ima-ng sha1:ce8204c948b9fe3ae67b94625ad620420c1dc838 /etc/ld.so.cache
10 d69ac2c1d60d28b2da07c7f0cbd49e31e9cca277 ima-ng sha1:8526466068709356630490ff5196c95a186092b8 /lib64/libreadline.so.7.0
10 ef3212c12d1fbb94de9534b0bbd9f0c8ea50a77b ima-ng sha1:f80ba92b8a6e390a80a7a3deef8eae921fc8ca4e /lib64/libc-2.27.so
10 f805861177a99c61eabebe21003b3c831ccf288b ima-ng sha1:261a3cd5863de3f2421662ba5b455df09d941168 /lib64/libncurses.so.6.1
10 52f680881893b28e6f0ce2b132d723a885333500 ima-ng sha1:b953a3fa385e64dfe9927de94c33318d3de56260 /lib64/libnss_files-2.27.so
10 4da8ce3c51a7814d4e38be55a2a990a5ceec8b27 ima-ng sha1:99a9c095c7928ecca8c3a4bc44b06246fc5f49de /etc/passwd
From left to right, the content of each record indicates:
- PCR: PCR register for extending measurement results (The default value is 10. This register is valid only when the TPM chip is installed in the system.)
- Template hash value: hash value that is finally used for extension, combining the file content hash and the length and value of the file path
- Template: template of the extended measurement value, for example, ima-ng
- File content hash value: hash value of the measured file content
- File path: path of the measured file
IMA Appraisal
The purpose of IMA appraisal is to control access to local files by comparing the reference value with the standard reference value.
IMA uses the security extension attributes security.ima and security.evm to store the reference values of file integrity measurement.
- security.ima: stores the hash value of the file content
- security.evm: stores the hash value signature of a file extended attribute
When a protected file is accessed, the hook in the kernel is triggered to verify the integrity of the extended attributes and content of the file.
- Use the public key in the kernel keyring to verify the signature value in the extended attribute of the security.evm file, and compare this signature value with the hash value of the extended attribute of the current file. If they match, the extended attribute of the file is complete (including security.ima).
- When the extended attribute of the file is complete, the system compares the extended attribute of the file security.ima with the digest value of the current file content. If they match, the system allows for the access to the file.
Likewise, the file scope and trigger conditions for IMA appraisal can be configured by users using IMA policies.
IMA Digest Lists
Currently, the IMA Digest Lists extension supports the following three combinations of startup parameters:
IMA measurement mode:
ima_policy=exec_tcb ima_digest_list_pcr=11IMA appraisal log mode + IMA measurement mode:
ima_template=ima-sig ima_policy="exec_tcb|appraise_exec_tcb|appraise_exec_immutable" initramtmpfs ima_hash=sha256 ima_appraise=log evm=allow_metadata_writes evm=x509 ima_digest_list_pcr=11 ima_appraise_digest_list=digestIMA appraisal enforcing mode + IMA measurement mode:
ima_template=ima-sig ima_policy="exec_tcb|appraise_exec_tcb|appraise_exec_immutable" initramtmpfs ima_hash=sha256 ima_appraise=enforce-evm evm=allow_metadata_writes evm=x509 ima_digest_list_pcr=11 ima_appraise_digest_list=digest
Procedure
Initial Deployment in the Native IMA Scenario
When the system is started for the first time, you need to configure the following startup parameters:
ima_appraise=fix ima_policy=appraise_tcb
In the fix mode, the system can be started when no reference value is available. appraise_tcb corresponds to an IMA policy. For details, see IMA Startup Parameters in the Appendix.
Next, you need to access all the files that need to be verified to add IMA extended attributes to them:
time find / -fstype ext4 -type f -uid 0 -exec dd if='{}' of=/dev/null count=0 status=none \;
This process takes some time. After the command is executed, you can see the marked reference value in the extended attributes of the protected file.
$ getfattr -m - -d /sbin/init
# file: sbin/init
security.ima=0sAXr7Qmun5mkGDS286oZxCpdGEuKT
security.selinux="system_u:object_r:init_exec_t"
Configure the following startup parameters and restart the system:
ima_appraise=enforce ima_policy=appraise_tcb
Initial Deployment in the Digest Lists Scenario
Set kernel parameters to enter the log mode.
Add the following parameters to edit the
/boot/efi/EFI/openEuler/grub.cfgfile:ima_template=ima-sig ima_policy="exec_tcb|appraise_exec_tcb|appraise_exec_immutable" initramtmpfs ima_hash=sha256 ima_appraise=log evm=allow_metadata_writes evm=x509 ima_digest_list_pcr=11 ima_appraise_digest_list=digestRun the
rebootcommand to restart the system and enter the log mode. In this mode, integrity check has been enabled, but the system can be started even if the check fails.Install the dependency package.
Run the yum command to install digest-list-tools and ima-evm-utils. Ensure that the versions are not earlier than the following:
$ yum install digest-list-tools ima-evm-utils
$ rpm -qa | grep digest-list-tools
digest-list-tools-0.3.93-1.oe1.x86_64
$ rpm -qa | grep ima-evm-utils
ima-evm-utils-1.2.1-9.oe1.x86_64
If the plymouth package is installed, you need to add
-ato the end of the cp command in line 147 in the/usr/libexec/plymouth/plymouth-populate-initrdscript file:... ddebug "Installing $_src" cp -a --sparse=always -pfL "$PLYMOUTH_SYSROOT$_src" "${initdir}/$target" }Run
dracutto generate initrd again:dracut -f -e xattrEdit the
/boot/efi/EFI/openEuler/grub.cfgfile by changing ima_appraise=log to ima_appraise=enforce-evm.ima_template=ima-sig ima_policy="exec_tcb|appraise_exec_tcb|appraise_exec_immutable" initramtmpfs ima_hash=sha256 ima_appraise=enforce-evm evm=allow_metadata_writes evm=x509 ima_digest_list_pcr=11 ima_appraise_digest_list=digestRun the reboot command to complete the initial deployment.
Building Digest Lists on OBS
Open Build Service (OBS) is a compilation system that was first used for building software packages in openSUSE and supports distributed compilation of multiple architectures.
Before building a digest list, ensure that your project contains the following RPM packages from openEuler:
- digest-list-tools
- pesign-obs-integration
- selinux-policy
- rpm
- openEuler-rpm-config
Add Project Config in the deliverable project:
Preinstall: pesign-obs-integration digest-list-tools selinux-policy-targeted
Macros:
%__brp_digest_list /usr/lib/rpm/openEuler/brp-digest-list %{buildroot}
:Macros
- The following content is added to Preinstall: digest-list-tools for generating the digest list; pesign-obs-integration for generating the digest list signature; selinux-policy-targeted, ensuring that the SELinux label in the environment is correct when the digest list is generated.
- Define the macro %__brp_digest_list in Macros. The RPM runs this macro to generate a digest list for the compiled binary file in the build phase. This macro can be used as a switch to control whether the digest list is generated in the project.
After the configuration is completed, OBS automatically performs full build. In normal cases, the following two files are added to the software package:
- /etc/ima/digest_lists/0-metadata_list-compact-[package name]-[version number]
- /etc/ima/digest_lists.tlv/0-metadata_list-compact_tlv-[package name]-[version number]
Building Digest Lists on Koji
Koji is a compilation system of the Fedora community. The openEuler community will support Koji in the future.
FAQs
Why does the system fail to be started, or commands fail to be executed, or services are abnormal after the system is started in enforcing mode?
In enforcing mode, IMA controls file access. If the content or extended attributes of a file to be accessed are incomplete, the access will be denied. If key commands that affect system startup cannot be executed, the system cannot be started.
Check whether the following problems exist:
Check whether the digest list is added to initrd.
Check whether the dracut command is executed to add the digest list to the kernel during the initial deployment. If the digest list is not added to initrd, the digest list cannot be imported during startup. As a result, the startup fails.
Check whether the official RPM package is used.
If a non-official openEuler RPM package is used, the RPM package may not carry the digest list, or the private key for signing the digest list does not match the public key for signature verification in the kernel. As a result, the digest list is not imported to the kernel.
If the cause is not clear, enter the log mode and find the cause from the error log:
dmesg | grep appraiseWhy access control is not performed on system files in enforcing mode?
When the system does not perform access control on the file as expected, check whether the IMA policy in the startup parameters is correctly configured:
$ cat /proc/cmdline
...ima_policy=exec_tcb|appraise_exec_tcb|appraise_exec_immutable...
Run the following command to check whether the IMA policy in the current kernel has taken effect:
cat /sys/kernel/security/ima/policyIf the policy file is empty, it indicates that the policy fails to be set. In this case, the system does not perform access control.
After the initial deployment is completed, do I need to manually run the dracut command to generate initrd after installing, upgrading, or uninstalling the software package?
No. The digest_list.so plug-in provided by the RPM package can automatically update the digest list at the RPM package granularity, allowing users to be unaware of the digest list.
Appendixes
Description of the IMA securityfs Interface
The native IMA provides the following securityfs interfaces:
Note: The following interface paths are in the
/sys/kernel/security/directory.
| Path | Permission | Description |
|---|---|---|
| ima/policy | 600 | IMA policy interface |
| ima/ascii_runtime_measurement | 440 | IMA measurement result in ASCII code format |
| ima/binary_runtime_measurement | 440 | IMA measurement result in binary format |
| ima/runtime_measurement_count | 440 | Measurement result statistics |
| ima/violations | 440 | Number of IMA measurement result conflicts |
| evm | 660 | EVM mode, that is, the mode for verifying the integrity of extended attributes of files |
The values of /sys/kernel/security/evm are as follows:
- 0: EVM uninitialized.
- 1: Uses HMAC (symmetric encryption) to verify the integrity of extended attributes.
- 2: Uses the public key signature (asymmetric encryption) to verify the integrity of extended attributes.
- 6: Disables the integrity check of extended attributes (This mode is used for openEuler).
The additional securityfs interfaces provided by the IMA Digest Lists extension are as follows:
| Path | Permission | Description |
|---|---|---|
| ima/digests_count | 440 | Total number of digests (IMA+EVM) in the system hash table |
| ima/digest_list_data | 200 | New interfaces in the digest list |
| ima/digest_list_data_del | 200 | Interfaces deleted from the digest list |
IMA Policy Syntax
Each IMA policy statement must start with an action represented by the keyword action and be followed by a filtering condition:
action: indicates the action of a policy. Only one action can be selected for a policy.
Note: You can ignore the word action and directly write dont_measure instead of action=dont_measure.
func: indicates the type of the file to be measured or authenticated. It is often used together with mask. Only one func can be selected for a policy.
- FILE_CHECK can be used only with MAY_EXEC, MAY_WRITE, and MAY_READ.
- MODULE_CHECK, MMAP_CHECK, and BPRM_CHECK can be used only with MAY_EXEC.
- A combination without the preceding matching relationships does not take effect.
mask: indicates the operation upon which files will be measured or appraised. Only one mask can be selected for a policy.
fsmagic: indicates the hexadecimal magic number of the file system type, which is defined in the
/usr/include/linux/magic.hfile.Note: By default, all file systems are measured unless you use the dont_measure/dont_appraise to mark a file system not to be measured.
fsuid: indicates the UUID of a system device. The value is a hexadecimal string of 16 characters.
objtype: indicates the file type. Only one file type can be selected for a policy.
Note: objtype has a finer granularity than func. For example, obj_type=nova_log_t indicates the nova log file.
uid: indicates the user (represented by the user ID) who performs operations on the file. Only one uid can be selected for a policy.
fowner: indicates the owner (represented by the user ID) of the file. Only one fowner can be selected for a policy.
The values and description of the keywords are as follows:
| Keyword | Value | Description |
|---|---|---|
| action | measure | Enables IMA measurement |
| dont_measure | Disables IMA measurement | |
| appraise | Enables IMA appraisal | |
| dont_appraise | Disables IMA appraisal | |
| audit | Enables audit | |
| func | FILE_CHECK | File to be opened |
| MODULE_CHECK | Kernel module file to be loaded | |
| MMAP_CHECK | Dynamic library file to be mapped to the memory space of the process | |
| BRPM_CHECK | File to be executed (excluding script files opened by programs such as /bin/hash) | |
| POLICY_CHECK | File to be loaded as a supplement to the IMA policy | |
| FIRMWARE_CHECK | Firmware to be loaded into memory | |
| DIGEST_LIST_CHECK | Digest list file to be loaded into the kernel | |
| KEXEC_KERNEL_CHECK | kexec kernel to be switched to | |
| mask | MAY_EXEC | Executes a file |
| MAY_WRITE | Writes data to a file This operation is not recommended because it is restricted by open source mechanisms such as echo and vim (the essence of modification is to create a temporary file and then rename it). The IMA measurement of MAY_WRITE is not triggered each time the file is modified. | |
| MAY_READ | Reads a file | |
| MAY_APPEND | Extends file attributes | |
| fsmagic | fsmagic=xxx | Hexadecimal magic number of the file system type |
| fsuuid | fsuuid=xxx | UUID of a system device. The value is a hexadecimal string of 16 characters. |
| fowner | fowner=xxx | User ID of the file owner |
| uid | uid=xxx | ID of the user who operates the file |
| obj_type | obj_type=xxx_t | File type (based on the SELinux tag) |
| pcr | pcr= | Selects the PCR used to extend the measurement values in the TPM. The default value is 10. |
| appraise_type | imasig | Signature-based IMA appraisal |
| meta_immutable | Evaluates the extended attributes of the file based on signatures (supporting the digest list). |
Note: PATH_CHECK is equivalent to FILE_CHECK, and FILE_MMAP is equivalent to MMAP_CHECK. They are not mentioned in this table.
IMA Native Startup Parameters
The following table lists the kernel startup parameters of the native IMA.
| Parameter | Value | Description |
|---|---|---|
| ima_appraise | off | Disables the IMA appraisal mode. The integrity check is not performed when the file is accessed and no new reference value is generated for the file. |
| enforce | Enables the IMA appraisal enforcing mode to perform the integrity check when the file is accessed. That is, the file digest value is calculated and compared with the reference value. If the comparison fails, the file access is rejected. In this case, the IMA generates a new reference value for the new file. | |
| fix | Enables the IMA repair mode. In this mode, the reference value of a protected file can be updated. | |
| log | Enables the IMA appraisal log mode to perform the integrity check when the file is accessed. However, commands can be executed even if the check fails, and only logs are recorded. | |
| ima_policy | tcb | Measures all file execution, dynamic library mapping, kernel module import, and device driver loading. The file read behavior of the root user is also measured. |
| appraise_tcb | Evaluates all files whose owner is the root user. | |
| secure_boot | Evaluates the kernel module import, hardware driver loading, kexec kernel switchover, and IMA policies. The prerequisite is that these files have IMA signatures. | |
| ima_tcb | None | Equivalent to ima_policy=tcb. |
| ima_appraise_tcb | None | Equivalent to ima_policy=appraise_tcb. |
| ima_hash | sha1/md5/... | IMA digest algorithm. The default value is sha1. |
| ima_template | ima | IMA measurement extension template |
| ima-ng | IMA measurement extension template | |
| ima-sig | IMA measurement extension template | |
| integrity_audit | 0 | Basic integrity audit information (default) |
| 1 | Additional integrity audit information |
Note: The ima_policy parameter can specify multiple values at the same time, for example, ima_policy=tcb|appraise_tcb. After the system is started, the IMA policy of the system is the sum of the policies for the two parameters.
The IMA policy for the ima_policy=tcb startup parameter is as follows:
# PROC_SUPER_MAGIC = 0x9fa0
dont_measure fsmagic=0x9fa0
# SYSFS_MAGIC = 0x62656572
dont_measure fsmagic=0x62656572
# DEBUGFS_MAGIC = 0x64626720
dont_measure fsmagic=0x64626720
# TMPFS_MAGIC = 0x01021994
dont_measure fsmagic=0x1021994
# DEVPTS_SUPER_MAGIC=0x1cd1
dont_measure fsmagic=0x1cd1
# BINFMTFS_MAGIC=0x42494e4d
dont_measure fsmagic=0x42494e4d
# SECURITYFS_MAGIC=0x73636673
dont_measure fsmagic=0x73636673
# SELINUX_MAGIC=0xf97cff8c
dont_measure fsmagic=0xf97cff8c
# SMACK_MAGIC=0x43415d53
dont_measure fsmagic=0x43415d53
# CGROUP_SUPER_MAGIC=0x27e0eb
dont_measure fsmagic=0x27e0eb
# CGROUP2_SUPER_MAGIC=0x63677270
dont_measure fsmagic=0x63677270
# NSFS_MAGIC=0x6e736673
dont_measure fsmagic=0x6e736673
measure func=MMAP_CHECK mask=MAY_EXEC
measure func=BPRM_CHECK mask=MAY_EXEC
measure func=FILE_CHECK mask=MAY_READ uid=0
measure func=MODULE_CHECK
measure func=FIRMWARE_CHECK
The IMA policy for the ima_policy=tcb_appraise startup parameter is as follows:
# PROC_SUPER_MAGIC = 0x9fa0
dont_appraise fsmagic=0x9fa0
# SYSFS_MAGIC = 0x62656572
dont_appraise fsmagic=0x62656572
# DEBUGFS_MAGIC = 0x64626720
dont_appraise fsmagic=0x64626720
# TMPFS_MAGIC = 0x01021994
dont_appraise fsmagic=0x1021994
# RAMFS_MAGIC
dont_appraise fsmagic=0x858458f6
# DEVPTS_SUPER_MAGIC=0x1cd1
dont_appraise fsmagic=0x1cd1
# BINFMTFS_MAGIC=0x42494e4d
dont_appraise fsmagic=0x42494e4d
# SECURITYFS_MAGIC=0x73636673
dont_appraise fsmagic=0x73636673
# SELINUX_MAGIC=0xf97cff8c
dont_appraise fsmagic=0xf97cff8c
# SMACK_MAGIC=0x43415d53
dont_appraise fsmagic=0x43415d53
# NSFS_MAGIC=0x6e736673
dont_appraise fsmagic=0x6e736673
# CGROUP_SUPER_MAGIC=0x27e0eb
dont_appraise fsmagic=0x27e0eb
# CGROUP2_SUPER_MAGIC=0x63677270
dont_appraise fsmagic=0x63677270
appraise fowner=0
The IMA policy for the ima_policy=secure_boot startup parameter is as follows:
appraise func=MODULE_CHECK appraise_type=imasig
appraise func=FIRMWARE_CHECK appraise_type=imasig
appraise func=KEXEC_KERNEL_CHECK appraise_type=imasig
appraise func=POLICY_CHECK appraise_type=imasig
IMA Digest List Startup Parameters
The kernel startup parameters added to the IMA digest list feature are as follows:
| Parameter | Value | Description |
|---|---|---|
| integrity | 0 | Disables the IMA feature (by default) |
| 1 | Enables the IMA feature | |
| ima_appraise | off | Disables the IMA appraisal mode |
| enforce-evm | Enables the IMA appraisal forced mode to perform the integrity check when the file is accessed and control the access. | |
| ima_appraise_digest_list | digest | When the EVM is disabled, the abstract list is used for IMA appraise. The abstract list protects both the content and extended attributes of the file. |
| digest-nometadata | If the EVM digest value does not exist, the integrity check is performed only based on the IMA digest value (the file extended attribute is not protected). | |
| evm | fix | Allows for any modification to the extended attribute (even if the modification causes the failure to verify the integrity of the extended attribute). |
| ignore | Allowed to modify the extended attribute only when it does not exist or is incorrect. | |
| ima_policy | exec_tcb | IMA measurement policy. For details, see the following policy description. |
| appraise_exec_tcb | IMA appraisal policy. For details, see the following policy description. | |
| appraise_exec_immutable | IMA appraisal policy. For details, see the following policy description. | |
| ima_digest_list_pcr | 11 | Uses PCR 11 instead of PCR 10, and uses only the digest list for measurement. |
| +11 | The PCR 10 measurement is reserved. When the TPM chip is available, the measurement result is written to the TPM chip. | |
| initramtmpfs | None | Adds the support for tmpfs. |
The IMA policy for the ima_policy=exec_tcb startup parameter is as follows:
dont_measure fsmagic=0x9fa0
dont_measure fsmagic=0x62656572
dont_measure fsmagic=0x64626720
dont_measure fsmagic=0x1cd1
dont_measure fsmagic=0x42494e4d
dont_measure fsmagic=0x73636673
dont_measure fsmagic=0xf97cff8c
dont_measure fsmagic=0x43415d53
dont_measure fsmagic=0x27e0eb
dont_measure fsmagic=0x63677270
dont_measure fsmagic=0x6e736673
measure func=MMAP_CHECK mask=MAY_EXEC
measure func=BPRM_CHECK mask=MAY_EXEC
measure func=MODULE_CHECK
measure func=FIRMWARE_CHECK
measure func=POLICY_CHECK
measure func=DIGEST_LIST_CHECK
measure parser
The IMA policy for the ima_policy=appraise_exec_tcb startup parameter is as follows:
appraise func=MODULE_CHECK appraise_type=imasig
appraise func=FIRMWARE_CHECK appraise_type=imasig
appraise func=KEXEC_KERNEL_CHECK appraise_type=imasig
appraise func=POLICY_CHECK appraise_type=imasig
appraise func=DIGEST_LIST_CHECK appraise_type=imasig
dont_appraise fsmagic=0x9fa0
dont_appraise fsmagic=0x62656572
dont_appraise fsmagic=0x64626720
dont_appraise fsmagic=0x858458f6
dont_appraise fsmagic=0x1cd1
dont_appraise fsmagic=0x42494e4d
dont_appraise fsmagic=0x73636673
dont_appraise fsmagic=0xf97cff8c
dont_appraise fsmagic=0x43415d53
dont_appraise fsmagic=0x6e736673
dont_appraise fsmagic=0x27e0eb
dont_appraise fsmagic=0x63677270
The IMA policy for the ima_policy=appraise_exec_immutable startup parameter is as follows:
appraise func=BPRM_CHECK appraise_type=imasig appraise_type=meta_immutable
appraise func=MMAP_CHECK
appraise parser appraise_type=imasig
IMA Kernel Compilation Options
The native IMA provides the following compilation options:
| Compilation Option | Description |
|---|---|
| CONFIG_INTEGRITY | IMA/EVM compilation switch |
| CONFIG_INTEGRITY_SIGNATURE | Enables IMA signature verification |
| CONFIG_INTEGRITY_ASYMMETRIC_KEYS | Enables IMA asymmetric signature verification |
| CONFIG_INTEGRITY_TRUSTED_KEYRING | Enables IMA/EVM key ring |
| CONFIG_INTEGRITY_AUDIT | Compiles the IMA audit module |
| CONFIG_IMA | IMA compilation switch |
| CONFIG_IMA_WRITE_POLICY | Allows updating the IMA policy in the running phase |
| CONFIG_IMA_MEASURE_PCR_IDX | Allows specifying the PCR number of the IMA measurement |
| CONFIG_IMA_LSM_RULES | Allows configuring LSM rules |
| CONFIG_IMA_APPRAISE | IMA appraisal compilation switch |
| IMA_APPRAISE_BOOTPARAM | Enables IMA appraisal startup parameters |
| CONFIG_EVM | EVM compilation switch |
The additional compilation options provided by the IMA Digest Lists extension are as follows:
| Compilation Option | Description |
|---|---|
| CONFIG_DIGEST_LIST | Enables the IMA Digest List feature |
IMA Performance Reference Data
The following figure compares the performance when IMA is disabled, native IMA is enabled, and IMA digest list is enabled.
Impact of IMA on the kdump Service
When the IMA enforce mode is enabled and kexec system call verification is configured in the policy, kdump may fail to be started.
appraise func=KEXEC_KERNEL_CHECK appraise_type=imasig
Cause of the kdump startup failure: After IMA is enabled, file integrity needs to be verified. Therefore, the kexec_file_load system call is restricted when kdump loads kernel image files. You can modify KDUMP_FILE_LOAD in the /etc/sysconfig/kdump configuration file to enable the kexec_file_load system call.
KDUMP_FILE_LOAD="on"
At the same time, the kexec_file_load system call itself also verifies the signature of the file. Therefore, the loaded kernel image file must contain the correct secure boot signature, and the current kernel must contain the corresponding verification certificate.
IMA Root Certificate Configuration
Currently, openEuler uses the RPM key to sign the IMA digest list. To ensure that the IMA function is available out of the box, openEuler imports the RPM root certificate (PGP certificate) to the kernel by default during kernel compilation. Currently, there are two PGP certificates, namely, the OBS certificate used in the earlier version and the openEuler certificate used in the switchover of openEuler 23.09.
$ cat /proc/keys | grep PGP
1909b4ad I------     1 perm 1f030000     0     0 asymmetri private OBS b25e7f66: PGP.rsa b25e7f66 []
2f10cd36 I------     1 perm 1f030000     0     0 asymmetri openeuler <openeuler@compass-ci.com> fb37bc6f: PGP.rsa fb37bc6f []
The current kernel does not support the import of the PGP sub-public key, and the switched openEuler certificate uses the sub-key signature. Therefore, the openEuler kernel preprocesses the certificate before compilation, extracts the sub-public key, and imports it to the kernel. For details, see the process_pgp_certs.sh script file in the code repository of the kernel software package.
If the user does not use the IMA digest list function or uses other keys to implement signature/verification, you can remove the related code and configure the kernel root certificate by yourself.
Dynamic Integrity Measurement (DIM)
This section describes the DIM feature and its usage.
Context
With the development of the IT industry, information systems are facing an increasing number of security risks. Information systems run a large amount of software, some of which is inevitably vulnerable. Once exploited by attackers, these vulnerabilities could severely damage system services, resulting in data leakage and service unavailability.
Most software attacks are accompanied by integrity damage, such as malicious process execution, configuration file tampering, and backdoor implantation. Therefore, protection technologies are proposed in the industry. Key data is measured and verified during system startup to ensure that the system can run properly. However, popular integrity protection technologies (such as secure boot and file integrity measurement) cannot protect memory data during process running. If an attacker somehow modifies the instructions of a process, the process may be hijacked or implanted with a backdoor, which is highly destructive and covert. To defend against such attacks, the DIM technology is proposed to measure and protect key data in the memory of a running process.
Terminology
Static baseline: baseline measurement data generated by parsing the binary file of the measurement target
Dynamic baseline: result of the first measurement on the measurement target
Measurement policy: configuration information for measuring the target
Measurement log: list of measurement information, including the measurement targets and measurement results
Description
The DIM feature measures key data (such as code sections and data sections) in the memory during program running and compares the measurement result with the baseline value to determine whether the memory data has been tampered with. In this way, DIM can detect attacks and take countermeasures.
Function Scope
- Currently, DIM supports only AArch64 and x86 architectures.
- Currently, DIM supports measurement of the following key memory data:
- Code section of a user-mode process (the section whose attribute is PT_LOAD and permission is RX in the ELF file, and the virtual memory area whose permission is RX after the corresponding process is loaded)
- Kernel module code section, whose start address and length are core_layout.base and core_layout.text_size respectively in the struct module structure corresponding to the kernel module.
- Kernel code section, corresponding to _stext to _etext (Addresses that may change due to the kernel static key mechanism are skipped.)
- DIM can work with the following hardware:
- The measurement result can be extended to the Platform Configuration Register (PCR) of Trusted Platform Module (TPM) 2.0 to connect to the remote attestation service.
Technical Limitations
- For user-mode processes, only mapped code sections of files can be measured. Anonymous code sections cannot be measured.
- Kernel hot patches cannot be measured.
- Measurement can only be triggered proactively. If a file is attacked and recovered during two measurement processes, the attack cannot be identified.
- Proactive modification of code sections, such as relocation of code sections, self-modification, and hot patches, will be identified as attacks.
- For kernel and kernel module measurement, the measurement result when dynamic baseline establishment is triggered is used as the measurement baseline value. The static baseline value only serves as a fixed identifier.
- The measurement target must have been loaded to the memory when dynamic baseline establishment is triggered (for example, process running or kernel module loading). Otherwise, the object cannot be measured.
- If the TPM PCR needs to be used to verify measurement logs, the DIM module cannot be removed. Otherwise, the measurement logs will be cleared and cannot match the PCR.
NOTE:
After DIM is enabled, system performance is affected in the following aspects:
- Loading the DIM feature and managing baseline data and measurement logs consume system memory. The impact depends on the protection policy configuration.
- Hashing is performed during DIM running, which consumes CPU resources. The impact depends on the size of the data to be measured.
- Resources will be locked and semaphores need to be obtained during DIM running, which may cause other concurrent processes to wait.
Specification Constraints
| Item | Value |
|---|---|
| Maximum size of a policy file, static baseline file, signature file, or certificate file | 10MB |
| Maximum number of tampering measurement logs recorded for a measurement target during multiple measurement periods after a dynamic baseline is established. | 10 |
| Maximum number of measurement policies that can be stored in /etc/dim/policy | 10,000 |
Architecture Description
DIM includes the dim_tools and dim software packages, which contain the following components:
| Software Package | Component | Description |
|---|---|---|
| dim_tools | dim_gen_baseline | User-mode component for generating the static baseline, which is required for generating the dynamic measurement. The baseline data is imported when DIM runs. |
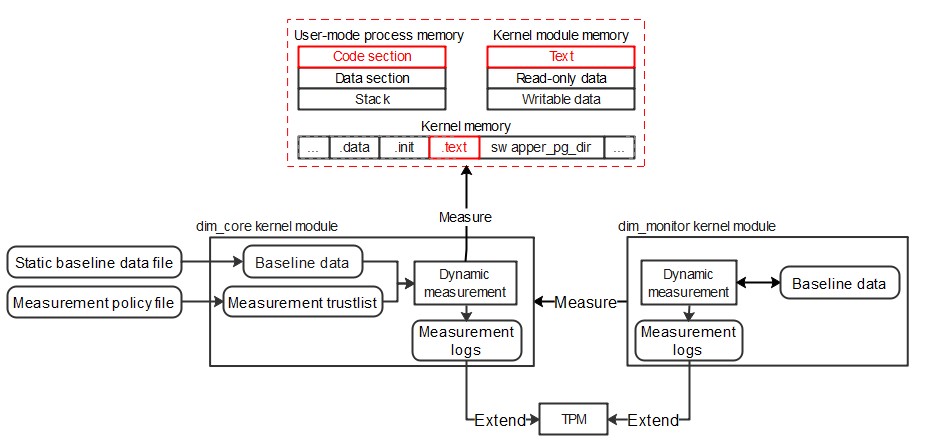
| dim | dim_core | Kernel module for executing the core dynamic measurement logic, including policy parsing, static baseline parsing, dynamic baseline establishment, measurement execution, measurement logging, and TPM extension operations, to measure key memory data. |
| dim | dim_monitor | Kernel module for measuring and protecting dim_core code sections and key data to prevent DIM function failures caused by attacks on dim_core. |
The following figure shows the overall architecture:
Key Procedures
Both the dim_core and dim_monitor modules provide the memory data measurement function, including the following core processes:
- Dynamic baseline process: The dim_core module reads and parses the policy and static baseline file, measures the code section of the target process, stores the measurement result as a dynamic baseline in the memory, compares the dynamic baseline data with the static baseline data, and records the comparison result in measurement logs. The dim_monitor module measures the code sections and key data of the dim_core module, uses the data as the dynamic baseline, and records measurement logs.
- Dynamic measurement process: The dim_core and dim_monitor modules measure the target and compare the measurement result with the dynamic baseline. If the measurement result is inconsistent with the dynamic baseline, the dim_core and dim_monitor modules record the result in measurement logs.
Interfaces
Interface Files
| Path | Description |
|---|---|
| /etc/dim/policy | Measurement policy file |
| /etc/dim/policy.sig | Measurement policy signature file, which is used to store the signature information of the policy file and is used when the signature verification function is enabled |
| /etc/dim/digest_list/*.hash | Static baseline file, which is used to store measurement baseline values |
| /etc/dim/digest_list/*.hash.sig | Static baseline signature file, which is used to store the signature information of the static baseline file and is used when the signature verification function is enabled |
| /etc/keys/x509_dim.der | Certificate file, which is used to verify the signature information of the policy file and static baseline file and is used when the signature verification function is enabled |
| /sys/kernel/security/dim | DIM file system directory, which is generated after the DIM kernel module is loaded and provides kernel interfaces for operating the DIM function |
File Formats
Measurement policy file format
The lines, each representing a measurement policy, are in plaintext and are separated by Unix newline (LF) characters. The following configuration formats are supported:
User-mode process code section measurement
measure obj=BPRM_TEXT path=<absolute path of the binary file corresponding to the executable file or dynamic library of the measurement target process>Kernel module code section measurement
measure obj=MODULE_TEXT path=<kernel module name>Kernel measurement
measure obj=KERNEL_TEXT
Example:
# cat /etc/dim/policy
measure obj=BPRM_TEXT path=/usr/bin/bash
measure obj=BPRM_TEXT path=/usr/lib64/libc.so.6
measure obj=MODULE_TEXT name=ext4
measure obj=KERNEL_TEXT
Static baseline file format
The lines, each representing a static baseline, are in plaintext and are separated by Unix newline (LF) characters. The following configuration formats are supported:
User-mode process baseline
dim USER sha256:6ae347be2d1ba03bf71d33c888a5c1b95262597fbc8d00ae484040408a605d2b <absolute path of the binary file corresponding to the executable file or dynamic library of the measurement target process>Kernel module baseline
dim KERNEL sha256:a18bb578ff0b6043ec5c2b9b4f1c5fa6a70d05f8310a663ba40bb6e898007ac5 <kernel release number>/<kernel module name>Kernel baseline
dim KERNEL sha256:2ce2bc5d65e112ba691c6ab46d622fac1b7dbe45b77106631120dcc5441a3b9a <kernel release number>
Example:
dim USER sha256:6ae347be2d1ba03bf71d33c888a5c1b95262597fbc8d00ae484040408a605d2b /usr/bin/bash
dim USER sha256:bc937f83dee4018f56cc823f5dafd0dfedc7b9872aa4568dc6fbe404594dc4d0 /usr/lib64/libc.so.6
dim KERNEL sha256:a18bb578ff0b6043ec5c2b9b4f1c5fa6a70d05f8310a663ba40bb6e898007ac5 6.4.0-1.0.1.4.oe2309.x86_64/dim_monitor
dim KERNEL sha256:2ce2bc5d65e112ba691c6ab46d622fac1b7dbe45b77106631120dcc5441a3b9a 6.4.0-1.0.1.4.oe2309.x86_64
Measurement log format
The lines, each representing a measurement log, are in plaintext and are separated by Unix newline (LF) characters. The format is as follows:
<PCR number> <measurement log hash> <measurement algorithm>:<measurement hash> <measurement target> <measurement log type>Example:
The code section of the bash process is measured. The measurement result is consistent with the static baseline.
12 0f384a6d24e121daf06532f808df624d5ffc061e20166976e89a7bb24158eb87 sha256:db032449f9e20ba37e0ec4a506d664f24f496bce95f2ed972419397951a3792e /usr/bin.bash [static baseline]The code section of the bash process is measured. The measurement result is inconsistent with the static baseline.
12 0f384a6d24e121daf06532f808df624d5ffc061e20166976e89a7bb24158eb87 sha256:db032449f9e20ba37e0ec4a506d664f24f496bce95f2ed972419397951a3792e /usr/bin.bash [tampered]The code section of the ext4 kernel module is measured. No static baseline is found.
12 0f384a6d24e121daf06532f808df624d5ffc061e20166976e89a7bb24158eb87 sha256:db032449f9e20ba37e0ec4a506d664f24f496bce95f2ed972419397951a3792e ext4 [no static baseline]dim_monitor measures dim_core and records the measurement result of the baseline.
12 660d594ba050c3ec9a7cdc8cf226c5213c1e6eec50ba3ff51ff76e4273b3335a sha256:bdab94a05cc9f3ad36d29ebbd14aba8f6fd87c22ae580670d18154b684de366c dim_core.text [dynamic baseline]
12 28a3cefc364c46caffca71e7c88d42cf3735516dec32796e4883edcf1241a7ea sha256:0dfd9656d6ecdadc8ec054a66e9ff0c746d946d67d932cd1cdb69780ccad6fb2 dim_core.data [dynamic baseline]
Certificate and signature file formats
The files are in the common format. For details, see Enabling Signature Verification.
Kernel Module Parameters
dim_core parameters
Parameter Description Value Range Default Value measure_log_capacity Maximum number of measurement logs recorded by dim_core. When this value is reached, dim_core stops recording measurement logs. 100-UINT_MAX (64-bit OS) 100000 measure_schedule Scheduling time after a process or module is measured, in milliseconds. The value 0 indicates that measurement is not scheduled. 0-1000 0 measure_interval Automatic measurement interval, in minutes. The value 0 indicates that automatic measurement is not enabled. 0-525600 0 measure_hash Measurement hash algorithm sha256, sm3 sha256 measure_pcr The TPM PCR to which the measurement result is extended. The value 0 indicates that the measurement result is not extended. The value must be an actual TPM PCR number. 0-128 0 signature Whether to enable the policy file and signature verification. The value 0 indicates that they are disabled, and the value 1 indicates that they are enabled. 0, 1 0 Example:
insmod /path/to/dim_core.ko measure_log_capacity=10000 measure_schedule=10 measure_pcr=12
modprobe dim_core measure_log_capacity=10000 measure_schedule=10 measure_pcr=12
dim_monitor parameters
Parameter Description Value Range Default Value measure_log_capacity Maximum number of measurement logs recorded by dim_monitor. When this value is reached, dim_monitor stops recording measurement logs. 100-UINT_MAX (64-bit OS) 100000 measure_hash Measurement hash algorithm sha256, sm3 sha256 measure_pcr The TPM PCR to which the measurement result is extended. The value 0 indicates that the measurement result is not extended. 0-128 0 Example:
insmod /path/to/dim_monitor.ko measure_log_capacity=10000 measure_hash=sm3
modprobe dim_monitor measure_log_capacity=10000 measure_hash=sm3
Kernel Interfaces
dim_core interface
Interface Attribute Function Example measure Write-only Write 1 to trigger dynamic measurement. If the operation is successful, 0 is returned. If the operation fails, an error code is returned. echo 1 > /sys/kernel/security/dim/measure baseline_init Write-only Write 1 to trigger dynamic baseline establishment. If the operation is successful, 0 is returned. If the operation fails, an error code is returned. echo 1 > /sys/kernel/security/dim/baseline_init ascii_runtime_measurements Read-only Read the interface to query measurement logs. cat /sys/kernel/security/dim/ascii_runtime_measurements runtime_status Read-only Read the interface to query the status information. If the operation fails, an error code is returned. cat /sys/kernel/security/dim/runtime_status interval Read/Write Write a numeric string to set the automatic measurement interval (the value range is the same as that of measure_interval). Read the interface to query the current automatic measurement interval. If the query fails, an error code is returned. echo 10 > /sys/kernel/security/dim/interval
cat /sys/kernel/security/dim/intervaldim_core Statuses
The possible statuses of dim_core are as follows:
- DIM_NO_BASELINE: dim_core is loaded but no operation is performed.
- DIM_BASELINE_RUNNING: The dynamic baseline is being established.
- DIM_MEASURE_RUNNING: Dynamic measurement is being performed.
- DIM_PROTECTED: The dynamic baseline has been established and is protected.
- DIM_ERROR: An error occurs during dynamic baseline establishment or dynamic measurement. You need to rectify the error and trigger dynamic baseline establishment or dynamic measurement again.
dim_monitor interfaces
Interface Attribute Description Example monitor_run Write-only Write 1 to trigger measurement. If the operation is successful, 0 is returned. If the operation fails, an error code is returned. echo 1 > /sys/kernel/security/dim/monitor_run monitor_baseline Write-only Write 1 to trigger baseline establishment. If the operation is successful, 0 is returned. If the operation fails, an error code is returned. echo 1 > /sys/kernel/security/dim/monitor_baseline monitor_ascii_runtime_measurements Read-only Read the interface to query measurement logs. cat /sys/kernel/security/dim/monitor_ascii_runtime_measurements monitor_status Read-only Read the interface to query the status information. If the operation fails, an error code is returned. cat /sys/kernel/security/dim/monitor_status dim_monitor Statuses
- ready: dim_monitor is loaded but no operation is performed.
- running: The dynamic baseline is being established or dynamic measurement is being performed.
- error: An error occurs during dynamic baseline establishment or dynamic measurement. You need to rectify the error and trigger dynamic baseline establishment or dynamic measurement again.
- protected: The dynamic baseline has been established and is protected.
User-Mode Tool Interface
See https://gitee.com/openeuler/dim_tools/blob/master/doc/cmd.md for the details of the dim_gen_baseline CLI interface.
Usage
Installing and Uninstalling DIM
Prerequisites:
- OS: openEuler 23.09 or later
- Kernel: openEuler kernel 5.10 or 6.4
Install dim_tools and dim software packages. The following uses openEuler 23.09 as an example:
# yum install -y dim_tools dim
After the software packages are installed, the DIM kernel components are not loaded by default. You can run the following commands to load or unload them:
# modprobe dim_core or insmod /path/to/dim_core.ko
# modprobe dim_monitor or insmod /path/to/dim_monitor.ko
# rmmod dim_monitor
# rmmod dim_core
After the components are loaded successfully, you can run the following commands to query the components:
# lsmod | grep dim_core
dim_core               77824  1 dim_monitor
# lsmod | grep dim_monitor
dim_monitor            36864  0
Unload the KO files before uninstalling the RPM package.
# rmmod dim_monitor
# rmmod dim_core
# rpm -e dim
dim_monitor must be loaded after dim_core and removed before dim_core. You can also install DIM from source. For details, see https://gitee.com/openeuler/dim/blob/master/README.md.
Measuring Code Sections of User-Mode Processes
Prerequisites:
The dim_core module is loaded successfully.
A user-mode resident measurement target program has been prepared. This section uses /opt/dim/demo/dim_test_demo as an example.
# /opt/dim/demo/dim_test_demo &
Step 1: Generate a static baseline for the binary file corresponding to the measurement target process.
# mkdir -p /etc/dim/digest_list
# dim_gen_baseline /opt/dim/demo/dim_test_demo -o /etc/dim/digest_list/test.hash
Step 2: Configure a measurement policy.
# echo "measure obj=BPRM_TEXT path=/opt/dim/demo/dim_test_demo" > /etc/dim/policy
Step 3: Trigger dynamic baseline establishment.
# echo 1 > /sys/kernel/security/dim/baseline_init
Step 4: Query measurement logs.
# cat /sys/kernel/security/dim/ascii_runtime_measurements
0 e9a79e25f091e03a8b3972b1a0e4ae2ccaed1f5652857fe3b4dc947801a6913e sha256:02e28dff9997e1d81fb806ee5b784fd853eac8812059c4dba7c119c5e5076989 /opt/dim/demo/dim_test_demo [static baseline]
If the preceding measurement log is displayed, the target process is measured successfully and the measurement result is consistent with the static baseline.
Step 5: Trigger dynamic measurement.
# echo 1 > /sys/kernel/security/dim/measure
After the measurement is complete, you can perform Step 4 to query the measurement logs. If the measurement result is consistent with the dynamic baseline, the measurement logs are not updated. Otherwise, an exception measurement log is added. If an attacker attempts to tamper with the target program (for example, by modifying and recompiling the code) and restart the target program, for example:
# pkill dim_test_demo
# /opt/dim/demo/dim_test_demo &
Trigger the measurement again and query the measurement logs. You can see a measurement log marked with "tampered."
# cat /sys/kernel/security/dim/ascii_runtime_measurements
0 e9a79e25f091e03a8b3972b1a0e4ae2ccaed1f5652857fe3b4dc947801a6913e sha256:02e28dff9997e1d81fb806ee5b784fd853eac8812059c4dba7c119c5e5076989 /opt/dim/demo/dim_test_demo [static baseline]
0 08a2f6f2922ad3d1cf376ae05cf0cc507c2f5a1c605adf445506bc84826531d6 sha256:855ec9a890ff22034f7e13b78c2089e28e8d217491665b39203b50ab47b111c8 /opt/dim/demo/dim_test_demo [tampered]
Measuring Code Sections of Kernel Modules
Prerequisites:
The dim_core module is loaded successfully.
A measurement target kernel module has been prepared. This section uses dim_test_module as an example, whose path is /opt/dim/demo/dim_test_module.ko.
# insmod /opt/dim/demo/dim_test_module.ko
The kernel version of the environment where the module is compiled must be the same as the current kernel version. Run the following command to confirm:
# modinfo dim_monitor.ko  | grep vermagic | grep "$(uname -r)"
vermagic:       6.4.0-1.0.1.4.oe2309.x86_64 SMP preempt mod_unload modversions
The first field of the vermagic kernel module information must be the same as the current kernel version.
Step 1: Generate a static baseline for the measurement target kernel module.
# mkdir -p /etc/dim/digest_list
# dim_gen_baseline /opt/dim/demo/dim_test_module.ko -o /etc/dim/digest_list/test.hash
Step 2: Configure a measurement policy.
# echo "measure obj=MODULE_TEXT name=dim_test_module" > /etc/dim/policy
Step 3: Trigger dynamic baseline establishment.
# echo 1 > /sys/kernel/security/dim/baseline_init
Step 4: Query measurement logs.
# cat /sys/kernel/security/dim/ascii_runtime_measurements
0 9603a9d5f87851c8eb7d2619f7abbe28cb8a91f9c83f5ea59f036794e23d1558 sha256:9da4bccc7ae1b709deab8f583b244822d52f3552c93f70534932ae21fac931c6 dim_test_module [static baseline]
The preceding measurement log indicates that dim_test_module is successfully measured and the current measurement result is used as the baseline value for subsequent measurement. The hash value in the measurement log is not the actual measurement value.
Step 5: Trigger dynamic measurement.
echo 1 > /sys/kernel/security/dim/measure
After the measurement is complete, you can perform Step 4 to query the measurement logs. If the measurement result is consistent with the dynamic baseline, the measurement logs are not updated. Otherwise, an exception measurement log is added. If an attacker attempts to tamper with the target kernel module (for example, by modifying and recompiling the code) and reload the module, for example:
rmmod dim_test_module
insmod /opt/dim/demo/dim_test_module.ko
Trigger the measurement again and query the measurement logs. You can see a measurement log marked with "tampered."
# cat /sys/kernel/security/dim/ascii_runtime_measurements
0 9603a9d5f87851c8eb7d2619f7abbe28cb8a91f9c83f5ea59f036794e23d1558 sha256:9da4bccc7ae1b709deab8f583b244822d52f3552c93f70534932ae21fac931c6 dim_test_module [static baseline]
0 6205915fe63a7042788c919d4f0ff04cc5170647d7053a1fe67f6c0943cd1f40 sha256:4cb77370787323140cb572a789703be1a4168359716a01bf745aa05de68a14e3 dim_test_module [tampered]
Measuring Code Sections of the Kernel
Prerequisites:
- The dim_core module is loaded successfully.
Step 1: generate a static baseline for the kernel.
# mkdir -p /etc/dim/digest_list
# dim_gen_baseline -k "$(uname -r)" -o /etc/dim/digest_list/test.hash /boot/vmlinuz-6.4.0-1.0.1.4.oe2309.x86_64
The file name /boot/vmlinuz-6.4.0-1.0.1.4.oe2309.x86_64 is used as an example.
Step 2: Configure a DIM policy.
# echo "measure obj=KERNEL_TEXT" > /etc/dim/policy
Step 3: Trigger dynamic baseline establishment.
# echo 1 > /sys/kernel/security/dim/baseline_init
Step 4: Query measurement logs.
# cat /sys/kernel/security/dim/ascii_runtime_measurements
0 ef82c39d767dece1f5c52b31d1e8c7d55541bae68a97542dda61b0c0c01af4d2 sha256:5f1586e95b102cd9b9f7df3585fe13a1306cbd464f2ebe47a51ad34128f5d0af 6.4.0-1.0.1.4.oe2309.x86_64 [static baseline]
The preceding measurement log indicates that the kernel is successfully measured and the current measurement result is used as the baseline value for subsequent measurement. The hash value in the measurement log is not the actual measurement value.
Step 5: Trigger dynamic measurement.
# echo 1 > /sys/kernel/security/dim/measure
After the measurement is complete, you can perform Step 4 to query the measurement logs. If the measurement result is consistent with the dynamic baseline, the measurement logs are not updated. Otherwise, an exception measurement log is added.
Measuring the dim_core Module
Prerequisites:
- The dim_core and dim_monitor modules are loaded successfully.
- The measurement policy has been configured.
Step 1: Trigger dynamic baseline establishment for dim_core.
# echo 1 > /sys/kernel/security/dim/baseline_init
Step2: Trigger dynamic baseline establishment for dim_monitor.
# echo 1 > /sys/kernel/security/dim/monitor_baseline
Step 3: Query dim_monitor measurement logs.
# cat /sys/kernel/security/dim/ascii_runtime_measurements
0 c1b0d9909ddb00633fc6bbe7e457b46b57e165166b8422e81014bdd3e6862899 sha256:35494ed41109ebc9bf9bf7b1c190b7e890e2f7ce62ca1920397cd2c02a057796 dim_core.text [dynamic baseline]
0 9be7121cd2c215d454db2a8aead36b03d2ed94fad0fbaacfbca83d57a410674f sha256:f35d20aae19ada5e633d2fde6e93133c3b6ae9f494ef354ebe5b162398e4d7fa dim_core.data [dynamic baseline]
The preceding measurement log indicates that dim_core is successfully measured and the current measurement result is used as the baseline value for subsequent measurement.
If you skip dynamic baseline establishment and directly perform measurement, "tampered" is displayed in the log.
Step 4: Trigger dynamic measurement of dim_monitor.
# echo 1 > /sys/kernel/security/dim/monitor_run
If the measurement result is consistent with the dynamic baseline, the measurement logs are not updated. Otherwise, an exception measurement log is added. If dynamic baseline establishment for dim_core is triggered again after the policy is modified, the measurement target changes, and the baseline data managed by dim_core also changes. As a result, the dim_monitor measurement result changes.
# echo "measure obj=BPRM_TEXT path=/usr/bin/bash" > /etc/dim/policy
# echo 1 > /sys/kernel/security/dim/baseline_init
Trigger the measurement of dim_monitor again and query the measurement logs. You can see a measurement log marked with "tampered."
# echo 1 > /sys/kernel/security/dim/monitor_run
# cat /sys/kernel/security/dim/monitor_ascii_runtime_measurements
0 c1b0d9909ddb00633fc6bbe7e457b46b57e165166b8422e81014bdd3e6862899 sha256:35494ed41109ebc9bf9bf7b1c190b7e890e2f7ce62ca1920397cd2c02a057796 dim_core.text [dynamic baseline]
0 9be7121cd2c215d454db2a8aead36b03d2ed94fad0fbaacfbca83d57a410674f sha256:f35d20aae19ada5e633d2fde6e93133c3b6ae9f494ef354ebe5b162398e4d7fa dim_core.data [dynamic baseline]
0 6a60d78230954aba2e6ea6a6b20a7b803d7adb405acbb49b297c003366cfec0d sha256:449ba11b0bfc6146d4479edea2b691aa37c0c025a733e167fd97e77bbb4b9dab dim_core.data [tampered]
Extending to the TPM PCR
Prerequisites:
The TPM 2.0 has been installed in the system. After the following command is executed, the command output is not empty:
# ls /dev/tpm*
/dev/tpm0  /dev/tpmrm0
The tpm2-tools software package has been installed in the system. After the following command is executed, the command output is not empty:
# rpm -qa tpm2-toolsThe measurement policy and static baseline have been configured.
Step 1: Load the dim_core and dim_monitor modules and set the numbers of the PCRs to which the measurement results are extended. In this example, PCR 12 is specified for the dim_core measurement result, and PCR 13 is specified for the dim_monitor measurement result.
# modprobe dim_core measure_pcr=12
# modprobe dim_monitor measure_pcr=13
Step 2: Trigger baseline establishment for dim_core and dim_monitor.
# echo 1 > /sys/kernel/security/dim/baseline_init
# echo 1 > /sys/kernel/security/dim/monitor_baseline
Step 3: Check the measurement logs. Each log is marked with the corresponding TPM PCR number.
# cat /sys/kernel/security/dim/ascii_runtime_measurements
12 2649c414d1f9fcac1c8d0df8ae7b1c18b5ea10a162b957839bdb8f8415ec6146 sha256:83110ce600e744982d3676202576d8b94cea016a088f99617767ddbd66da1164 /usr/lib/systemd/systemd [static baseline]
# cat /sys/kernel/security/dim/monitor_ascii_runtime_measurements
13 72ee3061d5a80eb8547cd80c73a80c3a8dc3b3e9f7e5baa10f709350b3058063 sha256:5562ed25fcdf557efe8077e231399bcfbcf0160d726201ac8edf7a2ca7c55ad0 dim_core.text [dynamic baseline]
13 8ba44d557a9855c03bc243a8ba2d553347a52c1a322ea9cf8d3d1e0c8f0e2656 sha256:5279eadc235d80bf66ba652b5d0a2c7afd253ebaf1d03e6e24b87b7f7e94fa02 dim_core.data [dynamic baseline]
Step 4: Check the TPM PCRs. Extended values have been written to the corresponding PCRs.
# tpm2_pcrread sha256 | grep "12:"
  12: 0xF358AC6F815BB29D53356DA2B4578B4EE26EB9274E553689094208E444D5D9A2
# tpm2_pcrread sha256 | grep "13:"
  13: 0xBFB9FF69493DEF9C50E52E38B332BDA8DE9C53E90FB96D14CD299E756205F8EA
Enabling Signature Verification
Prerequisites:
A public key certificate and a signature private key have been prepared. The signature algorithm is RSA, the hash algorithm is sha256, and the certificate format is DER. You can also run the following commands to generate the files:
# openssl genrsa -out dim.key 4096
# openssl req -new -sha256 -key dim.key -out dim.csr -subj "/C=AA/ST=BB/O=CC/OU=DD/CN=DIM Test"
# openssl x509 -req -days 3650 -signkey dim.key -in dim.csr -out dim.crt
# openssl x509 -in dim.crt -out dim.der -outform DER
The measurement policy has been configured.
Step 1: Save the DER certificate as /etc/keys/x509_dim.der.
# mkdir -p /etc/keys
# cp dim.der /etc/keys/x509_dim.der
Step 2: Sign the policy file and static baseline file. The signature file name must be the original file name suffixed with .sig.
# openssl dgst -sha256 -out /etc/dim/policy.sig -sign dim.key /etc/dim/policy
# openssl dgst -sha256 -out /etc/dim/digest_list/test.hash.sig -sign dim.key /etc/dim/digest_list/test.hash
Step 3: Load the dim_core module and enable the signature verification function.
modprobe dim_core signature=1
Now, the policy file and static baseline file can be loaded only after they pass the signature verification. The baseline establishment will fail if it is triggered after the policy file is modified:
# echo "" >> /etc/dim/policy
# echo 1 > /sys/kernel/security/dim/baseline_init
-bash: echo: write error: Key was rejected by service
If the signature verification of a static baseline file fails, dim_core skips the parsing of the file without causing a baseline establishment failure.
Configuring Measurement Algorithms
Prerequisites:
- The measurement policy has been configured.
Step 1: Load the dim_core and dim_monitor modules and configure the measurement algorithm. The following uses the SM3 algorithm as an example.
# modprobe dim_core measure_hash=sm3
# modprobe dim_monitor measure_hash=sm3
Step 2: Configure a policy that establishes a static baseline of the SM3 algorithm for the measurement target program.
# echo "measure obj=BPRM_TEXT path=/opt/dim/demo/dim_test_demo" > /etc/dim/policy
# dim_gen_baseline -a sm3 /opt/dim/demo/dim_test_demo -o /etc/dim/digest_list/test.hash
Step 3: Trigger baseline establishment.
# echo 1 > /sys/kernel/security/dim/baseline_init
# echo 1 > /sys/kernel/security/dim/monitor_baseline
Step 4: Check the measurement logs. Each log is marked with the corresponding hash algorithm.
# cat /sys/kernel/security/dim/ascii_runtime_measurements
0 585a64feea8dd1ec415d4e67c33633b97abb9f88e6732c8a039064351d24eed6 sm3:ca84504c02bef360ec77f3280552c006ce387ebb09b49b316d1a0b7f43039142 /opt/dim/demo/dim_test_demo [static baseline]
# cat /sys/kernel/security/dim/monitor_ascii_runtime_measurements
0 e6a40553499d4cbf0501f32cabcad8d872416ca12855a389215b2509af76e60b sm3:47a1dae98182e9d7fa489671f20c3542e0e154d3ce941440cdd4a1e4eee8f39f dim_core.text [dynamic baseline]
0 2c862bb477b342e9ac7d4dd03b6e6705c19e0835efc15da38aafba110b41b3d1 sm3:a4d31d5f4d5f08458717b520941c2aefa0b72dc8640a33ee30c26a9dab74eae9 dim_core.data [dynamic baseline]
Configuring Automatic Measurement
Prerequisites:
- The measurement policy has been configured.
Method 1: Load the dim_core module and set the automatic measurement interval to 1 minute.
modprobe dim_core measure_interval=1
After the module is loaded, dynamic baseline establishment is automatically triggered. Then, dynamic measurement is triggered every minute.
In this case, do not configure the measurement policy for dim_core to measure its own code sections. Otherwise, false alarms may occur. In addition, you need to configure /etc/dim/policy in advance. Otherwise, the module fails to be loaded when measure_interval is set to 1.
Method 2: After the dim_core module is loaded, you can configure the measurement interval through the kernel module interface. In the following example, the measurement interval is set to 1 minute.
modprobe dim_core
echo 1 > /sys/kernel/security/dim/interval
In this case, the measurement is not triggered immediately. One minute later, dynamic baseline establishment, or dynamic measurement, is triggered. Subsequently, dynamic measurement is triggered every minute.
Configuring the Measurement Scheduling Time
Prerequisites:
- The measurement policy has been configured.
Load the dim_core module and set the measurement scheduling time to 10 ms.
modprobe dim_core measure_schedule=10
When the dynamic baseline establishment or dynamic measurement is triggered, dim_core schedules the CPU to release 10 ms each time a process is measured.
Remote Attestation (Kunpeng Security Library)
Introduction
This project develops basic security software components running on Kunpeng processors. In the early stage, the project focuses on trusted computing fields such as remote attestation to empower security developers in the community.
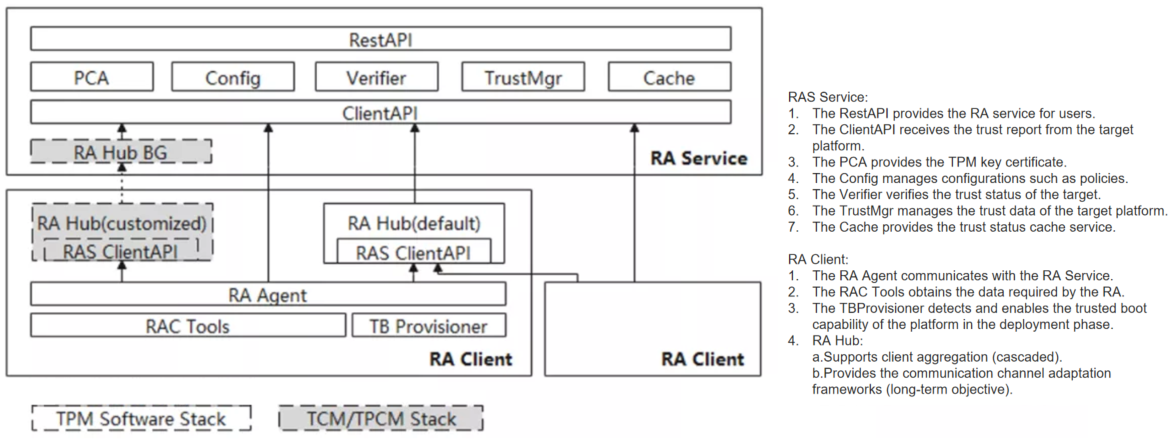
Software Architecture
On the platform without TEE enabled, this project can provide the platform remote attestation feature, and its software architecture is shown in the following figure:
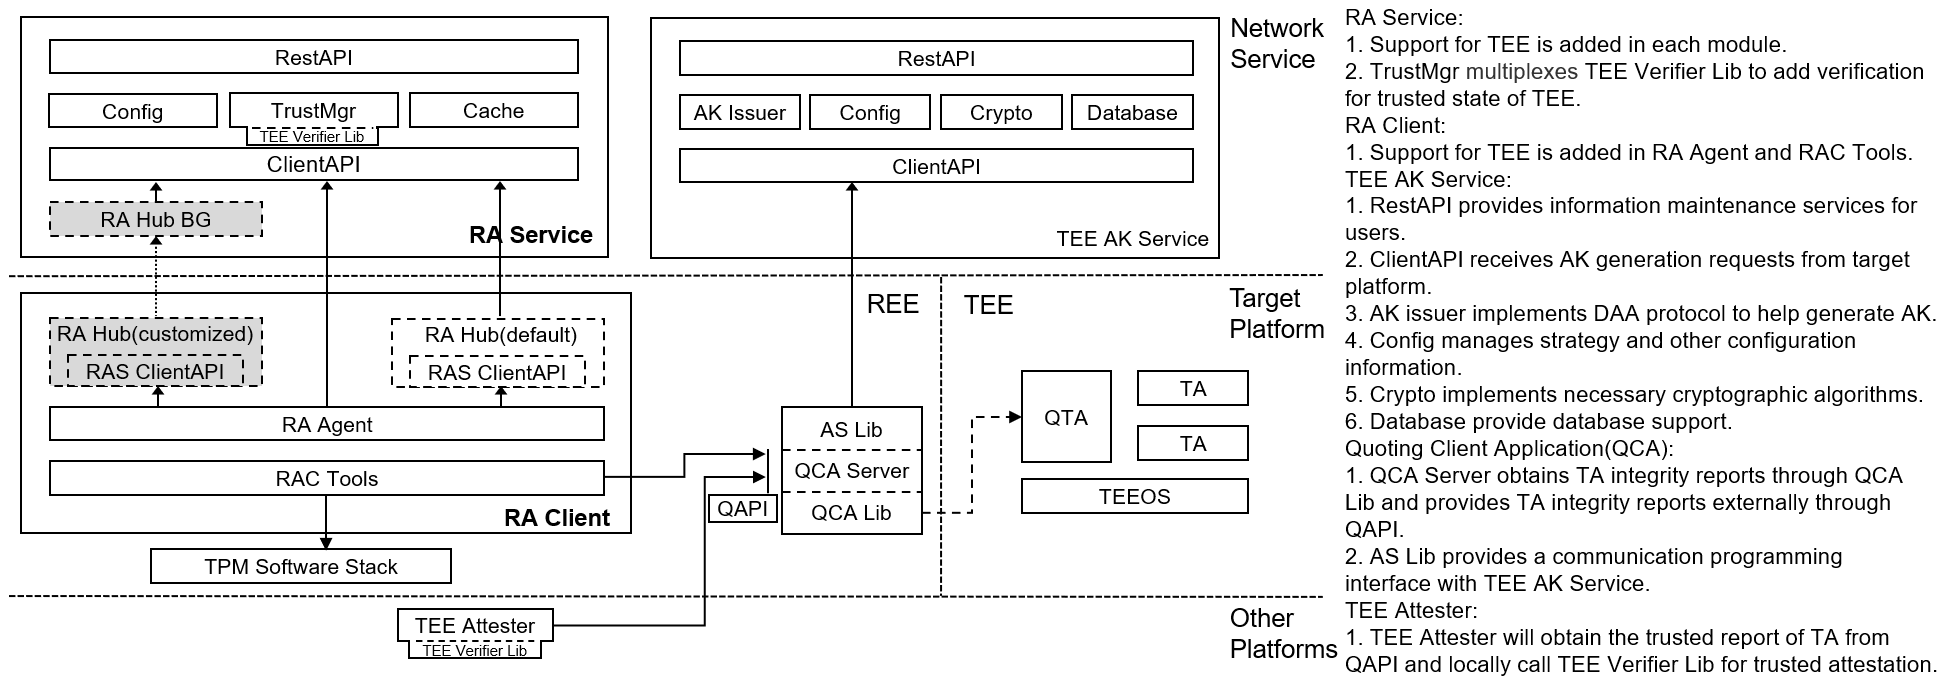
On the platform that has enabled TEE, this project can provide TEE remote attestation feature, and its software architecture is shown in the following figure:
Installation and Configuration
Run the following command to use the RPM package of the Yum installation program:
yum install kunpengsecl-ras kunpengsecl-rac kunpengsecl-rahub kunpengsecl-qcaserver kunpengsecl-attester kunpengsecl-tas kunpengsecl-develPrepare the database environment. Go to the
/usr/share/attestation/rasdirectory and run the pprepare-database-env.shscript to automatically configure the database environment.The configuration files required for program running are stored in three paths: current path
./config.yaml, home path${HOME}/.config/attestation/ras(rac)(rahub)(qcaserver)(attester)(tas)/config.yaml, and system path/etc/attestation/ras(rac)(rahub)(qcaserver)(attester)(tas)/config.yaml.(Optional) To create a home directory configuration file, run the
prepare-ras(rac)(hub)(qca)(attester)(tas)conf-env.shscript in/usr/share/attestation/ras(rac)(rahub)(qcaserver)(attester)(tas)after installing the RPM package.
Options
RAS Boot Options
Run the ras command to start the RAS program. Note that you need to provide the ECDSA public key in the current directory and name it ecdsakey.pub. Options are as follows:
  -H  --https         HTTP/HTTPS mode switch. The default value is https(true), false=http.
  -h  --hport         RESTful API port listened by RAS in HTTPS mode.
  -p, --port string   Client API port listened by RAS.
  -r, --rest string   RESTful API port listened by RAS in HTTP mode.
  -T, --token         Generates a verification code for test and exits.
  -v, --verbose       Prints more detailed RAS runtime log information.
  -V, --version       Prints the RAS version and exits.
RAC Boot Options
Run the sudo raagent command to start the RAC program. Note that the sudo permission is required to enable the physical TPM module. Options are as follows:
  -s, --server string   Specifies the RAS service port to be connected.
  -t, --test            Starts in test mode.
  -v, --verbose         Prints more detailed RAC runtime log information.
  -V, --version         Prints the RAC version and exits.
  -i, --imalog          Specifies the path of the IMA file.
  -b, --bioslog         Specifies the path of the BIOS file.
  -T, --tatest          Starts in TA test mode.
Note: 1.To use TEE remote attestation feature, you must start RAC not in TA test mode. And place the uuid, whether to use TCB, mem_hash and img_hash of the TA to be attestated sequentially in the talist file under the RAC execution path. At the same time, pre install the libqca.so and libteec.so library provided by the TEE team. The format of the talist file is as follows:
e08f7eca-e875-440e-9ab0-5f381136c600 false ccd5160c6461e19214c0d8787281a1e3c4048850352abe45ce86e12dd3df9fde 46d5019b0a7ffbb87ad71ea629ebd6f568140c95d7b452011acfa2f9daf61c7a2.To not use TEE remote attestation feature, you must copy the libqca.so and libteec.so library in
${DESTDIR}/usr/share/attestation/qcaserverpath to/usr/libor/usr/lib64path, and start RAC in TA test mode.
QCA Boot Options
Run the ${DESTDIR}/usr/bin/qcaserver command to start the QCA program. Note that to start QTA normally, the full path of qcaserver must be used, and the CA path parameter in QTA needs to be kept the same as the path. Options are as follows:
  -C, --scenario int    Sets the application scenario of the program, The default value is sce_no_as(0), 1=sce_as_no_daa, 2=sce_as_with_daa.
  -S, --server string   Specifies the open server address/port.
ATTESTER Boot Options
Run the attester command to start the ATTESTER program. Options are as follows:
  -B, --basevalue string   Sets the base value file read path
  -M, --mspolicy int       Sets the measurement strategy, which defaults to -1 and needs to be specified manually. 1=compare only img-hash values, 2=compare only hash values, and 3=compare both img-hash and hash values at the same time.
  -S, --server string      Specifies the address of the server to connect to.
  -U, --uuid int           Specifies the trusted apps to verify.
  -V, --version            Prints the program version and exit.
  -T, --test               Reads fixed nonce values to match currently hard-coded trusted reports.
TAS Boot Options
Run the tas command to start the TAS program. Options are as follows:
-T, --token Generates a verification code for test and exits.
Note: 1.To enable the TAS, you must configure the private key for TAS. Run the following command to modify the configuration file in the home directory:
$ cd ${HOME}/.config/attestation/tas
$ vim config.yaml
# The values of the following DAA_GRP_KEY_SK_X and DAA_GRP_KEY_SK_Y are for testing purposes only.
# Be sure to update their contents to ensure safety before normal use.
tasconfig:
 port: 127.0.0.1:40008
 rest: 127.0.0.1:40009
 akskeycertfile: ./ascert.crt
 aksprivkeyfile: ./aspriv.key
 huaweiitcafile: ./Huawei IT Product CA.pem
 DAA_GRP_KEY_SK_X: 65a9bf91ac8832379ff04dd2c6def16d48a56be244f6e19274e97881a776543c65a9bf91ac8832379ff04dd2c6def16d48a56be244f6e19274e97881a776543c
 DAA_GRP_KEY_SK_Y: 126f74258bb0ceca2ae7522c51825f980549ec1ef24f81d189d17e38f1773b56126f74258bb0ceca2ae7522c51825f980549ec1ef24f81d189d17e38f1773b56
Then enter
tasto start TAS program.2.In an environment with TAS, in order to improve the efficiency of QCA's certificate configuration process, not every boot needs to access the TAS to generate the certificate, but through the localized storage of the certificate. That is, read the certification path configured in
config.yamlon QCA side, check if a TAS-issued certificate has been saved locally through thefunc hasAKCert(s int) boolfunction. If the certificate is successfully read, there is no need to access TAS. If the certificate cannot be read, you need to access TAS and save the certificate returned by TAS locally.
API Definition
RAS APIs
To facilitate the administrator to manage the target server, RAS and the user TA in the TEE deployed on the target server, the following APIs are designed for calling:
| API | Method |
|---|---|
| / | GET |
| /{id} | GET, POST, DELETE |
| /{from}/{to} | GET |
| /{id}/reports | GET |
| /{id}/reports/{reportid} | GET, DELETE |
| /{id}/basevalues | GET |
| /{id}/newbasevalue | POST |
| /{id}/basevalues/{basevalueid} | GET, POST, DELETE |
| /{id}/ta/{tauuid}/status | GET |
| /{id}/ta/{tauuid}/tabasevalues | GET |
| /{id}/ta/{tauuid}/tabasevalues/{tabasevalueid} | GET, POST, DELETE |
| /{id}/ta/{tauuid}/newtabasevalue | POST |
| /{id}/ta/{tauuid}/tareports | GET |
| /{id}/ta/{tauuid}/tareports/{tareportid} | GET, POST, DELETE |
| /{id}/basevalues/{basevalueid} | GET, DELETE |
| /version | GET |
| /config | GET, POST |
| /{id}/container/status | GET |
| /{id}/device/status | GET |
The usage of the preceding APIs is described as follows:
To query information about all servers, use /.
curl -X GET -H "Content-Type: application/json" http://localhost:40002/
To query detailed information about a target server, use the GET method of /{id}. {id} is the unique ID allocated by RAS to the target server.
curl -X GET -H "Content-Type: application/json" http://localhost:40002/1
To modify information about the target server, use the POST method of /{id}. $AUTHTOKEN is the identity verification code automatically generated by running the ras -T command.
type clientInfo struct {
  Registered   *bool `json:"registered"`  // Registration status of the target server
  IsAutoUpdate *bool `json:"isautoupdate"`// Target server base value update policy
}
curl -X POST -H "Authorization: $AUTHTOKEN" -H "Content-Type: application/json" http://localhost:40002/1 -d '{"registered":false, "isautoupdate":false}'
To delete a target server, use the DELETE method of /{id}.
Note: This method does not delete all information about the target server. Instead, it sets the registration status of the target server to
false.
curl -X DELETE -H "Authorization: $AUTHTOKEN" -H "Content-Type: application/json" http://localhost:40002/1
To query information about all servers in a specified range, use the GET method of /{from}/{to}.
curl -X GET -H "Content-Type: application/json" http://localhost:40002/1/9
To query all trust reports of the target server, use the GET method of /{id}/reports.
curl -X GET -H "Content-Type: application/json" http://localhost:40002/1/reports
To query details about a specified trust report of the target server, use the GET method of /{id}/reports/{reportid}. {reportid} indicates the unique ID assigned by RAS to the trust report of the target server.
curl -X GET -H "Content-Type: application/json" http://localhost:40002/1/reports/1
To delete a specified trust report of the target server, use the DELETE method of /{id}/reports/{reportid}.
Note: This method will delete all information about the specified trusted report, and the report cannot be queried through the API.
curl -X DELETE -H "Authorization: $AUTHTOKEN" -H "Content-Type: application/json" http://localhost:40002/1/reports/1
To query all base values of the target server, use the GET method of /{id}/reports/{reportid}.
curl -X GET -H "Content-Type: application/json" http://localhost:40002/1/basevalues
To add a base value to the target server, use the POST method of /{id}/newbasevalue.
type baseValueJson struct {
  BaseType   string `json:"basetype"`   // Base value type
  Uuid       string `json:"uuid"`       // ID of a container or device
  Name       string `json:"name"`       // Base value name
  Enabled    bool   `json:"enabled"`    // Whether the base value is available
  Pcr        string `json:"pcr"`        // PCR value
  Bios       string `json:"bios"`       // BIOS value
  Ima        string `json:"ima"`        // IMA value
  IsNewGroup bool   `json:"isnewgroup"` // Whether this is a group of new reference values
}
curl -X POST -H "Authorization: $AUTHTOKEN" -H "Content-Type: application/json" http://localhost:40002/1/newbasevalue -d '{"name":"test", "basetype":"host", "enabled":true, "pcr":"testpcr", "bios":"testbios", "ima":"testima", "isnewgroup":true}'
To query details about a specified base value of a target server, use the get method of /{id}/basevalues/{basevalueid}. {basevalueid} indicates the unique ID allocated by RAS to the specified base value of the target server.
curl -X GET -H "Content-Type: application/json" http://localhost:40002/1/basevalues/1
To change the availability status of a specified base value of the target server, use the POST method of /{id}/basevalues/{basevalueid}.
curl -X POST -H "Content-type: application/json" -H "Authorization: $AUTHTOKEN" http://localhost:40002/1/basevalues/1 -d '{"enabled":true}'
To delete a specified base value of the target server, use the DELETE method of /{id}/basevalues/{basevalueid}.
Note: This method will delete all the information about the specified base value, and the base value cannot be queried through the API.
curl -X DELETE -H "Authorization: $AUTHTOKEN" -H "Content-Type: application/json" http://localhost:40002/1/basevalues/1
To query the trusted status of a specific user TA on the target server, use the GET method of the "/{id}/ta/{tauuid}/status" interface. Where {id} is the unique identification number assigned by RAS to the target server, and {tauuid} is the identification number of the specific user TA.
curl -X GET -H "Content-type: application/json" -H "Authorization: $AUTHTOKEN" http://localhost:40002/1/ta/test/status
To query all the baseline value information of a specific user TA on the target server, use the GET method of the "/{id}/ta/{tauuid}/tabasevalues" interface.
curl -X GET -H "Content-type: application/json" http://localhost:40002/1/ta/test/tabasevalues
To query the details of a specified base value for a specific user TA on the target server, use the GET method of the "/{id}/ta/{tauuid}/tabasevalues/{tabasevalueid}" interface. where {tabasevalueid} is the unique identification number assigned by RAS to the specified base value of a specific user TA on the target server.
curl -X GET -H "Content-type: application/json" http://localhost:40002/1/ta/test/tabasevalues/1
To modify the available status of a specified base value for a specific user TA on the target server, use the POST method of the "/{id}/ta/{tauuid}/tabasevalues/{tabasevalueid}" interface.
curl -X POST -H "Content-type: application/json" -H "Authorization: $AUTHTOKEN" http://localhost:40002/1/ta/test/tabasevalues/1 --data '{"enabled":true}'
To delete the specified base value of a specific user TA on the target server, use the DELETE method of the "/{id}/ta/{tauuid}/tabasevalues/{tabasevalueid}" interface.
Note: This method will delete all information about the specified base value, and the base value cannot be queried through the API.
curl -X DELETE -H "Content-type: application/json" -H "Authorization: $AUTHTOKEN" -k http://localhost:40002/1/ta/test/tabasevalues/1
To add a baseline value to a specific user TA on the target server, use the POST method of the "/{id}/ta/{tauuid}/newtabasevalue" interface.
type tabaseValueJson struct {
  Uuid      string `json:"uuid"`       // the identification number of the user TA
  Name      string `json:"name"`       // base value name
  Enabled   bool   `json:"enabled"`    // whether a baseline value is available
  Valueinfo string `json:"valueinfo"`  // mirror hash value and memory hash value
}
curl -X POST -H "Content-Type: application/json" -H "Authorization: $AUTHTOKEN" -k http://localhost:40002/1/ta/test/newtabasevalue -d '{"uuid":"test", "name":"testname", "enabled":true, "valueinfo":"test info"}'
To query the target server for all trusted reports for a specific user TA, use the GET method of the "/{id}/ta/{tauuid}/tareports" interface.
curl -X GET -H "Content-type: application/json" http://localhost:40002/1/ta/test/tareports
To query the details of a specified trusted report for a specific user TA on the target server, use the GET method of the "/{id}/ta/{tauuid}/tareports/{tareportid}" interface. Where {tareportid} is the unique identification number assigned by RAS to the specified trusted report of a specific user TA on the target server.
curl -X GET -H "Content-type: application/json" http://localhost:40002/1/ta/test/tareports/2
To delete the specified trusted report of a specific user TA on the target server, use the DELETE method of the "/{id}/ta/{tauuid}/tareports/{tareportid}" interface.
Note: This method will delete all information of the specified trusted report, and the report cannot be queried through the API.
curl -X DELETE -H "Content-type: application/json" http://localhost:40002/1/ta/test/tareports/2
To obtain the version information of the program, use the GET method of /version.
curl -X GET -H "Content-Type: application/json" http://localhost:40002/version
To query the configuration information about the target server, RAS, or database, use the GET method of /config.
curl -X GET -H "Content-Type: application/json" http://localhost:40002/config
To modify the configuration information about the target server, RAS, or database, use the POST method of /config.
type cfgRecord struct {
  // Target server configuration
    HBDuration      string `json:"hbduration" form:"hbduration"`
    TrustDuration   string `json:"trustduration" form:"trustduration"`
    DigestAlgorithm string `json:"digestalgorithm" form:"digestalgorithm"`
  // RAS configuration
    MgrStrategy     string `json:"mgrstrategy" form:"mgrstrategy"`
    ExtractRules    string `json:"extractrules" form:"extractrules"`
    IsAllupdate     *bool  `json:"isallupdate" form:"isallupdate"`
    LogTestMode     *bool  `json:"logtestmode" form:"logtestmode"`
}
curl -X POST -H "Authorization: $AUTHTOKEN" -H "Content-Type: application/json" http://localhost:40002/config -d '{"hbduration":"5s","trustduration":"20s","DigestAlgorithm":"sha256"}'
TAS APIs
To facilitate the administrator's management of TAS for remote control, the following API is designed for calling:
| API | Method |
|---|---|
| /config | GET, POST |
To query the configuration information, use the GET method of the /config interface.
curl -X GET -H "Content-Type: application/json" http://localhost:40009/config
To modify the configuration information, use the POST method of the /config interface.
curl -X POST -H "Content-Type: application/json" -H "Authorization: $AUTHTOKEN" http://localhost:40009/config -d '{"basevalue":"testvalue"}'
Note: Currently, only the base value in the configuration information of TAS is supported for querying and modifying.
FAQs
Why cannot RAS be started after it is installed?
In the current RAS design logic, after the program is started, it needs to search for the
ecdsakey.pubfile in the current directory and read the file as the identity verification code for accessing the program. If the file does not exist in the current directory, an error is reported during RAS boot.Solution 1: Run the
ras -Tcommand to generate a test token. Theecdsakey.pubfile is generated.
Solution 2: After deploying the oauth2 authentication service, save the verification public key of the JWT token generator asecdsakey.pub.Why cannot RAS be accessed through REST APIs after it is started?
RAS is started in HTTPS mode by default. Therefore, you need to provide a valid certificate for RAS to access it. However, RAS started in HTTP mode does not require a certificate.