Overview
The unified build platform is a software package construction system that provides platform services for transforming source code to binary software packages and software repositories. Through unified software package configuration management and software package dependency analysis, the platform achieves efficient software package building based on dependencies. It helps developers and partners build their own personal user repositories, OS core repositories, and access control capabilities.
Quick Start
User Registration
Login and Registration Process
Address: https://eulermaker.openeuler.openatom.cn/.
- Login
Click Log In in the upper right corner of the home page to go to the openEuler community login page.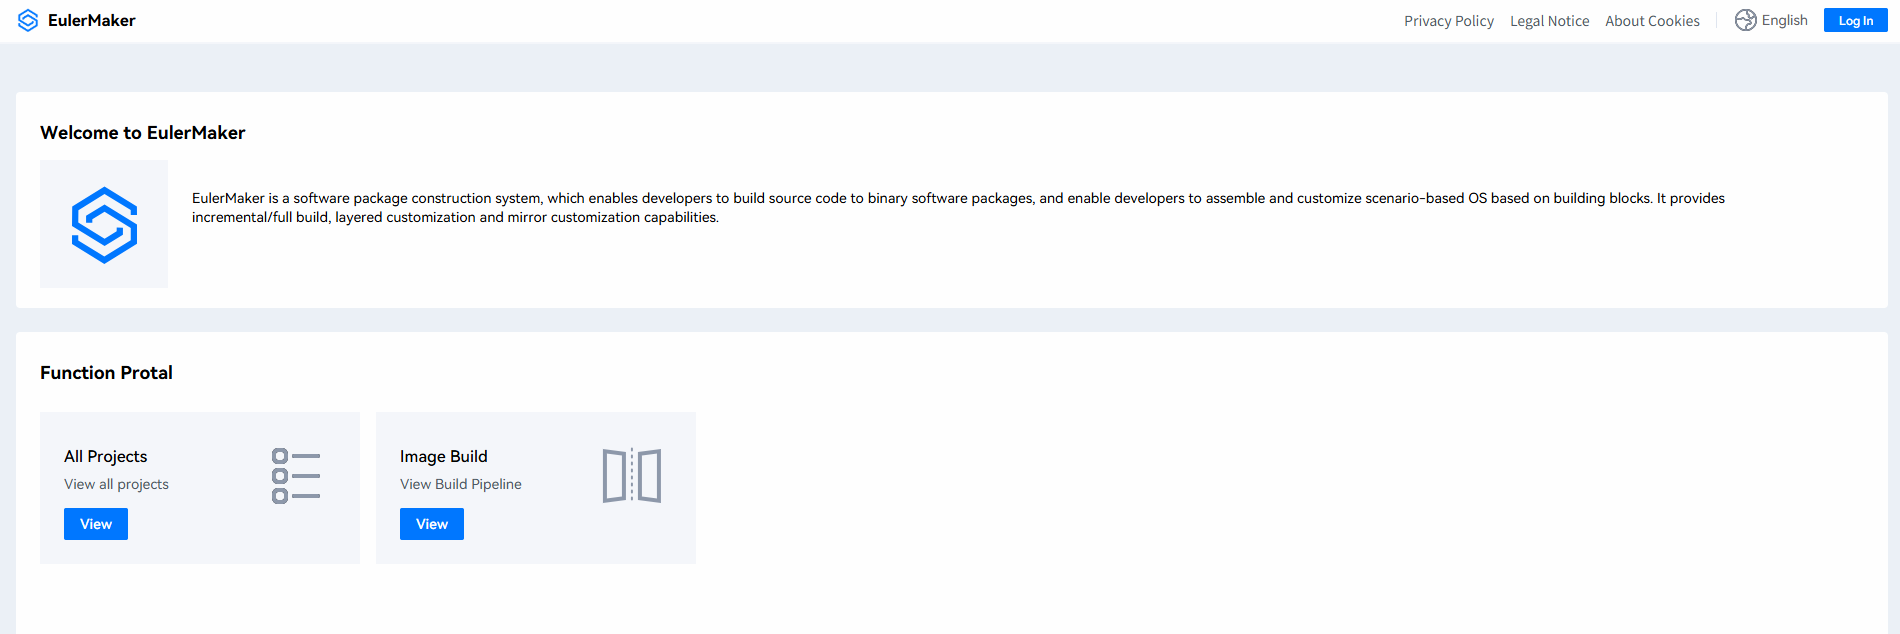 Enter the username and password of the openEuler community account.
 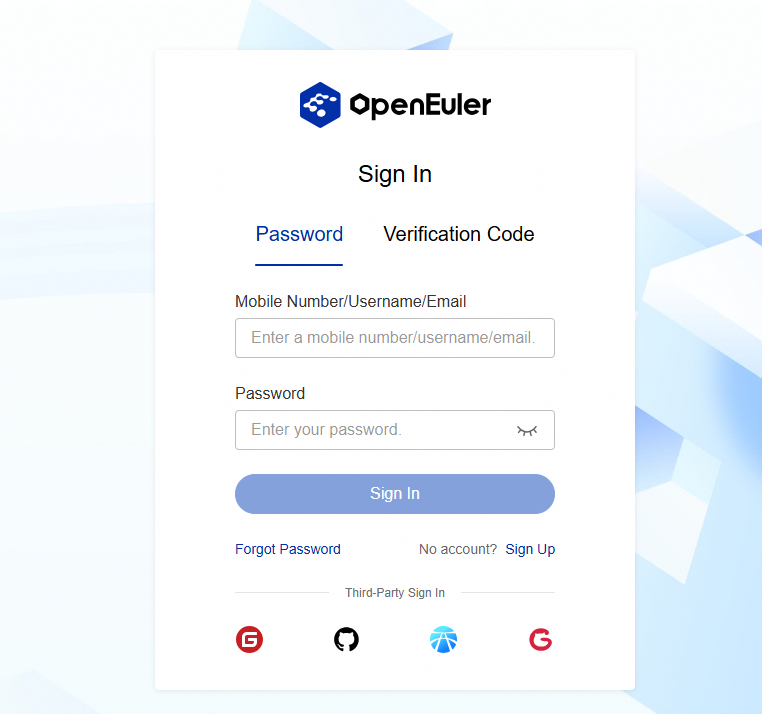 After the openEuler authorization is successful, the page is redirected based on whether the user has been bound to the EulerMaker account.
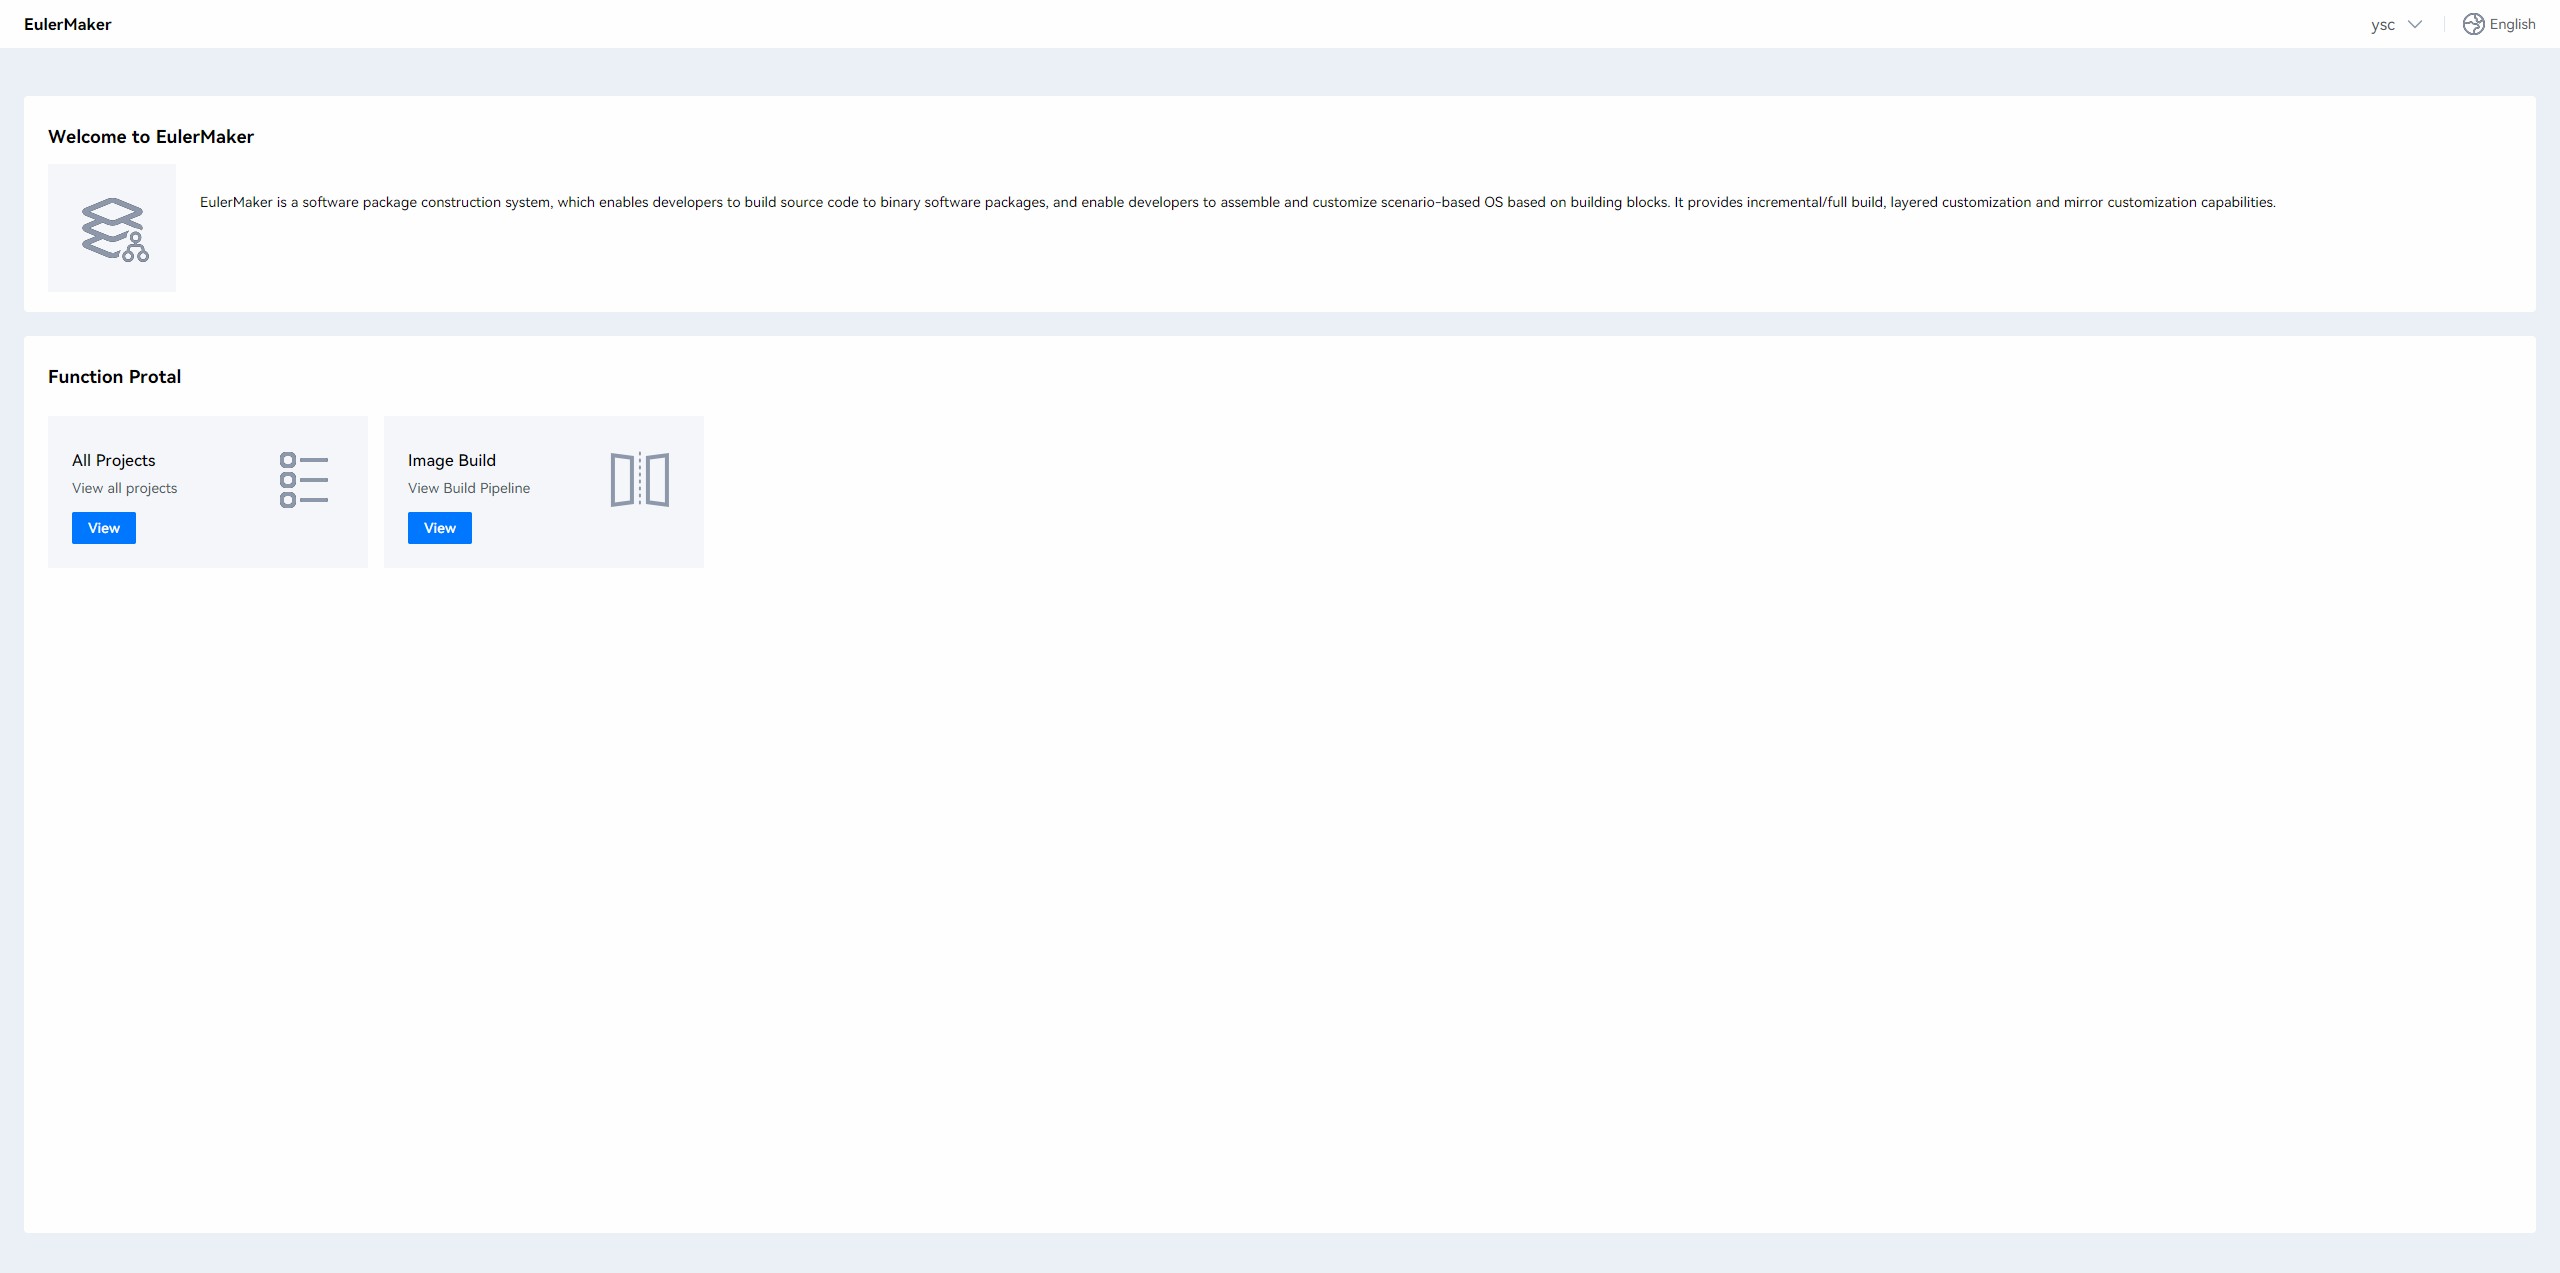
 - If yes, the homepage is displayed.
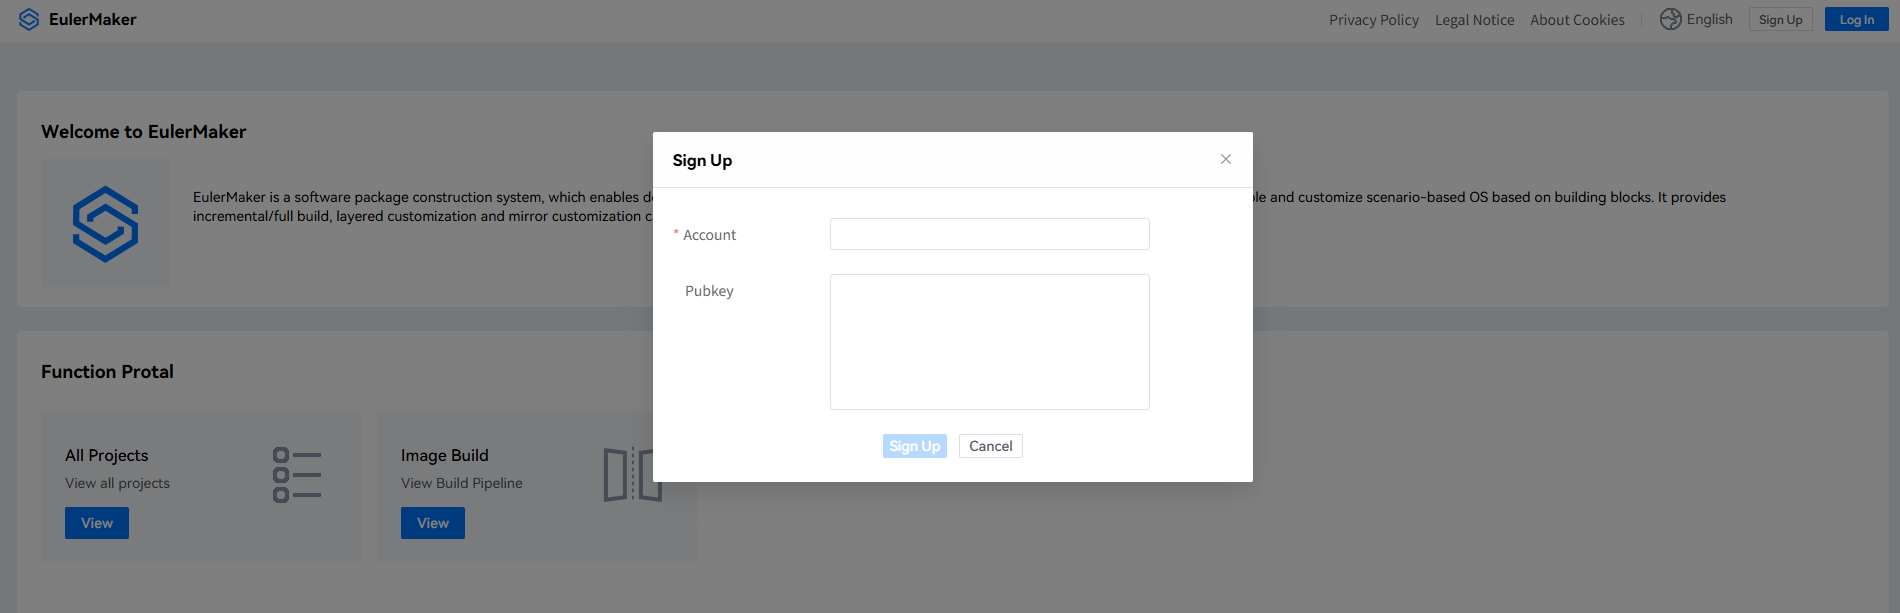
- If no, the account signup page is displayed. Enter the user information to complete the signup.
- If yes, the homepage is displayed.
Creating a Project
Creating a Project On the home page, click the View button under All Projects. The page of overall projects is displayed.
Click the Private Projects tab, click Add Project, and fill in the basic information to complete the creation of a project. 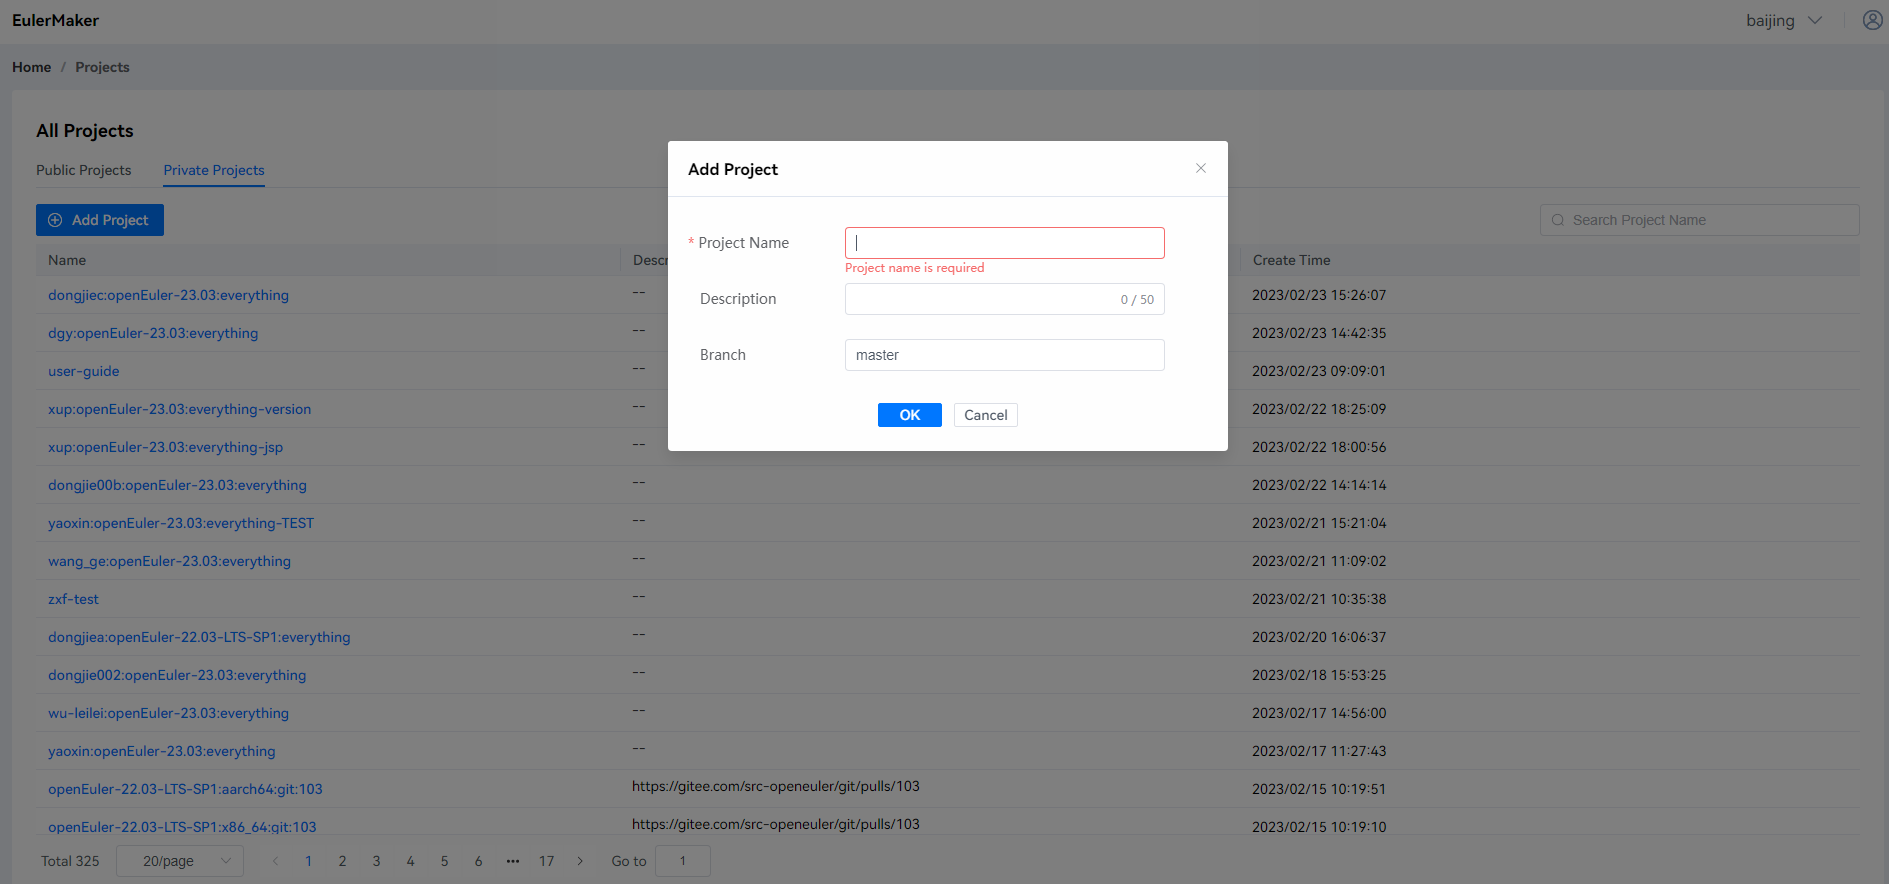
Viewing the New Project
After a project is created, click the project name in the Private Projects tab page. The Overview page of the project is displayed.
Adding a Package
Click Add Package, enter the package information to add a package. 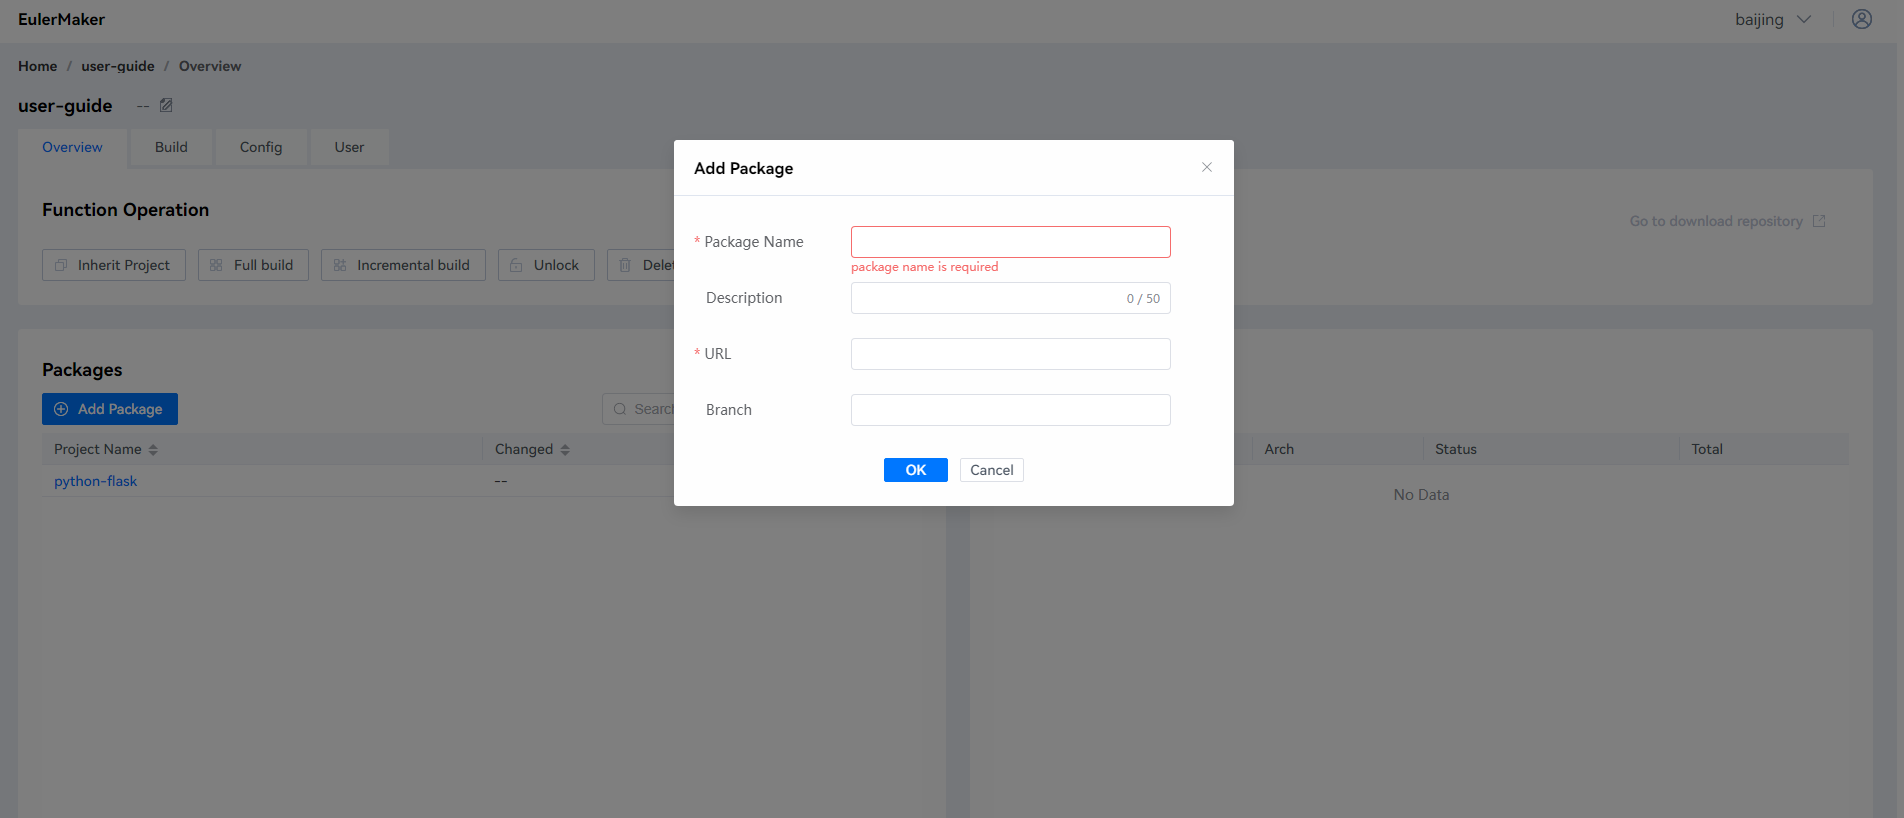
Project Configuration
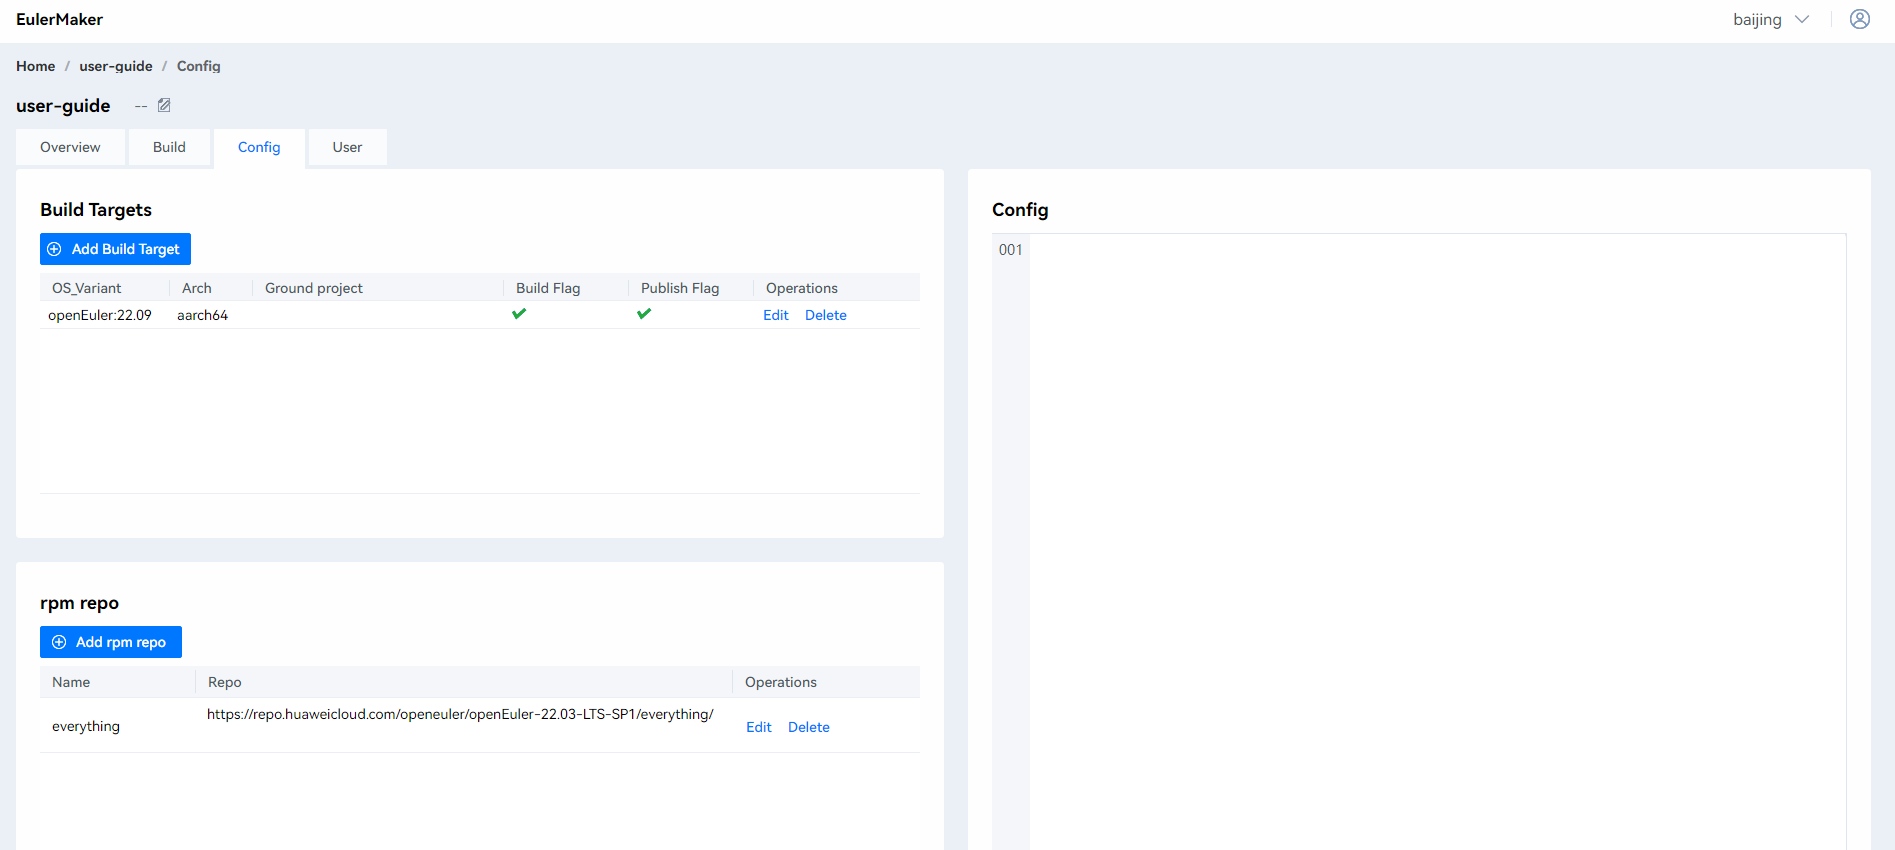
- Click the Config tab to go to the project configuration page.
- On this page, you can edit project configuration information such as adding a build target, editing flags (Build Flag and Publish Flag), and editing Config. The Config area supports input in YAML format. You can also configure functions here.
Inheriting a Project
Project Inheritance
On the Overview tab page of the project, click Inherit Project and enter the name of the new project. The overview page of the new project is displayed. Project inheritance only inherits the project configuration information from the parent project.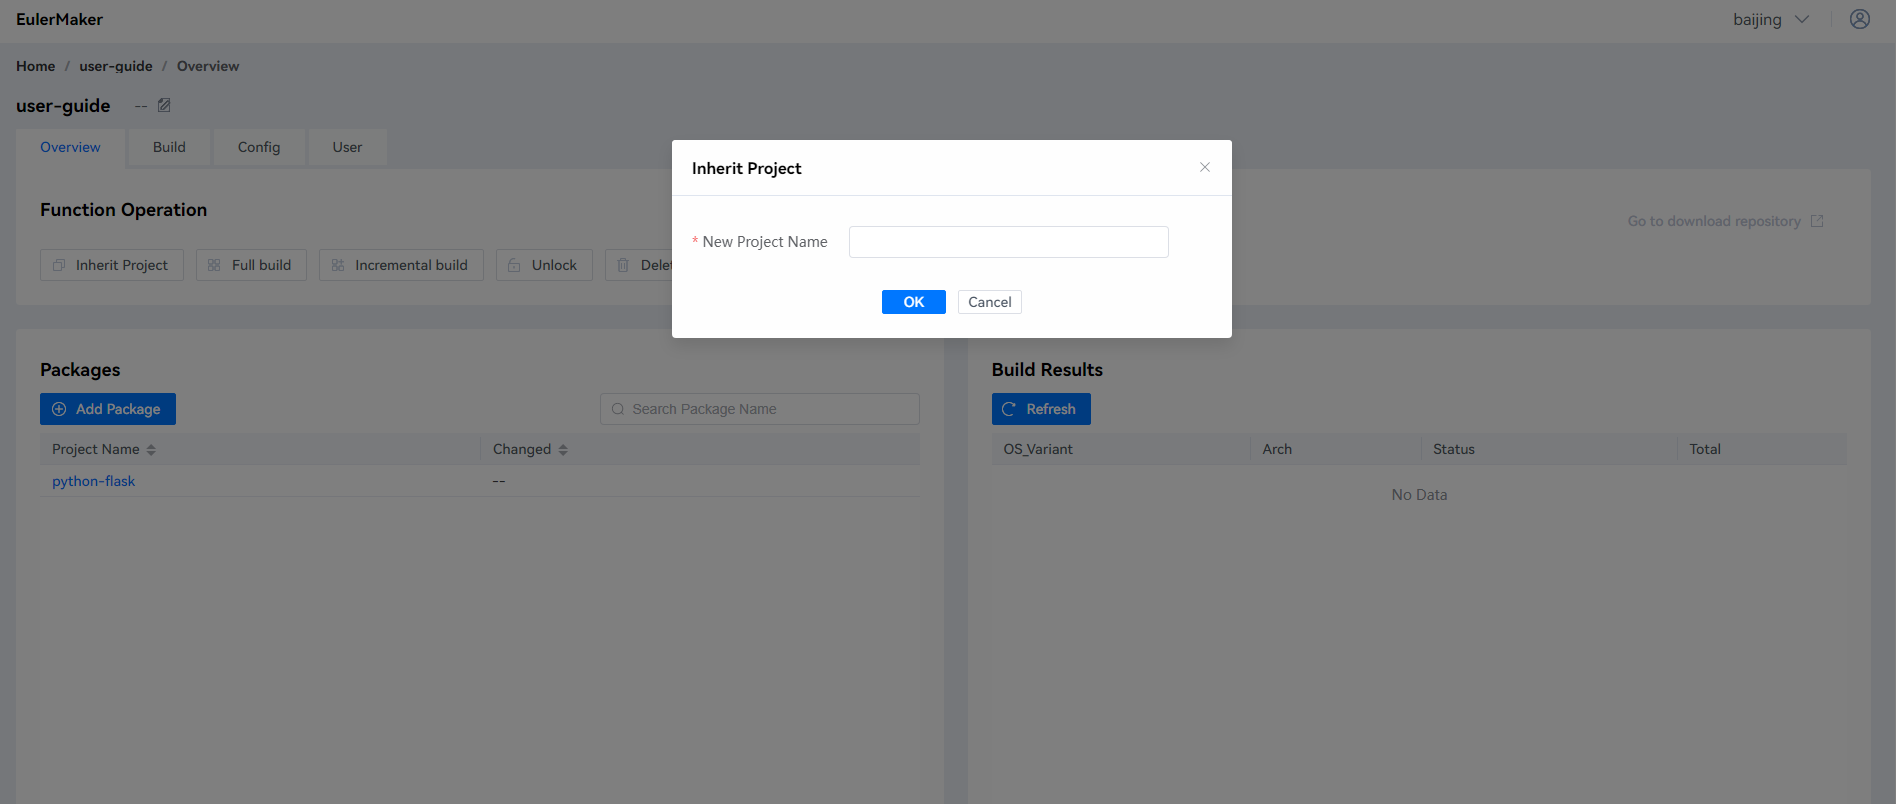
Package Inheritance
On the Overview tab page of the package, click Branch Package. In the dialog box that is displayed, the package inheritance information is displayed by default. Click OK. The overview page of the new project is displayed. Package inheritance inherits the project configuration information and software package from the parent project.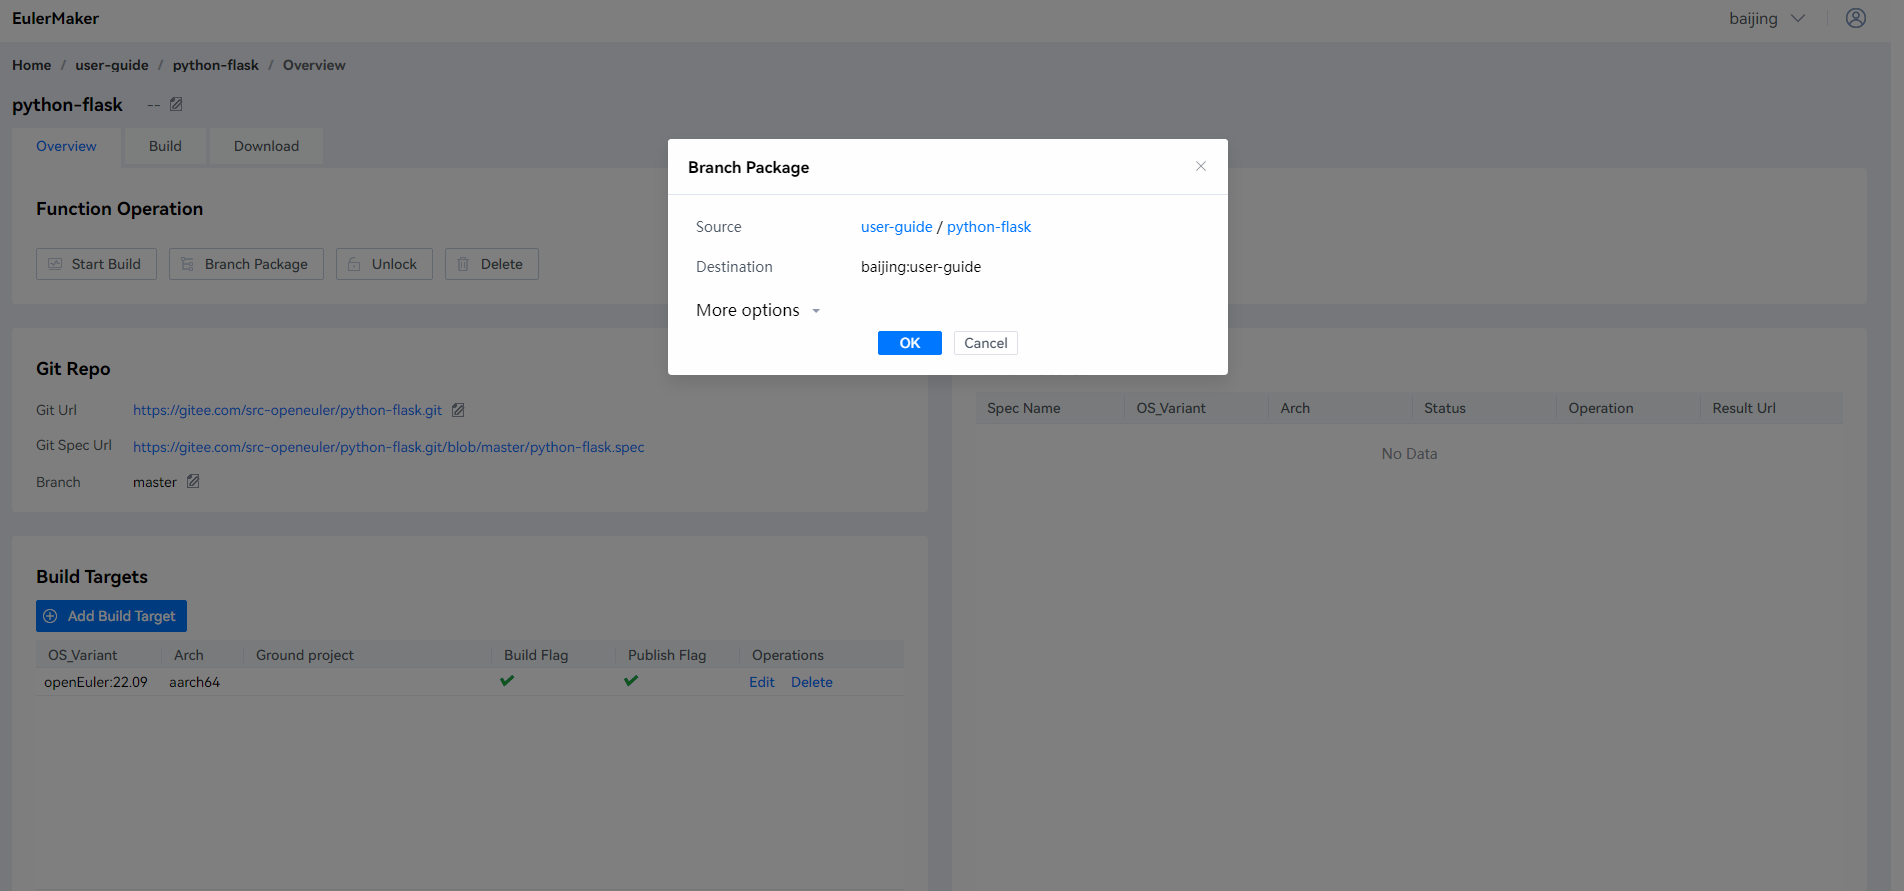
Creating a Build Task
Single-Package Build
- On the Overview tab page of the project, click the name of the desired package from the package list to go to the package overview page.
- You can change Git Url and Branch in the Git Repo area.
- In the Build Targets area, set the build parameters. OS Variant indicates the build task execution environment, Arch indicates the executor architecture, Ground Project indicates the foundation project, Build Flag indicates whether to build the package, and Publish Flag indicates whether to publish the package. You can modify or delete the added data in the Operation column.
- Click Start Build.
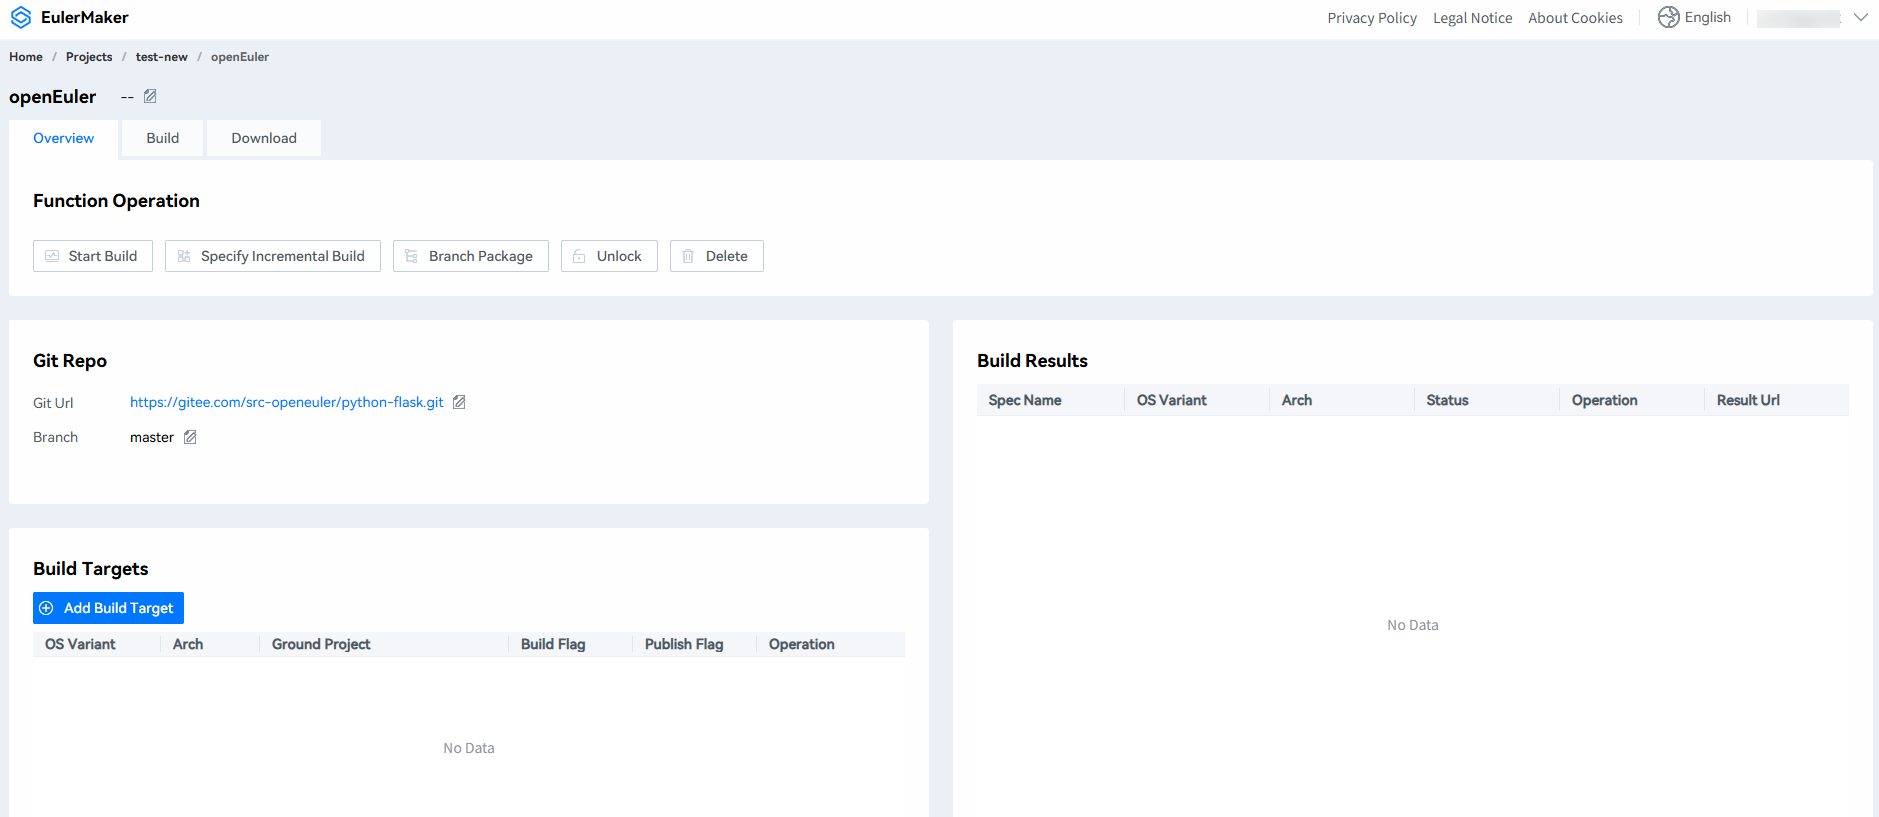
- Click the Build tab to view the build task execution status, or go to the Build tab page of the project to view the build status.
Full Build
- On the Overview tab page of the project, click Full Build to trigger a full build.
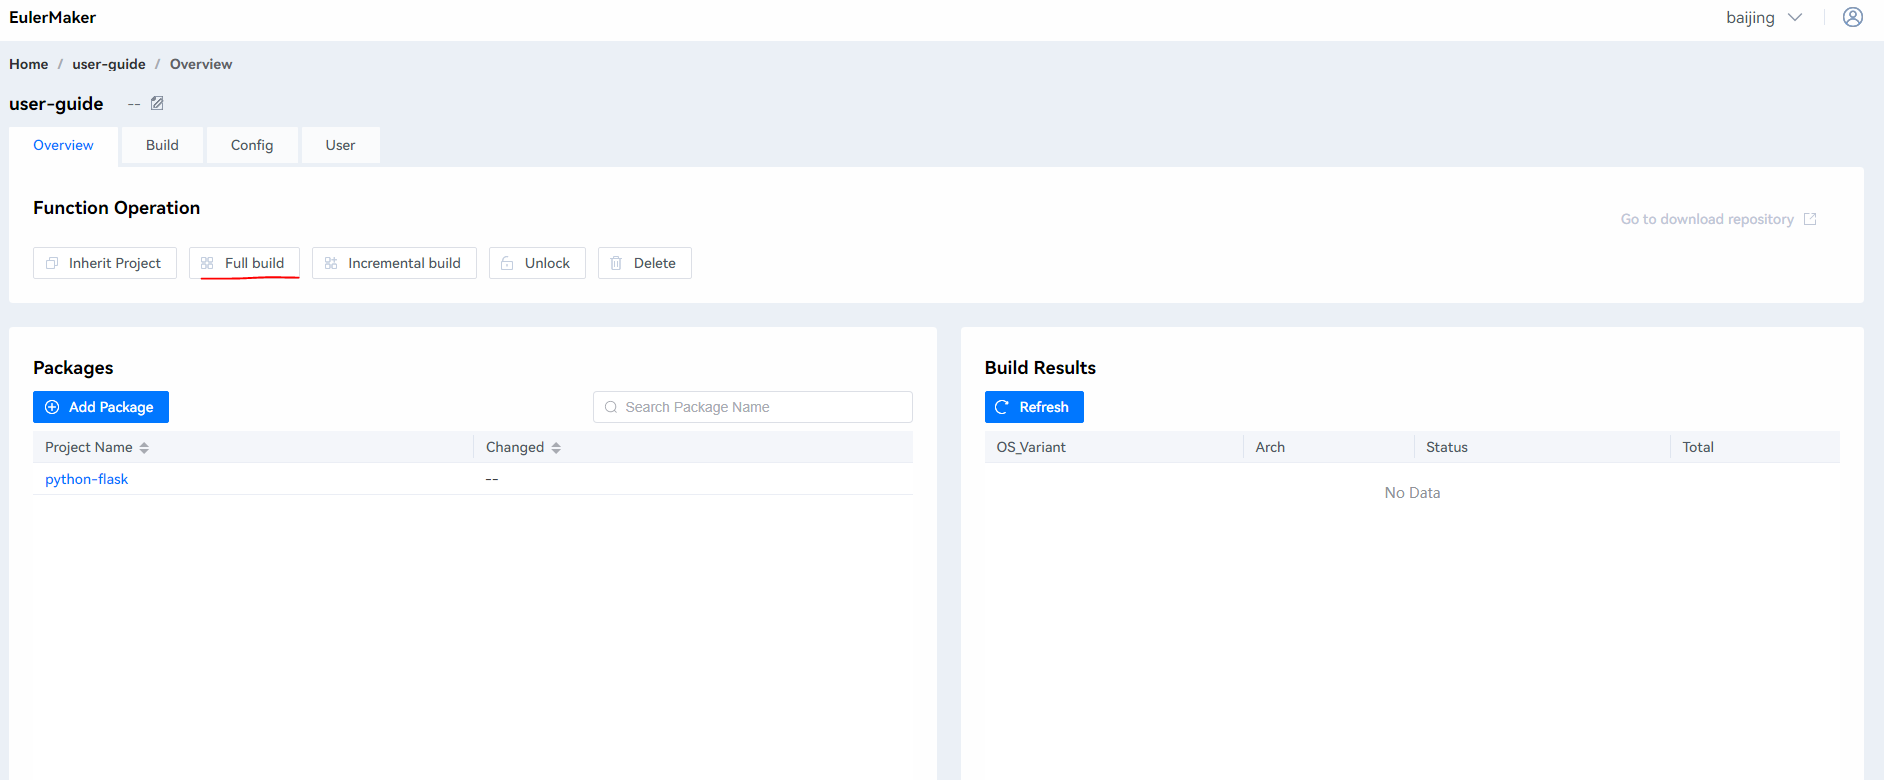
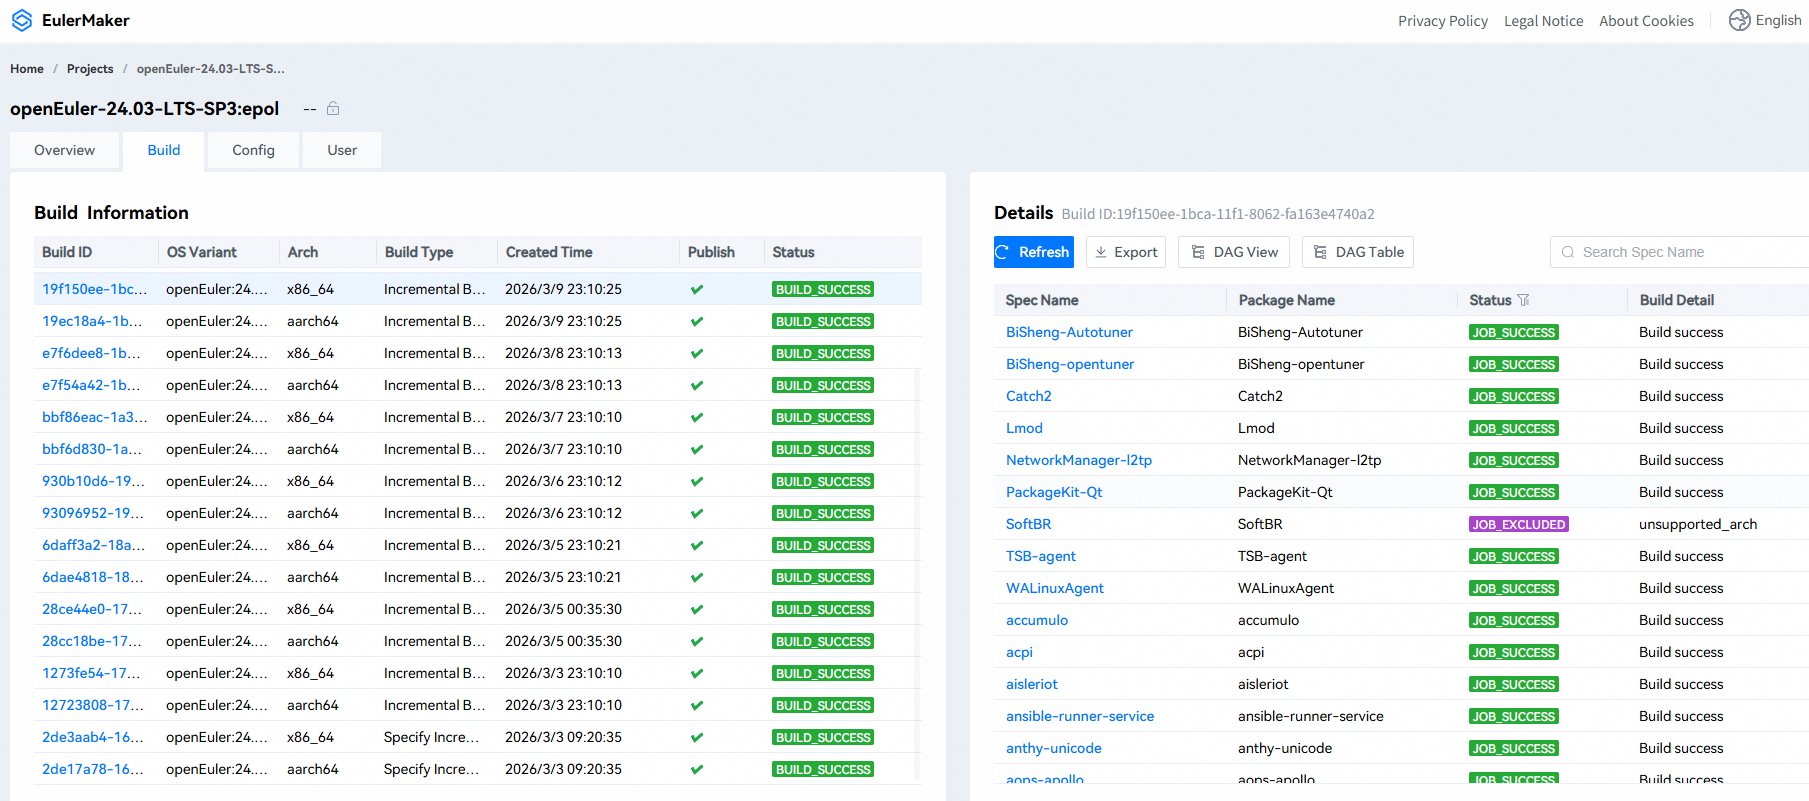
- Switch to the Build tab page of the project, and click the build ID to be viewed in the Build Information list. The list of packages to be built and the build status are displayed in the details area on the right. Click Export to export the list of packages to be built as an XLSX file.
Incremental Build
- On the Overview tab page of the project, click Incremental Build to trigger an incremental build.
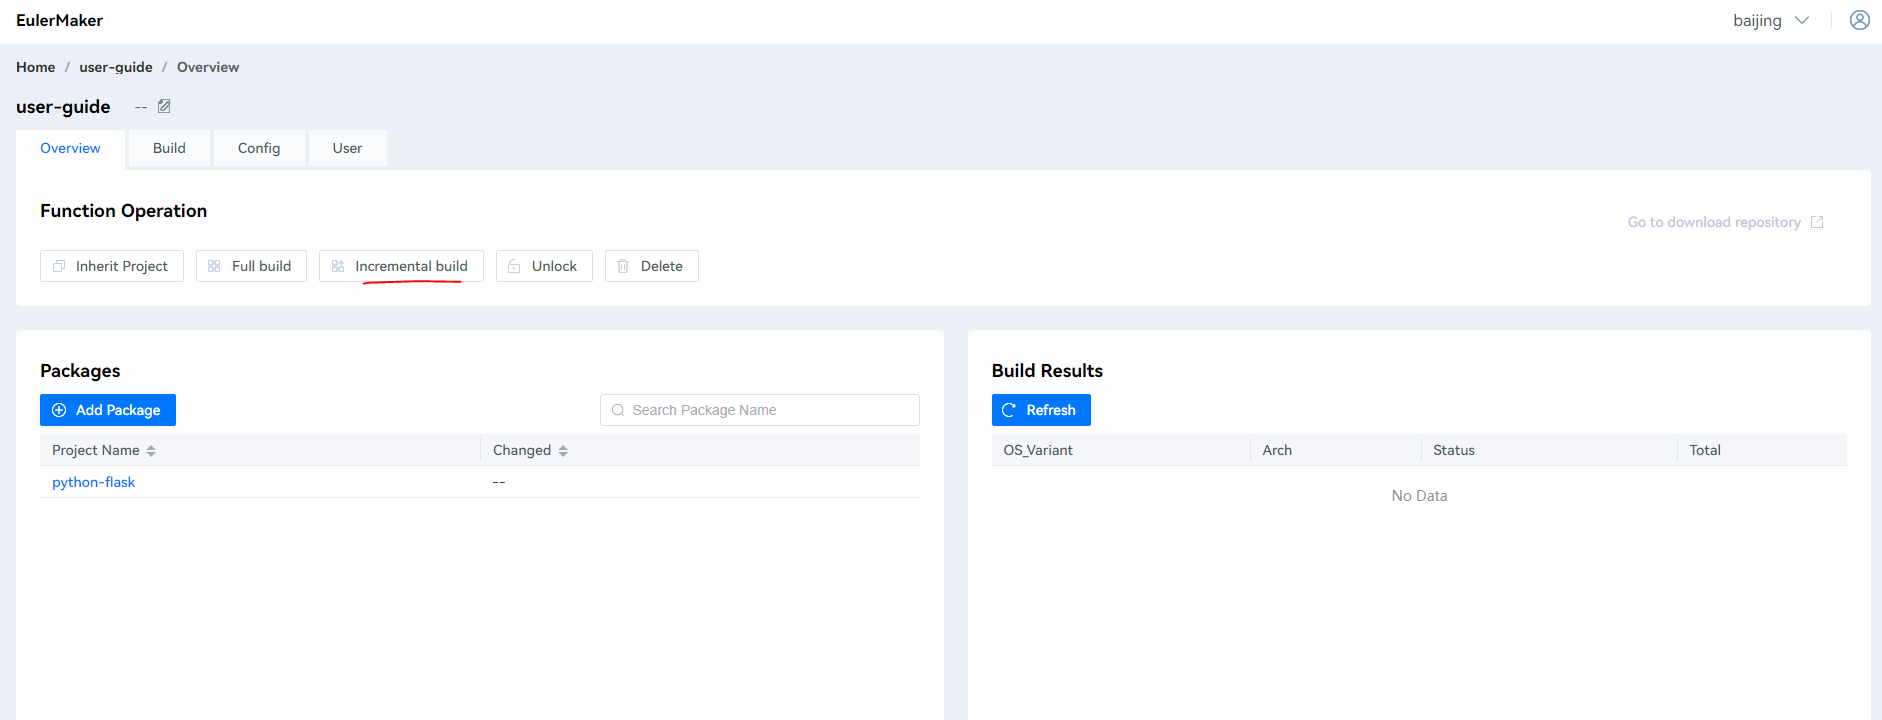
- Switch to the Build tab page of the project, and click the build ID to be viewed in the Build Information list. The list of packages to be built and the build status are displayed in the details area on the right. Click Export to export the list of packages to be built as an XLSX file.
Viewing the Build History
Viewing the Project Build History
- On the Overview tab page of the project, click the Build tab to view the historical build tasks and build details of the project.
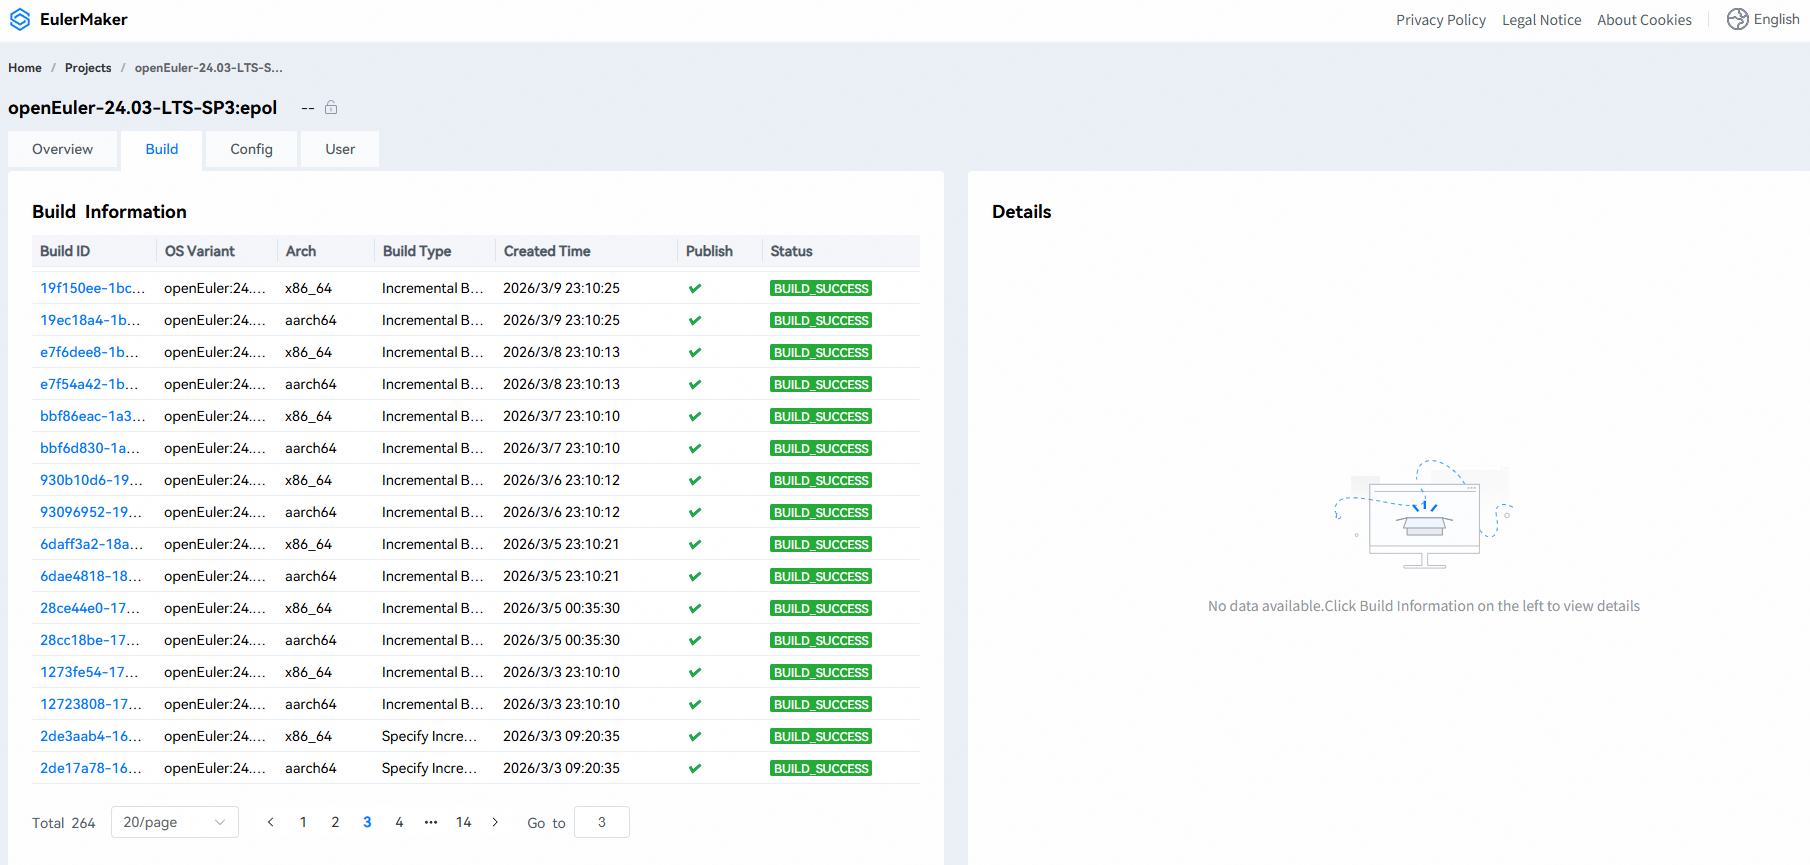
- Click any build ID in the build history. The spec name, status, and build details of the build package for this build task are displayed on the right of the page.
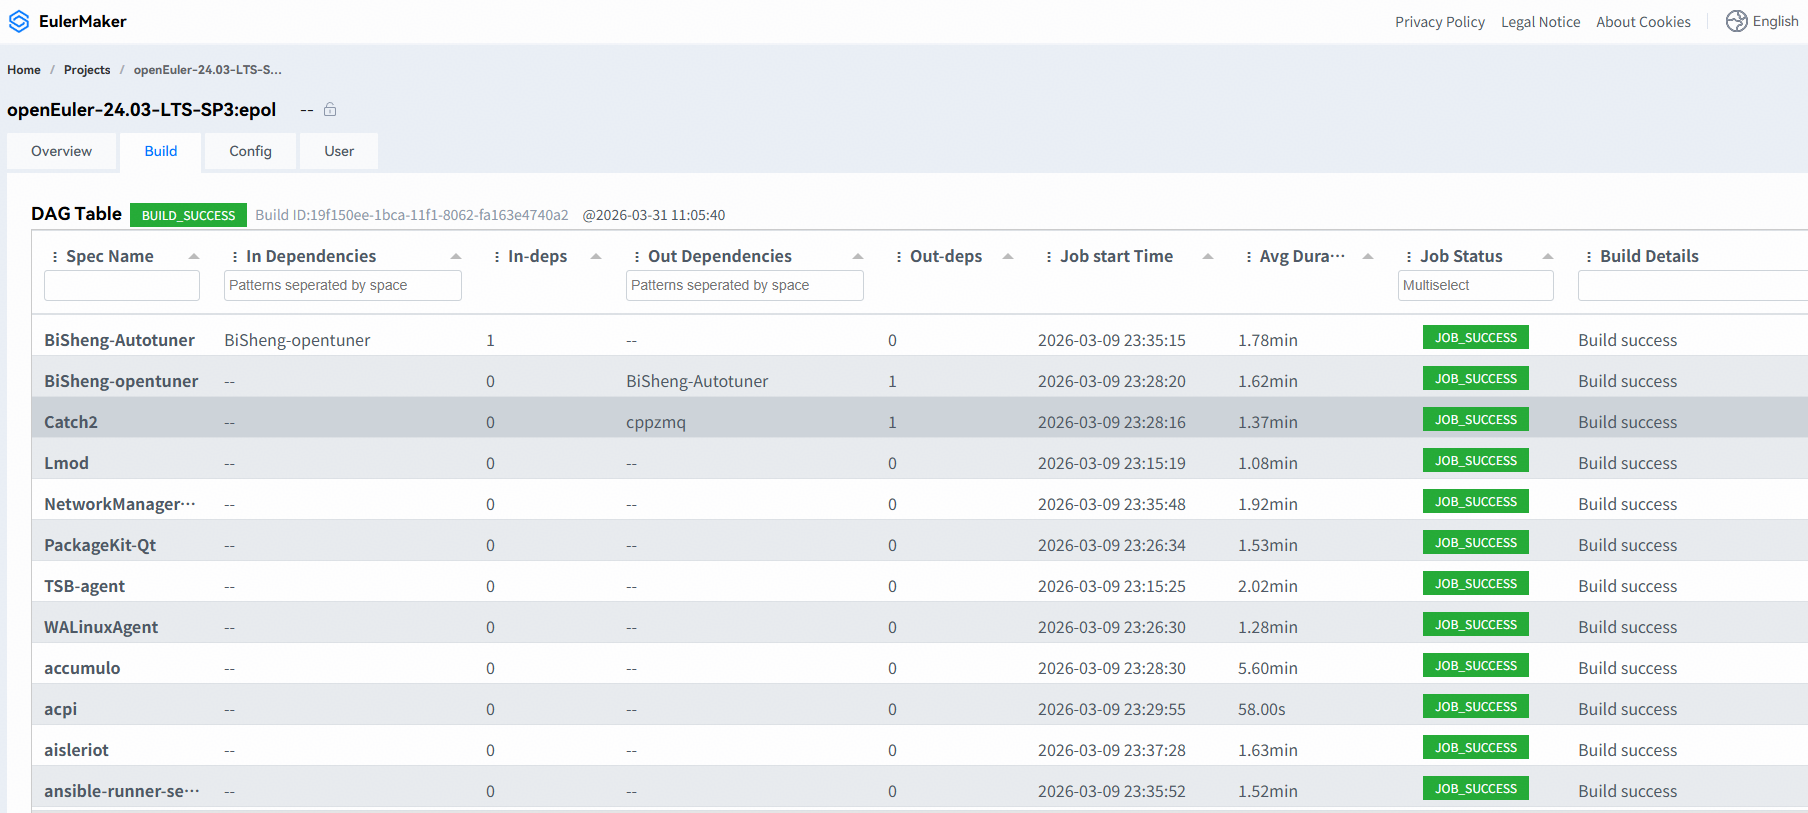
- Click DAG Table on the Details page to view the build task dependency and build information.
Obtaining the Software Package
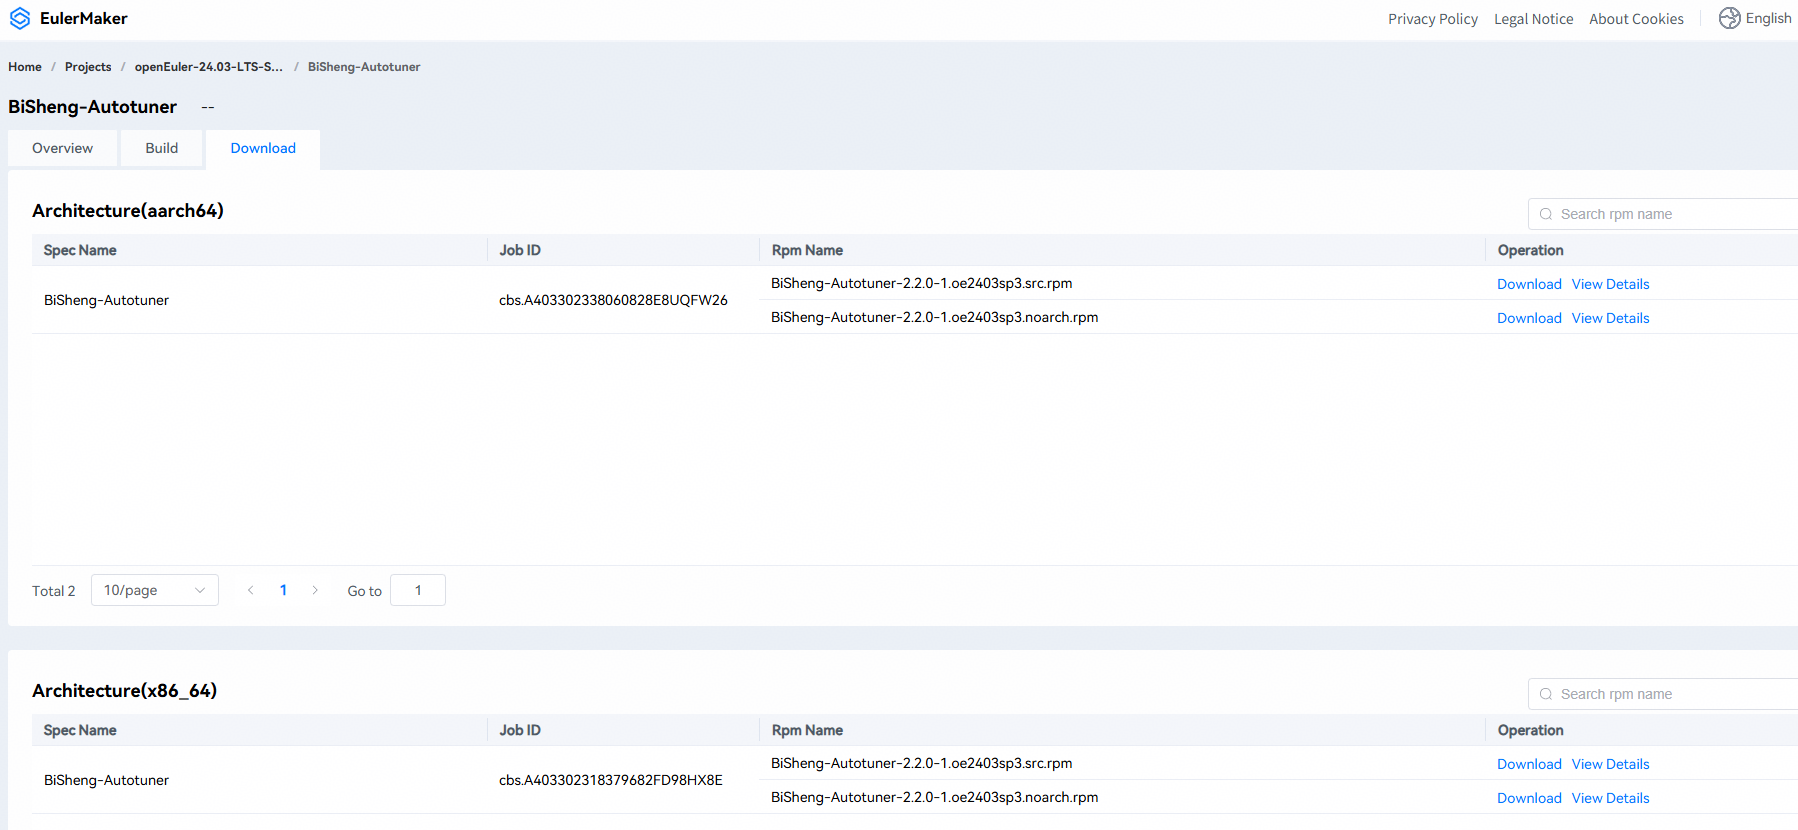
- On the Overview tab page of the project, click the name of the package to be downloaded in the package list to go to the package overview page.
- Click the Download tab page. The latest built software packages are displayed. Click Download to download a package and click View Details to view the software package details.
Customizing an Image
Adding a Pipeline
Creating a Pipeline
On the home page, click the View button under Image Build. The pipeline list page is displayed.
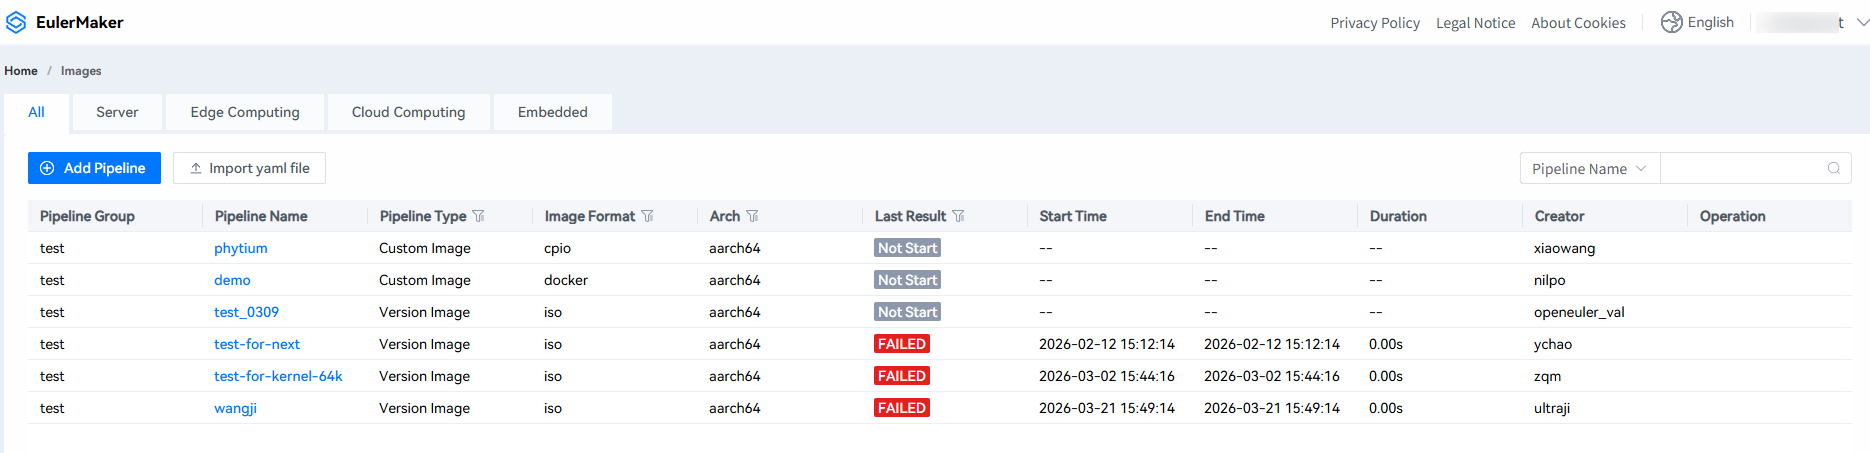
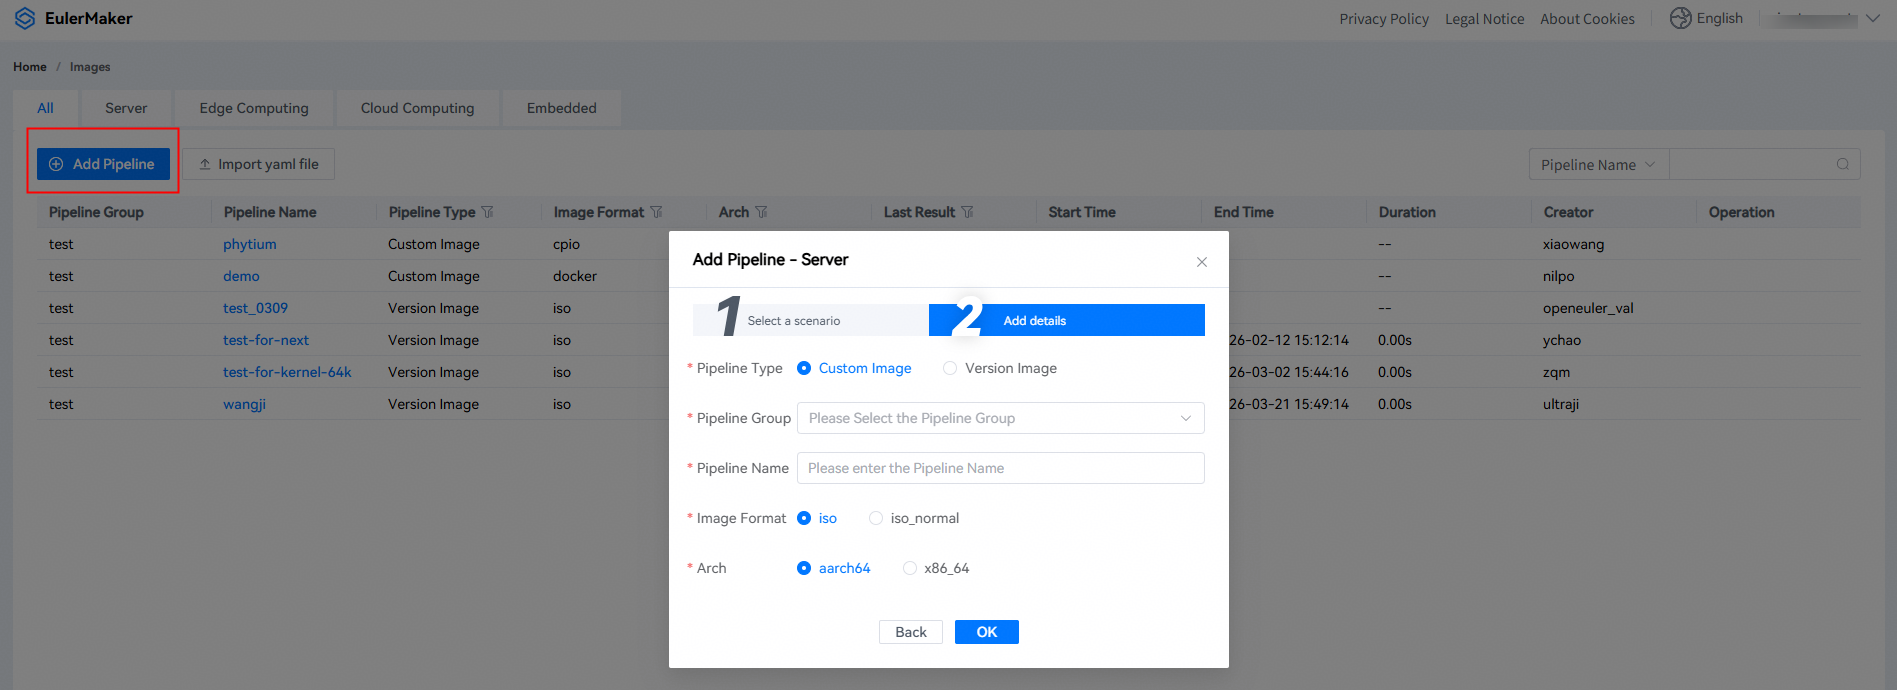
Click Add Pipeline and enter the basic information on the pipeline project page. Set Pipeline Type to Version Image or Custom Image, and click OK.
Viewing the New Pipeline Project
After the pipeline project is created, click the name of the created pipeline. The pipeline overview page is displayed.
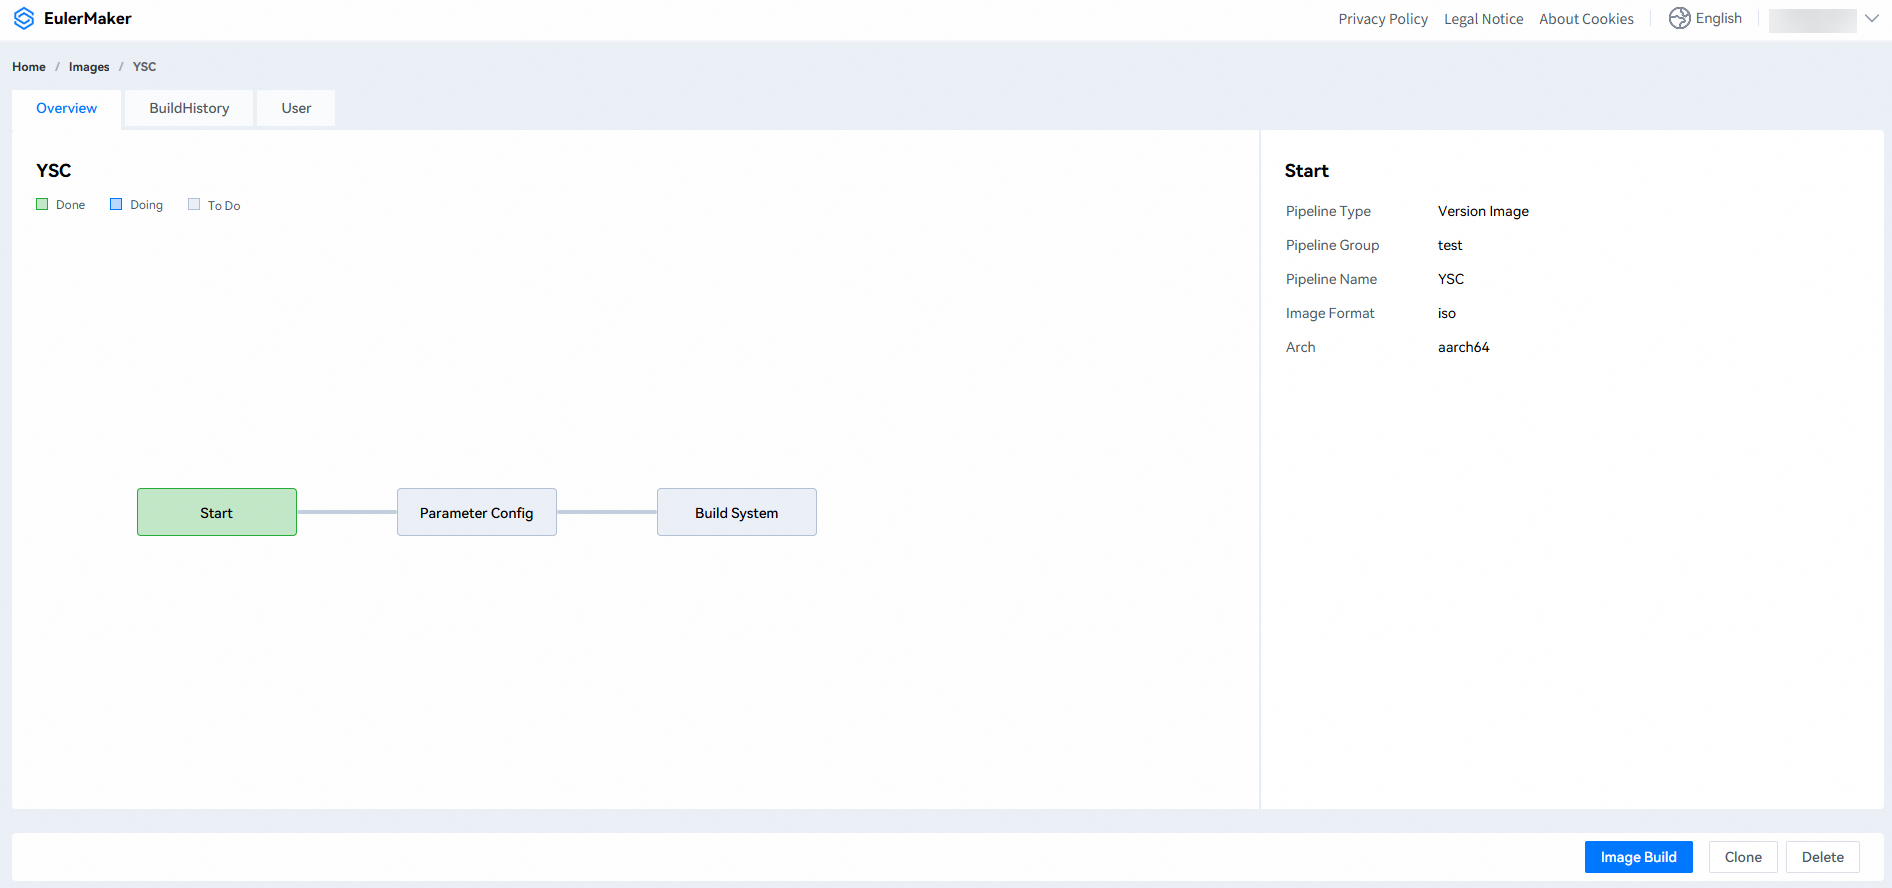
Version Image Type
Version Parameter Configuration
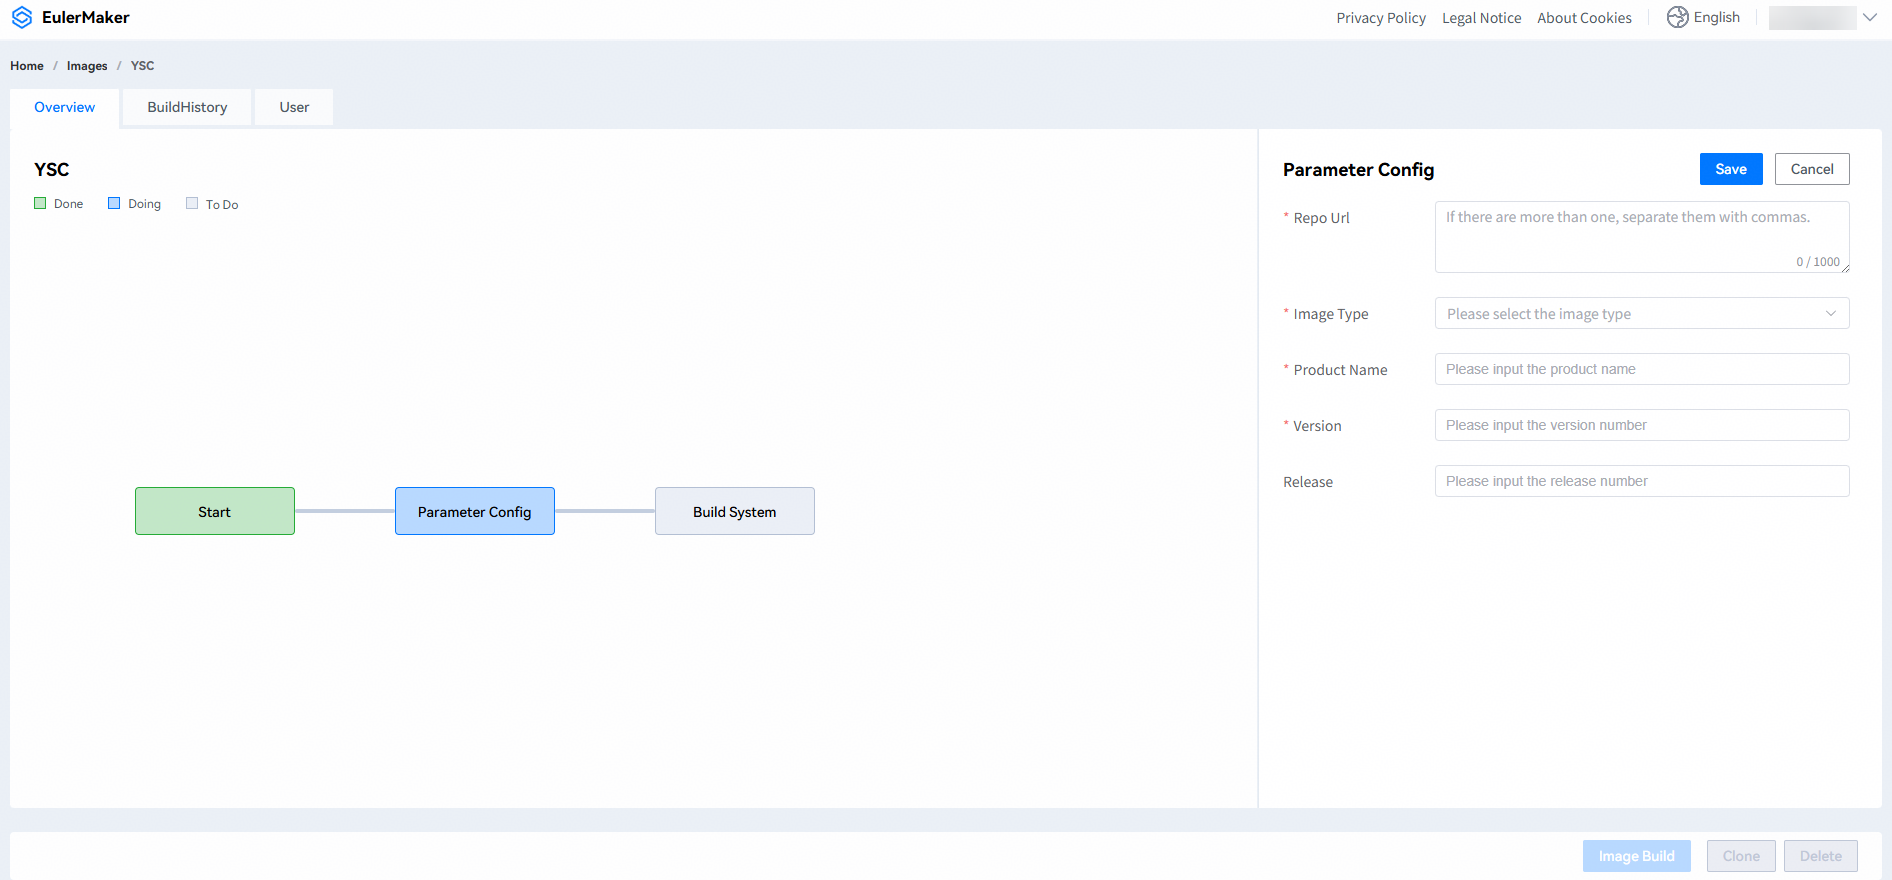
- Click the Parameter Config box. On the Parameter Config page that is displayed on the right, click Edit to add version parameter configuration information. The verification rules for the form fields are as follows:
| Form Field | Verification Rule |
|---|---|
| Repo Url | The length must be less than 1000 characters. If multiple repo URLs are configured, separate them with spaces. |
| Image Type | Mandatory for ISO images only. |
| Product Name | Only letters and digits are allowed. The length of "Product name-Version [-Release]-Architecture" cannot exceed 32 characters. |
| Version | Only letters, digits, hyphens (-), and periods (.) are allowed. The value must start with a letter or digit. The length of "Product name-Version [-Release]-Architecture" cannot exceed 32 characters. |
| Release | This field can be left empty. If you set it, the rule is the same as that for Version. |
Image Customization Type
Customizing Service Packages
ISO/CPIO Format
Click the name of the created image customization pipeline to go to the pipeline overview page.
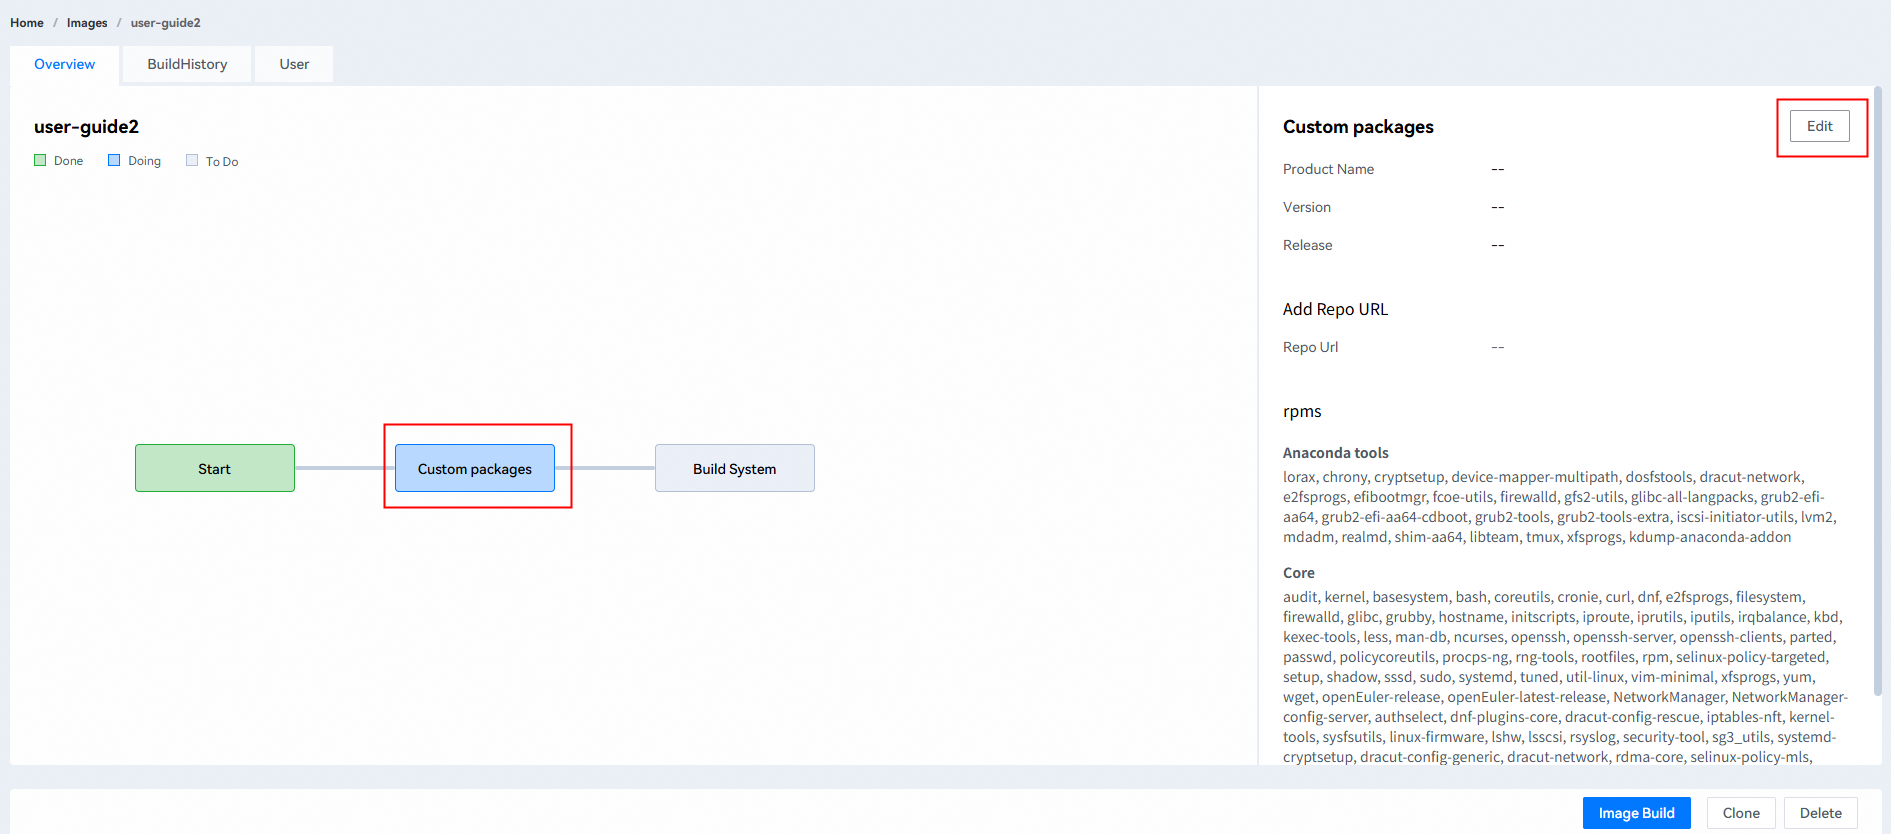
Click the Custom packages box. The page for customizing service packages is displayed on the right, as shown in the following figure. Click Edit to go to the modification page.
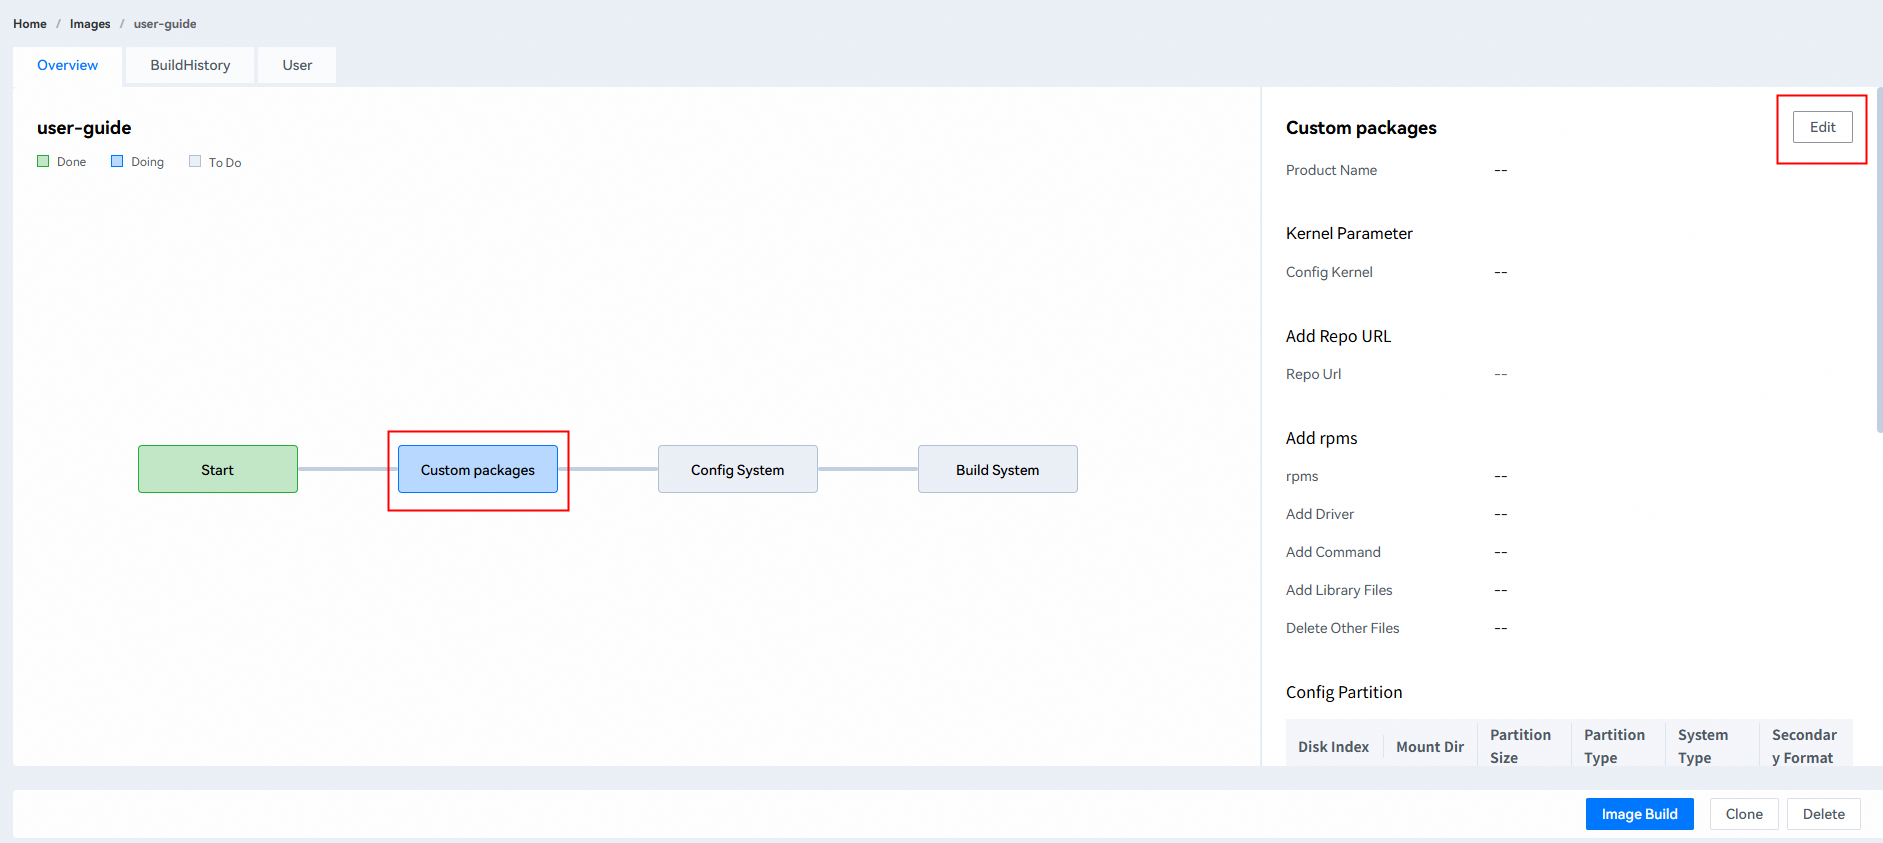
Enter the product name displayed during image installation.
Configure kernel parameters. To ensure stable and efficient running of the system, you can modify kernel command line parameters as required. Use spaces to separate multiple parameters.
Example: "net.ifnames=0 biosdevname=0 crashkernel=512M oops=panic softlockup_panic=1 reserve_kbox_mem=16M crash_kexec_post_notifiers panic=3 console=tty0"Repo Url: Enter the correct URL of the repository that contains the RPM packages to be added.
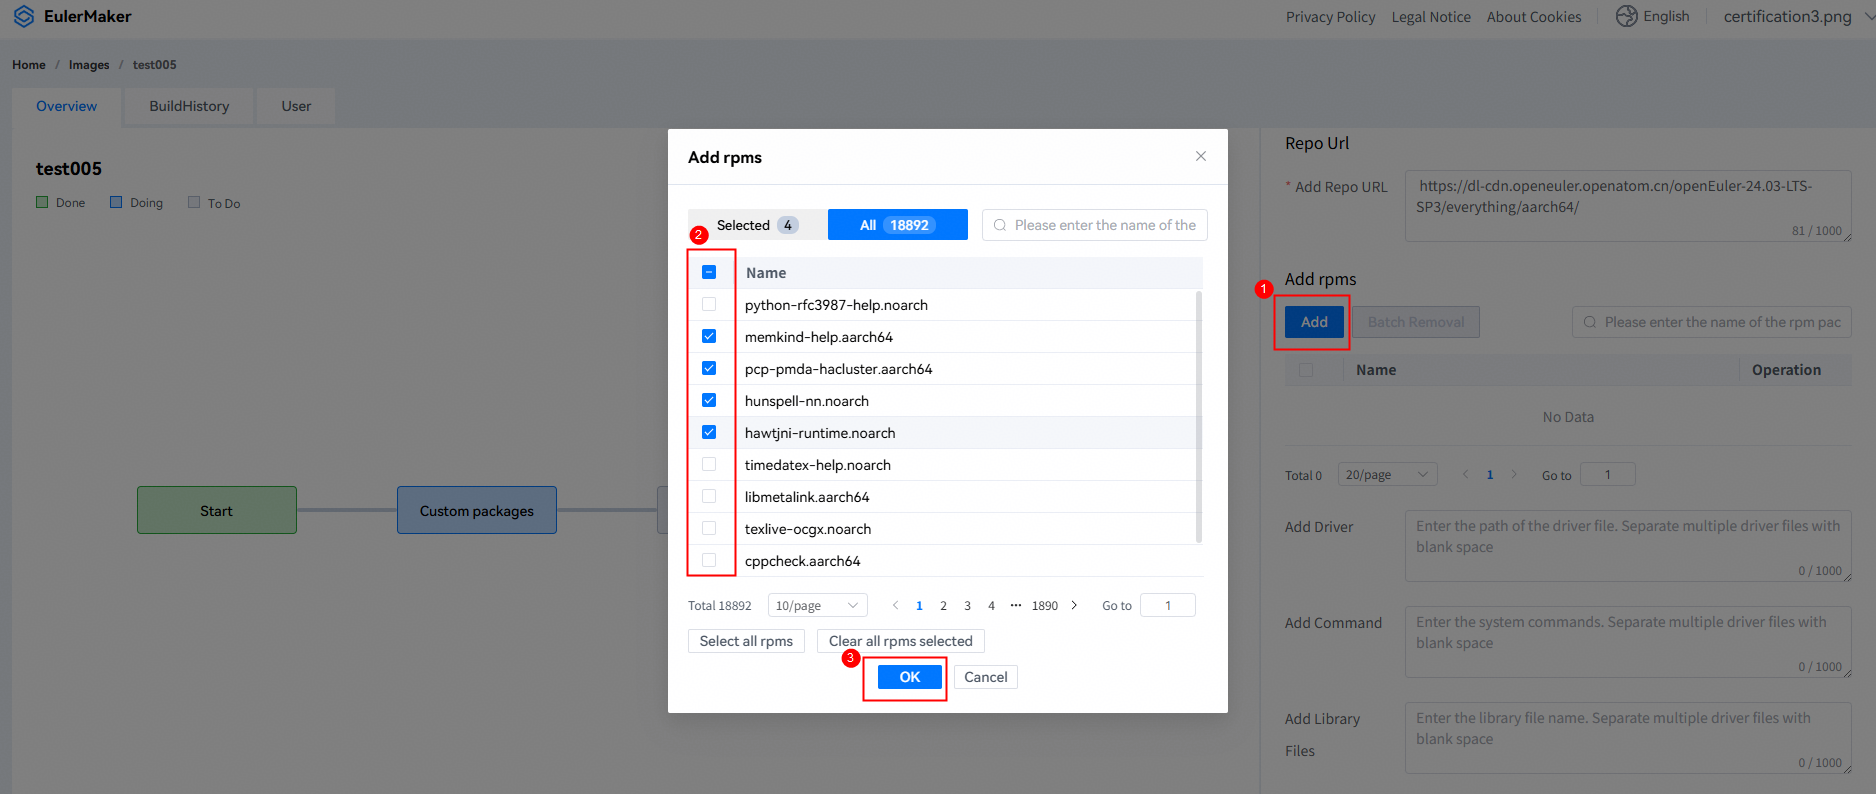
Add rpms: After configuring the correct repo URL, click Add. In the displayed Add rpms dialog box, select the required RPM packages. You can also search for the required RPM packages in the upper right corner of the dialog box and click OK to save the packages. To delete an added RPM package, click Remove in the Operation column of the RPM package table, or select the RPM packages to be deleted and click Batch Removal.
Add Driver: Enter the driver file path. Separate multiple values with spaces. This parameter is optional.
Add Command: Enter the system command. Separate multiple values with spaces. This parameter is optional.
Add Library Files: Enter the library file name. Separate multiple values with spaces. This parameter is optional.
Delete Other Files: Enter the path and name of the file to be deleted. Separate multiple values with spaces. This parameter is optional.
Config Partition: Click the plus sign (+) to add a configuration partition and set the following parameters as required.
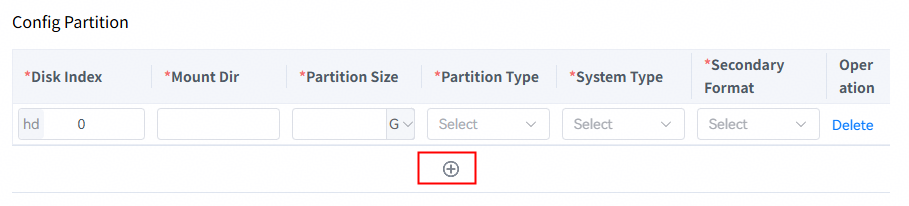
- Disk Index: disk number. Enter the disk number in the format of hdx, where x indicates the xth disk.
- Mount Dir: path where the partition is mounted. You can configure service partitions or adjust the system partitions in the default configuration.
- Partition Size: There are four types of partition sizes. You can click the drop-down box button to change the unit. The maximum size is 16 TB. MAX indicates that the remaining space on the disks is used to create a partition. This value can be set only for the last partition.
- Partition Type: There are three types of partitions: primary, extended (only the hd disk number needs to be configured for this partition), and logical.
- System Type: Currently, the ext4 and vfat file system types are supported.
- Secondary Format: indicates whether to format the disks during secondary installation. Select Yes or No.
Config Net: Click the plus sign (+) to add a configuration network and set the following parameters as required.
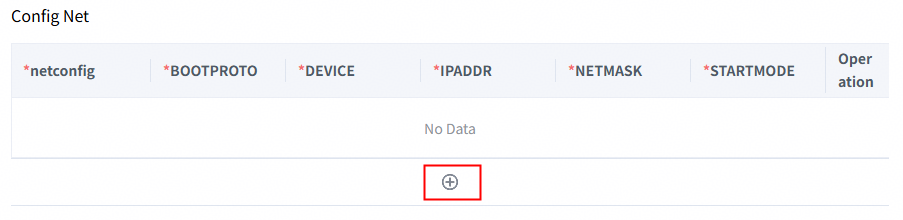
- BOOTPROTO: none: No protocol is used during booting, and no address is configured. static: A static address is allocated. dhcp: The DHCP is used to dynamically obtain an address.
- DEVICE: NIC name, for example, eth0.
- IPADDR: IP address. When the value of BOOTPROTO is static, this parameter is mandatory, for example, 192.168.11.100. In other cases, this parameter does not need to be configured.
- NETMASK: subnet mask. When the value of BOOTPROTO is static, this parameter is mandatory, for example, 255.255.255.0. In other cases, this parameter does not need to be configured.
- STARTMODE: NIC start mode. manual: The user runs the ifup command on the terminal to enable the NIC. auto\hotplug\ifplugd\nfsroot: An NIC is started when the OS identifies it. off: An NIC cannot be started in any case.
- BOOTPROTO: none: No protocol is used during booting, and no address is configured. static: A static address is allocated. dhcp: The DHCP is used to dynamically obtain an address.
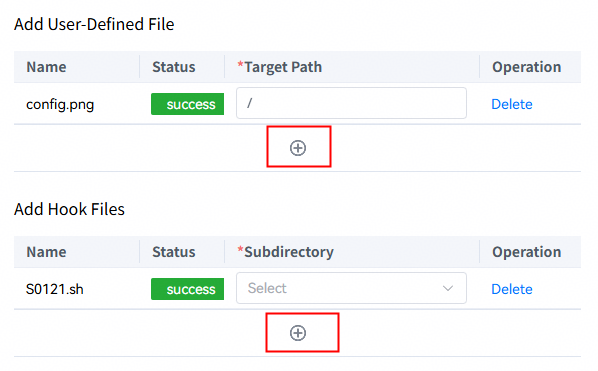
Add User-defined File: Click the plus sign (+). In the file manager dialog box that is displayed, select the file to be uploaded and click the Open button to upload it. After the file is uploaded successfully, the status changes to success, and you need to enter the target storage path. To delete a file, click Delete in the Operation column.
Note: The size of a user-defined file to be uploaded cannot exceed 16 MB.
Add Hook Files: Click the plus sign (+). In the file manager dialog box that is displayed, select the hook script file to be uploaded. Click Open to upload the file. The file name must start with S followed by a number (at least two digits, starting with 0 if there is only one digit), for example, S01xxx.sh. The number indicates the execution sequence of the hook script. After the upload is successful, the status changes to success, and you need to select the subdirectory for storing the hook script. To delete a file, click Delete in the Operation column.
Note: The size of the hook script file to be uploaded cannot exceed 16 MB.
After setting the parameters, click Save in the upper right corner.
docker/mini_docker/mini_cpio/iso_normal/qcow2 Format
- Click the name of the created image customization pipeline to go to the pipeline overview page.
- Click the Custom packages box. The page for customizing service packages is displayed on the right, as shown in the following figure. Click Edit to go to the modification page.
- Repo Url: Enter the correct URL of the repository that contains the RPM packages to be added.
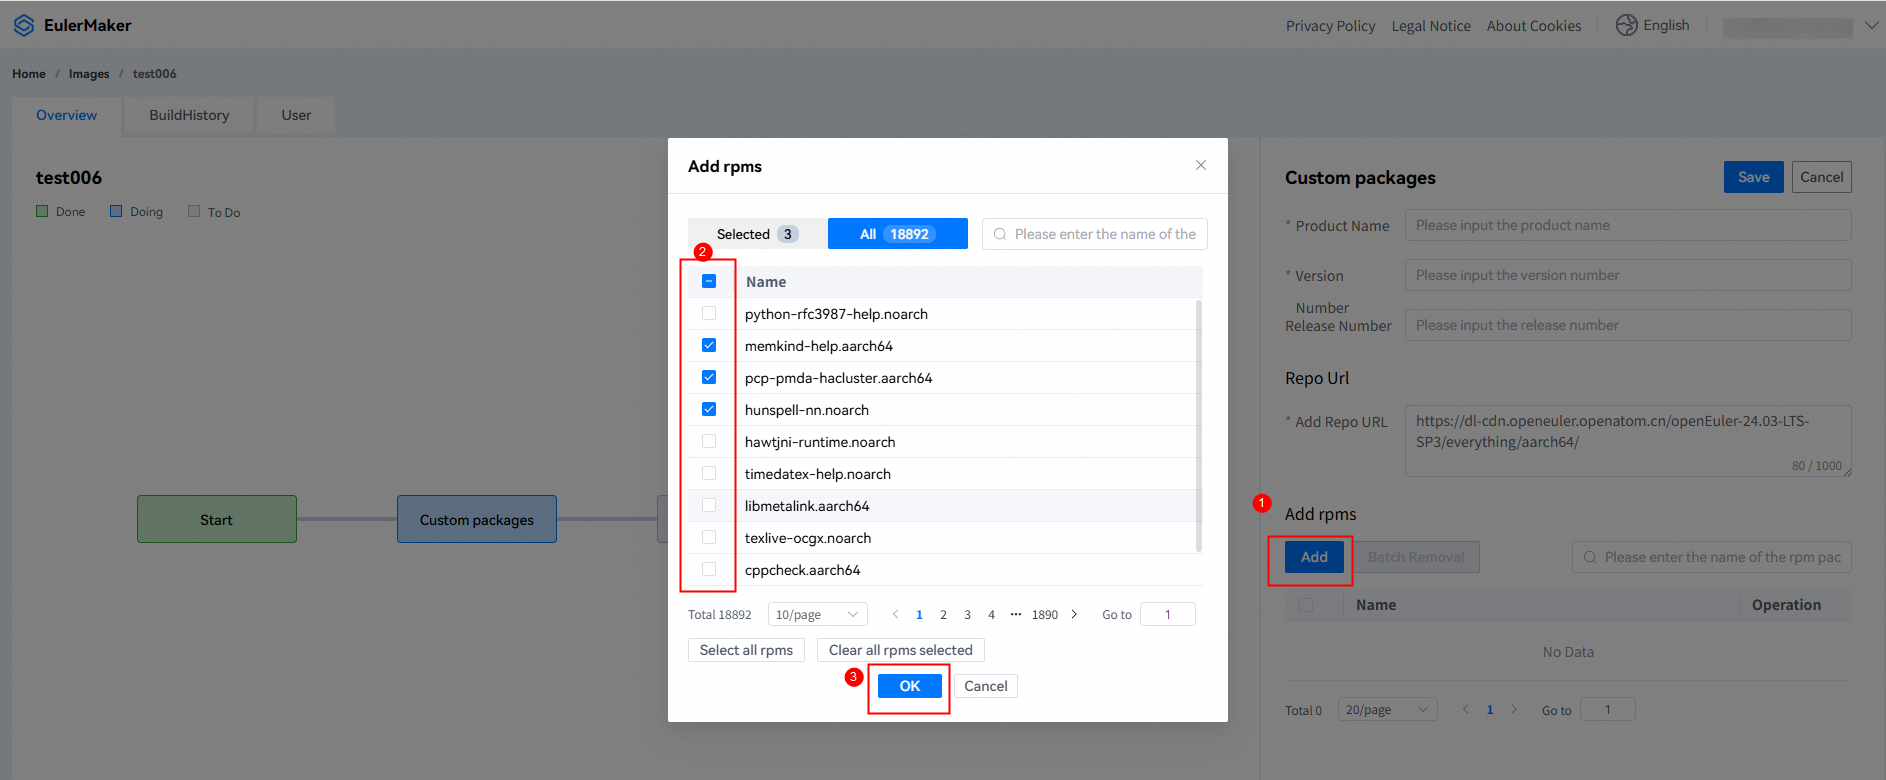
- Add rpms: After configuring the correct repo URL, click Add. In the displayed Add rpms dialog box, select the required RPM packages. You can also search for the required RPM packages in the upper right corner of the dialog box and click OK to save the packages. To delete an added RPM package, click Remove in the Operation column of the RPM package table, or select the RPM packages to be deleted and click Batch Removal.
- After setting the parameters, click Save in the upper right corner.
Configuring System Parameters
- System parameters need to be configured only for the
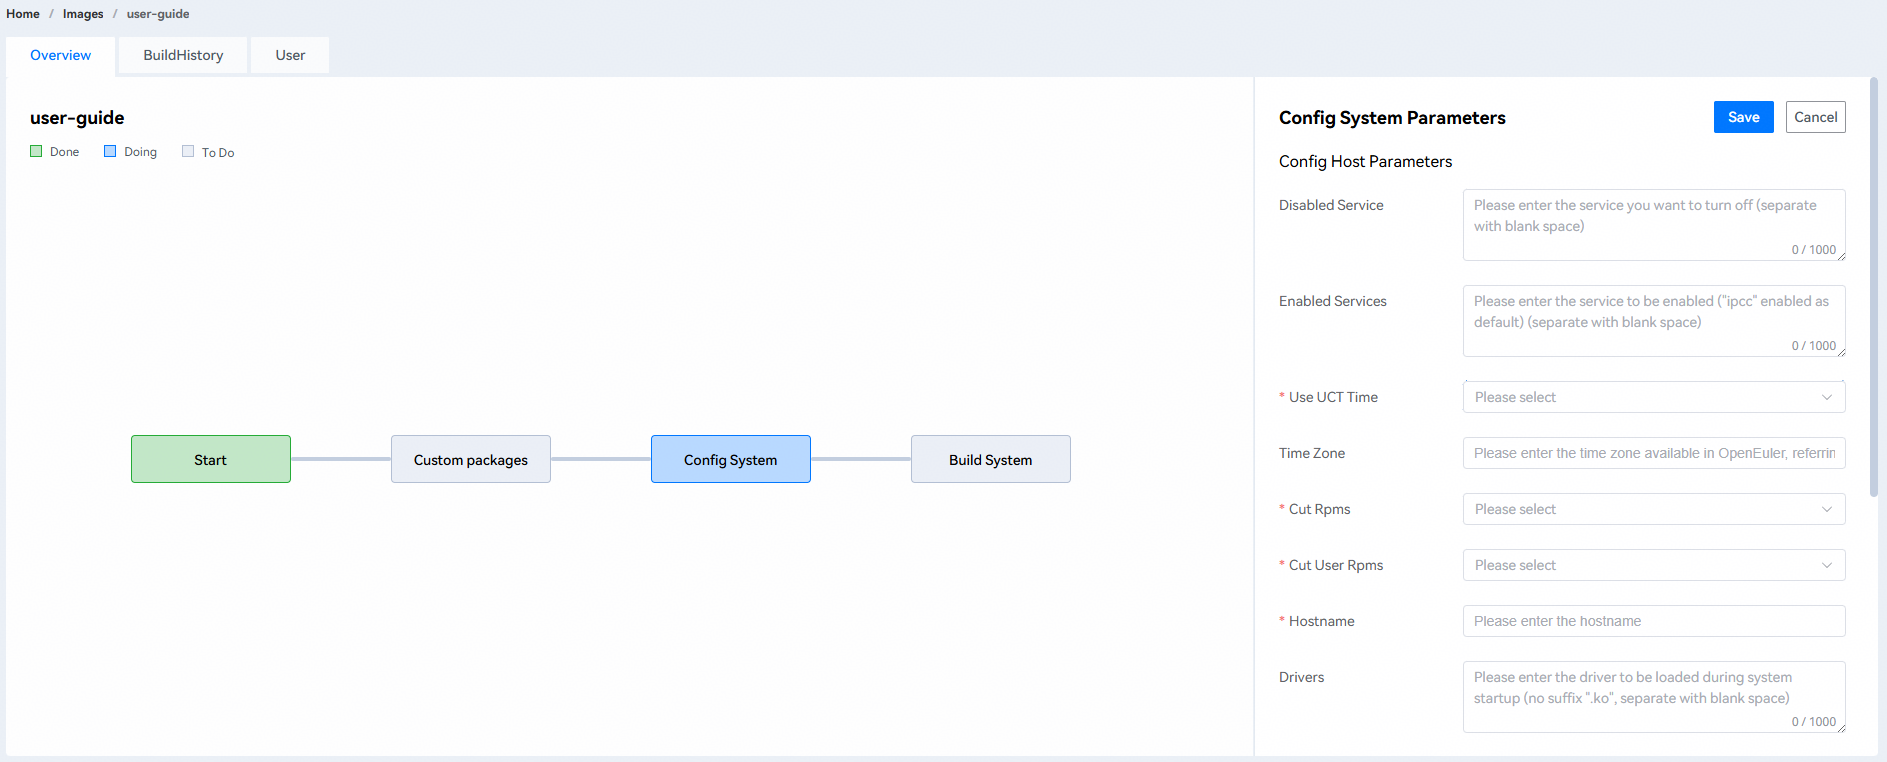
iso/cpioformat. - After entering the created pipeline, click Config System. The Config System Parameters page is displayed on the right. Click Edit.
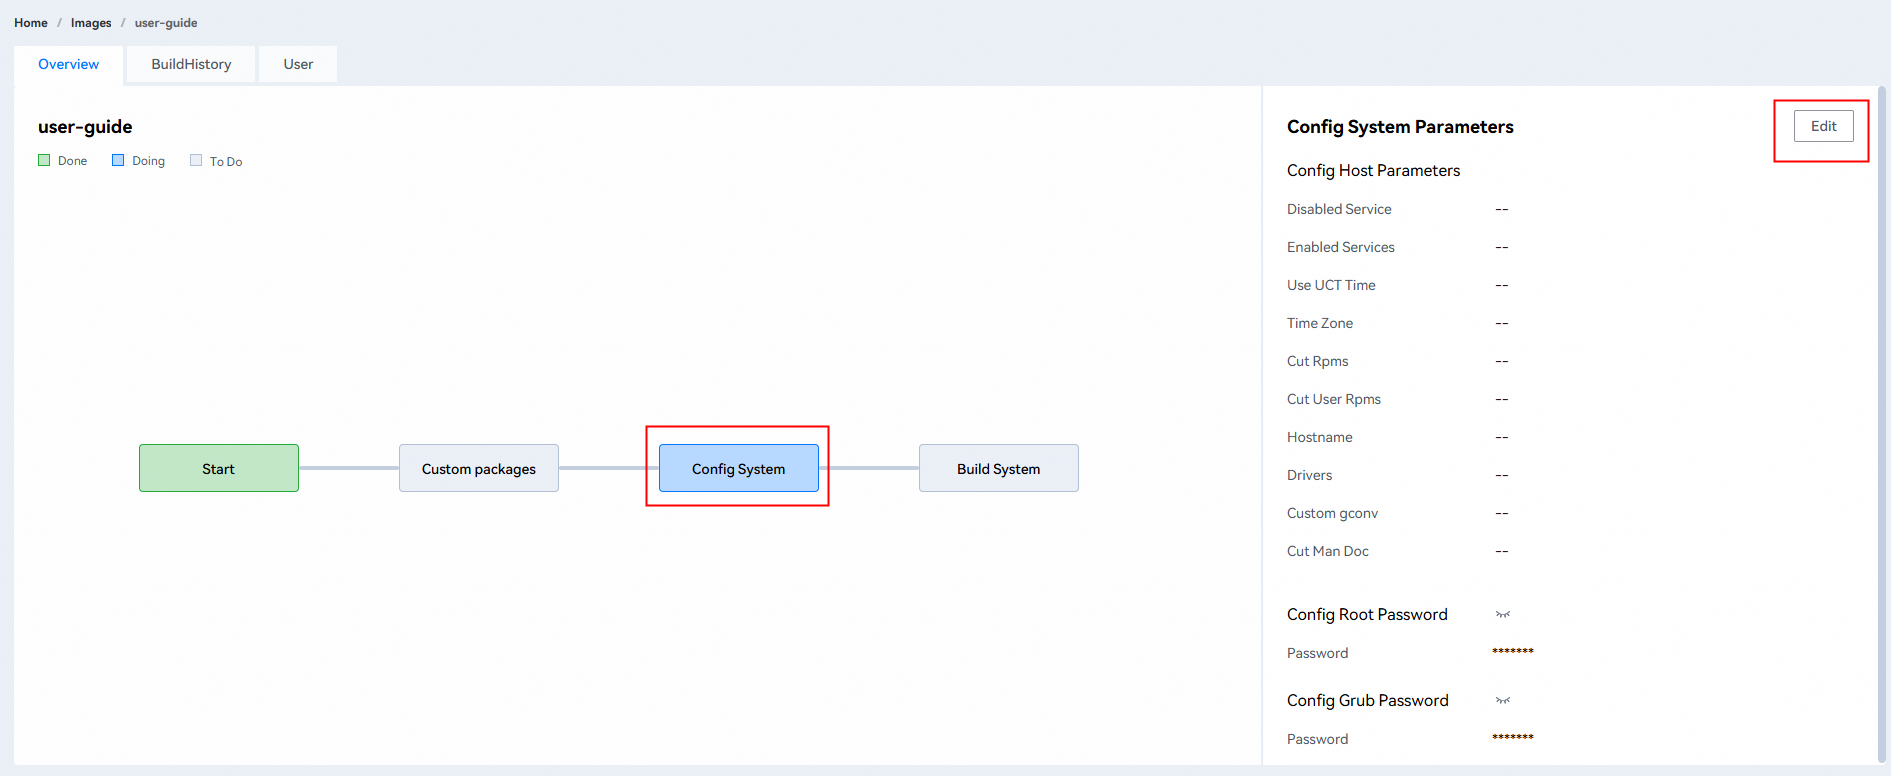
- Config Host Parameters: Set or select related parameters as required. The host name must be a combination of letters, digits, and hyphens (-), and must start with a letter or digit.
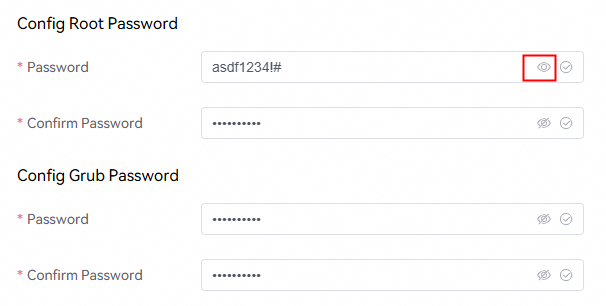
- Config Root Password: The passwords entered twice must be the same for password verification. You can click the visual icon on the right to view the entered password.
- Config Grub Password: The passwords entered twice must be the same for password verification. You can click the visual icon on the right to view the entered password.
- After setting the parameters, click Save in the upper right corner.
Building a System
Click Build System. The Production System page is displayed on the right. Click the Image Build button at the bottom. In the displayed dialog box, click OK. The build status and related build logs are displayed on the page. 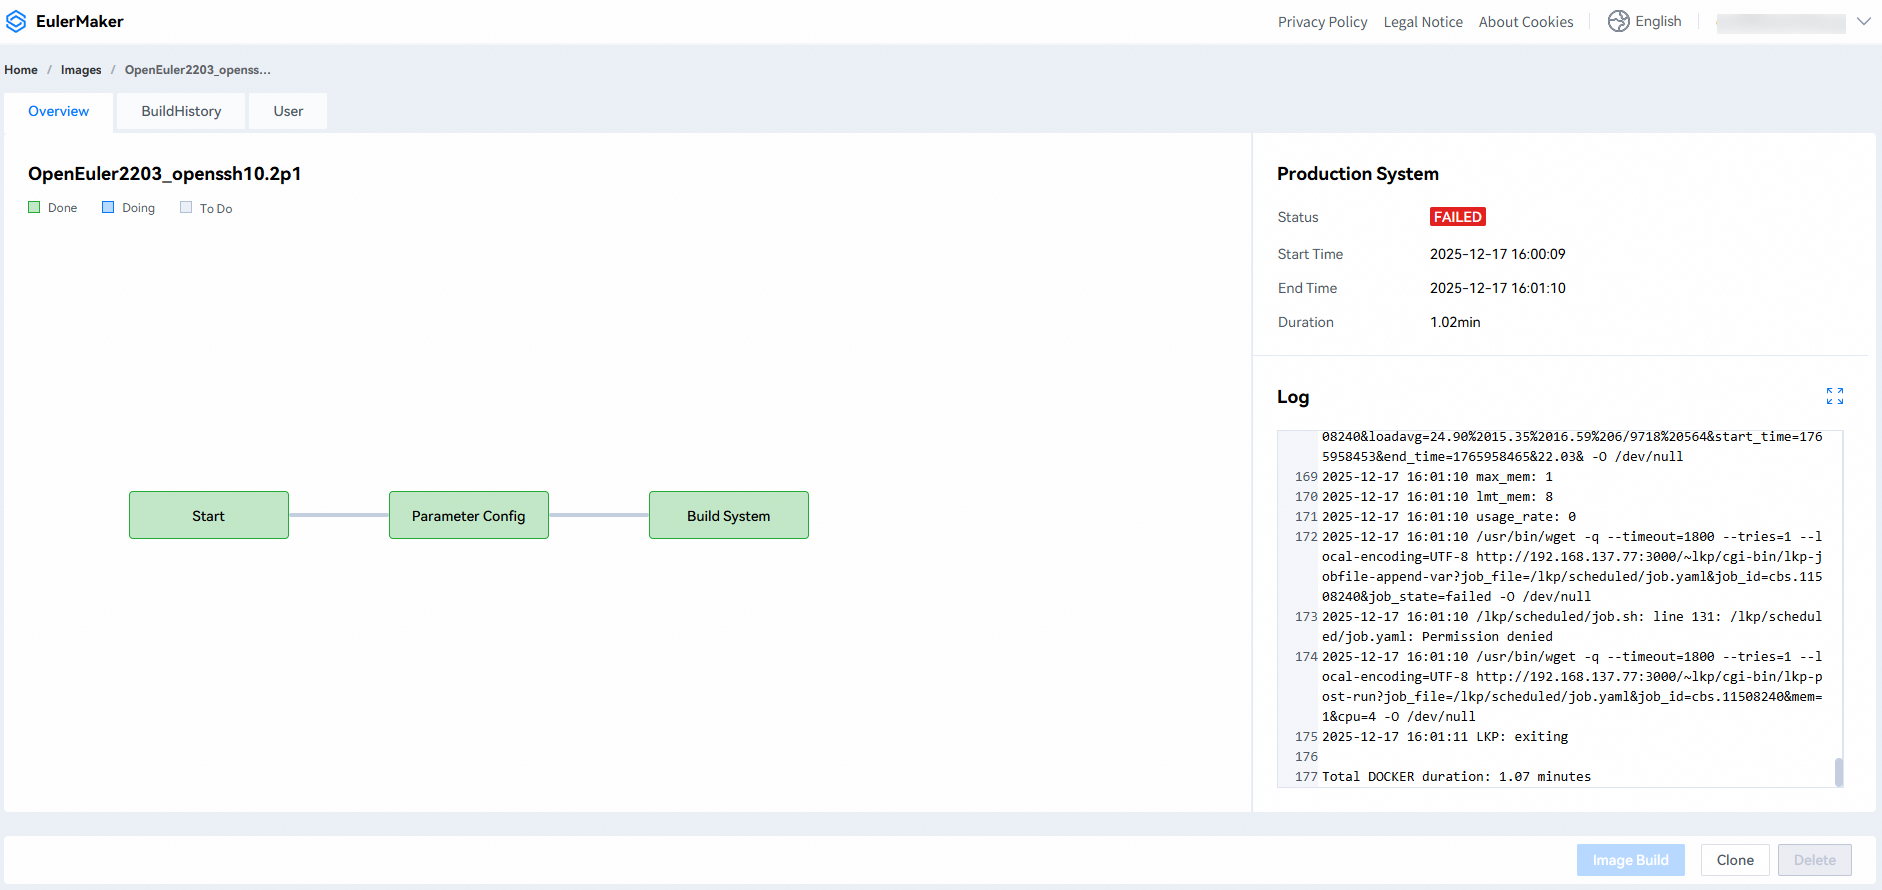
Downloading an Image and Querying Build Logs
Method 1: After an image is built, the build log information is displayed in the lower part of the Production System page. Click Download Image to download the image to the local PC.
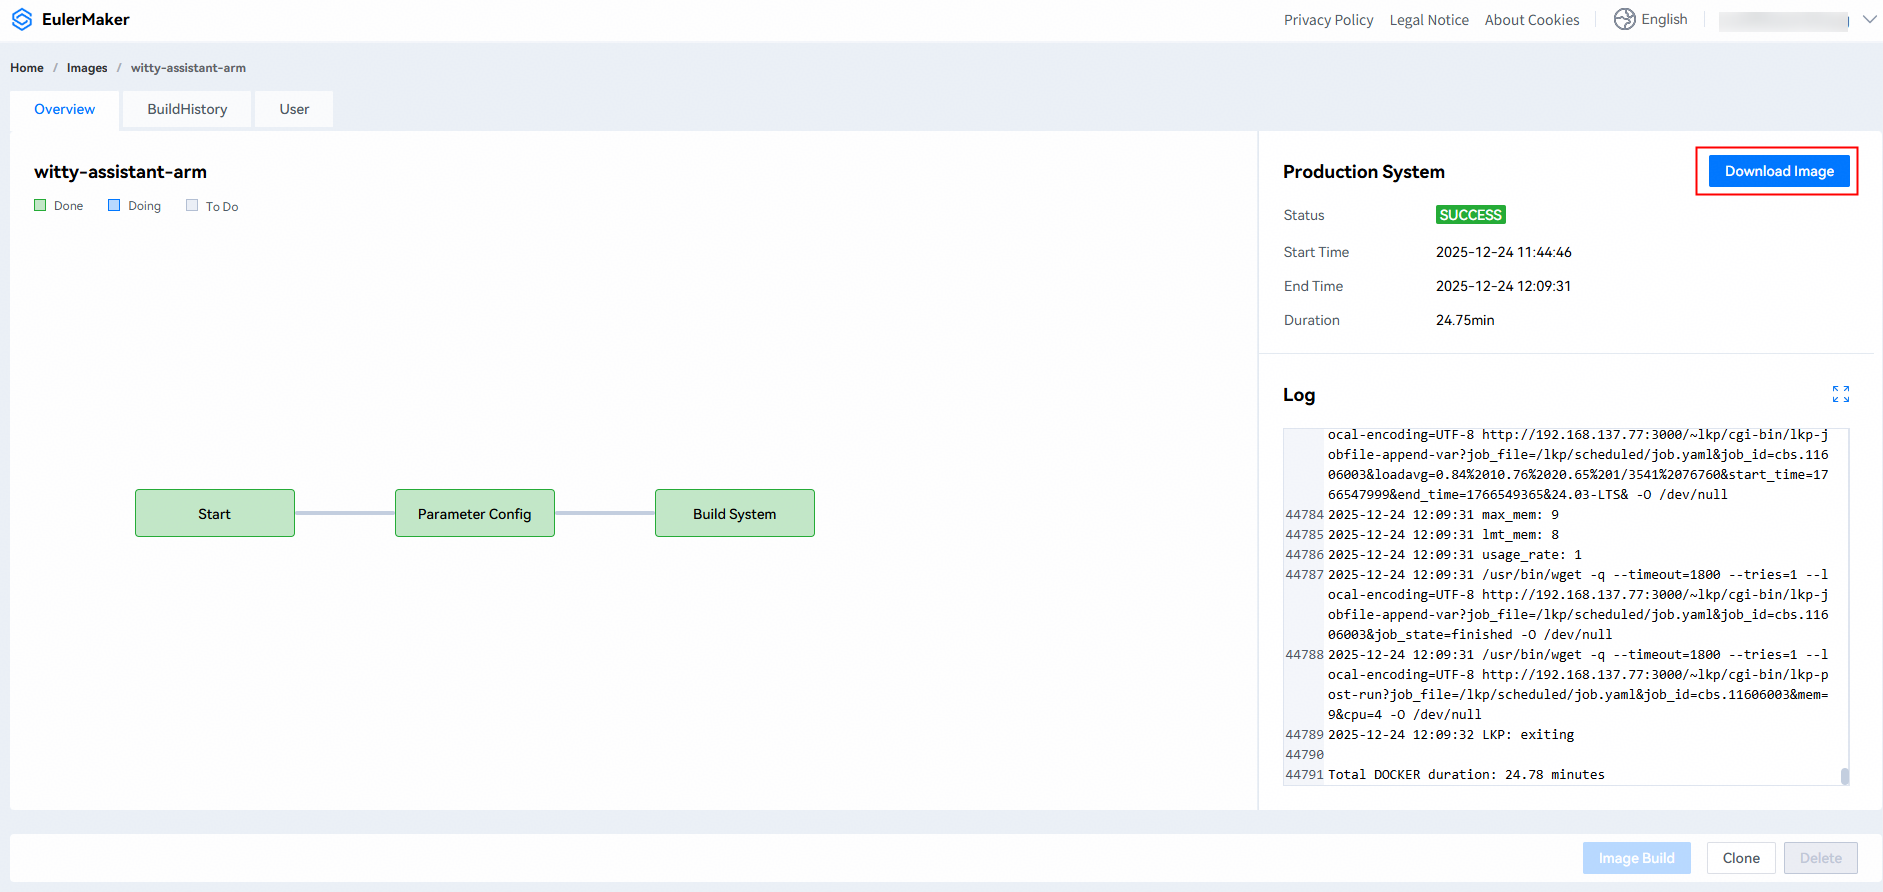
Method 2: After an image is built, click the BuildHistory tab page. The image download and log viewing options are displayed in the Operation column. Click View Log to go to the build log page. Click Download to download the image to the local PC.

Build History
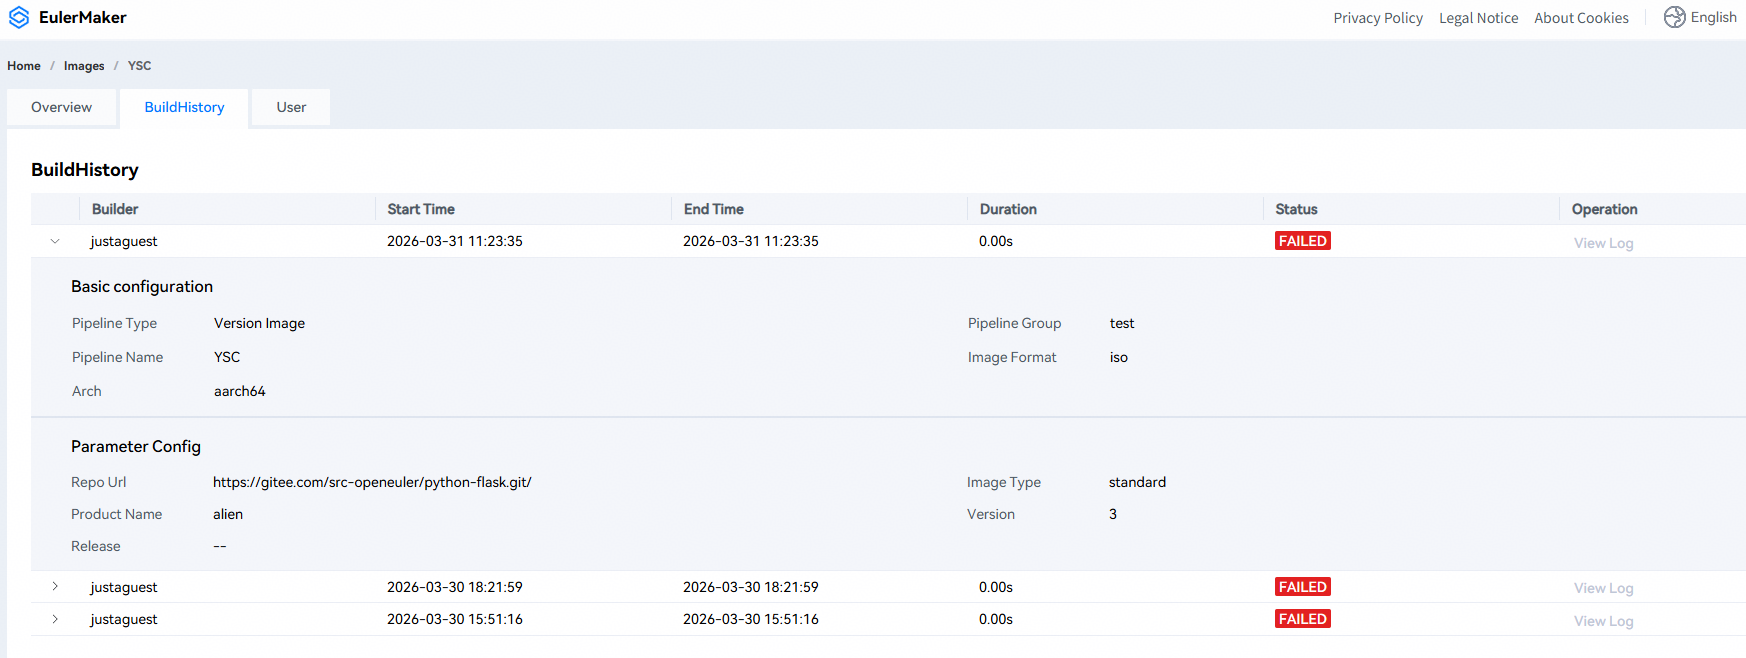
On the pipeline overview page, click BuildHistory to go to the pipeline build history page.
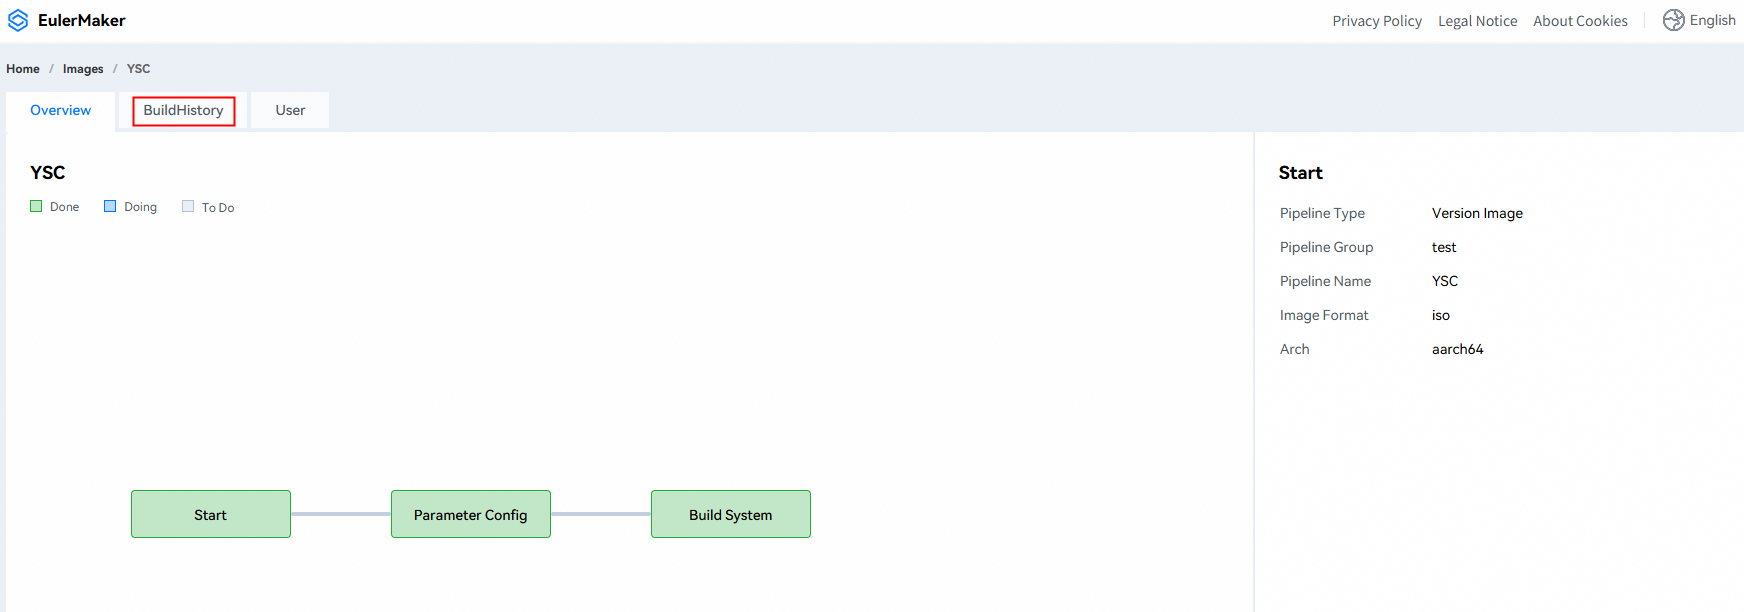
On this page, you can view the historical image build information, related images, and build logs of the pipeline.
User Management
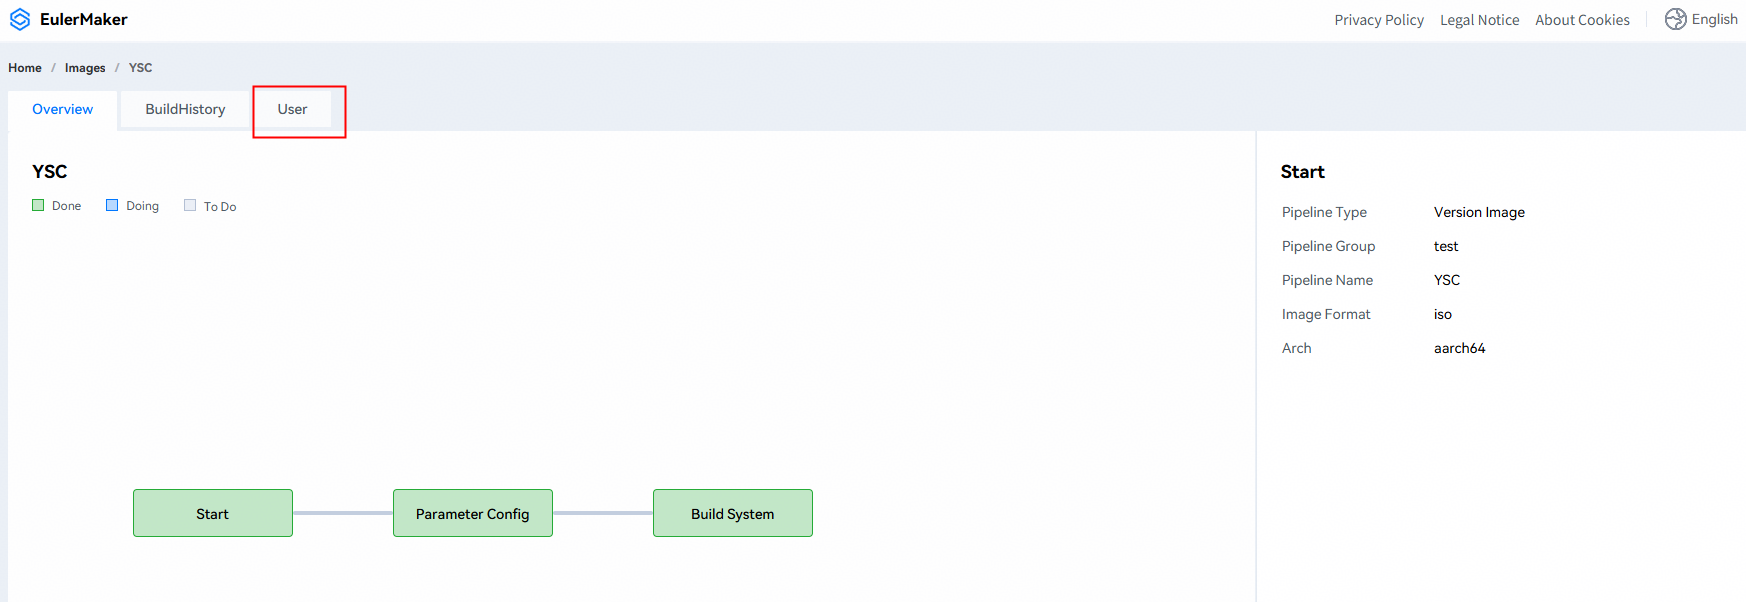
On the pipeline overview page, click User to go to the pipeline user management page.
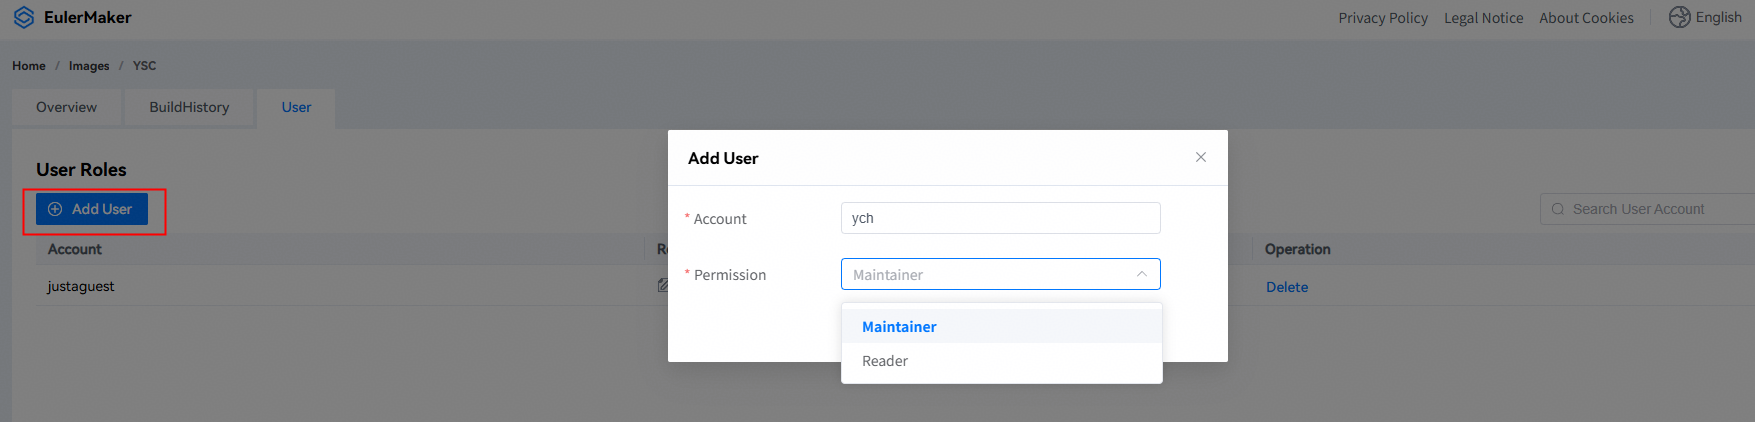
Click Add User, enter the username, and set the user permissions (Maintainer/Reader).
Cloning a Pipeline Project
Click the pipeline to be cloned to go to the pipeline overview page. Click Clone in the lower part, set or select the pipeline group, enter the new pipeline name, and click OK to complete the pipeline cloning.
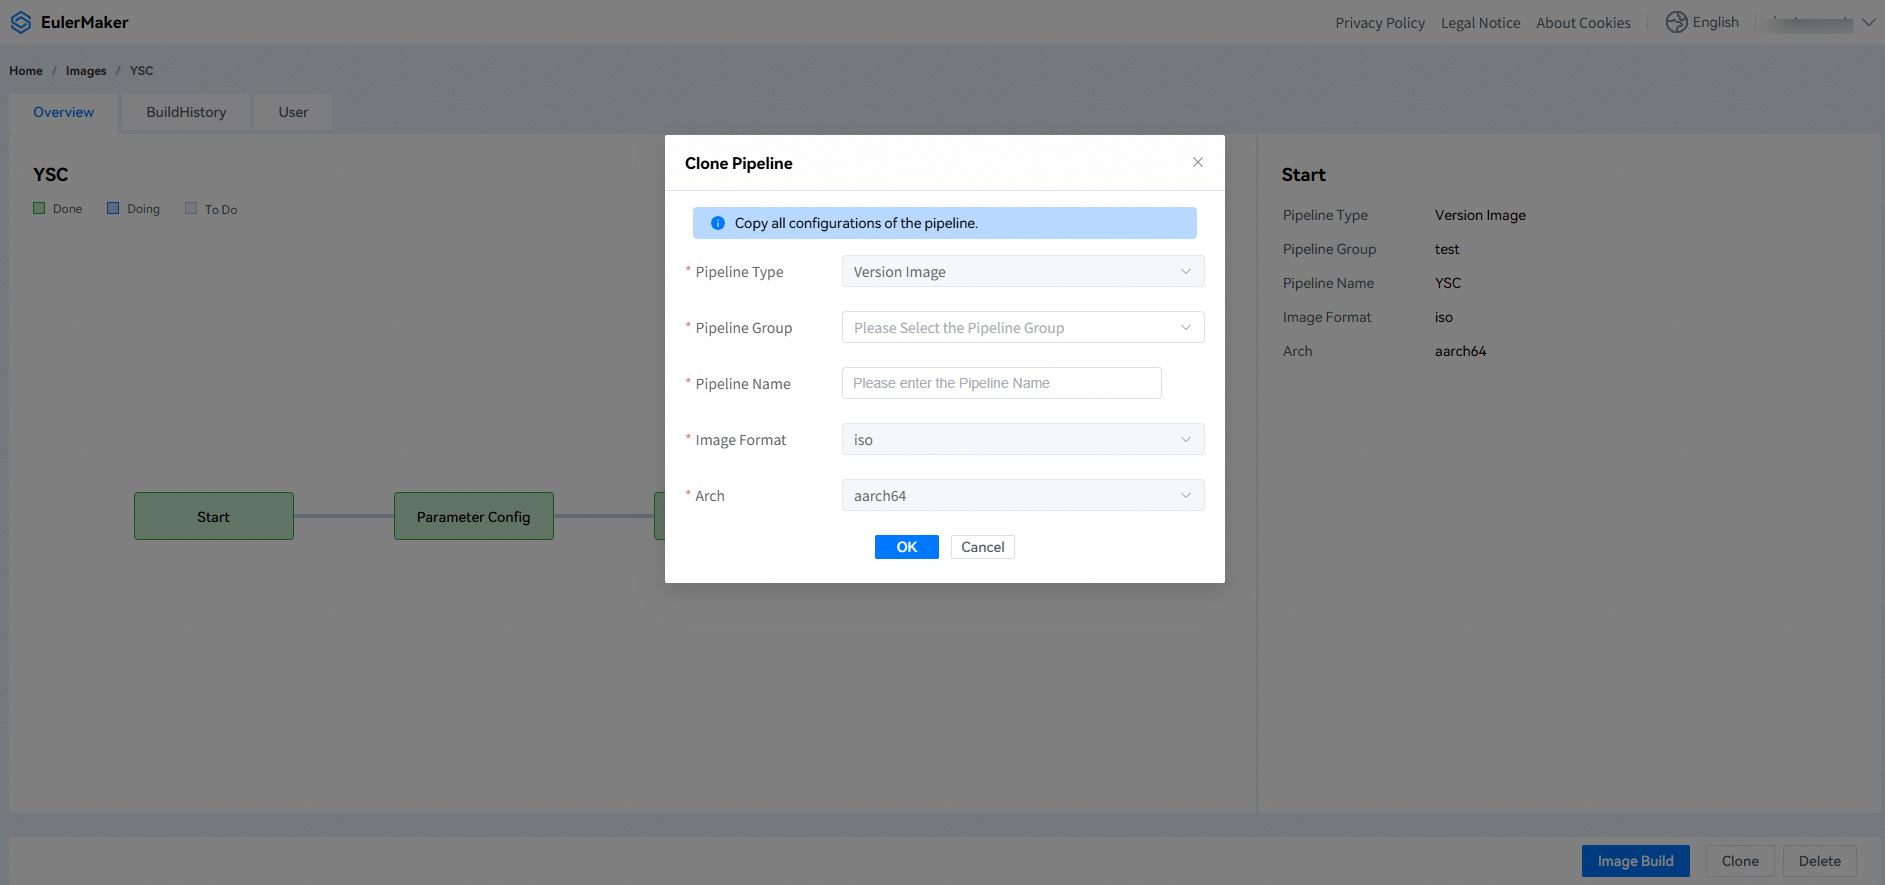
The overview page of the cloned pipeline is displayed, and the corresponding configuration parameters are cloned.
Deleting a Pipeline
Click the pipeline to be deleted to go to the pipeline overview page. Click Delete in the lower part. In the displayed dialog box, click OK to delete the pipeline, including the related images. 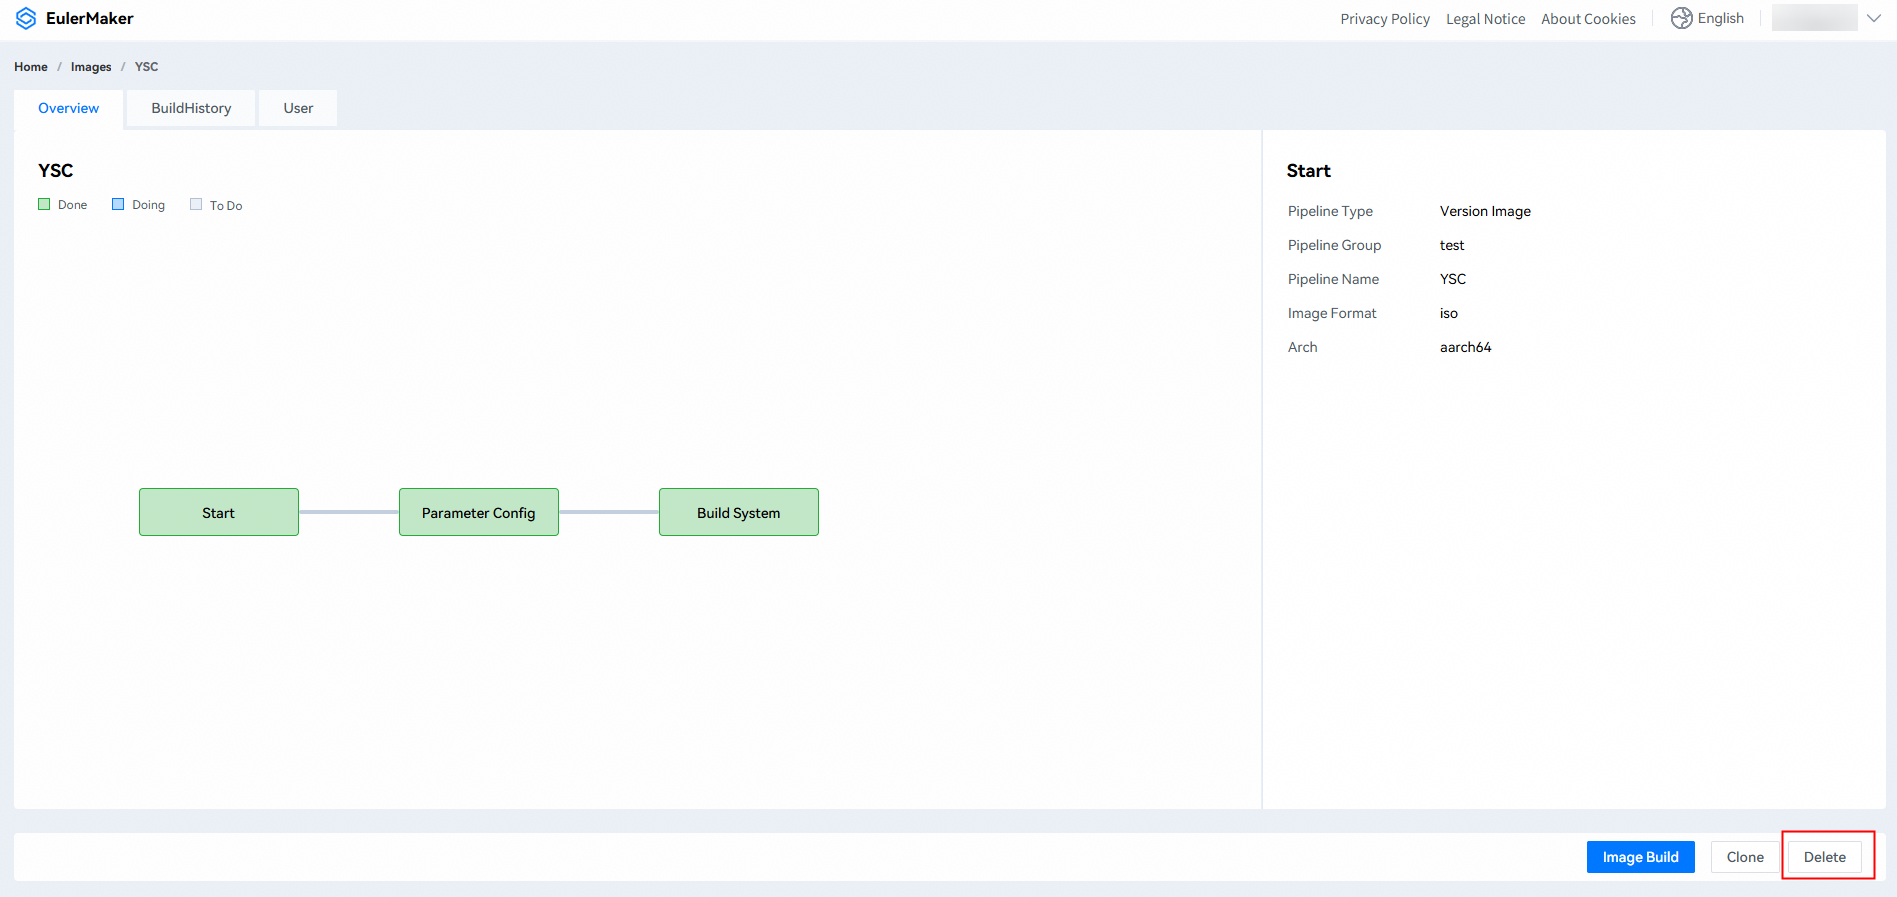
Build Based on Command Lines
Installing the EulerMaker Client Locally
EulerMaker uses lkp-tests as the client. You need to install lkp-tests locally. lkp-tests depends on Ruby to submit tasks. You are advised to install Ruby 2.5 or later.
Downloading and Installing lkp-tests
Run the following commands to install and configure lkp-test:
    git clone https://gitee.com/openeuler-customization/lkp-tests.git
    cd lkp-tests
    make install
    source ~/.${SHELL##*/}rc
Configuration File
Configure the username, password, and gateway in the local configuration file.
- #{ENV['HOME']}/.config/cli/defaults/*.yaml
    GATEWAY_IP: xxx
    GATEWAY_PORT: xxx
    SRV_HTTP_REPOSITORIES_HOST: xxx
    SRV_HTTP_REPOSITORIES_PORT: xxx
    SRV_HTTP_REPOSITORIES_PROTOCOL: xxx
    SRV_HTTP_RESULT_HOST: xxx
    SRV_HTTP_RESULT_PORT: xxx
    SRV_HTTP_RESULT_PROTOCOL: xxx
    DAG_HOST: xxx
    DAG_PORT: xxx
    ACCOUNT: xx
    PASSWORD: xx
    OAUTH_TOKEN_URL: https://omapi.osinfra.cn/oneid/oidc/token
    OAUTH_REDIRECT_URL: xx
    PUBLIC_KEY_URL: xx
GATEWAY_IP and GATEWAY_PORT are mandatory. If GITEE_ID and GITEE_PASSWORD are not configured, only commands that can be executed by guests can be executed. SRV_HTTP_RESULT_HOST and SRV_HTTP_RESULT_PORT indicate the microservices that store job logs. SRV_HTTP_RESULT_PROTOCOL is used only for the ccb log subcommand. SRV_HTTP_REPOSITORIES_HOST and SRV_HTTP_REPOSITORIES_PORT are the repository parameters, SRV_HTTP_REPOSITORIES_PROTOCOL is used only for the ccb download subcommand, and you do not need to configure them if download is not required.
After the configuration is complete, run the following command to check whether the ccb command can be used properly:
ccb -h/--helpCLI Client
Command Overview
# CRUD
# Basic Elasticsearch 7.x Document Operations (CRUD)
 https://www.cnblogs.com/liugp/p/11848408.html
 Basic Elasticsearch CRUD Operations
 https://www.cnblogs.com/powercto/p/14438907.html

ccb create <index> <os_project> k=v|--json JSON|--yaml YAML # Details see "ccb create -h".
ccb update <index> <os_project> k=v|--json JSON|--yaml YAML

ccb select <index> <os_project> k=v|--json JSON-file|--yaml YAML-file [-f/--field key1, key2...]
              [-s/--sort key1:asc/desc, key2:asc/desc...]
ccb download os_project=<project_name> packages=<package_name> architecture=x86/aarch64 [--sub] [--source] [--debuginfo]
ccb cancel $build_id
ccb log <job_id>
ccb build-single os_project=<project_name> packages=<package_name> k=v|--json JSON-file|--yaml YAML-file
Command Details
1. ccb select: Queries Information About Each Table
Querying Information About All Projects
ccb select projectsNote: The rpms and rpm_repos tables contain a large amount of data. You cannot run the ccb select Table_name command to query all information about the tables. To query the rpms table, you must use -f to specify the filter field or use key=value to specify the filter criteria.
ccb select rpms -f repo_id
ccb select rpms repo_id=openEuler-24.03-LTS:baseos-openEuler:24.03-LTS-x86_64-313
To query the rpm_repos table, you must use key=value to specify the filter criteria. If you do not know the value, you can query other tables first to obtain it and then use key=value to query the rpm_repos table.
ccb select builds -f repo_id  # Query the builds table to obtain the repo_id value.
ccb select rpm_repos repo_id=openEuler-24.03-LTS:baseos-openEuler:24.03-LTS-x86_64-313 # Use the repo_id value obtained in the previous command to query the rpm_repos table.
Querying All Information About Projects That Meet the Requirements
ccb select projects os_project=openEuler:Mainline owner=xxxQuerying Some Information About Projects That Meet the Requirements
ccb select projects os_project=openEuler:Mainline --field os_project, usersQuerying and Sorting Some Information About Projects That Meet the Requirements
ccb select projects os_project=openEuler:Mainline --field os_project, users --sort create_time:desc, os_project:ascListing All Snapshots of a Specified Project
ccb select snapshots os_project=openEuler:MainlineNote: The method for viewing other tables is similar.
2. ccb create project
Creating a Project
ccb create projects test-project --json config.json
config.json:
{
    "os_project": "test-project",
    "descrption": "this is a private project of zhangshan",
    "my_specs": [
        {
            "spec_name": "gcc",
            "spec_url": "https://atomgit.com/src-openEuler/gcc.git",
            "spec_branch": "openEuler-24.03-LTS"
        },
        {
            "spec_name": "python-flask",
            "spec_url": "https://atomgit.com/src-openEuler/python-flask.git",
            "spec_branch": "openEuler-24.03-LTS"
        }
    ],
    "build_targets": [
        {
            "os_variant": "openEuler_24.03",
            "architecture": "x86_64"
        },
        {
            "os_variant": "openEuler_24.03",
            "architecture": "aarch64"
        }
    ],
    "flags": {
        "build": true,
        "publish": true
    }
}
3. ccb update projects $os_project
Adding a Package to a Project
ccb update projects $os_project --json update.json
update.json:
{
    "my_specs+": [
        {
         "spec_name": <package-name>,
      "spec_url": <some-url>,
      "spec_branch": <some-branch>
        },
        ...
    ]
}
Adding or Deleting a User to or from a Project
ccb update projects $os_project --json update.json
update.json:
{
    "users-": ["zhangsan"],
    "users+": {
        "lisi": "reader",
     "wangwu": "maintainer"
    }
}
Locking a Package
ccb update projects test-project package_overrides.$package.lock=trueUnlocking a Package
ccb update projects test-project package_overrides.$package.lock=false4. Single-Package Build
build_targets is optional. You can specify one or more values. If this parameter is not specified, the default value of build_targets configured in os_project is used.
ccb build-single os_project=test-project packages=gcc --json build_targets.json
build_targets.json:
{
    "build_targets": [
        {
            "os_variant": "openEuler:24.03",
            "architecture": "x86_64"
        },
        {
            "os_variant": "openEuler:24.03",
            "architecture": "aarch64"
        }
    ]
}
5. Full/Incremental Build
If build_type is set to full, a full build is performed. If build_type is set to incremental, an incremental build is performed. The build_targets parameter is the same as that in single-package build. It is optional and you can specify one or more values for it. If it is not specified, the default value of build_targets configured in os_project is used. If snapshot_id is specified, os_project is optional, indicating that a full or incremental build is created based on a historical snapshot.
ccb build os_project=test-project build_type=full --json build_targets.json # Full build
ccb build snapshot_id=xxx build_type=incremental --json build_targets.json # Incremental build
build_targets.json:
{
    "build_targets": [
        {
            "os_variant": "openEuler:24.03",
            "architecture": "x86_64"
        },
        {
            "os_variant": "openEuler:24.03",
            "architecture": "aarch64"
        }
    ]
}
6. Downloading a Software Package
If snapshot_id is specified, os_project is optional. dest specifies the path for storing the downloaded software packages. This parameter is optional. By default, the current path is used.
Basic Usage
ccb download os_project=test-project packages=python-flask architecture=aarch64 dest=/tmp/rpm
ccb download snapshot_id=123456 packages=python-flask architecture=aarch64 dest=/tmp/rpm
-s Usage
# Use `-s` to download the source package of the packages. The following is an example:
ccb download os_project=test-project packages=python-flask architecture=aarch64 -s
-d Usage
# Use `-d` to download the debug (debuginfo and debugsource) packages of the packages. The following is an example:
ccb download os_project=test-project packages=python-flask architecture=aarch64 -d
-b Usage
# Use `-b all` to download all subpackages of the packages. The following is an example:
ccb download os_project=test-project packages=python-flask architecture=aarch64 -b all

# Use `-b $rpm` to download the specified subpackage `$rpm` of the packages. Use commas (,) to separate multiple subpackages. The following is an example:
ccb download os_project=test-project packages=python-flask architecture=aarch64 -b python2-flask
ccb download os_project=test-project packages=python-flask architecture=aarch64 -b python2-flask, python3-flask
Combination of -s, -d, and -b
# Use `-b all -s -d` to download the debug package, source package, and all subpackages of the packages. The following is an example:
ccb download os_project=test-project packages=python-flask architecture=aarch64 -b all -s -d

# Use `-b $rpm -s -d` to download the debug package, source package, and specified subpackages of the packages. (Multiple subpackages are separated with commas.) The following is an example:
ccb download os_project=test-project packages=python-flask architecture=aarch64 -b python2-flask -s -d
ccb download os_project=test-project packages=python-flask architecture=aarch64 -b python2-flask, python3-flask -s -d
7. cancel: Cancels a Build Task
ccb cancel $build_id8. Viewing Job Logs
ccb log <job_id>Concepts/Terms
| Terms | Meaning |
|---|---|
| project | A collection of packages, including the build_target configuration and the git_url configuration of the software package. |
| build_target | Specifies the build target, including the OS and version of the target, and the CPU architecture. |
| package | Software package, which is identified by spec_name. One or more RPM packages are generated for a package. |
| snapshot | Snapshot of a project, which records the commit_id of each software package at the current time and the snapshot of the dependent project. This ensures that the dependencies required for building a package are fixed. snapshot_id is globally unique. |
| build | Build task of a project, which is created based on snapshots. Each build_target generates a build, and build_id is globally unique. |
| job | Each build task generates one or more jobs, and each job corresponds to the build of a software package. |
| build_single | Single-package build |
| build_type | Build type, which can be full or incremental. |
版权所有 © 2026 openEuler 保留一切权利
京ICP备2020036654号-1
京公网安备 11030102011597 号