openEuler 24.03 LTS SP4 Quick Start (VM Deployment)
This document uses a VMware Workstation VM as an example to guide you through installing openEuler and logging in for the first time from scratch.
1. Overview
This tutorial guides you through all the steps required to install openEuler 24.03 LTS SP4, from downloading the installation image to logging in to the system for the first time.
Target Audience: O&M engineers and system administrators who have no physical hardware and are installing openEuler for the first time for personal learning or a development and test environment
Key Points: Download the ISO → Start the VM → Configure installation options → Verify the system
Learning Objectives
After completing this guide, you will be able to:
- Install the openEuler OS successfully.
- Complete the basic system configuration and log in for the first time.
- Verify the system information to confirm that the installation is successful.
Prerequisites
All openEuler versions support multiple architectures such as x86, Arm, LoongArch, and RISC-V, as well as a variety of CPU chips.
The minimum hardware requirements are as follows:
Table 1 Minimum hardware requirements
Component | Minimum Hardware Requirement |
|---|---|
Architecture |
|
CPU | 2-core CPU |
Memory | ≥4GB. |
Drive | For a better application experience, a capacity of no less than 16 GB is recommended. |
For details about the supported hardware compatibility range, see the Compatibility List.
Estimated Time
About 30 minutes (depending on the download speed and VM performance).
2. Downloading the Installation Image
2.1 Downloading the ISO File
Go to the openEuler download page:
Select openEuler 24.03 LTS SP4 and download it immediately.
Select based on your architecture:
| Installation Mode | aarch64 Architecture | x86_64 Architecture | Description |
|---|---|---|---|
| Local installation |
|
| Complete offline package |
| Network installation | Network Install ISO | Network Install ISO | Minimal package; network connection required |
Description
- The ISO release package for network installation is small. If the installation environment has network access, you can choose the network installation mode.
- The release package for the aarch64 architecture supports UEFI mode, and the release package for the x86_64 architecture supports both UEFI mode and Legacy mode.
2.2 Verifying File Integrity
After downloading the ISO file, you need to verify its integrity to prevent file corruption caused by the network or storage. Deployment is allowed only after the verification is successful.
Here, you judge whether the software package is complete by comparing the integrity check value provided on the official website with the check value manually calculated for the ISO file. If the two values are the same, the ISO file is complete. Otherwise, the ISO file integrity is damaged, and you need to obtain the ISO file again.
Description
This section uses the integrity check of the release package for the aarch64 architecture as an example. The procedure is the same for the release package of the x86_64 architecture.
Run the following command to manually calculate the check value of the ISO file:
sha256sum openEuler-24.03-LTS-SP4-aarch64-dvd.isoExpected output (example only):
0dd3af60fcc2e862e92d613b5e1a2c8806095ec8e770ea6a4a49055071193516The output check value must be the same as the integrity check value provided on the official website. Otherwise, download the ISO file again.
3. Creating the Boot Media
Mount the downloaded ISO image to the VM.
3.1 Installing openEuler on the VM
Description
- This section uses VMware Workstation as an example to describe the procedure for installing openEuler on a VM.
- Prerequisites: A VM has been created.
On the created VM, select CD/DVD, browse to the folder, and open the required image file, as shown in Figure 1.
Click Power On This Virtual Machine to start the VM, as shown in Figure 2.
The VM automatically enters the installation wizard, as shown in Figure 3.
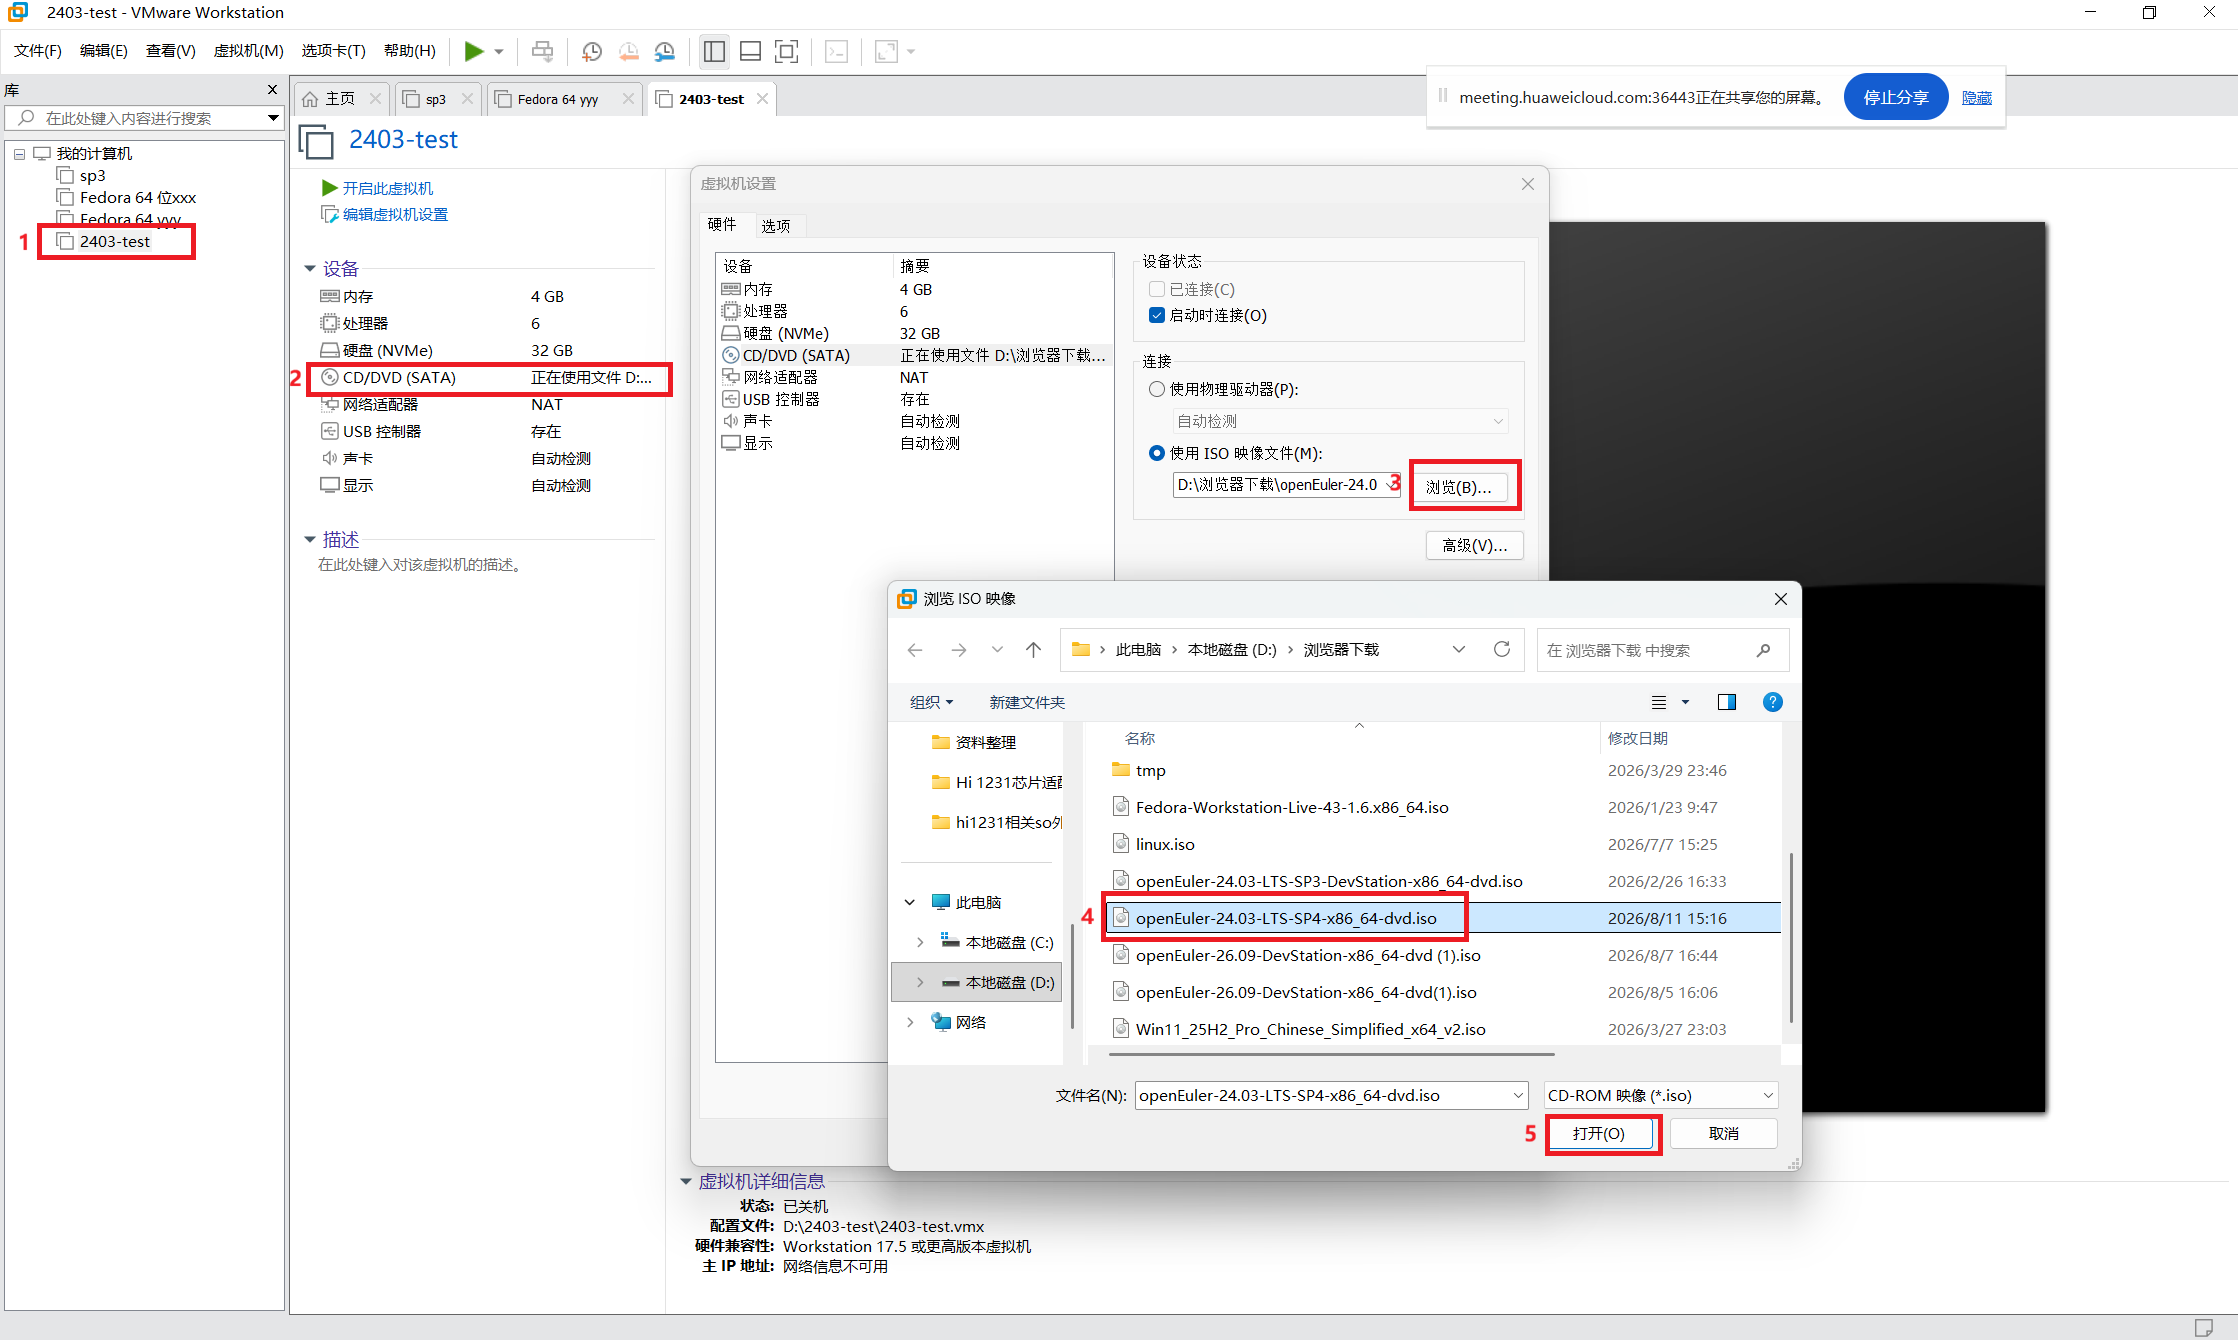
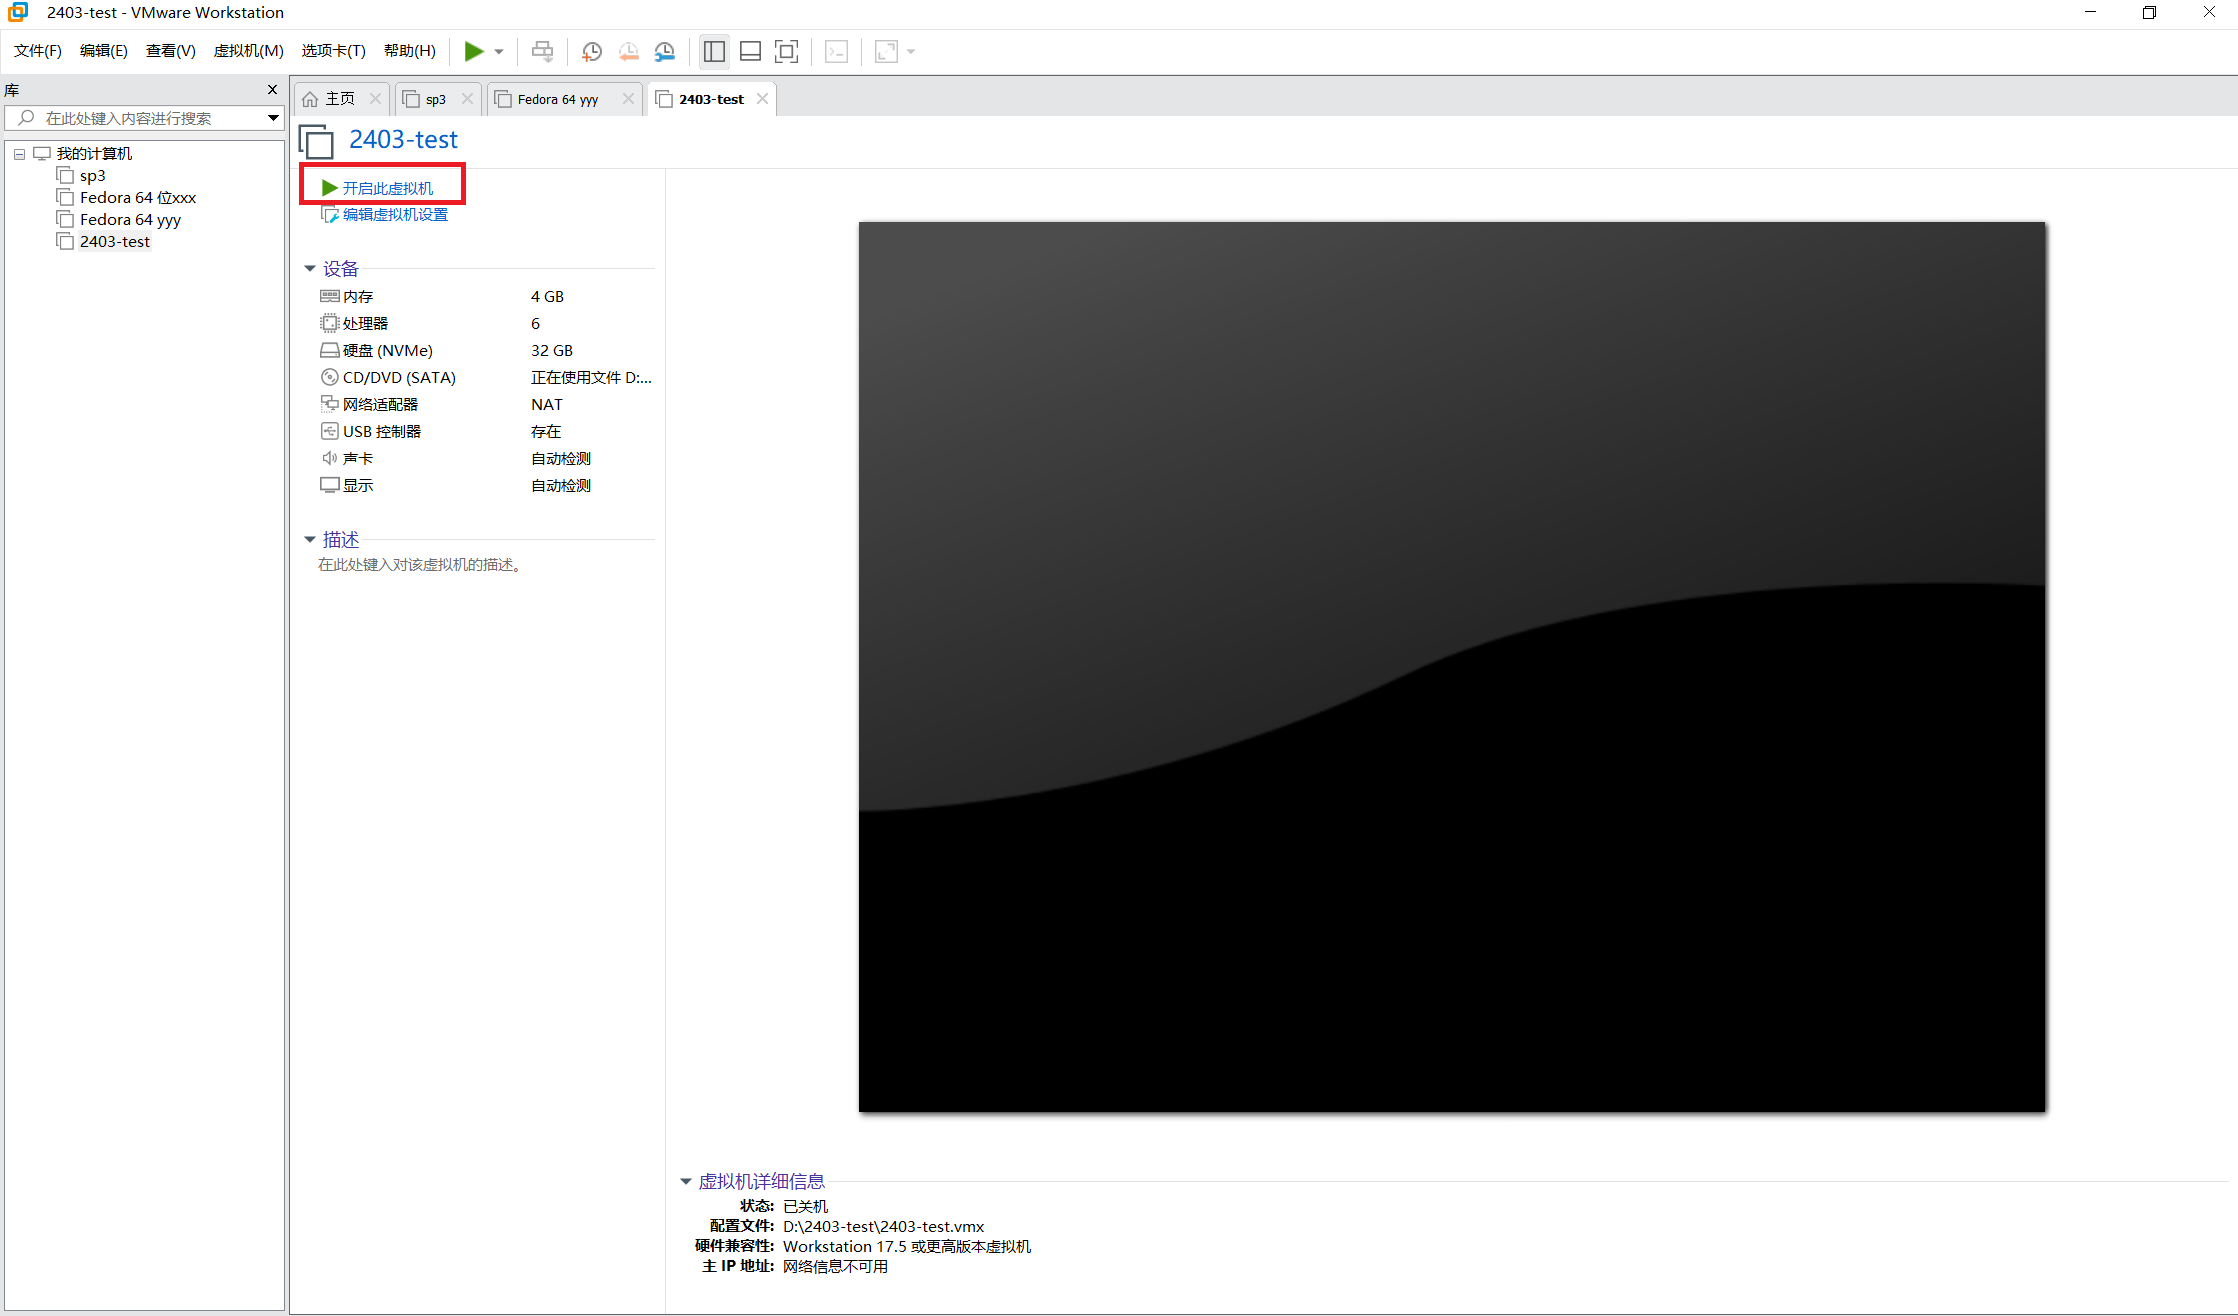
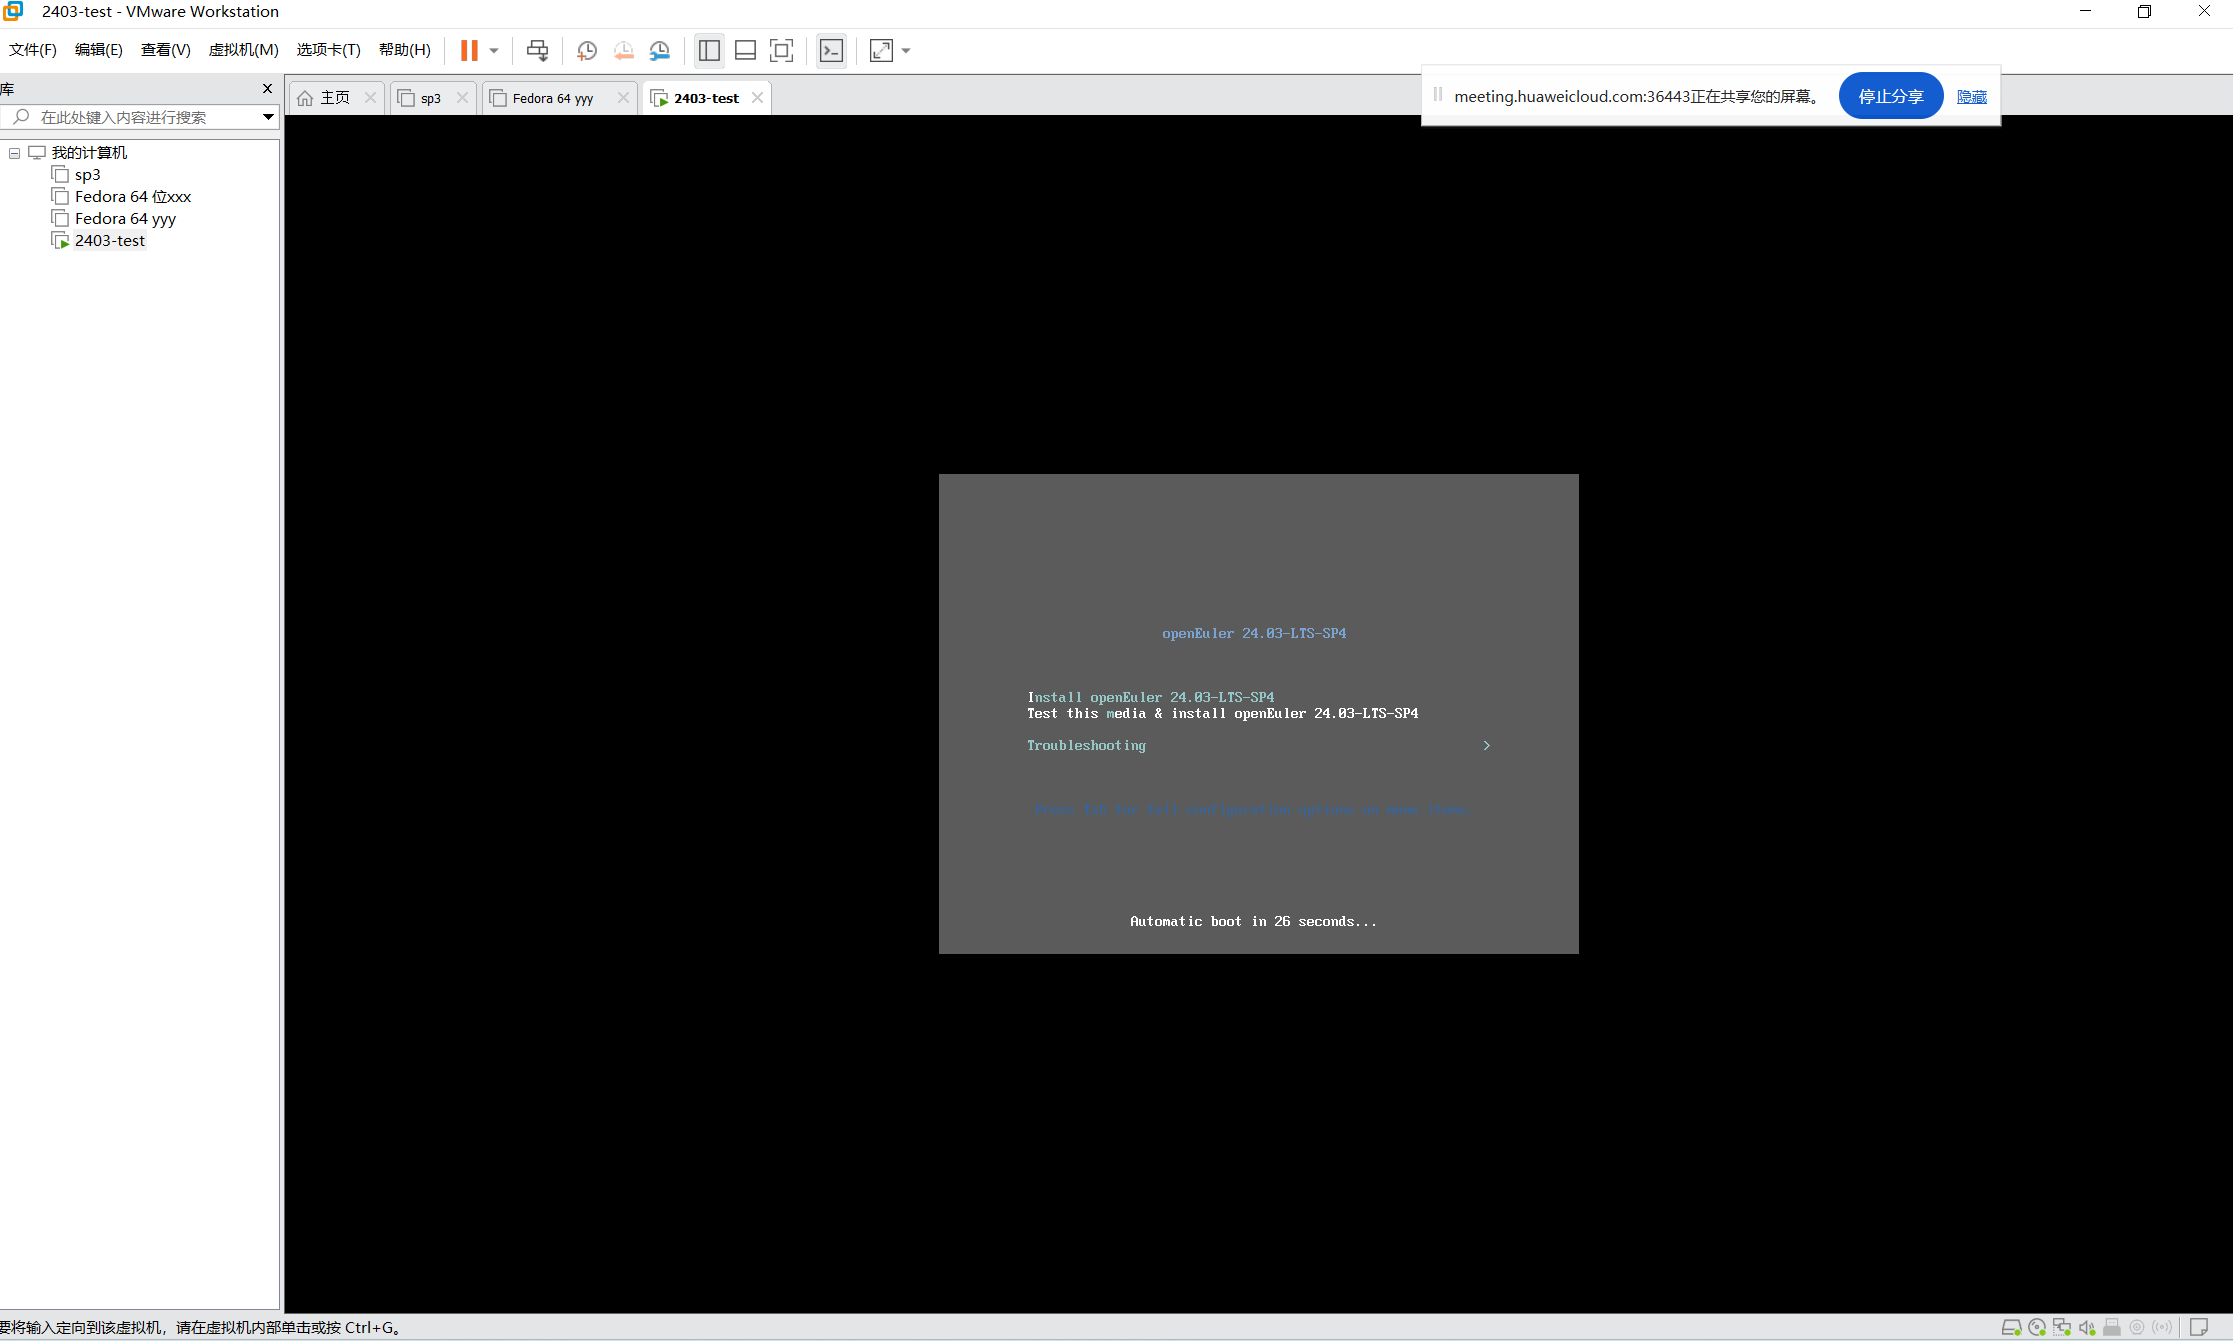
4. Setting Up the Installation
After entering the installation wizard, complete the initial settings before the installation.
4.1 Selecting the Language
The default language is English. You can select Chinese, as shown in Figure 4.
Figure 4 Selecting the language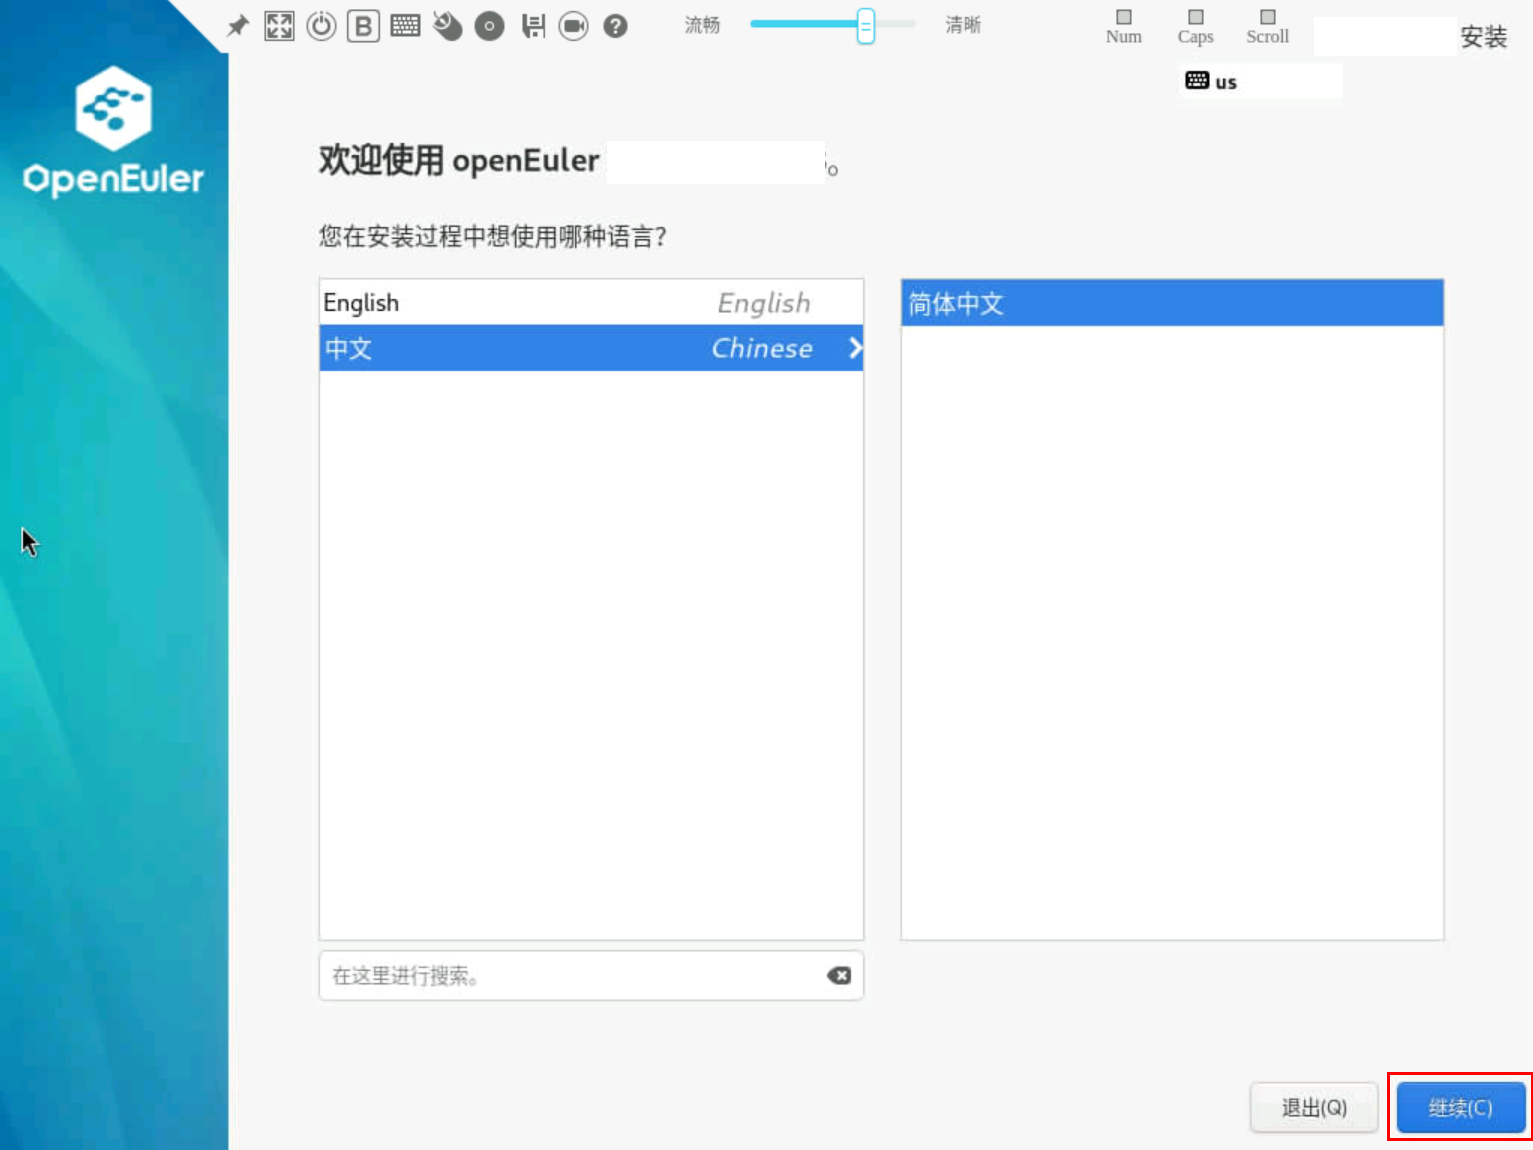
4.2 Configuring Installation Options
After entering the installation overview screen, the configuration items marked with the ⚠️ warning symbol must be configured.
⚠️ Risk Warning: The installation will erase data on the target drive. Back up important files in advance.
Figure 5 Installation overview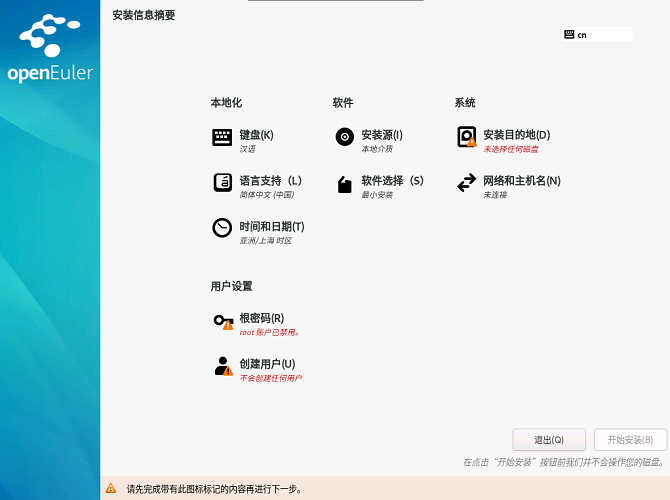
| Configuration Item | Operation | Suggestion |
|---|---|---|
| Software Selection | Select Minimal Install. | Development Tools can be added. |
| Installation Destination | Select the target drive. | Automatic partitioning is recommended. |
| Network and Host Name | Enable the network and configure a static IP address. | You can also change it using the nmcli command after the installation. |
| Root Password | Set the root password. | ≥8 characters, containing uppercase letters, lowercase letters, digits, and special characters. |
| User Creation | Create a normal user. | Recommended for daily use. |
4.2.1 Software Selection
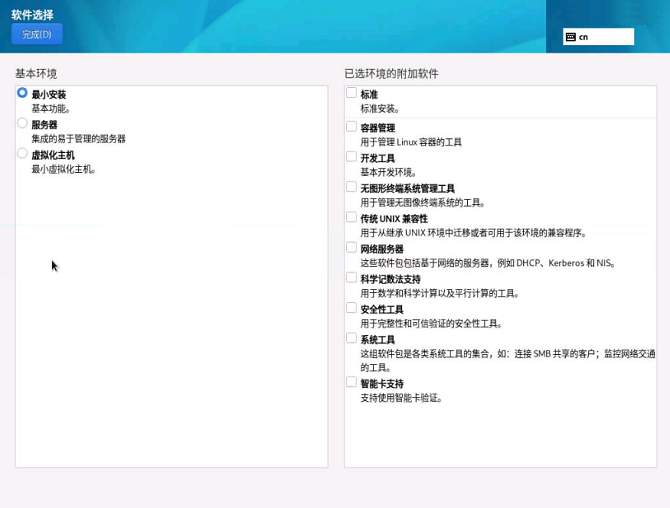
Select Software Selection. Based on actual service requirements, select Minimal Install on the left, and select additional options for the installation environment on the right, as shown in Figure 6.
Description
- In a minimal installation environment, not all packages in the installation source are installed. If a package you need is not installed, you can mount the installation source locally to create a repo source and install the package separately using the DNF tool.
- If you select Virtualization Host, the virtualization components
qemu,libvirt, andedk2are installed by default, and you can choose whether to install components such asovsin the additional options.
4.2.2 Installation Destination
Select Installation Destination. It is recommended to select Automatic for automatic partitioning, as shown in Figure 7.
Note
- When selecting an appropriate storage medium, do not select an NVMe SSD storage medium with the data protection feature enabled as the system drive. Otherwise, problems such as the OS failing to boot may occur.
- If you cannot confirm whether the BIOS supports it, using an NVMe drive to install the OS is not recommended. Alternatively, disable the data protection function of the NVMe drive to complete the OS installation.
Figure 7 Installation destination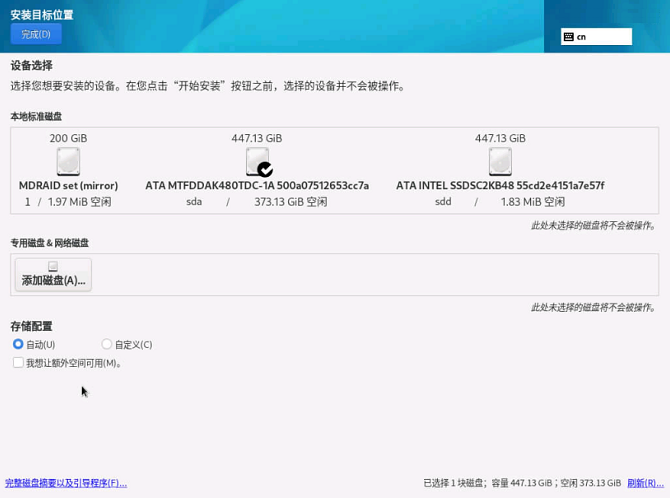
4.2.3 Network and Host Name
Select Network and Host Name and enable the available Ethernet connection, as shown in Figure 8.
Figure 8 Network configuration 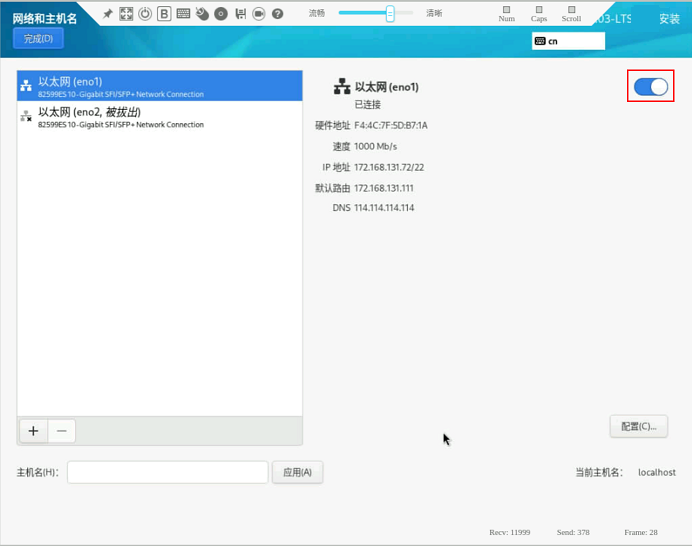
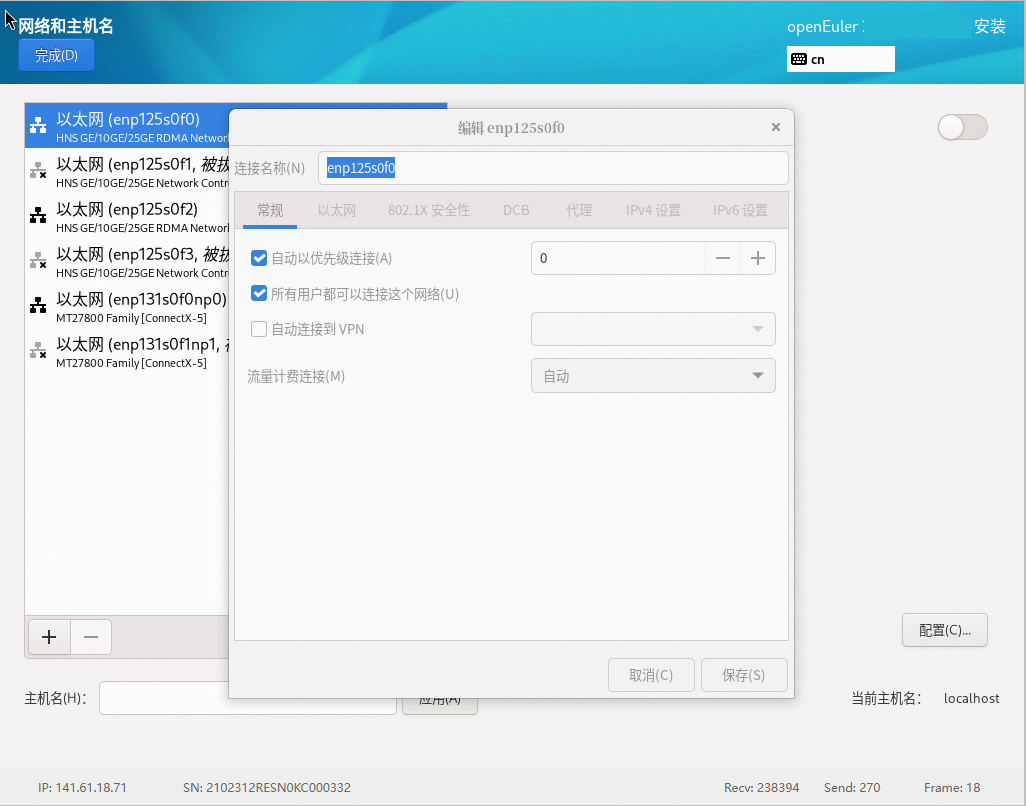
Click the Configure button. On the General tab page, select Connect automatically with priority and click Save, as shown in Figure 9.
4.2.4 Root Password
Select Root Password. On the ROOT PASSWORD page shown in Figure 10, enter the password according to the password complexity requirements and enter it again for confirmation.
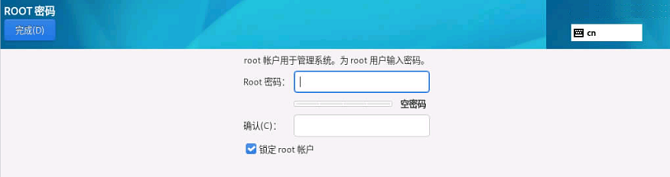
Password complexity requirements:
- Is at least 8 characters long.
- Contains any 3 of the following: uppercase letters, lowercase letters, digits, and special characters.
- Is not the same as the account name.
- Is not a dictionary word.
Description
In an installed openEuler environment, you can export the dictionary file dictionary.txt using the cracklib-unpacker /usr/share/cracklib/pw_dict > dictionary.txt command, so that you can check whether your password is in the dictionary.
4.2.5 User Creation
Select User Creation. The user creation screen is shown in Figure 11. Enter a user name and set a password. The password complexity requirements are the same as those for the root password. You can also set the user home directory and user group in the Advanced options, as shown in Figure 12.
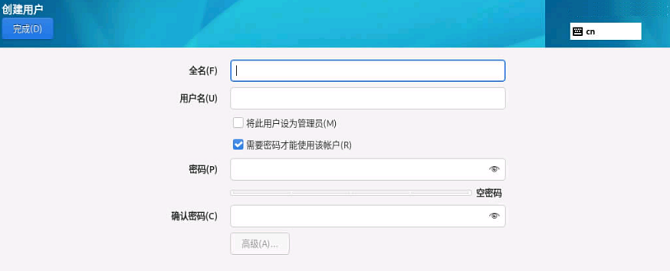
Figure 12 Advanced user configuration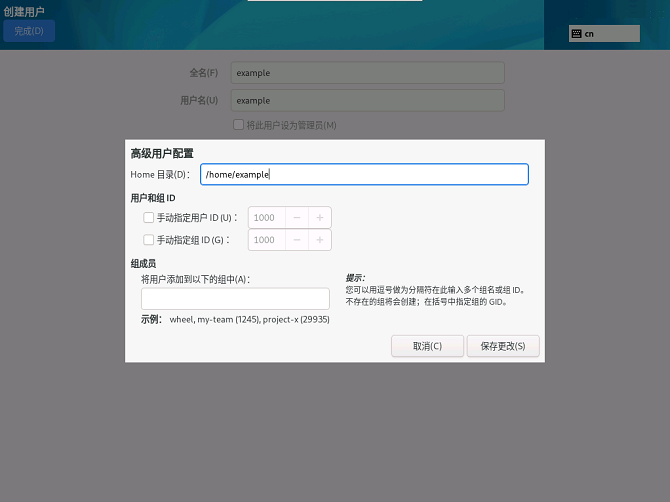
5. Starting the Installation
After all ⚠️ marks disappear, click Begin Installation, as shown in Figure 13.
Figure 13 Starting the installation
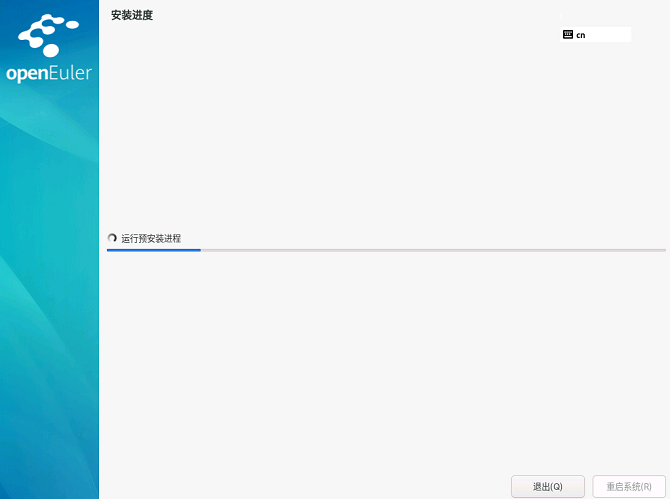
Expected result:
The installation progress bar is displayed...
Installing software packages...
Installation completed
6. Completing the Installation
After openEuler is installed, click Reboot System.
After the reboot, the system guides you to the first login screen.
7. Logging In and Verifying the System
7.1 Logging In to the System
After the reboot, the command-line login screen is displayed:
openEuler 24.03 LTS SP4
Kernel 6.6.x on an aarch64

localhost login:
Enter the user name and password to log in.
7.2 Viewing System Information
cat /etc/os-releaseExpected output:
NAME="openEuler"
VERSION="24.03 (LTS SP4)"
ID="openeuler"
VERSION_ID="24.03"
7.3 Viewing Hardware Information
Viewing the CPU:
lscpuExpected output:
Architecture:        aarch64
CPU(s):              <number of cores>
Model name:          <CPU model>
Viewing the memory:
free -hExpected output:
              total        used        free
Mem:           <size>      ...
Viewing the drives:
fdisk -lExpected output:
Disk /dev/sda: 200 GiB, 214748364800 bytes, 419430400 sectors
Disk model: QEMU HARDDISK
Units: sectors of 1 * 512 = 512 bytes
Sector size (logical/physical): 512 bytes / 512 bytes
I/O size (minimum/optimal): 512 bytes / 512 bytes
Disklabel type: gpt
Disk identifier: xxxxxxxx-xxxx-xxxx-xxxx-xxxxxxxxxxxx

Device       Start        End    Sectors  Size Type
/dev/sda1     2048     409599     407552  199M EFI System
/dev/sda2   409600   419430366  419020767  200G Linux filesystem
Viewing the IP address:
ip addrExpected output:
1: lo: <LOOPBACK,UP,LOWER_UP> mtu 65536 qdisc noqueue state UNKNOWN group default qlen 1000
    link/loopback 00:00:00:00:00:00 brd 00:00:00:00:00:00
    inet 127.0.0.1/8 scope host lo
       valid_lft forever preferred_lft forever
    inet6 ::1/128 scope host
       valid_lft forever preferred_lft forever
2: ens160: <BROADCAST,MULTICAST,UP,LOWER_UP> mtu 1500 qdisc mq state UP group default qlen 1000
    link/ether 00:0c:29:3b:25:c4 brd ff:ff:ff:ff:ff:ff
    altname enp3s0
    inet 192.168.31.102/24 brd 192.168.31.255 scope global dynamic noprefixroute ens160
       valid_lft 172670sec preferred_lft 172670sec
    inet6 fe80::20c:29ff:fe3b:25c4/64 scope link noprefixroute
       valid_lft forever preferred_lft forever
8. Keeping the System Up to Date
For a newly installed system, it is recommended to update it immediately to ensure that security patches and software packages are the latest versions.
8.1 Updating the System
dnf update -yAfter the update is complete, Complete! is displayed.
Note
If this update includes a system kernel version upgrade, you must restart the server (using the reboot command) after the update is complete for the new kernel to take effect. Before the restart, the system still runs the old kernel version.
8.2 Setting the Timezone
timedatectl set-timezone Asia/ShanghaiThere is no output, indicating that the command is successful by default.
8.3 Verifying Time Synchronization
timedatectl statusExpected output:
               Local time: Mon 2019-09-30 04:05:00 EDT
           Universal time: Mon 2019-09-30 08:05:00 UTC
                 RTC time: Mon 2019-09-30 08:05:00
                Time zone: Asia/Shanghai (CST, +0800)
System clock synchronized: yes
              NTP service: active
          RTC in local TZ: no
9. Successful Installation
Congratulations! You have completed the installation and basic configuration of openEuler 24.03 LTS SP4. You can now start exploring and using your server.
10. Troubleshooting
If you encounter problems during the installation, see the following FAQs:
Q1: The installation wizard does not appear?
Cause: The VM fails to mount the ISO image.
Solution:
- Browse to the folder and open the required image file again.
- Click to power on the VM.
Q2: The drive is not detected?
Cause: The RAID controller driver is missing.
Solution:
See the openEuler community forum: Example of manually loading a driver.
Q3: Setting the password fails?
Cause: The password does not meet the complexity requirements.
Solution:
Ensure that the password:
- Is at least 8 characters long.
- Contains 3 of the following: uppercase letters, lowercase letters, digits, and special characters.
- Is not a dictionary word.
Q4: A network error occurs in dnf update?
Cause: The network or DNS is not configured.
Solution:
nmtuiReconfigure the network and DNS.
Q5: The chronyd service is not running. How do I enable it?
Cause: The service may not be set to start automatically at startup. Run the following command to enable it and start it immediately:
Solution:
systemctl enable --now chronydNext Steps
| Scenario | Recommended Path |
|---|---|
| Deploy application services | Configuring the Web Server Setting Up the Database Server |
| Learn system management | Administrator Guide |
| Troubleshoot problems | Community Forum · Submit an Issue |
If you find any documentation errors, submit feedback in AtomGit Issue.
Licensed under the MulanPSL2
 J.G.W.A.B. No. 11030102011597