Kubernetes Cluster Deployment Guide Based on containerd
Starting from version 1.21, Kubernetes no longer supports the Kubernetes+Docker setup for cluster deployment. This guide demonstrates how to quickly set up a Kubernetes cluster using containerd as the container runtime. For custom cluster configurations, consult the official documentation.
Software Package Installation
1. Installing Required Packages
yum install -y containerd
yum install -y kubernetes*
yum install -y cri-tools
Note
- If Docker is already installed on the system, uninstall it before installing containerd to prevent conflicts.
The required containerd version is 1.6.22-15 or higher. If the installed version is not supported, upgrade to version 1.6.22-15 using the following commands, or perform a manual upgrade.
wget --no-check-certificate https://repo.openeuler.org/openEuler-24.03-LTS/update/x86_64/Packages/containerd-1.6.22-15.oe2403.x86_64.rpm
rpm -Uvh containerd-1.6.22-15.oe2403.x86_64.rpm
The package versions downloaded via yum in this guide are:
1. containerd
  - Architecture: x86_64
  - Version: 1.6.22-15
2. kubernetes - client/help/kubeadm/kubelet/master/node
  - Architecture: x86_64
  - Version: 1.29.1-4
3. cri-tools
  - Architecture: X86_64
  - Version: 1.29.0-3
2. Downloading CNI Components
mkdir -p /opt/cni/bin
cd /opt/cni/bin
wget --no-check-certificate https://github.com/containernetworking/plugins/releases/download/v1.5.1/cni-plugins-linux-amd64-v1.5.1.tgz
tar -xzvf ./cni-plugins-linux-amd64-v1.5.1.tgz -C .
Note
- The provided download link is for the AMD64 architecture. Choose the appropriate version based on your system architecture. Other versions are available in the GitHub repository.
3. Downloading CNI Plugin (Flannel)
wget https://raw.githubusercontent.com/flannel-io/flannel/master/Documentation/kube-flannel.yml --no-check-certificateEnvironment Configuration
This section configures the OS environment required for Kubernetes.
1. Setting the Host Name
hostnamectl set-hostname nodeName2. Configuring the Firewall
Method 1:
Configure firewall rules to open ports for etcd and the API Server, ensuring proper communication between the control plane and worker nodes.
Open ports for etcd:
firewall-cmd --zone=public --add-port=2379/tcp --permanent
firewall-cmd --zone=public --add-port=2380/tcp --permanent
Open ports for the API Server:
firewall-cmd --zone=public --add-port=6443/tcp --permanentApply the firewall rules:
firewall-cmd --reloadNote
- Firewall configuration may prevent certain container images from functioning properly. To ensure smooth operation, open the necessary ports based on the images being used.
Method 2:
Disable the firewall using the following commands:
systemctl stop firewalld
systemctl disable firewalld
3. Disabling SELinux
SELinux security policies may block certain operations within containers, such as writing to specific directories, accessing network resources, or executing privileged operations. This can cause critical services like CoreDNS to fail, resulting in CrashLoopBackOff or Error states. Disable SELinux using the following commands:
setenforce 0
sed -i "s/SELINUX=enforcing/SELINUX=disabled/g" /etc/selinux/config
4. Disabling Swap
The Kubernetes scheduler allocates pods to nodes based on available memory and CPU resources. If swap is enabled on a node, the actual physical memory and logically available memory may not align, which can affect the scheduler decisions, leading to node overloading or incorrect scheduling. Therefore, disable swap:
swapoff -a
sed -ri 's/.*swap.*/#&/' /etc/fstab
5. Configuring the Network
Enable IPv6 and IPv4 traffic filtering on bridged networks using iptables, and enable IP forwarding to ensure inter-pod communication across nodes:
$ cat > /etc/sysctl.d/k8s.conf << EOF
net.bridge.bridge-nf-call-ip6tables = 1
net.bridge.bridge-nf-call-iptables = 1
net.ipv4.ip_forward = 1
vm.swappiness=0
EOF
$ modprobe br_netfilter
$ sysctl -p /etc/sysctl.d/k8s.conf
Configuring containerd
This section configures containerd, including setting the pause image, cgroup driver, disabling certificate verification for the registry.k8s.io image repository, and configuring a proxy.
First, generate the default configuration file for containerd and output it to the file specified by containerd_conf:
containerd_conf="/etc/containerd/config.toml"
mkdir -p /etc/containerd
containerd config default > "${containerd_conf}"
Configure the pause image:
pause_img=$(kubeadm config images list | grep pause | tail -1)
sed -i "/sandbox_image/s#\".*\"#\"${pause_img}\"#" "${containerd_conf}"
Set the cgroup driver to systemd:
sed -i "/SystemdCgroup/s/=.*/= true/" "${containerd_conf}"Disable certificate verification for the registry.k8s.io image repository:
sed -i '/plugins."io.containerd.grpc.v1.cri".registry.configs/a\[plugins."io.containerd.grpc.v1.cri".registry.configs."registry.k8s.io".tls]\n insecure_skip_verify = true' /etc/containerd/config.tomlConfigure the proxy (replace "***" in HTTP_PROXY, HTTPS_PROXY, and NO_PROXY with your proxy information):
$ server_path="/etc/systemd/system/containerd.service.d"
$ mkdir -p "${server_path}"
$ cat > "${server_path}"/http-proxy.conf << EOF
[Service]
Environment="HTTP_PROXY=***"
Environment="HTTPS_PROXY=***"
Environment="NO_PROXY=***"
EOF
Restart containerd to apply the configurations:
systemctl daemon-reload
systemctl restart containerd
Configuring crictl to Use containerd as the Container Runtime
crictl config runtime-endpoint unix:///run/containerd/containerd.sock
crictl config image-endpoint unix:///run/containerd/containerd.sock
Configuring kubelet to Use systemd as the Cgroup Driver
systemctl enable kubelet.service
echo 'KUBELET_EXTRA_ARGS="--runtime-cgroups=/systemd/system.slice --kubelet-cgroups=/systemd/system.slice"'  >> /etc/sysconfig/kubelet
systemctl restart kubelet
Creating a Cluster Using Kubeadm (Control Plane Only)
1. Configuring Cluster Information
kubeadm config print init-defaults --component-configs KubeletConfiguration >> kubeletConfig.yaml
vim kubeletConfig.yaml
In the kubeletConfig.yaml file, configure the node name, advertise address (advertiseAddress), and the CIDR for the Pod network.
Modify name to match the hostname, consistent with the first step in the environment configuration:

Change advertiseAddress to the IP address of the control plane:
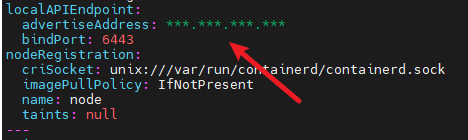
Add podSubnet under Networking to specify the CIDR range:

2. Deploying the Cluster
Use kubeadm to deploy the cluster. Many configurations are generated by default (such as authentication certificates). Refer to the official documentation for modifications.
Disable the proxy (if applicable):
unset http_proxy https_proxyDeploy the cluster using kubeadm init:
kubeadm init --config kubeletConfig.yamlSpecify the configuration file for kubectl:
mkdir -p "$HOME"/.kube
cp -i /etc/kubernetes/admin.conf "$HOME"/.kube/config
chown "$(id -u)":"$(id -g)" "$HOME"/.kube/config
export KUBECONFIG=/etc/kubernetes/admin.conf
3. Deploying the CNI Plugin (Flannel)
This tutorial uses Flannel as the CNI plugin. Below are the steps to download and deploy Flannel.
The Flannel used here is downloaded from the registry-1.docker.io image repository. To avoid certificate verification issues, configure the image repository to skip certificate verification in the containerd configuration file (/etc/containerd/config.toml).

Use kubectl apply to deploy the kube-flannel.yml file downloaded during the software package installation.
kubectl apply -f kube-flannel.ymlNote
The control plane may have taint issues, causing the node status in kubectl get nodes to remain "not ready." Refer to the official documentation to remove taints.
Joining the Cluster (Worker Nodes Only)
Disable the proxy (if applicable):
unset http_proxy https_proxyAfter installing and configuring the environment on worker nodes, join the cluster using the following command:
kubeadm join <control-plane-host>:<control-plane-port> --token <token> --discovery-token-ca-cert-hash sha256:<hash>This command is generated after kubeadm init completes on the control plane. Alternatively, you can generate it on the control plane using the following commands:
$ kubeadm token create  # Generate token.
$ openssl x509 -pubkey -in /etc/kubernetes/pki/ca.crt | openssl rsa -pubin -outform der 2>/dev/null | \
   openssl dgst -sha256 -hex | sed 's/^.* //'  # Get hash.
After joining, check the status of worker nodes on the control plane using:
kubectl get nodesIf the node status shows "not ready," it may be due to unsuccessful Flannel plugin deployment. In this case, run the locally generated Flannel executable to complete the deployment.
Running kubectl Commands on Worker Nodes (Optional):
To run kubectl commands on worker nodes, copy the control plane configuration file /etc/kubernetes/admin.conf to the same directory, then configure it using:
export KUBECONFIG=/etc/kubernetes/admin.confLicensed under the MulanPSL2
 J.G.W.A.B. No. 11030102011597