Configuring the Repository Server
NOTE
openEuler provides multiple repositories for online usage. For details about the repositories, see OS Installation. If you cannot obtain the openEuler repository online, you can use the ISO release package provided by openEuler to create a local openEuler repository. This section uses the openEuler-24.03-LTS-SP1-aarch64-dvd.iso file as an example. Modify the ISO file as required.
Overview
Create the openEuler-24.03-LTS-SP1-aarch64-dvd.iso file provided by openEuler as the repository. The following uses Nginx as an example to describe how to deploy the repository and provide the HTTP service.
Creating or Updating a Local Repository
Mount the openEuler ISO file openEuler-24.03-LTS-SP1-aarch64-dvd.iso to create and update a repository.
Obtaining the ISO File
Obtain the openEuler ISO file from the following website:
https://www.openeuler.org/en/download/archive/detail/?version=openEuler 24.03 LTS SP1
Mounting an ISO File to Create a Repository
Run the mount command as the root user to mount the ISO file.
The following is an example:
mount /home/openEuler/openEuler-24.03-LTS-SP1-aarch64-dvd.iso /mnt/The mounted mnt directory is as follows:
.
│── boot.catalog
│── docs
│── EFI
│── images
│── Packages
│── repodata
│── TRANS.TBL
└── RPM-GPG-KEY-openEuler
In the preceding directory, Packages indicates the directory where the RPM package is stored, repodata indicates the directory where the repository metadata is stored, and RPM-GPG-KEY-openEuler indicates the public key for signing openEuler.
Creating a Local Repository
You can copy related files in the ISO file to a local directory to create a local repository. The following is an example:
mount /home/openEuler/openEuler-24.03-LTS-SP1-aarch64-dvd.iso /mnt/
mkdir -p /home/openEuler/srv/repo/
cp -r /mnt/Packages /home/openEuler/srv/repo/
cp -r /mnt/repodata /home/openEuler/srv/repo/
cp -r /mnt/RPM-GPG-KEY-openEuler /home/openEuler/srv/repo/
The local repository directory is as follows:
.
│── Packages
│── repodata
└── RPM-GPG-KEY-openEuler
Packages indicates the directory where the RPM package is stored, repodata indicates the directory where the repository metadata is stored, and RPM-GPG-KEY-openEuler indicates the public key for signing openEuler.
Updating the Repository
You can update the repository in either of the following ways:
Use the latest ISO file to update the existing repository. The method is the same as that for creating a repository. That is, mount the ISO file or copy the ISO file to the local directory.
Add a RPM package to the Packages directory of the repository and run the createrepo command to update the repository.
shellcreaterepo --update --workers=10 ~/srv/repo
In this command, --update indicates the update, and --workers indicates the number of threads, which can be customized.
NOTE
If the command output contains "createrepo: command not found", run the dnf install createrepo command as the root user to install the createrepo softeware.
Deploying the Remote Repository
Install openEuler OS and deploy the repository using Nginx on openEuler OS.
Installing and Configuring Nginx
Download the Nginx tool and install it as the root user.
After Nginx is installed, configure /etc/nginx/nginx.conf as the root user.
NOTE
The configuration content in this document is for reference only. You can configure the content based on the site requirements (for example, security hardening requirements).
textuser nginx; worker_processes auto; # You are advised to set this parameter to **core-1** . error_log /var/log/nginx/error.log warn; # Log storage location pid /var/run/nginx.pid; events { worker_connections 1024; } http { include /etc/nginx/mime.types; default_type application/octet-stream; log_format main '$remote_addr - $remote_user [$time_local] "$request" ' '$status $body_bytes_sent "$http_referer" ' '"$http_user_agent" "$http_x_forwarded_for"'; access_log /var/log/nginx/access.log main; sendfile on; keepalive_timeout 65; server { listen 80; server_name localhost; # Server name (URL) client_max_body_size 4G; root /usr/share/nginx/repo; # Default service directory location / { autoindex on; # Enable the access to lower-layer files in the directory. autoindex_exact_size on; autoindex_localtime on; } } }
Starting Nginx
Run the following
systemctlcommands as the root user to start the Nginx service.shellsystemctl enable nginx systemctl start nginxYou can run the following command to check whether Nginx is started successfully:
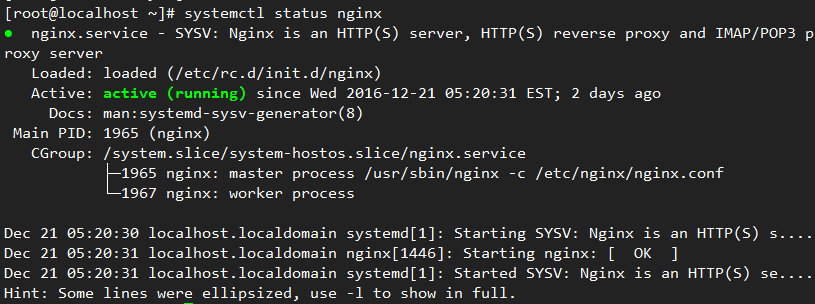
shellsystemctl status nginx- Figure 1 indicates that the Nginx service is started successfully.
Figure 1 The Nginx service is successfully started.
- If the Nginx service fails to be started, view the error information.
shellsystemctl status nginx.service --fullFigure 2 The Nginx service startup fails
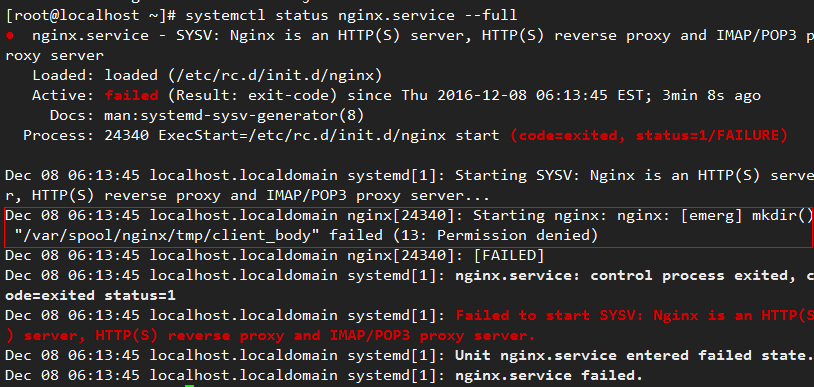
As shown in Figure 2, the Nginx service fails to be created because the /var/spool/nginx/tmp/client_body directory fails to be created. You need to manually create the directory as the root user. Solve similar problems as follows:
shellmkdir -p /var/spool/nginx/tmp/client_body mkdir -p /var/spool/nginx/tmp/proxy mkdir -p /var/spool/nginx/tmp/fastcgi mkdir -p /usr/share/nginx/uwsgi_temp mkdir -p /usr/share/nginx/scgi_temp
Deploying the Repository
Run the following command as the root user to create the /usr/share/nginx/repo directory specified in the Nginx configuration file /etc/nginx/nginx.conf:
shellmkdir -p /usr/share/nginx/repoRun the following command as the root user to modify the /usr/share/nginx/repo directory permission:
shellchmod -R 755 /usr/share/nginx/repoConfigure firewall rules as the root user to enable the port (port 80) configured for Nginx.
shellfirewall-cmd --add-port=80/tcp --permanent firewall-cmd --reloadCheck whether port 80 is enabled as the root user. If the output is yes, port 80 is enabled.
shellfirewall-cmd --query-port=80/tcpYou can also enable port 80 using iptables as the root user.
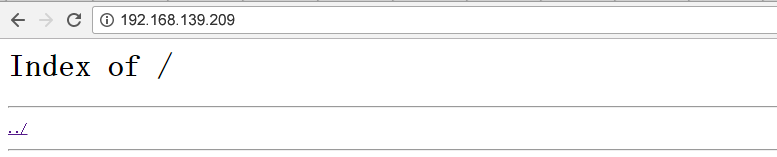
shelliptables -I INPUT -p tcp --dport 80 -j ACCEPTAfter the Nginx service is configured, you can use the IP address to access the web page, as shown in Figure 3.
Use either of the following methods to add the repository to the /usr/share/nginx/repo directory:
Copy related files in the image to the /usr/share/nginx/repo directory as the root user.
shellmount /home/openEuler/openEuler-24.03-LTS-SP1-aarch64-dvd.iso /mnt/ cp -r /mnt/Packages /usr/share/nginx/repo/ cp -r /mnt/repodata /usr/share/nginx/repo/ cp -r /mnt/RPM-GPG-KEY-openEuler /usr/share/nginx/repo/ chmod -R 755 /usr/share/nginx/repoThe openEuler-24.03-LTS-SP1-aarch64-dvd.iso file is stored in the /home/openEuler directory.
Create a soft link for the repository in the /usr/share/nginx/repo directory as the root user.
shellln -s /mnt /usr/share/nginx/repo/os/mnt is the created repository, and /usr/share/nginx/repo/os points to /mnt .
Using the Repository
The repository can be configured as a Yum repository, which is a shell front-end software package manager. Based on the Redhat package manager (RPM), YUM can automatically download the RPM package from the specified server, install the package, and process dependent relationship. It supports one-off installation for all dependent software packages.
Configuring Repository as the Yum Repository
You can configure the built repository as the Yum repository and create the ***.repo configuration file (the extension .repo is mandatory) in the /etc/yum.repos.d/ directory as the root user. You can configure the Yum repository on the local host or HTTP server.
Configuring the local Yum repository.
Create the openEuler.repo file in the /etc/yum.repos.d directory and use the local repository as the Yum repository. The content of the openEuler.repo file is as follows:
text[base] name=base baseurl=file:///home/openEuler/srv/repo enabled=1 gpgcheck=1 gpgkey=file:///home/openEuler/srv/repo/RPM-GPG-KEY-openEulerNOTE
- repoid indicates the ID of the software repository. Repoids in all .repo configuration files must be unique. In the example, repoid is set to base.
- name indicates the string that the software repository describes.
- baseurl indicates the address of the software repository.
- enabled indicates whether to enable the software source repository. The value can be 1 or 0. The default value is 1, indicating that the software source repository is enabled.
- gpgcheck indicates whether to enable the GNU privacy guard (GPG) to check the validity and security of sources of RPM packages. 1 indicates GPG check is enabled. 0 indicates the GPG check is disabled.
- gpgkey indicates the public key used to verify the signature.
Configuring the Yum repository for the HTTP server
Create the openEuler.repo file in the /etc/yum.repos.d directory.
If the repository of the HTTP server deployed by the user is used as the Yum repository, the content of openEuler.repo is as follows:
text[base] name=base baseurl=http://192.168.139.209/ enabled=1 gpgcheck=1 gpgkey=http://192.168.139.209/RPM-GPG-KEY-openEulerNOTE
192.168.139.209 is an example. Replace it with the actual IP address.
If the openEuler repository provided by openEuler is used as the Yum repository, the content of openEuler.repo is as follows (the AArch64-based OS repository is used as an example):
text[base] name=base baseurl=http://repo.openeuler.org/openEuler-24.03-LTS-SP1/OS/aarch64/ enabled=1 gpgcheck=1 gpgkey=http://repo.openeuler.org/openEuler-24.03-LTS-SP1/OS/aarch64/RPM-GPG-KEY-openEuler
Repository Priority
If there are multiple repositories, you can set the repository priority in the .repo file. If the priority is not set, the default priority is 99 . If the same RPM package exists in the sources with the same priority, the latest version is installed. 1 indicates the highest priority and 99 indicates the lowest priority. The following shows how to set the priority of openEuler.repo to 2.
[base]
name=base
baseurl=http://192.168.139.209/
enabled=1
priority=2
gpgcheck=1
gpgkey=http://192.168.139.209/RPM-GPG-KEY-openEuler
Related Commands of dnf
The dnf command can automatically parse the dependency between packages during installation and upgrade. The common usage method is as follows:
dnf <command> <packages name>Common commands are as follows:
Installation
Run the following command as the root user.
shelldnf install <packages name>Upgrade
Run the following command as the root user.
shelldnf update <packages name>Rollback
Run the following command as the root user.
shelldnf downgrade <packages name>Update check
shelldnf check-updateUninstallation
Run the following command as the root user.
shelldnf remove <packages name>Query
shelldnf search <packages name>Local installation
Run the following command as the root user.
shelldnf localinstall <absolute path to package name>Historical records check
shelldnf historyCache records clearing
shelldnf clean allCache update
shelldnf makecache
Licensed under the MulanPSL2
 J.G.W.A.B. No. 11030102011597