OpenStack Antelope Deployment Guide
[TOC]
This document is the OpenStack deployment guide based on openEuler 24.03 LTS SP4, written by the openEuler OpenStack SIG. The content is contributed by SIG members. If you have any questions or find any issues during reading, please contact the SIG maintainers, or directly submit an issue
Conventions
This section describes some common conventions used in this document.
| Name | Definition |
|---|---|
| RABBIT_PASS | Password for RabbitMQ, set by the user, used in OpenStack service configurations |
| CINDER_PASS | Password for the cinder service Keystone user, used in cinder configuration |
| CINDER_DBPASS | Database password for cinder service, used in cinder configuration |
| KEYSTONE_DBPASS | Database password for keystone service, used in keystone configuration |
| GLANCE_PASS | Password for the glance service Keystone user, used in glance configuration |
| GLANCE_DBPASS | Database password for glance service, used in glance configuration |
| HEAT_PASS | Password for the heat user registered in Keystone, used in heat configuration |
| HEAT_DBPASS | Database password for heat service, used in heat configuration |
| CYBORG_PASS | Password for the cyborg user registered in Keystone, used in cyborg configuration |
| CYBORG_DBPASS | Database password for cyborg service, used in cyborg configuration |
| NEUTRON_PASS | Password for the neutron user registered in Keystone, used in neutron configuration |
| NEUTRON_DBPASS | Database password for neutron service, used in neutron configuration |
| PROVIDER_INTERFACE_NAME | Name of the physical network interface, used in neutron configuration |
| OVERLAY_INTERFACE_IP_ADDRESS | Management IP address of the Controller node, used in neutron configuration |
| METADATA_SECRET | Secret password for metadata proxy, used in nova and neutron configurations |
| PLACEMENT_DBPASS | Database password for placement service, used in placement configuration |
| PLACEMENT_PASS | Password for the placement user registered in Keystone, used in placement configuration |
| NOVA_DBPASS | Database password for nova service, used in nova configuration |
| NOVA_PASS | Password for the nova user registered in Keystone, used in nova, cyborg, neutron configurations |
| IRONIC_DBPASS | Database password for ironic service, used in ironic configuration |
| IRONIC_PASS | Password for the ironic user registered in Keystone, used in ironic configuration |
| IRONIC_INSPECTOR_DBPASS | Database password for ironic-inspector service, used in ironic-inspector configuration |
| IRONIC_INSPECTOR_PASS | Password for the ironic-inspector user registered in Keystone, used in ironic-inspector configuration |
OpenStack SIG provides multiple methods to deploy OpenStack based on openEuler to meet different user scenarios. Please choose according to your needs.
RPM-based Deployment
Environment Preparation
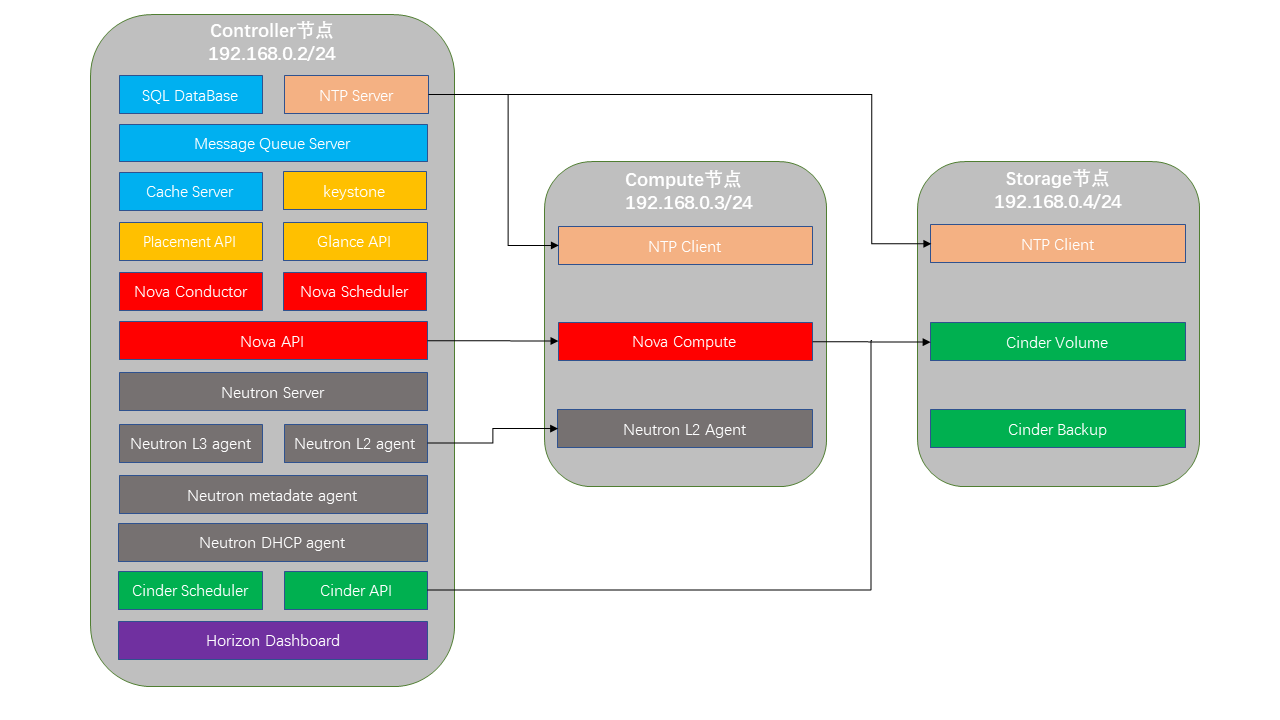
This document is based on the classic three-node environment for OpenStack deployment. The three nodes are Controller node, Compute node, and Storage node. The storage node generally only deploys storage services. If resources are limited, you can skip deploying this node separately and deploy the services from the storage node on the compute node.
First, prepare three openEuler 24.03 LTS SP4 environments. Download and install the corresponding image based on your environment: ISO image, qcow2 image.
The installation follows the following topology:
controller:192.168.0.2
compute:   192.168.0.3
storage:   192.168.0.4
If your environment uses different IPs, please modify the configuration files according to your environment IP.
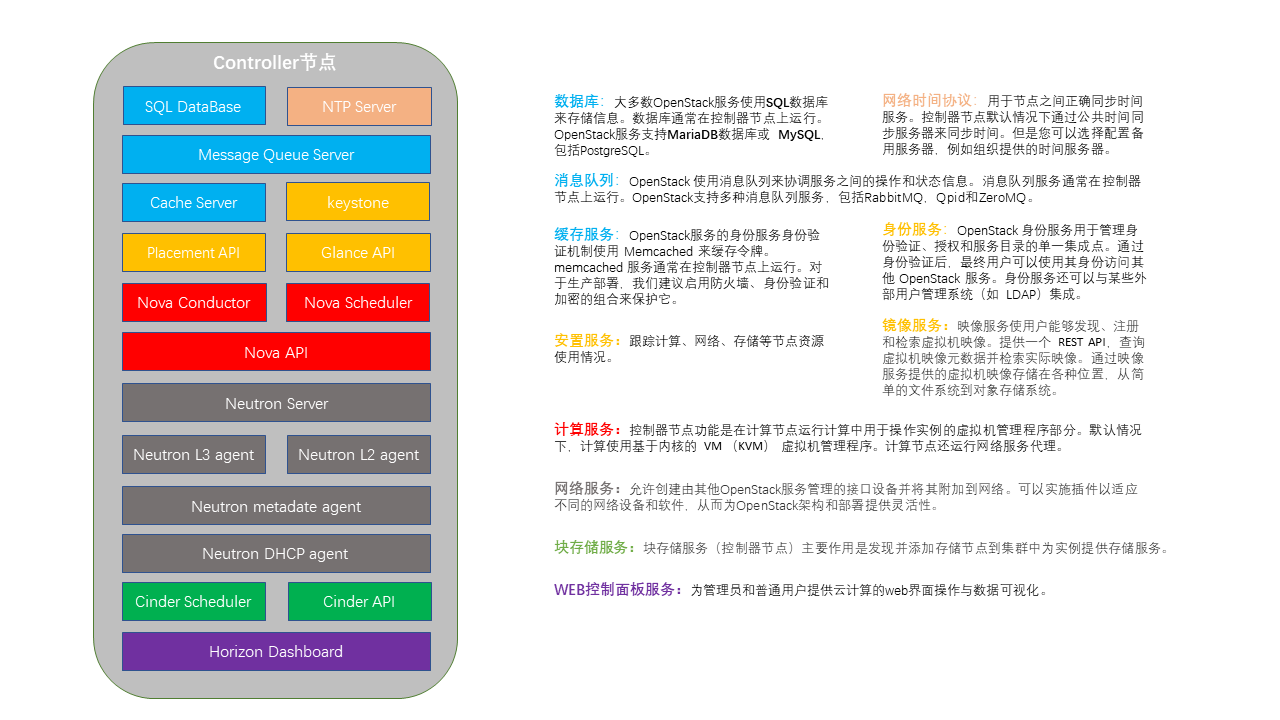
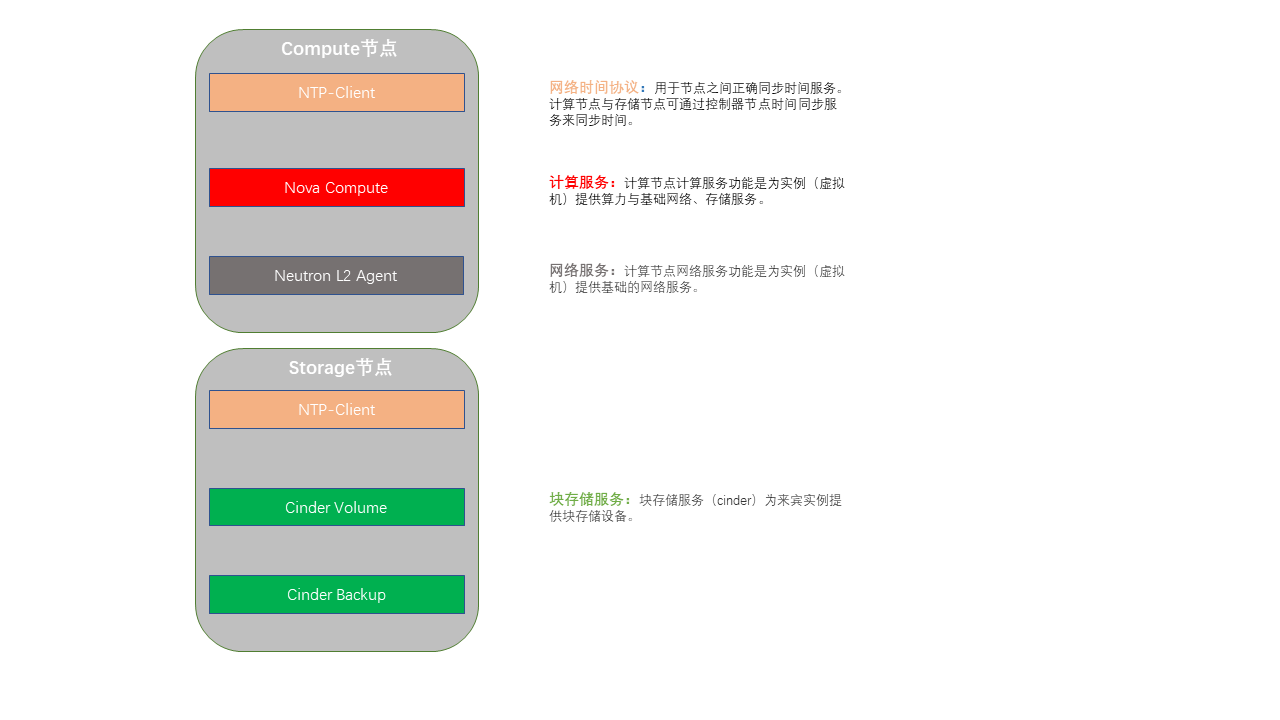
The three-node service topology for this document is shown in the figures below (only including core services: Keystone, Glance, Nova, Cinder, Neutron. For other services, please refer to the specific deployment chapters):
Before formal deployment, the following configuration and checks need to be performed on each node:
Configure the openEuler 24.03 LTS SP4 official yum repository and enable the EPOL repository to support OpenStack
shellyum update yum install openstack-release-antelope yum clean all && yum makecacheNote: If the EPOL repository is not enabled in your yum source, you need to configure EPOL as well. Make sure EPOL is configured as follows.
shellvi /etc/yum.repos.d/openEuler.repo [EPOL] name=EPOL baseurl=http://repo.openeuler.org/openEuler-24.03-LTS-SP4/EPOL/main/$basearch/ enabled=1 gpgcheck=1 gpgkey=http://repo.openeuler.org/openEuler-24.03-LTS-SP4/OS/$basearch/RPM-GPG-KEY-openEuler EOFModify hostname and mappings
Modify the hostname on each node. Using controller as an example:
shellhostnamectl set-hostname controller vi /etc/hostname Modify the content to controllerThen modify the
/etc/hostsfile on each node and add the following:shell192.168.0.2 controller 192.168.0.3 compute 192.168.0.4 storage
Clock Synchronization
Cluster environments require that each node's time be consistent at all times, which is generally guaranteed by clock synchronization software. This document uses the chrony software. Steps are as follows:
Controller Node:
Install the service
shelldnf install chronyModify the
/etc/chrony.confconfiguration file and add a new lineshell# Indicates which IPs are allowed to synchronize time from this node allow 192.168.0.0/24Restart the service
shellsystemctl restart chronyd
Other Nodes
Install the service
shelldnf install chronyModify the
/etc/chrony.confconfiguration file and add a new lineshell# NTP_SERVER is the controller IP, indicating to get time from this machine. Here we fill in 192.168.0.2, or the controller name configured in `/etc/hosts`. server NTP_SERVER iburstAlso, comment out the line
pool pool.ntp.org iburstto disable time synchronization from the public network.Restart the service
shellsystemctl restart chronyd
After configuration is complete, check the result by running chronyc sources on non-controller nodes. A result similar to the following indicates successful time synchronization from the controller.
MS Name/IP address         Stratum Poll Reach LastRx Last sample
===============================================================================
^* 192.168.0.2                 4   6     7     0  -1406ns[  +55us] +/-   16ms
Install Database
The database is installed on the controller node. MariaDB is recommended here.
Install software packages
shelldnf install mysql-config mariadb mariadb-server python3-PyMySQLCreate a new configuration file
/etc/my.cnf.d/openstack.cnfwith the following contentshell[mysqld] bind-address = 192.168.0.2 default-storage-engine = innodb innodb_file_per_table = on max_connections = 4096 collation-server = utf8_general_ci character-set-server = utf8Start the server
shellsystemctl start mariadbInitialize the database. Just follow the prompts
shellmysql_secure_installationExample as follows:
shellNOTE: RUNNING ALL PARTS OF THIS SCRIPT IS RECOMMENDED FOR ALL MariaDB SERVERS IN PRODUCTION USE! PLEASE READ EACH STEP CAREFULLY! In order to log into MariaDB to secure it, we'll need the current password for the root user. If you've just installed MariaDB, and haven't set the root password yet, you should just press enter here. Enter current password for root (enter for none): #Enter password here, since we are initializing DB, just press Enter OK, successfully used password, moving on... Setting the root password or using the unix_socket ensures that nobody can log into the MariaDB root user without the proper authorisation. You already have your root account protected, so you can safely answer 'n'. # Enter N according to the prompt Switch to unix_socket authentication [Y/n] N Enabled successfully! Reloading privilege tables.. ... Success! You already have your root account protected, so you can safely answer 'n'. # Enter Y to change password Change the root password? [Y/n] Y New password: Re-enter new password: Password updated successfully! Reloading privilege tables.. ... Success! By default, a MariaDB installation has an anonymous user, allowing anyone to log into MariaDB without having to have a user account created for them. This is intended only for testing, and to make the installation go a bit smoother. You should remove them before moving into a production environment. # Enter Y to remove anonymous users Remove anonymous users? [Y/n] Y ... Success! Normally, root should only be allowed to connect from 'localhost'. This ensures that someone cannot guess at the root password from the network. # Enter Y to disable remote root login Disallow root login remotely? [Y/n] Y ... Success! By default, MariaDB comes with a database named 'test' that anyone can access. This is also intended only for testing, and should be removed before moving into a production environment. # Enter Y to delete the test database Remove test database and access to it? [Y/n] Y - Dropping test database... ... Success! - Removing privileges on test database... ... Success! Reloading the privilege tables will ensure that all changes made so far will take effect immediately. # Enter Y to reload configuration Reload privilege tables now? [Y/n] Y ... Success! Cleaning up... All done! If you've completed all of the above steps, your MariaDB installation should now be secure.Verify. Check if you can log in to mariadb using the password set in step 4
shellmysql -uroot -p
Install Message Queue
The message queue is installed on the controller node. RabbitMQ is recommended here.
Install software packages
shelldnf install rabbitmq-serverStart the service
shellsystemctl start rabbitmq-serverConfigure the openstack user.
RABBIT_PASSis the password for openstack services to log in to the message queue, which must be consistent with the configuration of each service later.shellrabbitmqctl add_user openstack RABBIT_PASS rabbitmqctl set_permissions openstack ".*" ".*" ".*"
Install Cache Service
The message queue is installed on the controller node. Memcached is recommended here.
Install software packages
shelldnf install memcached python3-memcachedModify the configuration file
/etc/sysconfig/memcachedshellOPTIONS="-l 127.0.0.1,::1,controller"Start the service
shellsystemctl start memcached
Deploy Services
Keystone
Keystone is the authentication service provided by OpenStack. It is the entry point of the entire OpenStack, providing tenant isolation, user authentication, service discovery, and other functions. It must be installed.
Create the keystone database and grant privileges
sqlmysql -u root -p MariaDB [(none)]> CREATE DATABASE keystone; MariaDB [(none)]> GRANT ALL PRIVILEGES ON keystone.* TO 'keystone'@'localhost' \ IDENTIFIED BY 'KEYSTONE_DBPASS'; MariaDB [(none)]> GRANT ALL PRIVILEGES ON keystone.* TO 'keystone'@'%' \ IDENTIFIED BY 'KEYSTONE_DBPASS'; MariaDB [(none)]> exitNote
Replace
KEYSTONE_DBPASSwith a password for the Keystone databaseInstall software packages
shelldnf install openstack-keystone httpd mod_wsgiConfigure keystone-related settings
shellvim /etc/keystone/keystone.conf [database] connection = mysql+pymysql://keystone:KEYSTONE_DBPASS@controller/keystone [token] provider = fernetExplanation
In the [database] section, configure the database connection
In the [token] section, configure the token provider
Synchronize the database
shellsu -s /bin/sh -c "keystone-manage db_sync" keystoneInitialize the Fernet key repository
shellkeystone-manage fernet_setup --keystone-user keystone --keystone-group keystone keystone-manage credential_setup --keystone-user keystone --keystone-group keystoneStart the service
shellkeystone-manage bootstrap --bootstrap-password ADMIN_PASS \ --bootstrap-admin-url http://controller:5000/v3/ \ --bootstrap-internal-url http://controller:5000/v3/ \ --bootstrap-public-url http://controller:5000/v3/ \ --bootstrap-region-id RegionOneNote
Replace
ADMIN_PASSwith a password for the admin userConfigure Apache HTTP server
- Open httpd.conf and configure
shell# Path to the configuration file that needs to be modified vim /etc/httpd/conf/httpd.conf # Modify the following item, add if it doesn't exist ServerName controller- Create a symbolic link
shellln -s /usr/share/keystone/wsgi-keystone.conf /etc/httpd/conf.d/Explanation
Configure the
ServerNameitem to reference the controller nodeNoteIf the
ServerNameitem does not exist, it needs to be createdStart Apache HTTP service
shellsystemctl enable httpd.service systemctl start httpd.serviceCreate environment variable configuration
shellcat << EOF >> ~/.admin-openrc export OS_PROJECT_DOMAIN_NAME=Default export OS_USER_DOMAIN_NAME=Default export OS_PROJECT_NAME=admin export OS_USERNAME=admin export OS_PASSWORD=ADMIN_PASS export OS_AUTH_URL=http://controller:5000/v3 export OS_IDENTITY_API_VERSION=3 export OS_IMAGE_API_VERSION=2 EOFNote
Replace
ADMIN_PASSwith the password for the admin userCreate domain, projects, users, and roles in order
- First, install python3-openstackclient
shelldnf install python3-openstackclient- Source environment variables
shellsource ~/.admin-openrc- Create the service project. The domain
defaultwas created when running keystone-manage bootstrap
shellopenstack domain create --description "An Example Domain" exampleshellopenstack project create --domain default --description "Service Project" service- Create a (non-admin) project
myproject, usermyuser, and rolemyrole, then add the rolemyroletomyprojectandmyuser
shellopenstack project create --domain default --description "Demo Project" myproject openstack user create --domain default --password-prompt myuser openstack role create myrole openstack role add --project myproject --user myuser myroleVerify
- Unset temporary environment variables OS_AUTH_URL and OS_PASSWORD:
shellsource ~/.admin-openrc unset OS_AUTH_URL OS_PASSWORD- Request a token for the admin user:
shellopenstack --os-auth-url http://controller:5000/v3 \ --os-project-domain-name Default --os-user-domain-name Default \ --os-project-name admin --os-username admin token issue- Request a token for the myuser user:
shellopenstack --os-auth-url http://controller:5000/v3 \ --os-project-domain-name Default --os-user-domain-name Default \ --os-project-name myproject --os-username myuser token issue
Glance
Glance is the image service provided by OpenStack. It is responsible for uploading and downloading virtual machine and bare metal images. It must be installed.
Controller Node:
Create the glance database and grant privileges
sqlmysql -u root -p MariaDB [(none)]> CREATE DATABASE glance; MariaDB [(none)]> GRANT ALL PRIVILEGES ON glance.* TO 'glance'@'localhost' \ IDENTIFIED BY 'GLANCE_DBPASS'; MariaDB [(none)]> GRANT ALL PRIVILEGES ON glance.* TO 'glance'@'%' \ IDENTIFIED BY 'GLANCE_DBPASS'; MariaDB [(none)]> exitNote:
Replace
GLANCE_DBPASSwith a password for the glance databaseInitialize Glance resource objects
- Source environment variables
shellsource ~/.admin-openrc- When creating a user, the command line will prompt for a password. Please enter a custom password, and replace
GLANCE_PASSbelow with this password.
shellopenstack user create --domain default --password-prompt glance User Password: Repeat User Password:- Add the glance user to the service project and assign the admin role:
shellopenstack role add --project service --user glance admin- Create the glance service entity:
shellopenstack service create --name glance --description "OpenStack Image" image- Create the glance API service:
shellopenstack endpoint create --region RegionOne image public http://controller:9292 openstack endpoint create --region RegionOne image internal http://controller:9292 openstack endpoint create --region RegionOne image admin http://controller:9292Install software packages
shelldnf install openstack-glanceModify the glance configuration file
shellvim /etc/glance/glance-api.conf [database] connection = mysql+pymysql://glance:GLANCE_DBPASS@controller/glance [keystone_authtoken] www_authenticate_uri = http://controller:5000 auth_url = http://controller:5000 memcached_servers = controller:11211 auth_type = password project_domain_name = Default user_domain_name = Default project_name = service username = glance password = GLANCE_PASS [paste_deploy] flavor = keystone [glance_store] stores = file,http default_store = file filesystem_store_datadir = /var/lib/glance/images/Explanation:
In the [database] section, configure the database connection
In the [keystone_authtoken] and [paste_deploy] sections, configure the identity authentication service entry
In the [glance_store] section, configure the local file system storage and the location of image files
Synchronize the database
shellsu -s /bin/sh -c "glance-manage db_sync" glanceStart the service:
shellsystemctl enable openstack-glance-api.service systemctl start openstack-glance-api.serviceVerify
- Source environment variables
shellsource ~/.admin-openrc- Download an image
shellx86 image download: wget http://download.cirros-cloud.net/0.4.0/cirros-0.4.0-x86_64-disk.img arm image download: wget http://download.cirros-cloud.net/0.4.0/cirros-0.4.0-aarch64-disk.imgNote
If your environment uses Kunpeng architecture, please download the aarch64 version image. The image cirros-0.5.2-aarch64-disk.img has been tested.
- Upload an image to the Image service:
shellopenstack image create --disk-format qcow2 --container-format bare \ --file cirros-0.4.0-x86_64-disk.img --public cirros- Confirm the image is uploaded and verify its properties:
shellopenstack image list
Placement
Placement is the resource scheduling component provided by OpenStack. It is generally not user-facing and is called by components like Nova. It is installed on the controller node.
Before installing and configuring the Placement service, you need to create the corresponding database, service credentials, and API endpoints.
Create the database
- Use the root user to access the database service:
shellmysql -u root -p- Create the placement database:
sqlMariaDB [(none)]> CREATE DATABASE placement;- Grant database access:
sqlMariaDB [(none)]> GRANT ALL PRIVILEGES ON placement.* TO 'placement'@'localhost' \ IDENTIFIED BY 'PLACEMENT_DBPASS'; MariaDB [(none)]> GRANT ALL PRIVILEGES ON placement.* TO 'placement'@'%' \ IDENTIFIED BY 'PLACEMENT_DBPASS';Replace
PLACEMENT_DBPASSwith the password for the placement database access.- Exit the database access client:
shellexitConfigure users and endpoints
- Source admin credentials to get admin command-line permissions:
shellsource ~/.admin-openrc- Create the placement user and set the user password:
shellopenstack user create --domain default --password-prompt placement User Password: Repeat User Password:- Add the placement user to the service project and assign the admin role:
shellopenstack role add --project service --user placement admin- Create the placement service entity:
shellopenstack service create --name placement \ --description "Placement API" placement- Create Placement API service endpoints:
shellopenstack endpoint create --region RegionOne \ placement public http://controller:8778 openstack endpoint create --region RegionOne \ placement internal http://controller:8778 openstack endpoint create --region RegionOne \ placement admin http://controller:8778Install and configure components
- Install software packages:
shelldnf install openstack-placement-apiEdit the
/etc/placement/placement.confconfiguration file and complete the following:- In the
[placement_database]section, configure the database connection:
ini[placement_database] connection = mysql+pymysql://placement:PLACEMENT_DBPASS@controller/placementReplace
PLACEMENT_DBPASSwith the password for the placement database.- In the
[api]and[keystone_authtoken]sections, configure the identity authentication service entry:
ini[api] auth_strategy = keystone [keystone_authtoken] auth_url = http://controller:5000/v3 memcached_servers = controller:11211 auth_type = password project_domain_name = Default user_domain_name = Default project_name = service username = placement password = PLACEMENT_PASSReplace
PLACEMENT_PASSwith the password for the placement user.- In the
Database synchronization, populate the Placement database:
shellsu -s /bin/sh -c "placement-manage db sync" placementStart the service
Restart the httpd service:
shellsystemctl restart httpdVerify
- Source admin credentials to get admin command-line permissions
shellsource ~/.admin-openrc- Run the status check:
shellplacement-status upgrade checkini+----------------------------------------------------------------------+ | Upgrade Check Results | +----------------------------------------------------------------------+ | Check: Missing Root Provider IDs | | Result: Success | | Details: None | +----------------------------------------------------------------------+ | Check: Incomplete Consumers | | Result: Success | | Details: None | +----------------------------------------------------------------------+ | Check: Policy File JSON to YAML Migration | | Result: Failure | | Details: Your policy file is JSON-formatted which is deprecated. You | | need to switch to YAML-formatted file. Use the | | ``oslopolicy-convert-json-to-yaml`` tool to convert the | | existing JSON-formatted files to YAML in a backwards- | | compatible manner: https://docs.openstack.org/oslo.policy/ | | latest/cli/oslopolicy-convert-json-to-yaml.html. | +----------------------------------------------------------------------+Here you can see that the result for
Policy File JSON to YAML Migrationis Failure. This is because in Placement, the JSON-formatted policy file has been indeprecatedstatus since the Wallaby release. Refer to the prompt and use theoslopolicy-convert-json-to-yamltool to convert the existing JSON-formatted policy files to YAML format.shelloslopolicy-convert-json-to-yaml --namespace placement \ --policy-file /etc/placement/policy.json \ --output-file /etc/placement/policy.yaml mv /etc/placement/policy.json{,.bak}Note: This issue can be ignored in the current environment and does not affect operation.
Run commands against the placement API:
- Install the osc-placement plugin:
shelldnf install python3-osc-placement- List available resource classes and traits:
shellopenstack --os-placement-api-version 1.2 resource class list --sort-column name +----------------------------+ | name | +----------------------------+ | DISK_GB | | FPGA | | ... | openstack --os-placement-api-version 1.6 trait list --sort-column name +---------------------------------------+ | name | +---------------------------------------+ | COMPUTE_ACCELERATORS | | COMPUTE_ARCH_AARCH64 | | ... |
Nova
Nova is the compute service provided by OpenStack. It is responsible for creating and provisioning virtual machines, among other functions.
Controller Node
Execute the following operations on the controller node.
Create databases
- Use the root user to access the database service:
shellmysql -u root -p- Create
nova_api,nova, andnova_cell0databases:
sqlMariaDB [(none)]> CREATE DATABASE nova_api; MariaDB [(none)]> CREATE DATABASE nova; MariaDB [(none)]> CREATE DATABASE nova_cell0;- Grant database access:
sqlMariaDB [(none)]> GRANT ALL PRIVILEGES ON nova_api.* TO 'nova'@'localhost' \ IDENTIFIED BY 'NOVA_DBPASS'; MariaDB [(none)]> GRANT ALL PRIVILEGES ON nova_api.* TO 'nova'@'%' \ IDENTIFIED BY 'NOVA_DBPASS'; MariaDB [(none)]> GRANT ALL PRIVILEGES ON nova.* TO 'nova'@'localhost' \ IDENTIFIED BY 'NOVA_DBPASS'; MariaDB [(none)]> GRANT ALL PRIVILEGES ON nova.* TO 'nova'@'%' \ IDENTIFIED BY 'NOVA_DBPASS'; MariaDB [(none)]> GRANT ALL PRIVILEGES ON nova_cell0.* TO 'nova'@'localhost' \ IDENTIFIED BY 'NOVA_DBPASS'; MariaDB [(none)]> GRANT ALL PRIVILEGES ON nova_cell0.* TO 'nova'@'%' \ IDENTIFIED BY 'NOVA_DBPASS';Replace
NOVA_DBPASSwith the password for nova-related database access.- Exit the database access client:
sqlexitConfigure users and endpoints
- Source admin credentials to get admin command-line permissions:
shellsource ~/.admin-openrc- Create the nova user and set the user password:
shellopenstack user create --domain default --password-prompt nova User Password: Repeat User Password:- Add the nova user to the service project and assign the admin role:
shellopenstack role add --project service --user nova admin- Create the nova service entity:
shellopenstack service create --name nova \ --description "OpenStack Compute" compute- Create Nova API service endpoints:
shellopenstack endpoint create --region RegionOne \ compute public http://controller:8774/v2.1 openstack endpoint create --region RegionOne \ compute internal http://controller:8774/v2.1 openstack endpoint create --region RegionOne \ compute admin http://controller:8774/v2.1Install and configure components
- Install software packages:
shelldnf install openstack-nova-api openstack-nova-conductor \ openstack-nova-novncproxy openstack-nova-schedulerEdit the
/etc/nova/nova.confconfiguration file and complete the following:- In the
[default]section, enable the compute and metadata APIs, configure the RabbitMQ message queue connection, use the controller node management IP to configure my_ip, and explicitly define log_dir and state_path:
ini[DEFAULT] enabled_apis = osapi_compute,metadata transport_url = rabbit://openstack:RABBIT_PASS@controller:5672/ my_ip = 192.168.0.2 log_dir = /var/log/nova state_path = /var/lib/novaReplace
RABBIT_PASSwith the password for the openstack account in RabbitMQ.- In the
[api_database]and[database]sections, configure the database connections:
ini[api_database] connection = mysql+pymysql://nova:NOVA_DBPASS@controller/nova_api [database] connection = mysql+pymysql://nova:NOVA_DBPASS@controller/novaReplace
NOVA_DBPASSwith the password for nova-related databases.- In the
[api]and[keystone_authtoken]sections, configure the identity authentication service entry:
ini[api] auth_strategy = keystone [keystone_authtoken] auth_url = http://controller:5000/v3 memcached_servers = controller:11211 auth_type = password project_domain_name = Default user_domain_name = Default project_name = service username = nova password = NOVA_PASSReplace
NOVA_PASSwith the password for the nova user.- In the
[vnc]section, enable and configure the remote console entry:
ini[vnc] enabled = true server_listen = $my_ip server_proxyclient_address = $my_ip- In the
[glance]section, configure the image service API address:
ini[glance] api_servers = http://controller:9292- In the
[oslo_concurrency]section, configure the lock path:
ini[oslo_concurrency] lock_path = /var/lib/nova/tmp- In the [placement] section, configure the placement service entry:
ini[placement] region_name = RegionOne project_domain_name = Default project_name = service auth_type = password user_domain_name = Default auth_url = http://controller:5000/v3 username = placement password = PLACEMENT_PASSReplace
PLACEMENT_PASSwith the password for the placement user.- In the
Database synchronization:
- Synchronize the nova-api database:
shellsu -s /bin/sh -c "nova-manage api_db sync" nova- Register the cell0 database:
shellsu -s /bin/sh -c "nova-manage cell_v2 map_cell0" nova- Create the cell1 cell:
shellsu -s /bin/sh -c "nova-manage cell_v2 create_cell --name=cell1 --verbose" nova- Synchronize the nova database:
shellsu -s /bin/sh -c "nova-manage db sync" nova- Verify that cell0 and cell1 are registered correctly:
shellsu -s /bin/sh -c "nova-manage cell_v2 list_cells" nova
Start the service
shellsystemctl enable \ openstack-nova-api.service \ openstack-nova-scheduler.service \ openstack-nova-conductor.service \ openstack-nova-novncproxy.service systemctl start \ openstack-nova-api.service \ openstack-nova-scheduler.service \ openstack-nova-conductor.service \ openstack-nova-novncproxy.service
Compute Node
Execute the following operations on the compute node.
Install software packages
shelldnf install openstack-nova-computeEdit the
/etc/nova/nova.confconfiguration file- In the
[default]section, enable the compute and metadata APIs, configure the RabbitMQ message queue connection, use the Compute node management IP to configure my_ip, and explicitly define compute_driver, instances_path, log_dir:
ini[DEFAULT] enabled_apis = osapi_compute,metadata transport_url = rabbit://openstack:RABBIT_PASS@controller:5672/ my_ip = 192.168.0.3 compute_driver = libvirt.LibvirtDriver instances_path = /var/lib/nova/instances log_dir = /var/log/novaReplace
RABBIT_PASSwith the password for the openstack account in RabbitMQ.- In the
[api]and[keystone_authtoken]sections, configure the identity authentication service entry:
ini[api] auth_strategy = keystone [keystone_authtoken] auth_url = http://controller:5000/v3 memcached_servers = controller:11211 auth_type = password project_domain_name = Default user_domain_name = Default project_name = service username = nova password = NOVA_PASSReplace
NOVA_PASSwith the password for the nova user.- In the
[vnc]section, enable and configure the remote console entry:
ini[vnc] enabled = true server_listen = $my_ip server_proxyclient_address = $my_ip novncproxy_base_url = http://controller:6080/vnc_auto.html- In the
[glance]section, configure the image service API address:
ini[glance] api_servers = http://controller:9292- In the
[oslo_concurrency]section, configure the lock path:
ini[oslo_concurrency] lock_path = /var/lib/nova/tmp- In the [placement] section, configure the placement service entry:
ini[placement] region_name = RegionOne project_domain_name = Default project_name = service auth_type = password user_domain_name = Default auth_url = http://controller:5000/v3 username = placement password = PLACEMENT_PASSReplace
PLACEMENT_PASSwith the password for the placement user.- In the
Verify if the compute node supports hardware acceleration for virtual machines (x86_64)
When the processor is x86_64 architecture, you can run the following command to verify hardware acceleration support:
shellegrep -c '(vmx|svm)' /proc/cpuinfoIf the return value is 0, hardware acceleration is not supported. You need to configure libvirt to use QEMU instead of the default KVM. Edit the
[libvirt]section of/etc/nova/nova.conf:ini[libvirt] virt_type = qemuIf the return value is 1 or greater, hardware acceleration is supported and no additional configuration is needed.
Verify if the compute node supports hardware acceleration for virtual machines (arm64)
When the processor is arm64 architecture, you can run the following command to verify hardware acceleration support:
shellvirt-host-validate # This command is provided by libvirt. At this point, libvirt should have been installed as a dependency of openstack-nova-compute, and this command should be available in the environmentWhen FAIL is displayed, hardware acceleration is not supported. You need to configure libvirt to use QEMU instead of the default KVM.
shellQEMU: Checking if device /dev/kvm exists: FAIL (Check that CPU and firmware supports virtualization and kvm module is loaded)Edit the
[libvirt]section of/etc/nova/nova.conf:ini[libvirt] virt_type = qemuWhen PASS is displayed, hardware acceleration is supported and no additional configuration is needed.
shellQEMU: Checking if device /dev/kvm exists: PASSConfigure qemu (arm64 only)
This step is only required when the processor is arm64 architecture.
- Edit
/etc/libvirt/qemu.conf:
ininvram = ["/usr/share/AAVMF/AAVMF_CODE.fd: \ /usr/share/AAVMF/AAVMF_VARS.fd", \ "/usr/share/edk2/aarch64/QEMU_EFI-pflash.raw: \ /usr/share/edk2/aarch64/vars-template-pflash.raw"]- Edit
/etc/qemu/firmware/edk2-aarch64.json
json{ "description": "UEFI firmware for ARM64 virtual machines", "interface-types": [ "uefi" ], "mapping": { "device": "flash", "executable": { "filename": "/usr/share/edk2/aarch64/QEMU_EFI-pflash.raw", "format": "raw" }, "nvram-template": { "filename": "/usr/share/edk2/aarch64/vars-template-pflash.raw", "format": "raw" } }, "targets": [ { "architecture": "aarch64", "machines": [ "virt-*" ] } ], "features": [ ], "tags": [ ] }- Edit
Start the service
shellsystemctl enable libvirtd.service openstack-nova-compute.service systemctl start libvirtd.service openstack-nova-compute.service
Controller Node
Execute the following operations on the controller node.
Add compute node to the openstack cluster
- Source admin credentials to get admin command-line permissions:
shellsource ~/.admin-openrc- Confirm that the nova-compute service has been detected in the database:
shellopenstack compute service list --service nova-compute- Discover compute nodes and add compute nodes to the cell database:
shellsu -s /bin/sh -c "nova-manage cell_v2 discover_hosts --verbose" novaThe result is as follows:
iniModules with known eventlet monkey patching issues were imported prior to eventlet monkey patching: urllib3. This warning can usually be ignored if the caller is only importing and not executing nova code. Found 2 cell mappings. Skipping cell0 since it does not contain hosts. Getting computes from cell 'cell1': 6dae034e-b2d9-4a6c-b6f0-60ada6a6ddc2 Checking host mapping for compute host 'compute': 6286a86f-09d7-4786-9137-1185654c9e2e Creating host mapping for compute host 'compute': 6286a86f-09d7-4786-9137-1185654c9e2e Found 1 unmapped computes in cell: 6dae034e-b2d9-4a6c-b6f0-60ada6a6ddc2Verify
- List service components to verify that each process started and registered successfully:
shellopenstack compute service list- List API endpoints in the identity service to verify connectivity with the identity service:
shellopenstack catalog list- List images in the image service to verify connectivity with the image service:
shellopenstack image list- Check if cells are operating successfully and other prerequisites are in place.
shellnova-status upgrade check
Neutron
Neutron is the network service provided by OpenStack. It provides virtual switches, IP routing, DHCP, and other functions.
Controller Node
Create database, service credentials, and API service endpoints
- Create database:
sqlmysql -u root -p MariaDB [(none)]> CREATE DATABASE neutron; MariaDB [(none)]> GRANT ALL PRIVILEGES ON neutron.* TO 'neutron'@'localhost' IDENTIFIED BY 'NEUTRON_DBPASS'; MariaDB [(none)]> GRANT ALL PRIVILEGES ON neutron.* TO 'neutron'@'%' IDENTIFIED BY 'NEUTRON_DBPASS'; MariaDB [(none)]> exit;- Create users and services, and remember the password entered when creating the neutron user for configuring NEUTRON_PASS:
shellsource ~/.admin-openrc openstack user create --domain default --password-prompt neutron openstack role add --project service --user neutron admin openstack service create --name neutron --description "OpenStack Networking" network- Deploy Neutron API service:
shellopenstack endpoint create --region RegionOne network public http://controller:9696 openstack endpoint create --region RegionOne network internal http://controller:9696 openstack endpoint create --region RegionOne network admin http://controller:9696Install software packages
shelldnf install -y openstack-neutron openstack-neutron-linuxbridge ebtables ipset openstack-neutron-ml2Configure Neutron
- Modify /etc/neutron/neutron.conf
ini[database] connection = mysql+pymysql://neutron:NEUTRON_DBPASS@controller/neutron [DEFAULT] core_plugin = ml2 service_plugins = router allow_overlapping_ips = true transport_url = rabbit://openstack:RABBIT_PASS@controller auth_strategy = keystone notify_nova_on_port_status_changes = true notify_nova_on_port_data_changes = true [keystone_authtoken] www_authenticate_uri = http://controller:5000 auth_url = http://controller:5000 memcached_servers = controller:11211 auth_type = password project_domain_name = Default user_domain_name = Default project_name = service username = neutron password = NEUTRON_PASS [nova] auth_url = http://controller:5000 auth_type = password project_domain_name = Default user_domain_name = Default region_name = RegionOne project_name = service username = nova password = NOVA_PASS [oslo_concurrency] lock_path = /var/lib/neutron/tmp [experimental] linuxbridge = trueConfigure ML2. ML2 configuration can be modified according to user needs. This document uses provider network + linuxbridge**
Modify /etc/neutron/plugins/ml2/ml2_conf.ini
shell[ml2] type_drivers = flat,vlan,vxlan tenant_network_types = vxlan mechanism_drivers = linuxbridge,l2population extension_drivers = port_security [ml2_type_flat] flat_networks = provider [ml2_type_vxlan] vni_ranges = 1:1000 [securitygroup] enable_ipset = true- Modify /etc/neutron/plugins/ml2/linuxbridge_agent.ini
ini[linux_bridge] physical_interface_mappings = provider:PROVIDER_INTERFACE_NAME [vxlan] enable_vxlan = true local_ip = OVERLAY_INTERFACE_IP_ADDRESS l2_population = true [securitygroup] enable_security_group = true firewall_driver = neutron.agent.linux.iptables_firewall.IptablesFirewallDriverConfigure Layer-3 agent
Modify /etc/neutron/l3_agent.ini
shell[DEFAULT] interface_driver = linuxbridgeConfigure DHCP agent Modify /etc/neutron/dhcp_agent.ini
ini[DEFAULT] interface_driver = linuxbridge dhcp_driver = neutron.agent.linux.dhcp.Dnsmasq enable_isolated_metadata = trueConfigure metadata agent
Modify /etc/neutron/metadata_agent.ini
shell[DEFAULT] nova_metadata_host = controller metadata_proxy_shared_secret = METADATA_SECRETConfigure nova service to use neutron. Modify /etc/nova/nova.conf
ini[neutron] auth_url = http://controller:5000 auth_type = password project_domain_name = default user_domain_name = default region_name = RegionOne project_name = service username = neutron password = NEUTRON_PASS service_metadata_proxy = true metadata_proxy_shared_secret = METADATA_SECRETCreate symbolic link for /etc/neutron/plugin.ini
shellln -s /etc/neutron/plugins/ml2/ml2_conf.ini /etc/neutron/plugin.iniSynchronize the database
shellsu -s /bin/sh -c "neutron-db-manage --config-file /etc/neutron/neutron.conf --config-file /etc/neutron/plugins/ml2/ml2_conf.ini upgrade head" neutronRestart nova api service
shellsystemctl restart openstack-nova-apiStart network services
shellsystemctl enable neutron-server.service neutron-linuxbridge-agent.service \ neutron-dhcp-agent.service neutron-metadata-agent.service neutron-l3-agent.service systemctl start neutron-server.service neutron-linuxbridge-agent.service \ neutron-dhcp-agent.service neutron-metadata-agent.service neutron-l3-agent.service
Compute Node
Install software packages
shelldnf install openstack-neutron-linuxbridge ebtables ipset -yConfigure Neutron
- Modify /etc/neutron/neutron.conf
ini[DEFAULT] transport_url = rabbit://openstack:RABBIT_PASS@controller auth_strategy = keystone [keystone_authtoken] www_authenticate_uri = http://controller:5000 auth_url = http://controller:5000 memcached_servers = controller:11211 auth_type = password project_domain_name = Default user_domain_name = Default project_name = service username = neutron password = NEUTRON_PASS [oslo_concurrency] lock_path = /var/lib/neutron/tmp- Modify /etc/neutron/plugins/ml2/linuxbridge_agent.ini
ini[linux_bridge] physical_interface_mappings = provider:PROVIDER_INTERFACE_NAME [vxlan] enable_vxlan = true local_ip = OVERLAY_INTERFACE_IP_ADDRESS l2_population = true [securitygroup] enable_security_group = true firewall_driver = neutron.agent.linux.iptables_firewall.IptablesFirewallDriver- Configure nova compute service to use neutron. Modify /etc/nova/nova.conf
ini[neutron] auth_url = http://controller:5000 auth_type = password project_domain_name = default user_domain_name = default region_name = RegionOne project_name = service username = neutron password = NEUTRON_PASSRestart nova-compute service
shellsystemctl restart openstack-nova-compute.serviceStart Neutron linuxbridge agent service
shellsystemctl enable neutron-linuxbridge-agent systemctl start neutron-linuxbridge-agent
Cinder
Cinder is the storage service provided by OpenStack. It provides block device creation, provisioning, backup, and other functions.
Controller Node:
Initialize database
CINDER_DBPASSis a user-defined cinder database password.sqlmysql -u root -p MariaDB [(none)]> CREATE DATABASE cinder; MariaDB [(none)]> GRANT ALL PRIVILEGES ON cinder.* TO 'cinder'@'localhost' IDENTIFIED BY 'CINDER_DBPASS'; MariaDB [(none)]> GRANT ALL PRIVILEGES ON cinder.* TO 'cinder'@'%' IDENTIFIED BY 'CINDER_DBPASS'; MariaDB [(none)]> exitInitialize Keystone resource objects
shellsource ~/.admin-openrc #When creating a user, the command line will prompt for a password. Please enter a custom password, and replace `CINDER_PASS` below with this password. openstack user create --domain default --password-prompt cinder openstack role add --project service --user cinder admin openstack service create --name cinderv3 --description "OpenStack Block Storage" volumev3 openstack endpoint create --region RegionOne volumev3 public http://controller:8776/v3/%\(project_id\)s openstack endpoint create --region RegionOne volumev3 internal http://controller:8776/v3/%\(project_id\)s openstack endpoint create --region RegionOne volumev3 admin http://controller:8776/v3/%\(project_id\)sInstall software packages
shelldnf install openstack-cinder-api openstack-cinder-schedulerModify cinder configuration file
/etc/cinder/cinder.confini[DEFAULT] transport_url = rabbit://openstack:RABBIT_PASS@controller auth_strategy = keystone my_ip = 192.168.0.2 [database] connection = mysql+pymysql://cinder:CINDER_DBPASS@controller/cinder [keystone_authtoken] www_authenticate_uri = http://controller:5000 auth_url = http://controller:5000 memcached_servers = controller:11211 auth_type = password project_domain_name = Default user_domain_name = Default project_name = service username = cinder password = CINDER_PASS [oslo_concurrency] lock_path = /var/lib/cinder/tmpDatabase synchronization
shellsu -s /bin/sh -c "cinder-manage db sync" cinderModify nova configuration
/etc/nova/nova.confini[cinder] os_region_name = RegionOneStart the service
shellsystemctl restart openstack-nova-api systemctl start openstack-cinder-api openstack-cinder-scheduler
Storage Node:
The Storage node must have at least one hard disk prepared in advance as the cinder storage backend. The following assumes that the storage node already has an unused hard disk with the device name /dev/sdb. During configuration, please replace this with the actual environment information.
Cinder supports many types of backend storage. This guide uses the simplest LVM as a reference. If you want to use other backends like Ceph, please configure them yourself.
Install software packages
shelldnf install lvm2 device-mapper-persistent-data scsi-target-utils rpcbind nfs-utils openstack-cinder-volume openstack-cinder-backupConfigure LVM volume group
shellpvcreate /dev/sdb vgcreate cinder-volumes /dev/sdbModify cinder configuration
/etc/cinder/cinder.confini[DEFAULT] transport_url = rabbit://openstack:RABBIT_PASS@controller auth_strategy = keystone my_ip = 192.168.0.4 enabled_backends = lvm glance_api_servers = http://controller:9292 [keystone_authtoken] www_authenticate_uri = http://controller:5000 auth_url = http://controller:5000 memcached_servers = controller:11211 auth_type = password project_domain_name = default user_domain_name = default project_name = service username = cinder password = CINDER_PASS [database] connection = mysql+pymysql://cinder:CINDER_DBPASS@controller/cinder [lvm] volume_driver = cinder.volume.drivers.lvm.LVMVolumeDriver volume_group = cinder-volumes target_protocol = iscsi target_helper = lioadm [oslo_concurrency] lock_path = /var/lib/cinder/tmpConfigure cinder backup (optional)
cinder-backup is an optional backup service. Cinder also supports many backup backends. This document uses Swift storage. If you want to use other backends like NFS, please configure them yourself. For example, you can refer to the OpenStack official documentation for NFS configuration.
Modify
/etc/cinder/cinder.confand add to the[DEFAULT]section:ini[DEFAULT] backup_driver = cinder.backup.drivers.swift.SwiftBackupDriver backup_swift_url = SWIFT_URLHere
SWIFT_URLis the Swift service URL in the environment. After deploying the Swift service, runopenstack catalog show object-storeto get it.Start the service
shellsystemctl start openstack-cinder-volume target systemctl start openstack-cinder-backup (optional)
At this point, the Cinder service deployment is complete. You can perform simple verification on the controller using the following commands:
source ~/.admin-openrc
openstack storage service list
openstack volume list
Horizon
Horizon is the web interface provided by OpenStack. It allows users to control the OpenStack cluster through mouse operations on a web page, without using complex CLI commands. Horizon is generally deployed on the controller node.
Install software packages
shelldnf install openstack-dashboardModify configuration file
/etc/openstack-dashboard/local_settingsiniOPENSTACK_HOST = "controller" ALLOWED_HOSTS = ['*', ] OPENSTACK_KEYSTONE_URL = "http://controller:5000/v3" SESSION_ENGINE = 'django.contrib.sessions.backends.cache' CACHES = { 'default': { 'BACKEND': 'django.core.cache.backends.memcached.MemcachedCache', 'LOCATION': 'controller:11211', } } OPENSTACK_KEYSTONE_MULTIDOMAIN_SUPPORT = True OPENSTACK_KEYSTONE_DEFAULT_DOMAIN = "Default" OPENSTACK_KEYSTONE_DEFAULT_ROLE = "member" WEBROOT = '/dashboard' POLICY_FILES_PATH = "/etc/openstack-dashboard" OPENSTACK_API_VERSIONS = { "identity": 3, "image": 2, "volume": 3, }Restart the service
shellsystemctl restart httpd
At this point, the Horizon service deployment is complete. Open a browser and enter http://192.168.0.2/dashboard to open the Horizon login page.
Ironic
Ironic is the bare metal service of OpenStack. If users need to perform bare metal deployment, this component is recommended. Otherwise, it does not need to be installed.
Execute the following operations on the controller node.
Set up database
The bare metal service stores information in the database. Create an ironic database accessible by the ironic user, replacing IRONIC_DBPASS with an appropriate password:
sqlmysql -u root -p MariaDB [(none)]> CREATE DATABASE ironic CHARACTER SET utf8; MariaDB [(none)]> GRANT ALL PRIVILEGES ON ironic.* TO 'ironic'@'localhost' \ IDENTIFIED BY 'IRONIC_DBPASS'; MariaDB [(none)]> GRANT ALL PRIVILEGES ON ironic.* TO 'ironic'@'%' \ IDENTIFIED BY 'IRONIC_DBPASS'; MariaDB [(none)]> exit ByeCreate service user authentication
- Create Bare Metal service user
Replace
IRONIC_PASSwith the ironic user password, andIRONIC_INSPECTOR_PASSwith the ironic_inspector user password.shellopenstack user create --password IRONIC_PASS \ --email ironic@example.com ironic openstack role add --project service --user ironic admin openstack service create --name ironic \ --description "Ironic baremetal provisioning service" baremetal openstack service create --name ironic-inspector --description "Ironic inspector baremetal provisioning service" baremetal-introspection openstack user create --password IRONIC_INSPECTOR_PASS --email ironic_inspector@example.com ironic-inspector openstack role add --project service --user ironic-inspector admin- Create Bare Metal service access endpoints
shellopenstack endpoint create --region RegionOne baremetal admin http://192.168.0.2:6385 openstack endpoint create --region RegionOne baremetal public http://192.168.0.2:6385 openstack endpoint create --region RegionOne baremetal internal http://192.168.0.2:6385 openstack endpoint create --region RegionOne baremetal-introspection internal http://192.168.0.2:5050/v1 openstack endpoint create --region RegionOne baremetal-introspection public http://192.168.0.2:5050/v1 openstack endpoint create --region RegionOne baremetal-introspection admin http://192.168.0.2:5050/v1Install components
shelldnf install openstack-ironic-api openstack-ironic-conductor python3-ironicclientConfigure ironic-api service
Configuration file path: /etc/ironic/ironic.conf
- Configure the database location through the connection option, as follows. Replace IRONIC_DBPASS with the password for the ironic user, and replace DB_IP with the IP address of the DB server:
ini[database] # The SQLAlchemy connection string used to connect to the # database (string value) # connection = mysql+pymysql://ironic:IRONIC_DBPASS@DB_IP/ironic connection = mysql+pymysql://ironic:IRONIC_DBPASS@controller/ironic- Configure the ironic-api service to use RabbitMQ message broker through the following options. Replace RPC_* with the detailed address and credentials for RabbitMQ:
ini[DEFAULT] # A URL representing the messaging driver to use and its full # configuration. (string value) # transport_url = rabbit://RPC_USER:RPC_PASSWORD@RPC_HOST:RPC_PORT/ transport_url = rabbit://openstack:RABBIT_PASS@controller:5672/Users can also replace RabbitMQ with json-rpc on their own.
- Configure ironic-api service to use identity authentication service credentials. Replace PUBLIC_IDENTITY_IP with the public IP of the identity authentication server, replace PRIVATE_IDENTITY_IP with the private IP of the identity authentication server, replace IRONIC_PASS with the password for the ironic user in the identity authentication service, and replace RABBIT_PASS with the password for the openstack account in RabbitMQ:
ini[DEFAULT] # Authentication strategy used by ironic-api: one of # "keystone" or "noauth". "noauth" should not be used in a # production environment because all authentication will be # disabled. (string value) auth_strategy=keystone host = controller memcache_servers = controller:11211 enabled_network_interfaces = flat,noop,neutron default_network_interface = noop enabled_hardware_types = ipmi enabled_boot_interfaces = pxe enabled_deploy_interfaces = direct default_deploy_interface = direct enabled_inspect_interfaces = inspector enabled_management_interfaces = ipmitool enabled_power_interfaces = ipmitool enabled_rescue_interfaces = no-rescue,agent isolinux_bin = /usr/share/syslinux/isolinux.bin logging_context_format_string = %(asctime)s.%(msecs)03d %(process)d %(levelname)s %(name)s [%(global_request_id)s %(request_id)s % (user_identity)s] %(instance)s%(message)s [keystone_authtoken] # Authentication type to load (string value) auth_type=password # Complete public Identity API endpoint (string value) # www_authenticate_uri=http://PUBLIC_IDENTITY_IP:5000 www_authenticate_uri=http://controller:5000 # Complete admin Identity API endpoint. (string value) # auth_url=http://PRIVATE_IDENTITY_IP:5000 auth_url=http://controller:5000 # Service username. (string value) username=ironic # Service account password. (string value) password=IRONIC_PASS # Service tenant name. (string value) project_name=service # Domain name containing project (string value) project_domain_name=Default # User's domain name (string value) user_domain_name=Default [agent] deploy_logs_collect = always deploy_logs_local_path = /var/log/ironic/deploy deploy_logs_storage_backend = local image_download_source = http stream_raw_images = false force_raw_images = false verify_ca = False [oslo_concurrency] [oslo_messaging_notifications] transport_url = rabbit://openstack:RABBIT_PASS@controller:5672/ topics = notifications driver = messagingv2 [oslo_messaging_rabbit] amqp_durable_queues = True rabbit_ha_queues = True [pxe] ipxe_enabled = false pxe_append_params = nofb nomodeset vga=normal coreos.autologin ipa-insecure=1 image_cache_size = 204800 tftp_root=/var/lib/tftpboot/cephfs/ tftp_master_path=/var/lib/tftpboot/cephfs/master_images [dhcp] dhcp_provider = none- Create bare metal service database tables
shellironic-dbsync --config-file /etc/ironic/ironic.conf create_schema- Restart ironic-api service
shellsudo systemctl restart openstack-ironic-apiConfigure ironic-conductor service
The following is the standard configuration for the ironic-conductor service itself. The ironic-conductor service can be distributed on different nodes from the ironic-api service. In this guide, both are deployed on the controller node, so duplicate configuration items can be skipped.
- Replace my_ip with the IP of the host where the conductor service is located:
ini[DEFAULT] # IP address of this host. If unset, will determine the IP # programmatically. If unable to do so, will use "127.0.0.1". # (string value) # my_ip=HOST_IP my_ip = 192.168.0.2- Configure the database location. ironic-conductor should use the same configuration as ironic-api. Replace IRONIC_DBPASS with the password for the ironic user:
ini[database] # The SQLAlchemy connection string to use to connect to the # database. (string value) connection = mysql+pymysql://ironic:IRONIC_DBPASS@controller/ironic- Configure ironic-api service to use RabbitMQ message broker through the following options. ironic-conductor should use the same configuration as ironic-api. Replace RABBIT_PASS with the password for the openstack account in RabbitMQ:
ini[DEFAULT] # A URL representing the messaging driver to use and its full # configuration. (string value) transport_url = rabbit://openstack:RABBIT_PASS@controller:5672/Users can also replace RabbitMQ with json-rpc on their own.
- Configure credentials to access other OpenStack services
To communicate with other OpenStack services, the bare metal service needs to authenticate with the OpenStack Identity service using a service user when requesting other services. These user credentials must be configured in each configuration file related to the corresponding service.
shell[neutron] - Access OpenStack network service [glance] - Access OpenStack image service [swift] - Access OpenStack object storage service [cinder] - Access OpenStack block storage service [inspector] - Access OpenStack bare metal introspection service [service_catalog] - A special entry used to save the credentials used by the bare metal service, which are used to discover its own API URL endpoints registered in the OpenStack identity authentication service catalogFor simplicity, you can use the same service user for all services. For backward compatibility, this user should be the same as the one configured in the [keystone_authtoken] of the ironic-api service. However, this is not mandatory. You can also create and configure different service users for each service.
In the example below, the authentication information for accessing the OpenStack network service is configured as:
iniNetwork service is deployed in an identity authentication service domain named RegionOne, with only the public endpoint interface registered in the service catalog Use specific CA SSL certificate for HTTPS connection during requests Use the same service user as the ironic-api service configuration Dynamic password authentication plugin discovers the appropriate identity authentication service API version based on other optionsReplace IRONIC_PASS with the ironic user password.
ini[neutron] # Authentication type to load (string value) auth_type = password # Authentication URL (string value) auth_url=https://IDENTITY_IP:5000/ # Username (string value) username=ironic # User's password (string value) password=IRONIC_PASS # Project name to scope to (string value) project_name=service # Domain ID containing project (string value) project_domain_id=default # User's domain id (string value) user_domain_id=default # PEM encoded Certificate Authority to use when verifying # HTTPs connections. (string value) cafile=/opt/stack/data/ca-bundle.pem # The default region_name for endpoint URL discovery. (string # value) region_name = RegionOne # List of interfaces, in order of preference, for endpoint # URL. (list value) valid_interfaces=public # Other reference configurations [glance] endpoint_override = http://controller:9292 www_authenticate_uri = http://controller:5000 auth_url = http://controller:5000 auth_type = password username = ironic password = IRONIC_PASS project_domain_name = default user_domain_name = default region_name = RegionOne project_name = service [service_catalog] region_name = RegionOne project_domain_id = default user_domain_id = default project_name = service password = IRONIC_PASS username = ironic auth_url = http://controller:5000 auth_type = passwordBy default, to communicate with other services, the bare metal service will try to discover the appropriate endpoint for that service through the identity authentication service catalog. If you want to use a different endpoint for a specific service, specify it in the bare metal service configuration file through the endpoint_override option:
ini[neutron] endpoint_override = <NEUTRON_API_ADDRESS>- Configure allowed drivers and hardware types
Set the hardware types allowed by the ironic-conductor service through enabled_hardware_types:
ini[DEFAULT] enabled_hardware_types = ipmiConfigure hardware interfaces:
inienabled_boot_interfaces = pxe enabled_deploy_interfaces = direct,iscsi enabled_inspect_interfaces = inspector enabled_management_interfaces = ipmitool enabled_power_interfaces = ipmitoolConfigure interface defaults:
ini[DEFAULT] default_deploy_interface = direct default_network_interface = neutronIf any drivers using Direct deploy are enabled, you must install and configure Swift backend for the image service. Ceph Object Gateway (RADOS Gateway) is also supported as a backend for the image service.
- Restart ironic-conductor service
shellsudo systemctl restart openstack-ironic-conductorConfigure ironic-inspector service
- Install components
shelldnf install openstack-ironic-inspector- Create database
sql# mysql -u root -p MariaDB [(none)]> CREATE DATABASE ironic_inspector CHARACTER SET utf8; MariaDB [(none)]> GRANT ALL PRIVILEGES ON ironic_inspector.* TO 'ironic_inspector'@'localhost' \ IDENTIFIED BY 'IRONIC_INSPECTOR_DBPASS'; MariaDB [(none)]> GRANT ALL PRIVILEGES ON ironic_inspector.* TO 'ironic_inspector'@'%' \ IDENTIFIED BY 'IRONIC_INSPECTOR_DBPASS'; MariaDB [(none)]> exit Bye- Configure
/etc/ironic-inspector/inspector.conf
Configure the database location through the connection option, as follows. Replace IRONIC_INSPECTOR_DBPASS with the password for the ironic_inspector user:
ini[database] backend = sqlalchemy connection = mysql+pymysql://ironic_inspector:IRONIC_INSPECTOR_DBPASS@controller/ironic_inspector min_pool_size = 100 max_pool_size = 500 pool_timeout = 30 max_retries = 5 max_overflow = 200 db_retry_interval = 2 db_inc_retry_interval = True db_max_retry_interval = 2 db_max_retries = 5- Configure message queue communication address
ini[DEFAULT] transport_url = rabbit://openstack:RABBIT_PASS@controller:5672/- Set Keystone authentication
ini[DEFAULT] auth_strategy = keystone timeout = 900 rootwrap_config = /etc/ironic-inspector/rootwrap.conf logging_context_format_string = %(asctime)s.%(msecs)03d %(process)d %(levelname)s %(name)s [%(global_request_id)s %(request_id)s % (user_identity)s] %(instance)s%(message)s log_dir = /var/log/ironic-inspector state_path = /var/lib/ironic-inspector use_stderr = False [ironic] api_endpoint = http://IRONIC_API_HOST_ADDRRESS:6385 auth_type = password auth_url = http://PUBLIC_IDENTITY_IP:5000 auth_strategy = keystone ironic_url = http://IRONIC_API_HOST_ADDRRESS:6385 os_region = RegionOne project_name = service project_domain_name = Default user_domain_name = Default username = IRONIC_SERVICE_USER_NAME password = IRONIC_SERVICE_USER_PASSWORD [keystone_authtoken] auth_type = password auth_url = http://controller:5000 www_authenticate_uri = http://controller:5000 project_domain_name = default user_domain_name = default project_name = service username = ironic_inspector password = IRONICPASSWD region_name = RegionOne memcache_servers = controller:11211 token_cache_time = 300 [processing] add_ports = active processing_hooks = $default_processing_hooks,local_link_connection,lldp_basic ramdisk_logs_dir = /var/log/ironic-inspector/ramdisk always_store_ramdisk_logs = true store_data =none power_off = false [pxe_filter] driver = iptables [capabilities] boot_mode=True- Configure ironic inspector dnsmasq service
ini# Configuration file path: /etc/ironic-inspector/dnsmasq.conf port=0 interface=enp3s0 #Replace with actual listening network interface dhcp-range=192.168.0.40,192.168.0.50 #Replace with actual DHCP address range bind-interfaces enable-tftp dhcp-match=set:efi,option:client-arch,7 dhcp-match=set:efi,option:client-arch,9 dhcp-match=aarch64, option:client-arch,11 dhcp-boot=tag:aarch64,grubaa64.efi dhcp-boot=tag:!aarch64,tag:efi,grubx64.efi dhcp-boot=tag:!aarch64,tag:!efi,pxelinux.0 tftp-root=/tftpboot #Replace with actual tftpboot directory log-facility=/var/log/dnsmasq.log- Disable DHCP on the ironic provision network subnet
shellopenstack subnet set --no-dhcp 72426e89-f552-4dc4-9ac7-c4e131ce7f3c- Initialize the ironic-inspector service database
shellironic-inspector-dbsync --config-file /etc/ironic-inspector/inspector.conf upgrade- Start services
shellsystemctl enable --now openstack-ironic-inspector.service systemctl enable --now openstack-ironic-inspector-dnsmasq.serviceConfigure httpd service
- Create the httpd root directory for ironic and set ownership. The directory path must be consistent with the http_root configuration item in the [deploy] group in /etc/ironic/ironic.conf.
shellmkdir -p /var/lib/ironic/httproot chown ironic.ironic /var/lib/ironic/httprootInstall and configure httpd service
- Install httpd service. Skip if already installed
shelldnf install httpd -y- Create the /etc/httpd/conf.d/openstack-ironic-httpd.conf file with the following content:
iniListen 8080 <VirtualHost *:8080> ServerName ironic.openeuler.com ErrorLog "/var/log/httpd/openstack-ironic-httpd-error_log" CustomLog "/var/log/httpd/openstack-ironic-httpd-access_log" "%h %l %u %t \"%r\" %>s %b" DocumentRoot "/var/lib/ironic/httproot" <Directory "/var/lib/ironic/httproot"> Options Indexes FollowSymLinks Require all granted </Directory> LogLevel warn AddDefaultCharset UTF-8 EnableSendfile on </VirtualHost>Note that the listening port must be consistent with the port specified in the http_url configuration item in the [deploy] options in /etc/ironic/ironic.conf.
- Restart httpd service.
shellsystemctl restart httpd
Download or create deploy ramdisk images
Deploying a bare metal node requires two sets of images: deploy ramdisk images and user images. Deploy ramdisk images run the ironic-python-agent (IPA) service, through which Ironic performs environment preparation for bare metal nodes. User images are the final images installed on bare metal nodes for user use.
Ramdisk images can be created using ironic-python-agent-builder or disk-image-builder tools. Users can also choose other tools to create them. If using native tools, you need to install the corresponding software packages.
For specific usage, refer to the official documentation. The official community also provides pre-made deploy images that can be downloaded.
The following describes the complete process of building ironic deploy images using ironic-python-agent-builder.
- Install ironic-python-agent-builder
shelldnf install python3-ironic-python-agent-builder or pip3 install ironic-python-agent-builder dnf install qemu-img git- Create images
Basic usage:
shellusage: ironic-python-agent-builder [-h] [-r RELEASE] [-o OUTPUT] [-e ELEMENT] [-b BRANCH] [-v] [--lzma] [--extra-args EXTRA_ARGS] [--elements-path ELEMENTS_PATH] distribution positional arguments: distribution Distribution to use options: -h, --help show this help message and exit -r RELEASE, --release RELEASE Distribution release to use -o OUTPUT, --output OUTPUT Output base file name -e ELEMENT, --element ELEMENT Additional DIB element to use -b BRANCH, --branch BRANCH If set, override the branch that is used for ironic-python-agent and requirements -v, --verbose Enable verbose logging in diskimage-builder --lzma Use lzma compression for smaller images --extra-args EXTRA_ARGS Extra arguments to pass to diskimage-builder --elements-path ELEMENTS_PATH Path(s) to custom DIB elements separated by a colonOperation example:
shell# The -o option specifies the generated image name # ubuntu specifies generating an image for ubuntu system ironic-python-agent-builder -o my-ubuntu-ipa ubuntuYou can set the
ARCHenvironment variable (default is amd64) to specify the architecture of the image to be built. If it isarmarchitecture, you need to add:shellexport ARCH=aarch64- Enable SSH login
Initialize environment variables, set username and password, enable
sudopermissions; and add the-eoption to use the corresponding DIB element. Image creation operation is as follows:shellexport DIB_DEV_USER_USERNAME=ipa \ export DIB_DEV_USER_PWDLESS_SUDO=yes \ export DIB_DEV_USER_PASSWORD='123' ironic-python-agent-builder -o my-ssh-ubuntu-ipa -e selinux-permissive -e devuser ubuntu- Specify code repository
Initialize the corresponding environment variables, then create the image:
shell# Clone code directly from gerrit DIB_REPOLOCATION_ironic_python_agent=https://opendev.org/openstack/ironic-python-agent DIB_REPOREF_ironic_python_agent=stable/2023.1 # Specify local repository and branch DIB_REPOLOCATION_ironic_python_agent=/home/user/path/to/repo DIB_REPOREF_ironic_python_agent=my-test-branch ironic-python-agent-builder ubuntuReference: source-repositories.
Note
The native openstack PXE configuration file template does not support arm64 architecture. Users need to modify the native openstack code themselves: In the Wallaby release, the community's ironic still does not support arm64 UEFI PXE boot, which is manifested by the incorrectly formatted grub.cfg file generated (usually located under /tftpboot/) causing PXE boot failure.
Generated error configuration file:
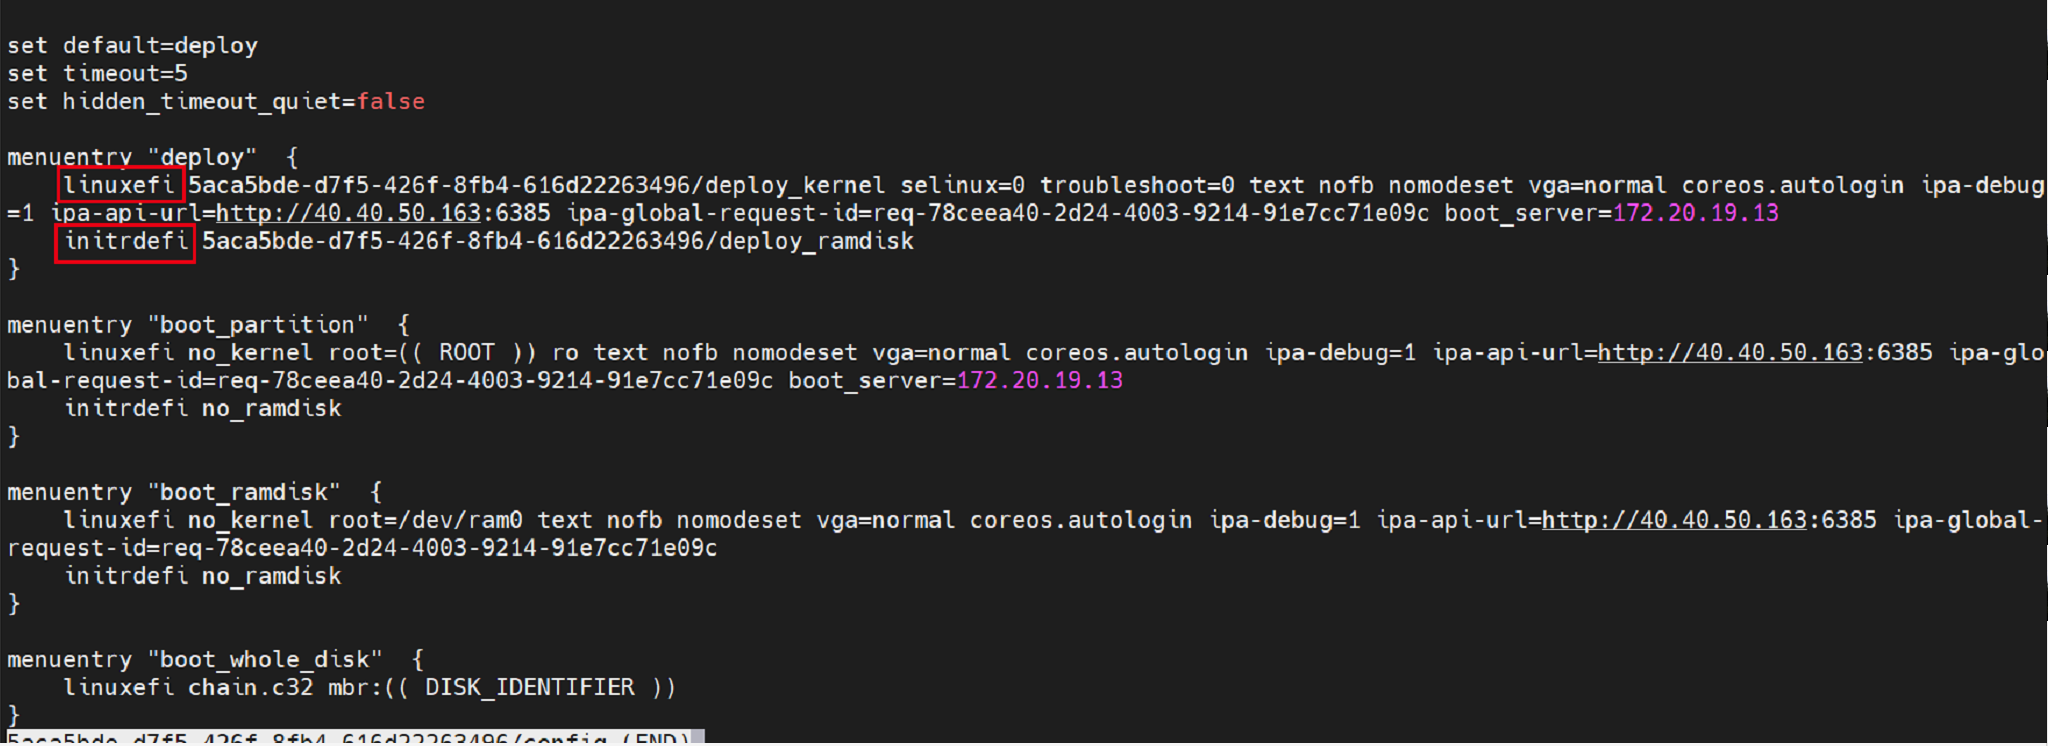
As shown above, the commands to find vmlinux and ramdisk images in arm architecture are linux and initrd respectively. The red-highlighted commands in the figure above are for x86 architecture UEFI PXE boot.
Users need to modify the code logic that generates grub.cfg themselves.
TLS error when ironic sends IPA query command execution status request:
In the current version, both IPA and ironic enable TLS authentication by default to send requests to each other. Just disable it according to the official documentation.
- Add ipa-insecure=1 to the [agent] section in the ironic configuration file (/etc/ironic/ironic.conf):
ini[agent] verify_ca = False [pxe] pxe_append_params = nofb nomodeset vga=normal coreos.autologin ipa-insecure=1- Add the IPA configuration file /etc/ironic_python_agent/ironic_python_agent.conf in the ramdisk image and configure TLS settings as follows:
/etc/ironic_python_agent/ironic_python_agent.conf (need to create /etc/ironic_python_agent/ directory in advance)
ini[DEFAULT] enable_auto_tls = FalseSet permissions:
shellchown -R ipa.ipa /etc/ironic_python_agent/- Modify the IPA service startup file in the ramdisk image to add configuration file options
Edit /usr/lib/systemd/system/ironic-python-agent.service file
ini[Unit] Description=Ironic Python Agent After=network-online.target [Service] ExecStartPre=/sbin/modprobe vfat ExecStart=/usr/local/bin/ironic-python-agent --config-file /etc/ironic_python_agent/ironic_python_agent.conf Restart=always RestartSec=30s [Install] WantedBy=multi-user.target
Trove
Trove is the database service of OpenStack. If users use the database service provided by OpenStack, this component is recommended. Otherwise, it does not need to be installed.
Controller Node
Create database.
The database service stores information in the database. Create a trove database accessible by the trove user, replacing TROVE_DBPASS with an appropriate password.
sqlCREATE DATABASE trove CHARACTER SET utf8; GRANT ALL PRIVILEGES ON trove.* TO 'trove'@'localhost' IDENTIFIED BY 'TROVE_DBPASS'; GRANT ALL PRIVILEGES ON trove.* TO 'trove'@'%' IDENTIFIED BY 'TROVE_DBPASS';Create service credentials and API endpoints.
Create service credentials.
shell# Create trove user openstack user create --domain default --password-prompt trove # Add admin role openstack role add --project service --user trove admin # Create database service openstack service create --name trove --description "Database service" databaseCreate API endpoints.
shellopenstack endpoint create --region RegionOne database public http://controller:8779/v1.0/%\(tenant_id\)s openstack endpoint create --region RegionOne database internal http://controller:8779/v1.0/%\(tenant_id\)s openstack endpoint create --region RegionOne database admin http://controller:8779/v1.0/%\(tenant_id\)sInstall Trove.
shelldnf install openstack-trove python-troveclientModify configuration files.
Edit /etc/trove/trove.conf.
ini[DEFAULT] bind_host=192.168.0.2 log_dir = /var/log/trove network_driver = trove.network.neutron.NeutronDriver network_label_regex=.* management_security_groups = <manage security group> nova_keypair = trove-mgmt default_datastore = mysql taskmanager_manager = trove.taskmanager.manager.Manager trove_api_workers = 5 transport_url = rabbit://openstack:RABBIT_PASS@controller:5672/ reboot_time_out = 300 usage_timeout = 900 agent_call_high_timeout = 1200 use_syslog = False debug = True [database] connection = mysql+pymysql://trove:TROVE_DBPASS@controller/trove [keystone_authtoken] auth_url = http://controller:5000/v3/ auth_type = password project_domain_name = Default project_name = service user_domain_name = Default password = trove username = TROVE_PASS [service_credentials] auth_url = http://controller:5000/v3/ region_name = RegionOne project_name = service project_domain_name = Default user_domain_name = Default username = trove password = TROVE_PASS [mariadb] tcp_ports = 3306,4444,4567,4568 [mysql] tcp_ports = 3306 [postgresql] tcp_ports = 5432Explanation:
In the
[Default]group,bind_hostis configured as the IP of the Trove controller node.transport_urlis theRabbitMQconnection information. ReplaceRABBIT_PASSwith the RabbitMQ password.connectionin the[database]group is the database information created for Trove in MySQL earlier.
In Trove's user information, replaceTROVE_PASSWORDwith the actual password for the trove user.Edit /etc/trove/trove-guestagent.conf.
ini[DEFAULT] log_file = trove-guestagent.log log_dir = /var/log/trove/ ignore_users = os_admin control_exchange = trove transport_url = rabbit://openstack:RABBIT_PASS@controller:5672/ rpc_backend = rabbit command_process_timeout = 60 use_syslog = False debug = True [service_credentials] auth_url = http://controller:5000/v3/ region_name = RegionOne project_name = service password = TROVE_PASS project_domain_name = Default user_domain_name = Default username = trove [mysql] docker_image = your-registry/your-repo/mysql backup_docker_image = your-registry/your-repo/db-backup-mysql:1.1.0Explanation:
guestagentis an independent component in Trove. It needs to be pre-baked into the virtual machine image created by Trove through Nova. After the database instance is created, the guestagent process will start, which is responsible for reporting heartbeats to Trove via the message queue (RabbitMQ). Therefore, RabbitMQ user and password information need to be configured.transport_urlis theRabbitMQconnection information. ReplaceRABBIT_PASSwith the RabbitMQ password.
In Trove's user information, replaceTROVE_PASSWORDwith the actual password for the trove user.
Starting from the Victoria release, Trove uses a unified image to run different types of databases. Database services run in Docker containers inside the Guest virtual machine.Database synchronization.
shellsu -s /bin/sh -c "trove-manage db_sync" troveComplete installation.
shell# Configure services to start on boot systemctl enable openstack-trove-api.service openstack-trove-taskmanager.service \ openstack-trove-conductor.service # Start services systemctl start openstack-trove-api.service openstack-trove-taskmanager.service \ openstack-trove-conductor.service
Swift
Swift provides elastic, scalable, and highly available distributed object storage services, suitable for storing large-scale unstructured data.
Controller Node
Create service credentials and API endpoints.
Create service credentials.
shell# Create swift user openstack user create --domain default --password-prompt swift # Add admin role openstack role add --project service --user swift admin # Create object storage service openstack service create --name swift --description "OpenStack Object Storage" object-storeCreate API endpoints.
shellopenstack endpoint create --region RegionOne object-store public http://controller:8080/v1/AUTH_%\(project_id\)s openstack endpoint create --region RegionOne object-store internal http://controller:8080/v1/AUTH_%\(project_id\)s openstack endpoint create --region RegionOne object-store admin http://controller:8080/v1Install Swift.
shelldnf install openstack-swift-proxy python3-swiftclient python3-keystoneclient \ python3-keystonemiddleware memcachedConfigure proxy-server.
The Swift RPM package already includes a basic usable proxy-server.conf. You only need to manually modify the IP and SWIFT_PASS in it.
inivim /etc/swift/proxy-server.conf [filter:authtoken] paste.filter_factory = keystonemiddleware.auth_token:filter_factory www_authenticate_uri = http://controller:5000 auth_url = http://controller:5000 memcached_servers = controller:11211 auth_type = password project_domain_id = default user_domain_id = default project_name = service username = swift password = SWIFT_PASS delay_auth_decision = True service_token_roles_required = True
Storage Node
Install supported packages.
shelldnf install openstack-swift-account openstack-swift-container openstack-swift-object dnf install xfsprogs rsyncFormat devices /dev/sdb and /dev/sdc as XFS.
shellmkfs.xfs /dev/sdb mkfs.xfs /dev/sdcCreate mount point directory structure.
shellmkdir -p /srv/node/sdb mkdir -p /srv/node/sdcFind the UUID of the new partition.
shellblkidEdit the /etc/fstab file and add the following to it.
shellUUID="<UUID-from-output-above>" /srv/node/sdb xfs noatime 0 2 UUID="<UUID-from-output-above>" /srv/node/sdc xfs noatime 0 2Mount the devices.
shellmount /srv/node/sdb mount /srv/node/sdcNote
If users do not need disaster recovery functionality, the above steps only need to create one device, and you can skip the rsync configuration below.
(Optional) Create or edit the /etc/rsyncd.conf file to include the following:
ini[DEFAULT] uid = swift gid = swift log file = /var/log/rsyncd.log pid file = /var/run/rsyncd.pid address = MANAGEMENT_INTERFACE_IP_ADDRESS [account] max connections = 2 path = /srv/node/ read only = False lock file = /var/lock/account.lock [container] max connections = 2 path = /srv/node/ read only = False lock file = /var/lock/container.lock [object] max connections = 2 path = /srv/node/ read only = False lock file = /var/lock/object.lockReplace MANAGEMENT_INTERFACE_IP_ADDRESS with the IP address of the management network on the storage node
Start the rsyncd service and configure it to start on system boot:
shellsystemctl enable rsyncd.service systemctl start rsyncd.serviceConfigure storage nodes.
Edit the account-server.conf, container-server.conf, and object-server.conf files in the /etc/swift directory. Replace bind_ip with the IP address of the management network on the storage node.
ini[DEFAULT] bind_ip = 192.168.0.4Ensure correct ownership of the mount point directory structure.
shellchown -R swift:swift /srv/nodeCreate the recon directory and ensure it has correct ownership.
shellmkdir -p /var/cache/swift chown -R root:swift /var/cache/swift chmod -R 775 /var/cache/swift
Controller Node Create and Distribute Rings
Create the account ring.
Switch to the
/etc/swiftdirectory.shellcd /etc/swiftCreate the base
account.builderfile.shellswift-ring-builder account.builder create 10 1 1Add each storage node to the ring.
shellswift-ring-builder account.builder add --region 1 --zone 1 \ --ip STORAGE_NODE_MANAGEMENT_INTERFACE_IP_ADDRESS \ --port 6202 --device DEVICE_NAME \ --weight 100Replace STORAGE_NODE_MANAGEMENT_INTERFACE_IP_ADDRESS with the IP address of the management network on the storage node.
Replace DEVICE_NAME with the storage device name on the same storage node.Note
Repeat this command for each storage device on each storage node
Verify the account ring contents.
shellswift-ring-builder account.builderRebalance the account ring.
shellswift-ring-builder account.builder rebalanceCreate the container ring.
Switch to the
/etc/swiftdirectory.Create the base
container.builderfile.shellswift-ring-builder container.builder create 10 1 1Add each storage node to the ring.
shellswift-ring-builder container.builder add --region 1 --zone 1 \ --ip STORAGE_NODE_MANAGEMENT_INTERFACE_IP_ADDRESS --port 6201 --device DEVICE_NAME \ --weight 100Replace STORAGE_NODE_MANAGEMENT_INTERFACE_IP_ADDRESS with the IP address of the management network on the storage node.
Replace DEVICE_NAME with the storage device name on the same storage node.Note
Repeat this command for each storage device on each storage node
Verify the container ring contents.
shellswift-ring-builder container.builderRebalance the container ring.
shellswift-ring-builder container.builder rebalanceCreate the object ring.
Switch to the
/etc/swiftdirectory.Create the base
object.builderfile.shellswift-ring-builder object.builder create 10 1 1Add each storage node to the ring.
shellswift-ring-builder object.builder add --region 1 --zone 1 \ --ip STORAGE_NODE_MANAGEMENT_INTERFACE_IP_ADDRESS \ --port 6200 --device DEVICE_NAME \ --weight 100Replace STORAGE_NODE_MANAGEMENT_INTERFACE_IP_ADDRESS with the IP address of the management network on the storage node.
Replace DEVICE_NAME with the storage device name on the same storage node.Note
Repeat this command for each storage device on each storage node
Verify the object ring contents.
shellswift-ring-builder object.builderRebalance the object ring.
shellswift-ring-builder object.builder rebalanceDistribute ring configuration files.
Copy the
account.ring.gz,container.ring.gz, andobject.ring.gzfiles to the/etc/swiftdirectory on each storage node and any other nodes running the proxy service.Edit the configuration file /etc/swift/swift.conf.
ini[swift-hash] swift_hash_path_suffix = test-hash swift_hash_path_prefix = test-hash [storage-policy:0] name = Policy-0 default = yesReplace test-hash with unique values
Copy the swift.conf file to the /etc/swift directory on each storage node and any other nodes running the proxy service.
On all nodes, ensure correct ownership of the configuration directory.
shellchown -R root:swift /etc/swiftComplete installation
On the controller node and any other nodes running the proxy service, start the object storage proxy service and its dependencies, and configure them to start on system boot.
shellsystemctl enable openstack-swift-proxy.service memcached.service systemctl start openstack-swift-proxy.service memcached.serviceOn storage nodes, start the object storage services and configure them to start on system boot.
shellsystemctl enable openstack-swift-account.service \ openstack-swift-account-auditor.service \ openstack-swift-account-reaper.service \ openstack-swift-account-replicator.service \ openstack-swift-container.service \ openstack-swift-container-auditor.service \ openstack-swift-container-replicator.service \ openstack-swift-container-updater.service \ openstack-swift-object.service \ openstack-swift-object-auditor.service \ openstack-swift-object-replicator.service \ openstack-swift-object-updater.service systemctl start openstack-swift-account.service \ openstack-swift-account-auditor.service \ openstack-swift-account-reaper.service \ openstack-swift-account-replicator.service \ openstack-swift-container.service \ openstack-swift-container-auditor.service \ openstack-swift-container-replicator.service \ openstack-swift-container-updater.service \ openstack-swift-object.service \ openstack-swift-object-auditor.service \ openstack-swift-object-replicator.service \ openstack-swift-object-updater.service
Cyborg
Cyborg provides accelerator device support for OpenStack, including GPU, FPGA, ASIC, NP, SoCs, NVMe/NOF SSDs, ODP, DPDK/SPDK, and more.
Controller Node
Initialize the corresponding database
sqlmysql -u root -p MariaDB [(none)]> CREATE DATABASE cyborg; MariaDB [(none)]> GRANT ALL PRIVILEGES ON cyborg.* TO 'cyborg'@'localhost' IDENTIFIED BY 'CYBORG_DBPASS'; MariaDB [(none)]> GRANT ALL PRIVILEGES ON cyborg.* TO 'cyborg'@'%' IDENTIFIED BY 'CYBORG_DBPASS'; MariaDB [(none)]> exit;Create users and services, and remember the password entered when creating the cyborg user for configuring CYBORG_PASS
shellsource ~/.admin-openrc openstack user create --domain default --password-prompt cyborg openstack role add --project service --user cyborg admin openstack service create --name cyborg --description "Acceleration Service" acceleratorDeploy Cyborg API service using uwsgi
shellopenstack endpoint create --region RegionOne accelerator public http://controller/accelerator/v2 openstack endpoint create --region RegionOne accelerator internal http://controller/accelerator/v2 openstack endpoint create --region RegionOne accelerator admin http://controller/accelerator/v2Install Cyborg
shelldnf install openstack-cyborgConfigure Cyborg
Modify
/etc/cyborg/cyborg.confini[DEFAULT] transport_url = rabbit://openstack:RABBIT_PASS@controller:5672/ use_syslog = False state_path = /var/lib/cyborg debug = True [api] host_ip = 0.0.0.0 [database] connection = mysql+pymysql://cyborg:CYBORG_DBPASS@controller/cyborg [service_catalog] cafile = /opt/stack/data/ca-bundle.pem project_domain_id = default user_domain_id = default project_name = service password = CYBORG_PASS username = cyborg auth_url = http://controller:5000/v3/ auth_type = password [placement] project_domain_name = Default project_name = service user_domain_name = Default password = password username = PLACEMENT_PASS auth_url = http://controller:5000/v3/ auth_type = password auth_section = keystone_authtoken [nova] project_domain_name = Default project_name = service user_domain_name = Default password = NOVA_PASS username = nova auth_url = http://controller:5000/v3/ auth_type = password auth_section = keystone_authtoken [keystone_authtoken] memcached_servers = localhost:11211 signing_dir = /var/cache/cyborg/api cafile = /opt/stack/data/ca-bundle.pem project_domain_name = Default project_name = service user_domain_name = Default password = CYBORG_PASS username = cyborg auth_url = http://controller:5000/v3/ auth_type = passwordSynchronize database tables
shellcyborg-dbsync --config-file /etc/cyborg/cyborg.conf upgradeStart Cyborg service
shellsystemctl enable openstack-cyborg-api openstack-cyborg-conductor openstack-cyborg-agent systemctl start openstack-cyborg-api openstack-cyborg-conductor openstack-cyborg-agent
Aodh
Aodh can create alarms based on monitoring data collected by Ceilometer or Gnocchi, and set trigger rules.
Controller Node
Create database.
sqlCREATE DATABASE aodh; GRANT ALL PRIVILEGES ON aodh.* TO 'aodh'@'localhost' IDENTIFIED BY 'AODH_DBPASS'; GRANT ALL PRIVILEGES ON aodh.* TO 'aodh'@'%' IDENTIFIED BY 'AODH_DBPASS';Create service credentials and API endpoints.
Create service credentials.
shellopenstack user create --domain default --password-prompt aodh openstack role add --project service --user aodh admin openstack service create --name aodh --description "Telemetry" alarmingCreate API endpoints.
shellopenstack endpoint create --region RegionOne alarming public http://controller:8042 openstack endpoint create --region RegionOne alarming internal http://controller:8042 openstack endpoint create --region RegionOne alarming admin http://controller:8042Install Aodh.
shelldnf install openstack-aodh-api openstack-aodh-evaluator \ openstack-aodh-notifier openstack-aodh-listener \ openstack-aodh-expirer python3-aodhclientModify configuration files.
inivim /etc/aodh/aodh.conf [database] connection = mysql+pymysql://aodh:AODH_DBPASS@controller/aodh [DEFAULT] transport_url = rabbit://openstack:RABBIT_PASS@controller auth_strategy = keystone [keystone_authtoken] www_authenticate_uri = http://controller:5000 auth_url = http://controller:5000 memcached_servers = controller:11211 auth_type = password project_domain_id = default user_domain_id = default project_name = service username = aodh password = AODH_PASS [service_credentials] auth_type = password auth_url = http://controller:5000/v3 project_domain_id = default user_domain_id = default project_name = service username = aodh password = AODH_PASS interface = internalURL region_name = RegionOneSynchronize database.
shellaodh-dbsyncComplete installation.
shell# Configure services to start on boot systemctl enable openstack-aodh-api.service openstack-aodh-evaluator.service \ openstack-aodh-notifier.service openstack-aodh-listener.service # Start services systemctl start openstack-aodh-api.service openstack-aodh-evaluator.service \ openstack-aodh-notifier.service openstack-aodh-listener.service
Gnocchi
Gnocchi is an open-source time series database that can integrate with Ceilometer.
Controller Node
Create database.
sqlCREATE DATABASE gnocchi; GRANT ALL PRIVILEGES ON gnocchi.* TO 'gnocchi'@'localhost' IDENTIFIED BY 'GNOCCHI_DBPASS'; GRANT ALL PRIVILEGES ON gnocchi.* TO 'gnocchi'@'%' IDENTIFIED BY 'GNOCCHI_DBPASS';Create service credentials and API endpoints.
Create service credentials.
shellopenstack user create --domain default --password-prompt gnocchi openstack role add --project service --user gnocchi admin openstack service create --name gnocchi --description "Metric Service" metricCreate API endpoints.
shellopenstack endpoint create --region RegionOne metric public http://controller:8041 openstack endpoint create --region RegionOne metric internal http://controller:8041 openstack endpoint create --region RegionOne metric admin http://controller:8041Install Gnocchi.
shelldnf install openstack-gnocchi-api openstack-gnocchi-metricd python3-gnocchiclientModify configuration files.
inivim /etc/gnocchi/gnocchi.conf [api] auth_mode = keystone port = 8041 uwsgi_mode = http-socket [keystone_authtoken] auth_type = password auth_url = http://controller:5000/v3 project_domain_name = Default user_domain_name = Default project_name = service username = gnocchi password = GNOCCHI_PASS interface = internalURL region_name = RegionOne [indexer] url = mysql+pymysql://gnocchi:GNOCCHI_DBPASS@controller/gnocchi [storage] # coordination_url is not required but specifying one will improve # performance with better workload division across workers. # coordination_url = redis://controller:6379 file_basepath = /var/lib/gnocchi driver = fileSynchronize database.
shellgnocchi-upgradeComplete installation.
shell# Configure services to start on boot systemctl enable openstack-gnocchi-api.service openstack-gnocchi-metricd.service # Start services systemctl start openstack-gnocchi-api.service openstack-gnocchi-metricd.service
Ceilometer
Ceilometer is the data collection service in OpenStack.
Controller Node
Create service credentials.
shellopenstack user create --domain default --password-prompt ceilometer openstack role add --project service --user ceilometer admin openstack service create --name ceilometer --description "Telemetry" meteringInstall Ceilometer software packages.
shelldnf install openstack-ceilometer-notification openstack-ceilometer-centralEdit configuration file /etc/ceilometer/pipeline.yaml.
yamlpublishers: # set address of Gnocchi # + filter out Gnocchi-related activity meters (Swift driver) # + set default archive policy - gnocchi://?filter_project=service&archive_policy=lowEdit configuration file /etc/ceilometer/ceilometer.conf.
ini[DEFAULT] transport_url = rabbit://openstack:RABBIT_PASS@controller [service_credentials] auth_type = password auth_url = http://controller:5000/v3 project_domain_id = default user_domain_id = default project_name = service username = ceilometer password = CEILOMETER_PASS interface = internalURL region_name = RegionOneDatabase synchronization.
shellceilometer-upgradeComplete the Ceilometer installation on the controller node.
shell# Configure services to start on boot systemctl enable openstack-ceilometer-notification.service openstack-ceilometer-central.service # Start services systemctl start openstack-ceilometer-notification.service openstack-ceilometer-central.service
Compute Node
Install Ceilometer software packages.
shelldnf install openstack-ceilometer-compute dnf install openstack-ceilometer-ipmi # OptionalEdit configuration file /etc/ceilometer/ceilometer.conf.
ini[DEFAULT] transport_url = rabbit://openstack:RABBIT_PASS@controller [service_credentials] auth_url = http://controller:5000 project_domain_id = default user_domain_id = default auth_type = password username = ceilometer project_name = service password = CEILOMETER_PASS interface = internalURL region_name = RegionOneEdit configuration file /etc/nova/nova.conf.
ini[DEFAULT] instance_usage_audit = True instance_usage_audit_period = hour [notifications] notify_on_state_change = vm_and_task_state [oslo_messaging_notifications] driver = messagingv2Complete installation.
shellsystemctl enable openstack-ceilometer-compute.service systemctl start openstack-ceilometer-compute.service systemctl enable openstack-ceilometer-ipmi.service # Optional systemctl start openstack-ceilometer-ipmi.service # Optional # Restart nova-compute service systemctl restart openstack-nova-compute.service
Heat
Heat is the orchestration service of OpenStack. It orchestrates composite cloud applications based on descriptive templates, also known as Orchestration Service. Heat services are generally installed on the Controller node.
Controller Node
Create the heat database and grant proper access rights to the heat database. Replace HEAT_DBPASS with an appropriate password:
sqlmysql -u root -p MariaDB [(none)]> CREATE DATABASE heat; MariaDB [(none)]> GRANT ALL PRIVILEGES ON heat.* TO 'heat'@'localhost' IDENTIFIED BY 'HEAT_DBPASS'; MariaDB [(none)]> GRANT ALL PRIVILEGES ON heat.* TO 'heat'@'%' IDENTIFIED BY 'HEAT_DBPASS'; MariaDB [(none)]> exit;Create service credentials, create the heat user, and add the admin role to it:
shellsource ~/.admin-openrc openstack user create --domain default --password-prompt heat openstack role add --project service --user heat adminCreate heat and heat-cfn services and their corresponding API endpoints:
shellopenstack service create --name heat --description "Orchestration" orchestration openstack service create --name heat-cfn --description "Orchestration" cloudformation openstack endpoint create --region RegionOne orchestration public http://controller:8004/v1/%\(tenant_id\)s openstack endpoint create --region RegionOne orchestration internal http://controller:8004/v1/%\(tenant_id\)s openstack endpoint create --region RegionOne orchestration admin http://controller:8004/v1/%\(tenant_id\)s openstack endpoint create --region RegionOne cloudformation public http://controller:8000/v1 openstack endpoint create --region RegionOne cloudformation internal http://controller:8000/v1 openstack endpoint create --region RegionOne cloudformation admin http://controller:8000/v1Create additional information for stack management
Create the heat domain:
shellopenstack domain create --description "Stack projects and users" heatCreate the heat_domain_admin user under the heat domain, and record the password entered for configuring
HEAT_DOMAIN_PASSbelow:shellopenstack user create --domain heat --password-prompt heat_domain_adminAdd the admin role to the heat_domain_admin user:
shellopenstack role add --domain heat --user-domain heat --user heat_domain_admin adminCreate the heat_stack_owner role:
shellopenstack role create heat_stack_ownerCreate the heat_stack_user role:
shellopenstack role create heat_stack_userInstall software packages
shelldnf install openstack-heat-api openstack-heat-api-cfn openstack-heat-engineModify configuration file
/etc/heat/heat.conf:ini[DEFAULT] transport_url = rabbit://openstack:RABBIT_PASS@controller heat_metadata_server_url = http://controller:8000 heat_waitcondition_server_url = http://controller:8000/v1/waitcondition stack_domain_admin = heat_domain_admin stack_domain_admin_password = HEAT_DOMAIN_PASS stack_user_domain_name = heat [database] connection = mysql+pymysql://heat:HEAT_DBPASS@controller/heat [keystone_authtoken] www_authenticate_uri = http://controller:5000 auth_url = http://controller:5000 memcached_servers = controller:11211 auth_type = password project_domain_name = default user_domain_name = default project_name = service username = heat password = HEAT_PASS [trustee] auth_type = password auth_url = http://controller:5000 username = heat password = HEAT_PASS user_domain_name = default [clients_keystone] auth_uri = http://controller:5000Initialize heat database tables:
shellsu -s /bin/sh -c "heat-manage db_sync" heatStart services:
shellsystemctl enable openstack-heat-api.service openstack-heat-api-cfn.service openstack-heat-engine.service systemctl start openstack-heat-api.service openstack-heat-api-cfn.service openstack-heat-engine.service
Tempest
Tempest is the integration testing service of OpenStack. If users need comprehensive automated testing of the installed OpenStack environment, this component is recommended. Otherwise, it does not need to be installed.
Controller Node:
Install Tempest
shelldnf install openstack-tempestInitialize directory
shelltempest init mytestModify configuration files.
shellcd mytest vi etc/tempest.confThe tempest.conf needs to configure the current OpenStack environment information. For specific content, refer to the official example
Execute tests
shelltempest runInstall Tempest extensions (optional) The OpenStack services themselves also provide some Tempest test packages. Users can install these packages to enrich Tempest's test content. In Antelope, we provide extension tests for Cinder, Glance, Keystone, Ironic, and Trove. Users can execute the following command to install and use them:
shelldnf install python3-cinder-tempest-plugin python3-glance-tempest-plugin python3-ironic-tempest-plugin python3-keystone-tempest-plugin python3-trove-tempest-plugin
Deployment using OpenStack SIG development tool oos
oos (openEuler OpenStack SIG) is a command-line tool provided by the OpenStack SIG. The oos env series commands provide one-click deployment of OpenStack (all in one or three-node cluster) using ansible scripts. Users can use this script to quickly deploy an OpenStack environment based on openEuler RPM. The oos tool supports connecting to cloud providers (currently only Huawei Cloud provider is supported) and host management to deploy OpenStack environments. The following uses connecting to Huawei Cloud to deploy an all in one OpenStack environment as an example to illustrate how to use the oos tool.
Install the
oostoolshellyum install openstack-sig-toolConfigure Huawei Cloud provider information
Open the
/usr/local/etc/oos/oos.conffile and modify the configuration to your Huawei Cloud resource information. AK/SK is the user's Huawei Cloud login key. Other configurations can be kept as defaults (default uses Singapore region). You need to create corresponding resources on the cloud in advance, including:- A security group with the default name
oos - An openEuler image with the name format openEuler-%(release)s-%(arch)s, for example
openEuler-24.03-sp4-arm64 - A VPC with the name
oos_vpc - Two subnets under this VPC, named
oos_subnet1andoos_subnet2
ini[huaweicloud] ak = sk = region = ap-southeast-3 root_volume_size = 100 data_volume_size = 100 security_group_name = oos image_format = openEuler-%%(release)s-%%(arch)s vpc_name = oos_vpc subnet1_name = oos_subnet1 subnet2_name = oos_subnet2- A security group with the default name
Configure OpenStack environment information
Open the
/usr/local/etc/oos/oos.conffile and modify the configuration according to the current machine environment and requirements. The content is as follows:shell[environment] mysql_root_password = root mysql_project_password = root rabbitmq_password = root project_identity_password = root enabled_service = keystone,neutron,cinder,placement,nova,glance,horizon,aodh,ceilometer,cyborg,gnocchi,kolla,heat,swift,trove,tempest neutron_provider_interface_name = br-ex default_ext_subnet_range = 10.100.100.0/24 default_ext_subnet_gateway = 10.100.100.1 neutron_dataplane_interface_name = eth1 cinder_block_device = vdb swift_storage_devices = vdc swift_hash_path_suffix = ash swift_hash_path_prefix = has glance_api_workers = 2 cinder_api_workers = 2 nova_api_workers = 2 nova_metadata_api_workers = 2 nova_conductor_workers = 2 nova_scheduler_workers = 2 neutron_api_workers = 2 horizon_allowed_host = * kolla_openeuler_plugin = falseKey Configuration
Configuration Item Explanation enabled_service Service list to install. Delete or add according to user needs neutron_provider_interface_name neutron L3 bridge name default_ext_subnet_range neutron private network IP segment default_ext_subnet_gateway neutron private network gateway neutron_dataplane_interface_name Network card used by neutron. It is recommended to use a new network card to avoid conflicts with existing network cards and prevent all-in-one host disconnection cinder_block_device Volume device name used by cinder swift_storage_devices Volume device name used by swift kolla_openeuler_plugin Whether to enable the kolla plugin. If set to True, kolla will support deploying openEuler containers (only supported on openEuler LTS) Create an openEuler 24.03 LTS SP4 x86_64 virtual machine on Huawei Cloud for deploying
all in oneOpenStackshell# sshpass is used during `oos env create` to configure passwordless access to the target virtual machine dnf install sshpass oos env create -r 24.03-lts-sp4 -f small -a x86 -n test-oos all_in_oneFor specific parameters, use the
oos env create --helpcommand to checkDeploy OpenStack
all in oneenvironmentshelloos env setup test-oos -r antelopeFor specific parameters, use the
oos env setup --helpcommand to checkInitialize Tempest environment
If users want to run Tempest tests in this environment, execute the
oos env initcommand, which will automatically create the OpenStack resources required by Tempestshelloos env init test-oosExecute Tempest tests
Users can use oos to execute automatically:
shelloos env test test-oosYou can also manually log in to the target node, enter the
mytestdirectory under the root directory, and manually executetempest run
If deploying OpenStack environment using host management method, the overall logic is consistent with connecting to Huawei Cloud above. Steps 1, 3, 5, and 6 remain unchanged. Skip step 2 for Huawei Cloud provider information configuration and change step 4 to host management operation.
The managed virtual machine must ensure:
- At least one network card for oos use, with the name consistent with the configuration. Related configuration:
neutron_dataplane_interface_name - At least one hard disk for oos use, with the name consistent with the configuration. Related configuration:
cinder_block_device - If deploying Swift service, a new hard disk is required, with the name consistent with the configuration. Related configuration:
swift_storage_devices
# sshpass is used during `oos env create` to configure passwordless access to the target host
dnf install sshpass
oos env manage -r 24.03-lts-sp4 -i TARGET_MACHINE_IP -p TARGET_MACHINE_PASSWD -n test-oos
Replace TARGET_MACHINE_IP with the target machine IP and TARGET_MACHINE_PASSWD with the target machine password. For specific parameters, use the oos env manage --help command to check.
版权所有 © 2026 openEuler 保留一切权利
京ICP备2020036654号-1
京公网安备 11030102011597 号